DPM Step-By-Step: upgrading to v2019
Applies to
This guide applies to System Center Data Protection Manager 2016, 1801, 1807
Introduction
In the this Wiki article will be performing a step-by-step in-place upgrade from DPM 1807 to DPM 2019, we will go through every step in detail.
DPM 2019 upgrade paths
The diagram below shows the currently supported upgrade paths for DPM 2019.
Direct in-place upgrade to DPM 2019
Indirect upgrade to DPM 2019
Requirements
For the system requirements for System Center Data Protection Manager 2019, please refer to the Microsoft documentation on the following link:
/en-us/system-center/dpm/install-dpm?view=sc-dpm-2019#setup-prerequisites
Pre-upgrade tasks
Before performing the upgrade, there are a few tasks that needs to be done, so we will go though them in detail.
High Level overview of the pre-upgrade tasks
- Backup the DPM database.
- Stop the DPM services.
Detailed overview of the pre-upgrade tasks
1. Open up the SQL Server Management Studio either on a remote computer or locally on the DPM database server, and then connect to the DPM 1807 SQL instance.
1.1. In the SQL Server Management Studio, expand the Databases, then select the DPM database, right-click it and go to Tasks > and choose Back Up…
1.2. Click on the Add button.
1.3. Now click on the radio button [ … ].
1.4. Provide a name for the DPM database backup, choose a location where to store the backup or go with the default location, click OK once done.
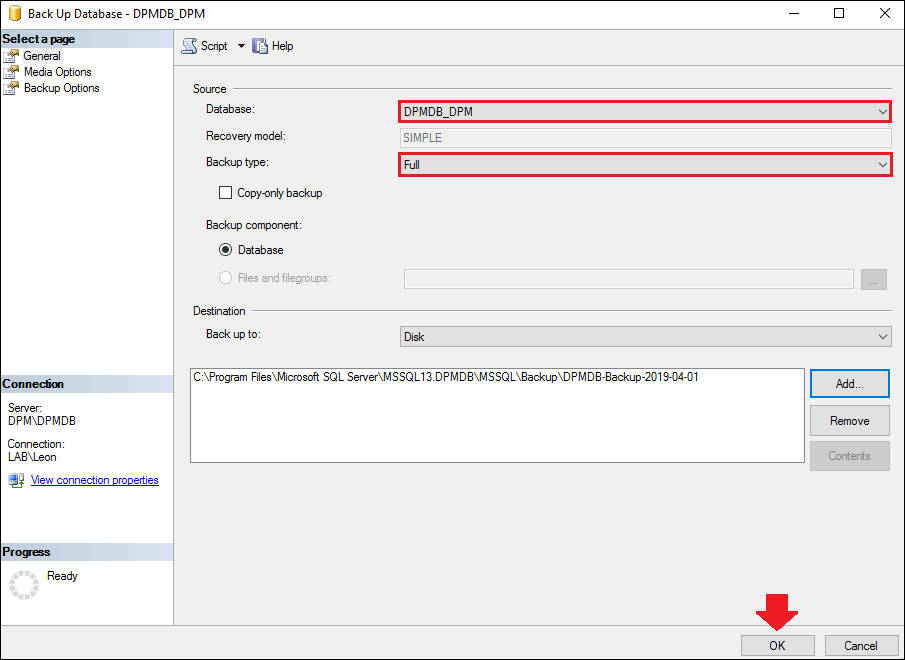
1.5. Make sure that the DPM database is selected and that the backup type is set to Full, click OK to start the backup process.
1.6. Once the backup process has completed, click OK to close window.
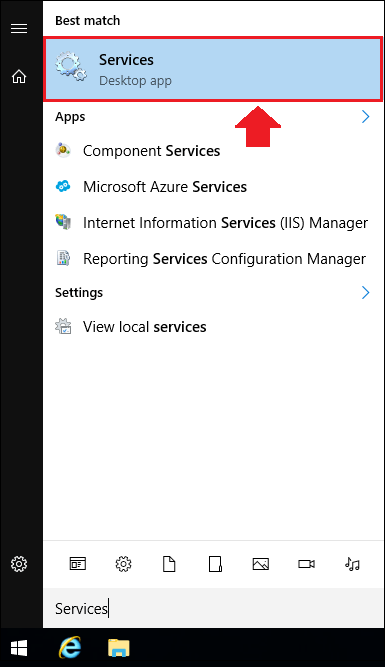
2. We will now stop the DPM services, go to Start and search for “Services” and then hit Enter to open the services window.
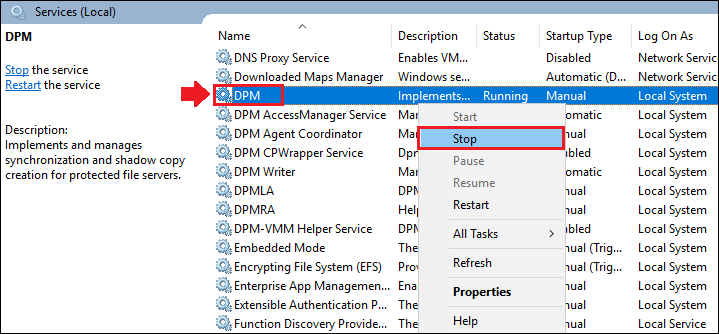
2.1. Locate the DPM services, as shown below:
2.2. Right-click the DPM service and choose Stop, do the same for the DPM AccessManager service and the DPM Writer service.
2.3. Once all DPM services are stopped we are ready for the upgrade.
**Note: **If you also have Microsoft Azure backup Server (MABS) installed on the same server, make sure to stop the following services as well:
- Microsoft Azure Recovery Services Management Agent
- Microsoft Azure Recovery Services Agent
Upgrade to DPM 2019
We will start by mounting the System Center Data Protection Manager (DPM) 2019 ISO image file and then extract the installation files.
Mount and extract the installation files
1. Mount the Data Protection Manager 2019 ISO image to the DPM server.
2. Run the SC_DPM2019 executable file (Run as administrator) to start the extraction wizard for the DPM 2019 installation files.
3. A System Center Data Protection Manager 2019 extraction wizard will open up, click Next to continue.
4. Check the I accept the agreement and then click Next.
5. Specify the location where the DPM 2019 installation files will be extracted to (For example: C:\System Center Data Protection Manager 2019), and then click Next.
6. Click on Extract to start extracting the DPM 2019 installation files to the location we’ve specified in the previous step.
7. Once the extraction is complete, click Finish.
Perform the DPM 2019 upgrade
1. Head to the location where we chose to extract the DPM 2019 installation files.
2. Right-click the Setup executable file and choose Run as administrator.
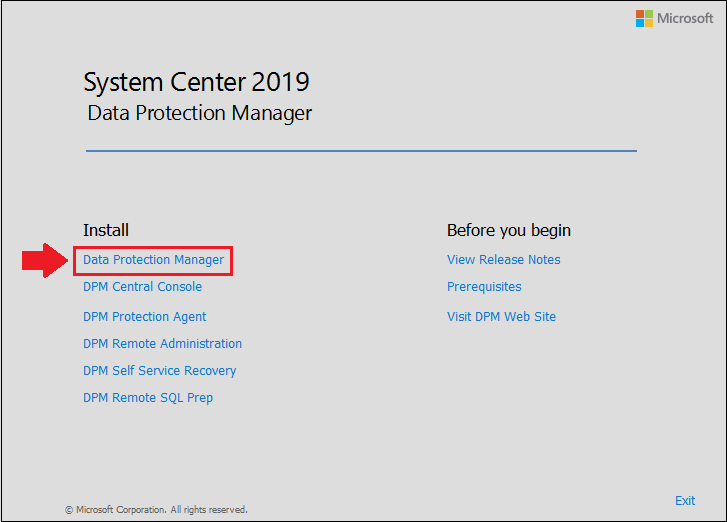
3. A System Center Data Protection Manager 2019 installation menu will now appear.
4. Click on Data Protection Manager to start the upgrade to DPM 2019.
5. The Data Protection Manager Setup wizard will now appear, click Next to continue.
6. In the next window the prerequisites check will be done, as this is an upgrade the server name and database should already be filled in automatically, click Check and Install to start checking the prerequisites.
7. Once the prerequisites check is complete, click Next to continue.
Note: The prerequisites check will give a warning saying that the attached DPM database will be upgraded and a backup should be taken before proceeding.
8. Enter the product key for the System Center Data Protection Manager 2019, this is important as the product key can only be entered during the installation/upgrade of DPM, it cannot be entered afterwards!
Once the product key has been entered, click Next to continue.
9. The installation location cannot be changed, as this is an upgrade, click Next to continue.
10. If we want to receive updates for our DPM, check the Use Microsoft Update when I check for updates (recommended), if not then choose
I do no want to use Microsoft Update, click Next to start the upgrade process.
11. The upgrade will now take place.
12. Once the upgrade to DPM 2019 has finished, click Close to close the Data Protection Manager Setup wizard.
13. Let’s do a final check to see if our DPM 2019 upgrade was successful, open the Microsoft System Center Data Protection Manager console and click on About in the upper toolbar.
14. We can now see that DPM has been upgraded to version 2019, let’s continue with the post-upgrade tasks.
Post-upgrade tasks
1. Open the Microsoft System Center Data Protection Manager console and head to the Protection pane.
2. We can see that our Protection Group / Protection Groups are in an error state, this is normal after the upgrade.
3. To see more in detail why the Protection Group / Protection Groups are in an error state, expand them.
4. We can see that the Agent is incompatible, this is because we’ve upgraded to a newer version of DPM which means there are new DPM agent versions.
To fix this we will need to upgrade the DPM agents, head to the Management pane.
5. Under the Production Servers tab, we can see that the currently installed DPM agent’s status are in Needs updating.
6. To resolve this we simply have to update the DPM agents, to do this click on the Update Available button for each DPM agent.
Update the DPM agent
1. In the Management pane within the Microsoft System Center Data Protection Manager console, head to the Production Servers tab.
2. We should see a list of all the installed DPM agents in the center, click on Update Available for an agent to start the update process.
3. A warning window will appear, which will notify us that the selected DPM agent will be upgraded, click Yes to continue.
Note: If you upgrade a DPM agent that has protected items (listed under Protected computers with protection agents), the following warning window will appear:
4. The upgrade process might takes a few minutes to complete.
5. Once the DPM agent has been updated, we should see an OK agent status once again, and in the details the new DPM agent version of 10.19.58.0.
6. Perform the upgrade on all the DPM agents in the environment, once all agents are updated we can head towards the last post-upgrade task.
Perform consistency checks
1. In the Microsoft System Center Data Protection Manager console, head to the Protection pane.
2. We can see that the replica is now in an inconsistent state, this is normal after upgrading the DPM version, so we will have to perform consistency checks on our replica(s) to solve this.
Right-click on the Protection Group / Protection Groups and select Perform consistency check.
3. A warning window will be shown saying that the consistency check is a time consuming operation, click Yes to start the consistency check.
4. Once the consistency check is running we should see the status of Replica inconsistent, verification in progress.
5. Wait for the consistency check to complete, once it has completed on all the Protection Group / Protection Groups we should see an OK healthy status once again.
We have now successfully upgraded to System Center Data Protection Manager (DPM) 2019 and performed all the necessary tasks!
See Also


