Connecting DJI Drones with Azure Cognitive Services
1. Introduction
Microsoft Cognitive Services are designed to democratize AI by packaging it into discrete components that are easy for developers to use in their own projects. Combined with Cognitive Services,we can do more with DJI drones by analysis of the image and video. In this tutorial, we will show how to connect DJI drones with Azure Cognitive Services. The full project information can be found here: https://www.hackster.io/JiongShi/azure-cloud-services-for-dji-drones-d8d3a3. You can download the sample project from my Github page: https://github.com/shijiong/AzureCloudService4DJI. We use DJI Mavic Air as an example to demonstrate this demo.
2. Create a Basic UWP Application
Please refer to this tutorial to create a UWP application: Connecting DJI Drones with Azure IoT Hub. We can connect the UWP application with DJI drone by Windows SDK and get the real-time on-board sensor data, i.e., 3-axes velocities. In the rest of this article, we will demonstrate how to capture the image and upload it to cognitive services to get the analysis of the computer vision.
3. Create Computer Vision Resources
Follow this tutorial to create computer vision resources, including key and endpoint. You will need the key and endpoint from the resource you create to connect your application to the Computer Vision service. You'll paste your key and endpoint into the code below later in the tutorial.
4. Add Screen Capture Capability
The real time video from the aircraft can be displayed on the SwapChainPanel. However, snapshot is not supported by SwapChainPanel. Hence, we resort to the Windows.Graphics.Capture to acquire frames from application window. This official document will guide you to implement screen capture in your application: Screen capture. The APIs found in the Windows.Graphics.Capture namespace require a general capability to be declared in your application's manifest:
- Open Package.appxmanifest in the Solution Explorer.
- Select the Capabilities tab.
- Check Graphics Capture.
It is shown in Fig. 1 as follows.
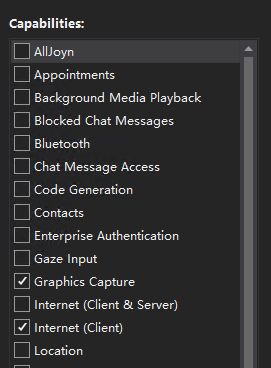
Fig.1 Add Windows.Graphics.Capture Capbility
5. Import Win2D APIs
In this demo, we convert each Direct3D11CaptureFrame into a CanvasBitmap, which is part of the Win2D APIs. Once we have the CanvasBitmap, we can save it as an image file. In order to use Win2D APIs, we can import the NuGet package directly. Search Win2D.uwp in the Browse bar and install it as shown in Fig. 2.

Fig. 2 Add Win2D.uwp NuGet Package
6. Add Microsoft Cognitive Services APIs
To facilitate the process of Microsoft Cognitive Services, we can import the required client library, which provides access to the Microsoft Cognitive Services APIs. In this demo, we make use of Face APIs, which can be installed by NuGet Manager as shown in Fig. 3.

Fig. 3 Add Microsoft Cognitive Services NuGet Package
Note that the Face API is still in prerelease state, remember to check the “Include prerelease” option.
7. Add Image and Canvas Control to the UI
It is quite straightforward to display the image and the results of analysis on the screen once the computer vision returns the JSON data. Hence, we add an Image control to display the captured image and a Canvas control to overlap the recognition results on the Image. Add the following code to the Mainpage.xaml.
01.<RelativePanel Name="spMain" Grid.Row="2">
02.    <Image Name="imgPhoto"
03.           RelativePanel.AlignLeftWithPanel="True"
04.           RelativePanel.AlignRightWithPanel="True"
05.           RelativePanel.AlignTopWithPanel="True"
06.           RelativePanel.AlignBottomWithPanel="True"
07.           Stretch="Uniform">
08.    </Image>
09.    <Canvas Name="cvasMain" RelativePanel.AlignLeftWithPanel="True"
10.            RelativePanel.AlignRightWithPanel="True"
11.            RelativePanel.AlignTopWithPanel="True"
12.            RelativePanel.AlignBottomWithPanel="True"
13.            >
14.        <Popup Name="emotionData" IsOpen="False" IsLightDismissEnabled="True">
15.
16.        </Popup>
17.    </Canvas>
18.</RelativePanel>
8. Take a screenshot
Once user clicks the “Screenshot” button, the application will start the GraphicsCaptureItem choosing process. After user finish choosing, we will convert the Direct3D11CaptureFrame into a CanvasBitmap, which will be saved as an image file. And furthermore, the image file can be used to upload to the Azure Cognitive Service. The ScreenshotButton_ClickAsync method is defined as follows.
01.private async void ScreenshotButton_ClickAsync(object sender, RoutedEventArgs e)
02.{
03.    var picker = new GraphicsCapturePicker();
04.    GraphicsCaptureItem item = await picker.PickSingleItemAsync();
05.    if (item != null)
06.    {
07.        _item = item;
08.        _lastSize = _item.Size;
09.
10.        if (_lastSize.Height != 0)
11.        {
12.            _framePool = Direct3D11CaptureFramePool.Create(
13.               _canvasDevice, // D3D device
14.               DirectXPixelFormat.B8G8R8A8UIntNormalized, // Pixel format
15.               2, // Number of frames
16.               _item.Size); // Size of the buffers
17.
18.            _session = _framePool.CreateCaptureSession(_item);
19.            _session.StartCapture();
20.            Thread.Sleep(200);
21.            var frame = _framePool.TryGetNextFrame();
22.            if (frame != null)
23.            {
24.                // Convert our D3D11 surface into a Win2D object.
25.                CanvasBitmap canvasBitmap = CanvasBitmap.CreateFromDirect3D11Surface(
26.                    _canvasDevice,
27.                    frame.Surface);
28.
29.                _currentFrame = canvasBitmap;
30.                await SaveImageAsync(_screenshotFilename, _currentFrame);
31.            }
32.            _session?.Dispose();
33.            _framePool?.Dispose();
34.            _item = null;
35.            _session = null;
36.            _framePool = null;
37.        }
38.    }
39.
40.}
9. Save Image and Display the Results
When the application gets the frame, we an save it to the local storage and it is also used to upload to the cognitive service to get the description of the image. To implement this, we can define the SaveImageAsync as follows.
01.private async Task SaveImageAsync(string filename, CanvasBitmap frame)
02.{
03.     StorageFolder pictureFolder = KnownFolders.SavedPictures;
04.
05.     StorageFile file = await pictureFolder.CreateFileAsync(
06.         filename,
07.         CreationCollisionOption.ReplaceExisting);
08.
09.     using (var fileStream = await file.OpenAsync(FileAccessMode.ReadWrite))
10.     {
11.         await frame.SaveAsync(fileStream, CanvasBitmapFileFormat.Png, 1f);
12.     }
13.
14.     var stream = await file.OpenAsync(Windows.Storage.FileAccessMode.Read);
15.     var stream_send = stream.CloneStream();
16.     var stream_send2 = stream.CloneStream();
17.     var image = new  BitmapImage();
18.     image.SetSource(stream);
19.     imgPhoto.Source = image;
20.     size_image = new  Size(image.PixelWidth, image.PixelHeight);
21.
22.     ringLoading.IsActive = true;
23.
24.     //Face service
25.     FaceClient f_client = new  FaceClient(
26.         new ApiKeyServiceClientCredentials(key_face),
27.         new System.Net.Http.DelegatingHandler[] { });  // need to provide and endpoint and a delegate. key_face, face_apiroot);
28.     f_client.Endpoint = face_apiroot;
29.
30.     var requiedFaceAttributes = new  FaceAttributeType[] {
31.                         FaceAttributeType.Age,
32.                         FaceAttributeType.Gender,
33.                         FaceAttributeType.Smile,
34.                         FaceAttributeType.FacialHair,
35.                         FaceAttributeType.HeadPose,
36.                         FaceAttributeType.Emotion,
37.                         FaceAttributeType.Glasses
38.                         };
39.     var faces_task = await f_client.Face.DetectWithStreamAsync(stream_send.AsStream(), true, true, requiedFaceAttributes);
40.
41.     faces = faces_task.ToArray();
42.
43.     if (faces != null)
44.     {
45.         DisplayEmotionsData(faces);
46.         DisplayFacesData(faces);
47.     }
48.
49.     //hide preview
50.     if (swapChainPanel.Visibility == Visibility.Collapsed)
51.     {
52.         swapChainPanel.Visibility = Visibility.Visible;
53.         spMain.Visibility = Visibility.Collapsed;
54.         ShowPreviewButton.Content = "Hide Preview";
55.     }
56.     else
57.     {
58.         swapChainPanel.Visibility = Visibility.Collapsed;
59.         spMain.Visibility = Visibility.Visible;
60.         ShowPreviewButton.Content = "Show Preview";
61.     }
62.
63.     ringLoading.IsActive = false;
64. }
Here, DisplayEmotionsData is used to display the emotion results in the TextBlock as follows.
001.private void  DisplayEmotionsData(DetectedFace[] faces, bool init = true)
002. {
003.     if (faces == null)
004.         return;
005.     if (!init)
006.         return;
007.
008.     var list_child = gridEmotions.Children.ToList();
009.     list_child.ForEach((e) =>
010.     {
011.         if (e as TextBlock != null && (e as TextBlock).Tag != null)
012.         {
013.             gridEmotions.Children.Remove(e);
014.         }
015.     });
016.
017.     int index = 1;
018.     foreach (var face in faces)
019.     {
020.         TextBlock txt0 = new  TextBlock();
021.         txt0.Padding = new  Thickness(1);
022.         txt0.FontSize = 11;
023.         txt0.Text = "#" + index;
024.         Grid.SetRow(txt0, index + 1);
025.         Grid.SetColumn(txt0, 0);
026.         txt0.Tag = true;
027.
028.         TextBlock txt1 = new  TextBlock();
029.         txt1.Padding = new  Thickness(1);
030.         txt1.FontSize = 11;
031.         txt1.Text = Math.Round(face.FaceAttributes.Emotion.Anger, 2).ToString();
032.         Grid.SetRow(txt1, index + 1);
033.         Grid.SetColumn(txt1, 1);
034.         txt1.Tag = true;
035.
036.         TextBlock txt2 = new  TextBlock();
037.         txt2.Padding = new  Thickness(1);
038.         txt2.FontSize = 11;
039.         txt2.Text = Math.Round(face.FaceAttributes.Emotion.Contempt, 2).ToString();
040.         Grid.SetRow(txt2, index + 1);
041.         Grid.SetColumn(txt2, 2);
042.         txt2.Tag = true;
043.
044.         TextBlock txt3 = new  TextBlock();
045.         txt3.Padding = new  Thickness(1);
046.         txt3.FontSize = 11;
047.         txt3.Text = Math.Round(face.FaceAttributes.Emotion.Disgust, 2).ToString();
048.         Grid.SetRow(txt3, index + 1);
049.         Grid.SetColumn(txt3, 3);
050.         txt3.Tag = true;
051.
052.         TextBlock txt4 = new  TextBlock();
053.         txt4.Padding = new  Thickness(1);
054.         txt4.FontSize = 11;
055.         txt4.Text = Math.Round(face.FaceAttributes.Emotion.Fear, 2).ToString();
056.         Grid.SetRow(txt4, index + 1);
057.         Grid.SetColumn(txt4, 4);
058.         txt4.Tag = true;
059.
060.         TextBlock txt5 = new  TextBlock();
061.         txt5.Padding = new  Thickness(1);
062.         txt5.FontSize = 11;
063.         txt5.Text = Math.Round(face.FaceAttributes.Emotion.Happiness, 2).ToString();
064.         Grid.SetRow(txt5, index + 1);
065.         Grid.SetColumn(txt5, 5);
066.         txt5.Tag = true;
067.
068.         TextBlock txt6 = new  TextBlock();
069.         txt6.Padding = new  Thickness(1);
070.         txt6.FontSize = 11;
071.         txt6.Text = Math.Round(face.FaceAttributes.Emotion.Neutral, 2).ToString();
072.         Grid.SetRow(txt6, index + 1);
073.         Grid.SetColumn(txt6, 6);
074.         txt6.Tag = true;
075.
076.         TextBlock txt7 = new  TextBlock();
077.         txt7.Padding = new  Thickness(1);
078.         txt7.FontSize = 11;
079.         txt7.Text = Math.Round(face.FaceAttributes.Emotion.Sadness, 2).ToString();
080.         Grid.SetRow(txt7, index + 1);
081.         Grid.SetColumn(txt7, 7);
082.         txt7.Tag = true;
083.
084.         TextBlock txt8 = new  TextBlock();
085.         txt8.Padding = new  Thickness(1);
086.         txt8.FontSize = 11;
087.         txt8.Text = Math.Round(face.FaceAttributes.Emotion.Surprise, 2).ToString();
088.         Grid.SetRow(txt8, index + 1);
089.         Grid.SetColumn(txt8, 8);
090.         txt8.Tag = true;
091.
092.         index++;
093.         gridEmotions.Children.Add(txt0);
094.         gridEmotions.Children.Add(txt1);
095.         gridEmotions.Children.Add(txt2);
096.         gridEmotions.Children.Add(txt3);
097.         gridEmotions.Children.Add(txt4);
098.         gridEmotions.Children.Add(txt5);
099.         gridEmotions.Children.Add(txt6);
100.         gridEmotions.Children.Add(txt7);
101.         gridEmotions.Children.Add(txt8);
102.     }
103. }
And we use DisplayFacesData to overlap the orange rectangle on the image, where the faces are detected.
01.private void  DisplayFacesData(DetectedFace[] faces, bool init = true)
02.{
03.     if (faces == null)
04.         return;
05.
06.     cvasMain.Children.Clear();
07.     var offset_h = 0.0; var offset_w = 0.0;
08.     var p = 0.0;
09.     var d = cvasMain.ActualHeight / cvasMain.ActualWidth;
10.     var d2 = size_image.Height / size_image.Width;
11.     if (d < d2)
12.     {
13.         offset_h = 0;
14.         offset_w = (cvasMain.ActualWidth - cvasMain.ActualHeight / d2) / 2;
15.         p = cvasMain.ActualHeight / size_image.Height;
16.     }
17.     else
18.     {
19.         offset_w = 0;
20.         offset_h = (cvasMain.ActualHeight - cvasMain.ActualWidth / d2) / 2;
21.         p = cvasMain.ActualWidth / size_image.Width;
22.     }
23.     if (faces != null)
24.     {
25.         int count = 1;
26.         foreach (var face in faces)
27.         {
28.             Windows.UI.Xaml.Shapes.Rectangle rect = new  Windows.UI.Xaml.Shapes.Rectangle();
29.             rect.Width = face.FaceRectangle.Width * p;
30.             rect.Height = face.FaceRectangle.Height * p;
31.             Canvas.SetLeft(rect, face.FaceRectangle.Left * p + offset_w);
32.             Canvas.SetTop(rect, face.FaceRectangle.Top * p + offset_h);
33.             rect.Stroke = new  SolidColorBrush(Colors.Orange);
34.             rect.StrokeThickness = 3;
35.
36.             cvasMain.Children.Add(rect);
37.
38.             TextBlock txt = new  TextBlock();
39.             txt.Foreground = new  SolidColorBrush(Colors.Orange);
40.             txt.Text = "#" + count;
41.             Canvas.SetLeft(txt, face.FaceRectangle.Left * p + offset_w);
42.             Canvas.SetTop(txt, face.FaceRectangle.Top * p + offset_h - 20);
43.             cvasMain.Children.Add(txt);
44.             count++;
45.         }
46.     }
47. }
Once it receives the response from the Azure, every recognized face on the screen will be overlapped with an orange rectangle, which is shown in Figure 4.
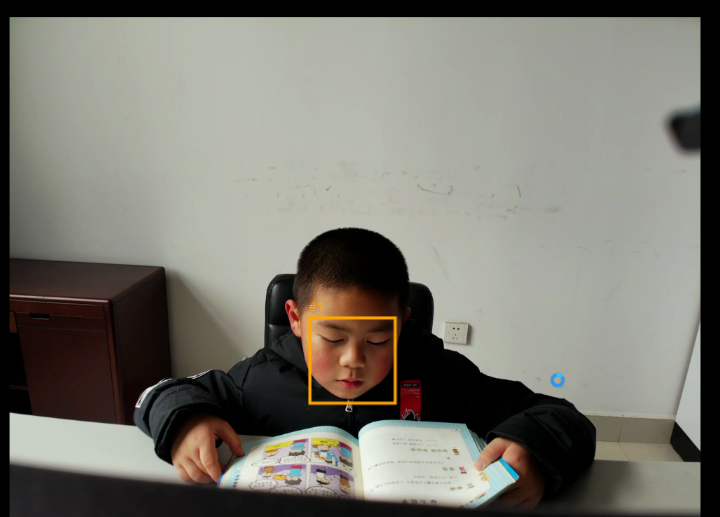
Fig. 4 The result of Face API
Summary
In this tutorial, we showed the steps to connect your drones with Azure Cognitive Services. You can take a screenshot and send it to the Azure Face APIs to get the face recognition results, which will be displayed on the UI.
Resources
1. Azure Cloud Services for DJI Drones: https://www.hackster.io/JiongShi/azure-cloud-services-for-dji-drones-d8d3a3
2. Source Code: https://github.com/shijiong/AzureCloudService4DJI
3. DJI Windows SDK: https://developer.dji.com/windows-sdk/
See Also
1. Connecting DJI Drones with Azure IoT Hub: https://social.technet.microsoft.com/wiki/contents/articles/54262.connecting-dji-drones-with-azure-iot-hub.aspx
2. Connecting DJI Drones with Azure Table Storage: https://social.technet.microsoft.com/wiki/contents/articles/54263.connecting-dji-drones-with-azure-table-storage.aspx