Note
Access to this page requires authorization. You can try signing in or changing directories.
Access to this page requires authorization. You can try changing directories.
Note
This isn't the latest version of this article. For the current release, see the .NET 9 version of this article.
Important
This information relates to a pre-release product that may be substantially modified before it's commercially released. Microsoft makes no warranties, express or implied, with respect to the information provided here.
For the current release, see the .NET 9 version of this article.
This article is the second part of the Blazor movie database app tutorial that teaches you the basics of building an ASP.NET Core Blazor Web App with features to manage a movie database.
In this part of the tutorial series:
- A class is added to the app representing a movie in a database.
- Entity Framework Core (EF Core) services and tooling create a database context and database. EF Core is an object-relational mapper (O/RM) that simplifies data access. You write model classes first, and EF Core creates the database from the model classes, which is called scaffolding.
- Additional tooling scaffolds a Razor component-based UI for interacting with the movie records in the database via the database context.
Add a data model
In Solution Explorer, right-click the BlazorWebAppMovies project and select Add > New Folder. Name the folder Models.
Right-click the Models folder. Select Add > Class. Name the file Movie.cs. Use the following contents for the file.
Add a folder to the project named Models.
Add a class file to the Models folder named Movie.cs. Use the following contents for the file.
Add a folder to the project named Models.
Add a class file to the Models folder named Movie.cs. Use the following contents for the file.
Models/Movie.cs:
using System.ComponentModel.DataAnnotations;
using System.ComponentModel.DataAnnotations.Schema;

namespace BlazorWebAppMovies.Models;

public class Movie
{
    public int Id { get; set; }

    public string? Title { get; set; }

    public DateOnly ReleaseDate { get; set; }

    public string? Genre { get; set; }

    [DataType(DataType.Currency)]
    [Column(TypeName = "decimal(18, 2)")]
    public decimal Price { get; set; }
}
The Movie class contains:
- A record identifier property (
Id), which is required by EF Core and the database to track records. In the database, theIdproperty is the database record's primary key. - Other properties that describe aspects of a movie:
- Title (
Title) - Release date (
ReleaseDate) - Genre (
Genre) - Price (
Price)
- Title (
The question mark on a string type indicates that the property is nullable (it can hold a null value).
The EF Core database provider selects data types based on the .NET types of the model's properties. The provider also takes into account other metadata provided by System.ComponentModel.DataAnnotations, which are a set of attribute classes placed above a model's property with the following format, where the {ANNOTATION} placeholder is the annotation name. You can place multiple annotations on the same line separated by commas inside the brackets, or you can place multiple annotations on separate lines, which is the approach adopted by this tutorial series.
[{ANNOTATION}]
The Price property in the Movie class file has two data annotations:
[DataType(DataType.Currency)]
[Column(TypeName = "decimal(18, 2)")]
public decimal Price { get; set; }
These annotations specify:
- That the property holds a currency data type.
- The database column is a decimal of 18 digits with two decimal places.
More information on data annotations, including adding data annotations for validation, is covered in a later part of the tutorial series.
Select Build > Build Solution from the menu bar or press F6 on the keyboard. Confirm in the Output panel that the build succeeded.
Add Nuget packages and tools
To add the required NuGet packages and tools, execute the following .NET CLI commands in the Terminal (Terminal menu > New Terminal).
Paste all of the following commands at the prompt (>) of the Terminal. When you paste multiple commands, a warning appears stating that multiple commands will execute. Dismiss the warning and proceed with the paste operation.
When you paste multiple commands, all of the commands execute except the last one. The last command doesn't execute until you press Enter on the keyboard.
dotnet tool install --global dotnet-aspnet-codegenerator
dotnet tool install --global dotnet-ef
dotnet add package Microsoft.EntityFrameworkCore.SQLite
dotnet add package Microsoft.VisualStudio.Web.CodeGeneration.Design
dotnet add package Microsoft.EntityFrameworkCore.SqlServer
dotnet add package Microsoft.EntityFrameworkCore.Tools
dotnet add package Microsoft.AspNetCore.Components.QuickGrid
dotnet add package Microsoft.AspNetCore.Components.QuickGrid.EntityFrameworkAdapter
dotnet add package Microsoft.AspNetCore.Diagnostics.EntityFrameworkCore
Important
After the first eight commands execute, make sure that you press Enter on the keyboard to execute the last command.
Note
The preceding commands are .NET CLI commands, and .NET CLI commands are executed when entered at a PowerShell prompt, which is the default command shell of the VS Code Terminal.
Save the project file.
The preceding commands add:
- Command-line interface (CLI) tools for EF Core.
aspnet-codegeneratorscaffolding tool.- Design time tools for EF Core.
- The SQLite and SQL Server providers with the EF Core package as a dependency.
Microsoft.VisualStudio.Web.CodeGeneration.Designfor scaffolding.Microsoft.AspNetCore.Diagnostics.EntityFrameworkCoreto use the AddDatabaseDeveloperPageExceptionFilter extension method in theProgramfile, which captures database-related exceptions.
In the Command Palette (Ctrl+Shift+P), use the .NET: Build command to build the app.
Confirm that the app built successfully.
Add Nuget packages and tools
To add the required NuGet packages and tools, execute the following .NET CLI commands in a command shell opened to the project's root folder.
Paste all of the following commands at the prompt (>) of the command shell. When you paste multiple commands, a warning appears stating that multiple commands will execute. Dismiss the warning and proceed with the paste operation.
When you paste multiple commands, all of the commands execute except the last one. The last command doesn't execute until you press Enter on the keyboard.
dotnet tool install --global dotnet-aspnet-codegenerator
dotnet tool install --global dotnet-ef
dotnet add package Microsoft.EntityFrameworkCore.SQLite
dotnet add package Microsoft.VisualStudio.Web.CodeGeneration.Design
dotnet add package Microsoft.EntityFrameworkCore.SqlServer
dotnet add package Microsoft.EntityFrameworkCore.Tools
dotnet add package Microsoft.AspNetCore.Components.QuickGrid
dotnet add package Microsoft.AspNetCore.Components.QuickGrid.EntityFrameworkAdapter
dotnet add package Microsoft.AspNetCore.Diagnostics.EntityFrameworkCore
Save the project file.
The preceding commands add:
- Command-line interface (CLI) tools for EF Core.
aspnet-codegeneratorscaffolding tool.- Design time tools for EF Core.
- The SQLite and SQL Server providers with the EF Core package as a dependency.
Microsoft.VisualStudio.Web.CodeGeneration.Designfor scaffolding.Microsoft.AspNetCore.Diagnostics.EntityFrameworkCoreto use the AddDatabaseDeveloperPageExceptionFilter extension method in theProgramfile, which captures database-related exceptions.
In a command shell opened to the project's root folder, execute the dotnet build command:
dotnet build
Confirm that the app built successfully.
Scaffold the model
In this section, the Movie model is used to scaffold a database context and a UI for managing movies in the database. .NET scaffolding is a code generation framework for .NET applications. You use scaffolding to quickly add database and UI code that interacts with data models.
Right-click on the Components/Pages folder and select Add > New Scaffolded Item:

With the Add New Scaffold Item dialog open to Installed > Common > Blazor > Razor Component, select Razor Components using Entity Framework (CRUD). Select the Add button.
CRUD is an acronym for Create, Read, Update, and Delete. The scaffolder produces create, edit, delete, details, and index components for the app.

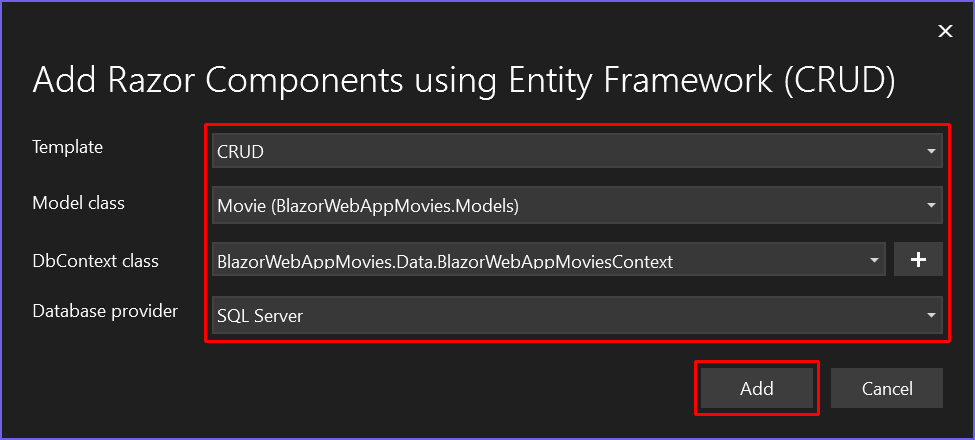
Complete the Add Razor Components using Entity Framework (CRUD) dialog:
- The Template dropdown list includes other templates for specifically creating create, edit, delete, details, and list components. This dropdown list comes in handy when you only need to create a specific type of component scaffolded to a model class. Leave the Template dropdown list set to CRUD to scaffold a full set of components.
- In the Model class dropdown list, select Movie (BlazorWebAppMovies.Models).
- For DbContext class, select the + (plus sign) button.
- In the Add Data Context modal dialog, the class name
BlazorWebAppMovies.Data.BlazorWebAppMoviesContextis generated. Use the default generated value. Select the Add button. - After the model dialog closes, the Database provider dropdown list defaults to SQL Server. When you're building apps in the future, you can select the appropriate provider for the database that you're using. The options include SQLite, PostgreSQL, and Azure Cosmos DB. Leave the Database provider dropdown list set to SQL Server.
- Select Add.
In the Terminal (Terminal menu > New Terminal) opened to the project's root directory, execute the following command. SQLite is used as the database for users adopting VS Code tooling for this tutorial series.
dotnet aspnet-codegenerator blazor CRUD -dbProvider sqlite -dc BlazorWebAppMovies.Data.BlazorWebAppMoviesContext -m Movie -outDir Components/Pages
CRUD is an acronym for Create, Read, Update, and Delete. The blazor generator with the CRUD template produces create, edit, delete, details, and index components for the app.
The following table details the ASP.NET Core code generator options used in the preceding command:
-dbProvider: Database provider to use. Options includesqlserver(default),sqlite,cosmos,postgres.-dc: The DbContext class to use, including the namespace (BlazorWebAppMovies.Data).-m: The name of the model.-outDir: The output directory for the generated components. A folder is created from the model name in the output directory to hold the components (for example,MoviePagesin this case).
In a command shell opened to the project's root folder, execute the following command. SQLite is used as the database for users adopting .NET CLI tooling for this tutorial series.
dotnet aspnet-codegenerator blazor CRUD -dbProvider sqlite -dc BlazorWebAppMovies.Data.BlazorWebAppMoviesContext -m Movie -outDir Components/Pages
CRUD is an acronym for Create, Read, Update, and Delete. The blazor generator with the CRUD template produces create, edit, delete, details, and index components for the app.
The following table details the ASP.NET Core code generator options used in the preceding command:
-dbProvider: Database provider to use. Options includesqlserver(default),sqlite,cosmos,postgres.-dc: The DbContext class to use, including the namespace (BlazorWebAppMovies.Data).-m: The name of the model.-outDir: The output directory for the generated components. A folder is created from the model name in the output directory to hold the components (for example,MoviePagesin this case).
The appsettings.json file is updated with the connection string used to connect to a local database. In the following example, the {CONNECTION STRING} is the connection string automatically generated by the scaffolder:
"ConnectionStrings": {
  "BlazorWebAppMoviesContext": "{CONNECTION STRING}"
}
Warning
Don't store app secrets, connection strings, credentials, passwords, personal identification numbers (PINs), private C#/.NET code, or private keys/tokens in client-side code, which is always insecure. In test/staging and production environments, server-side Blazor code and web APIs should use secure authentication flows that avoid maintaining credentials within project code or configuration files. Outside of local development testing, we recommend avoiding the use of environment variables to store sensitive data, as environment variables aren't the most secure approach. For local development testing, the Secret Manager tool is recommended for securing sensitive data. For more information, see Securely maintain sensitive data and credentials.
Files created and updated by scaffolding
The scaffolding process creates the following component files and movie database context class file:
Components/Pages/MoviePagesCreate.razor: Creates new movie entities.Delete.razor: Deletes a movie entity.Details.razor: Shows movie entity details.Edit.razor: Updates a movie entity.Index.razor: Lists movie entities (records) in the database.
Data/BlazorWebAppMoviesContext.cs: Database context file (DbContext).
The component files in the MoviePages folder are described in greater detail in the next part of this tutorial. The database context is described later in this article.
If the MoviePages folder and assets aren't present after scaffolding, return to the Scaffold the model section and rescaffold the Movie model, making sure that you select the Razor Components using Entity Framework (CRUD) scaffolder under Installed > Common > Blazor > Razor Component in the Add New Scaffold Item dialog.
ASP.NET Core is built with dependency injection, which is a software design pattern for achieving Inversion of Control (IoC) between classes and their dependencies. Services, such as the EF Core database context, are registered with dependency injection during application startup. These services are injected into Razor components for use by the components.
The QuickGrid component is a Razor component for efficiently displaying data in tabular form. The scaffolder places a QuickGrid component in the Index component (Components/Pages/Index.razor) to display movie entities. Calling AddQuickGridEntityFrameworkAdapter on the service collection adds an EF Core adapter for QuickGrid to recognize EF Core-supplied IQueryable<T> instances and to resolve database queries asynchronously for efficiency.
In combination with UseDeveloperExceptionPage, AddDatabaseDeveloperPageExceptionFilter captures database-related exceptions that can be resolved by using Entity Framework migrations. When these exceptions occur, an HTML response is generated with details about possible actions to resolve the issue.
The following code is added to the Program file by the scaffolder:
builder.Services.AddDbContextFactory<BlazorWebAppMoviesContext>(options =>
    options.UseSqlServer(
        builder.Configuration.GetConnectionString("BlazorWebAppMoviesContext") ??
        throw new InvalidOperationException(
            "Connection string 'BlazorWebAppMoviesContext' not found.")));

builder.Services.AddQuickGridEntityFrameworkAdapter();

builder.Services.AddDatabaseDeveloperPageExceptionFilter();
Create the initial database schema using EF Core's migration feature
The migrations feature in EF Core:
- Creates the initial database schema.
- Incrementally updates the database schema to keep it synchronized with the app's data model. Existing data in the database is preserved.
EF Core adopts the code-first approach for database design and maintenance:
- Entity classes are created and updated first in the app.
- The database is created and updated from the app's entity classes.
This is the reverse procedure of database-first approaches, where the database is designed, built, and updated first. Adopting EF Core's code-first approach aims to speed up the process of app development because most of the difficult and time-consuming database creation and management procedures are handled transparently by the EF Core tooling, so you can focus on app development.
In this section, Visual Studio Connected Services are used to issue EF Core commands that:
- Add an initial migration.
- Update the database using the initial migration.
In Solution Explorer, double-click Connected Services. In the SQL Server Express LocalDB area of Service Dependencies, select the ellipsis (...) followed by Add migration:

Give the migration a Migration name of InitialCreate, which is a name that describes the migration. Wait for the database context to load in the DbContext class names field, which may take a few seconds. Select Finish to create the migration:

Select the Close button after the operation finishes.
Adding a migration generates code to create the initial database schema. The schema is based on the model specified in DbContext.
Select the ellipsis (...) again followed by the Update database command:

The Update database with the latest migration dialog opens. Wait for the DbContext class names field to update and for prior migrations to load, which may take a few seconds. Select the Finish button:

The update database command executes the Up method migrations that haven't been applied in a migration code file created by the scaffolder. In this case, the command executes the Up method in the Migrations/{TIME STAMP}_InitialCreate.cs file, which creates the database. The {TIME STAMP} placeholder is a time stamp.
Select the Close button after the operation finishes.
Right-click the BlazorWebAppMovies project file (BlazorWebAppMovies.csproj) and select Open in Integrated Terminal.
The Terminal window opens with a command prompt at the project directory, which contains the Program file and the app's project file (.csproj).
Execute the following .NET CLI command to add an initial migration. The migrations command generates code to create the initial database schema. The schema is based on the model specified in DbContext. The InitialCreate argument is used to name the migration. Any name can be used, but the convention is to use a name that describes the migration.
dotnet ef migrations add InitialCreate
After the preceding command completes, update the database with the update command. The update command executes the Up method on migrations that haven't been applied in a migration code file created by the scaffolder. In this case, the command executes the Up method migrations in the Migrations/{TIME STAMP}_InitialCreate.cs file, which creates the database. The {TIME STAMP} placeholder is a time stamp.
dotnet ef database update
From the project's root folder, execute the following .NET CLI command to add an initial migration. The migrations command generates code to create the initial database schema. The schema is based on the model specified in DbContext. The InitialCreate argument is used to name the migration. Any name can be used, but the convention is to use a name that describes the migration.
dotnet ef migrations add InitialCreate
After the preceding command completes, update the database with the update command. The update command executes the Up method on migrations that haven't been applied in a migration code file created by the scaffolder. In this case, the command executes the Up method migrations in the Migrations/{TIME STAMP}_InitialCreate.cs file, which creates the database. The {TIME STAMP} placeholder is a time stamp.
dotnet ef database update
The database context BlazorWebAppMoviesContext (Data/BlazorWebAppMoviesContext.cs):
- Derives from Microsoft.EntityFrameworkCore.DbContext.
- Specifies which entities are included in the data model.
- Coordinates EF Core functionality, such as CRUD operations, for the
Moviemodel. - Contains a DbSet<TEntity> property for the
Movieentity set. In EF terminology, an entity set typically corresponds to a database table. An entity corresponds to a row in the table.
The name of the connection string is passed in to the context by calling a method on a DbContextOptions object. For local development, the connection string is read from the appsettings.json file.
Warning
Don't store app secrets, connection strings, credentials, passwords, personal identification numbers (PINs), private C#/.NET code, or private keys/tokens in client-side code, which is always insecure. In test/staging and production environments, server-side Blazor code and web APIs should use secure authentication flows that avoid maintaining credentials within project code or configuration files. Outside of local development testing, we recommend avoiding the use of environment variables to store sensitive data, as environment variables aren't the most secure approach. For local development testing, the Secret Manager tool is recommended for securing sensitive data. For more information, see Securely maintain sensitive data and credentials.
Test the app
Run the app.
Add /movies to the URL in the browser's address bar to navigate to the movies Index page.
After the Index page loads, select the Create New link.
Add a movie to the database. In the following example, the classic sci-fi movie The Matrix (©1999 Warner Bros. Entertainment Inc.) is added as the first movie entry. Selecting the Create button adds the movie to the database:
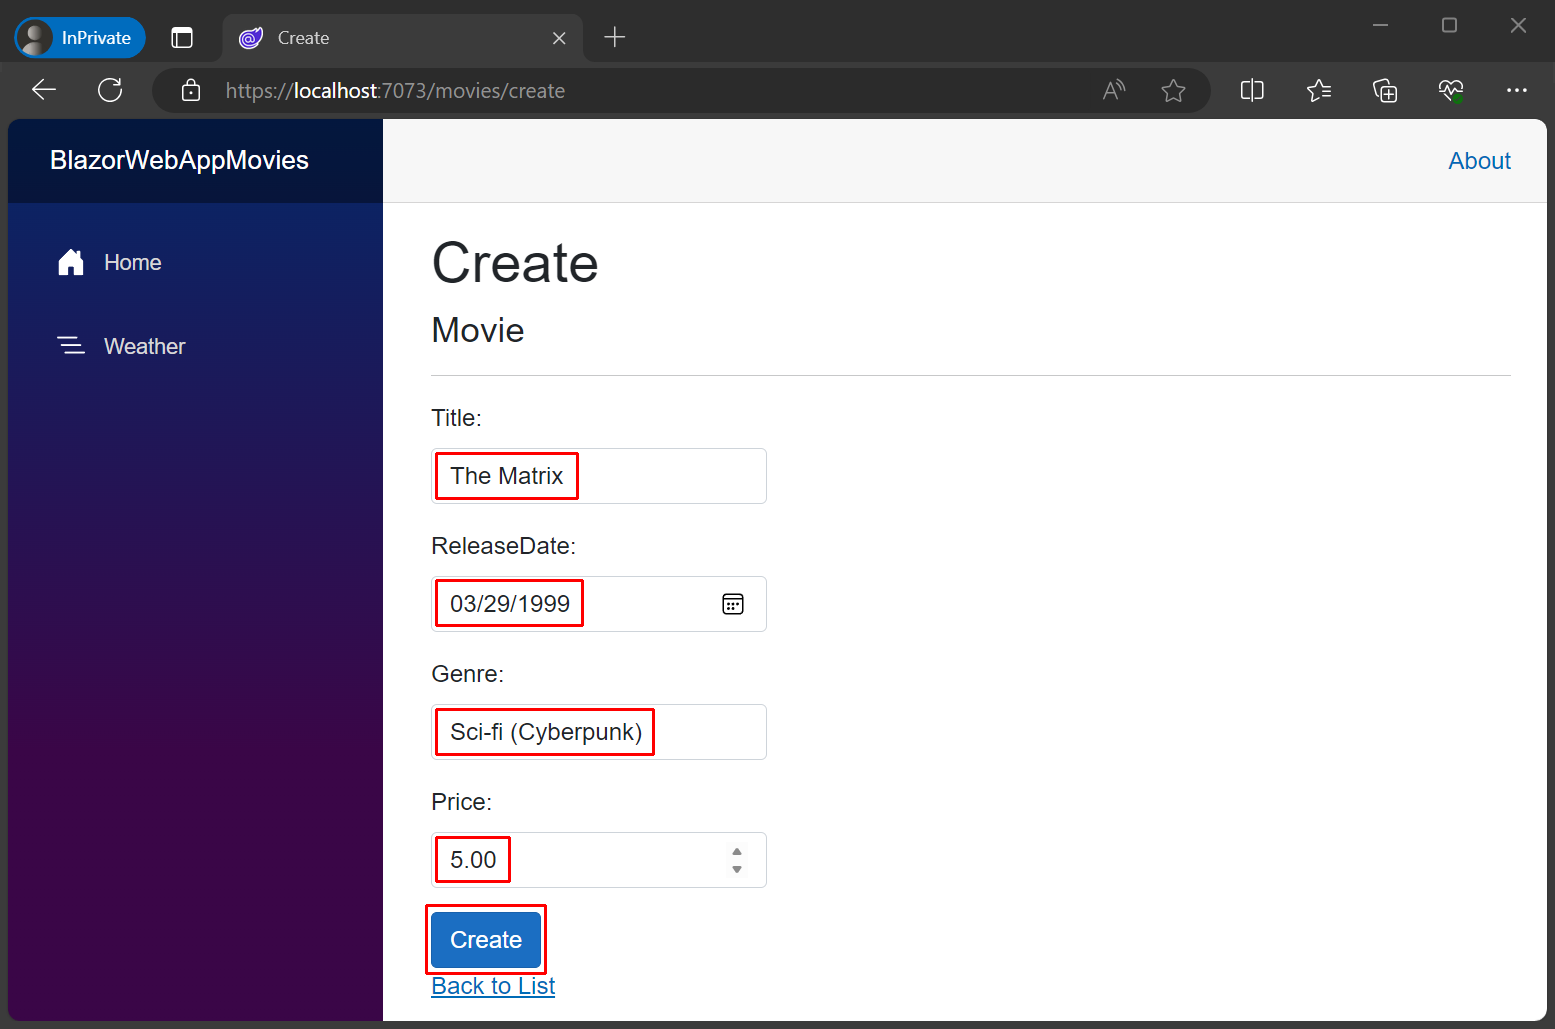
When you select the Create button, the movie data is posted to the server and saved in the database.
In .NET 9, the Visual Studio debugger may break with a NavigationException on the line that navigates back to the Index page:

To resolve this problem:
- Deselect the checkbox for Break when this exception type is user-handled.
- Select the Continue button in the menu bar to continue execution.
The exception isn't thrown when a NavigateTo method is executed throughout the rest of the tutorial series.
In .NET 10 or later:
- Updates to the way that NavigateTo manages navigation never result in a NavigationException.
- The Visual Studio debugger doesn't break when processing NavigateTo calls with a valid endpoint.
When the app returns to the Index page, the added entity appears:

Open the Edit page. Edit the movie's record and save the changes.
Examine the Delete page, but don't delete The Matrix movie from the database. The presence of this movie record is valuable in the next step of the tutorial where rendered HTML is studied and some enhancements are made to the data displayed. If you already deleted the movie, add the movie to the database again using the Create page before proceeding to the next part of the tutorial series.
Stop the app
Stop the app using either of the following approaches:
- Close the browser window.
- In Visual Studio, either:
Use the Stop button in Visual Studio's menu bar:

Press Shift+F5 on the keyboard.
Stop the app using the following approach:
- Close the browser window.
- In VS Code, either:
- From the Run menu, select Stop Debugging.
- Press Shift+F5 on the keyboard.
Stop the app using the following approach:
- Close the browser window.
- From the command shell, press Ctrl+C.
Troubleshoot with the completed sample
If you run into a problem while following the tutorial that you can't resolve from the text, compare your code to the completed project in the Blazor samples repository:
Blazor samples GitHub repository (dotnet/blazor-samples)
Select the latest version folder. The sample folder for this tutorial's project is named BlazorWebAppMovies.
Additional resources
EF Core documentation:
- Entity Framework Core
- Entity Framework Core tools reference - .NET Core CLI
- Data Types
- SaveChangesAsync: The API document includes basic information on how entities are saved and change detection.
- Environment-based
Startupclass and methods dotnet aspnet-codegenerator- Dependency injection in ASP.NET Core
- ASP.NET Core Blazor `QuickGrid` component
Legal
The Matrix is a copyright of Warner Bros. Entertainment Inc..
Next steps
Collaborate with us on GitHub
The source for this content can be found on GitHub, where you can also create and review issues and pull requests. For more information, see our contributor guide.
ASP.NET Core