Note
Access to this page requires authorization. You can try signing in or changing directories.
Access to this page requires authorization. You can try changing directories.
By Brady Gaster
Azure App Service is a Microsoft cloud computing platform service for hosting web apps, including ASP.NET Core.
Note
This article refers to publishing an ASP.NET Core SignalR app from Visual Studio. For more information, see SignalR service for Azure.
Publish the app
This article covers publishing using the tools in Visual Studio. Visual Studio Code users can use Azure CLI commands to publish apps to Azure. For more information, see Publish an ASP.NET Core app to Azure with command line tools.
Right-click on the project in Solution Explorer and select Publish.
Confirm that App Service and Create new are selected in the Pick a publish target dialog.
Select Create Profile from the Publish button drop down.
Enter the information described in the following table in the Create App Service dialog and select Create.
Item Description Name Unique name of the app. Subscription Azure subscription that the app uses. Resource Group Group of related resources to which the app belongs. Hosting Plan Pricing plan for the web app. Select Azure SignalR Service in the Service Dependencies section. Select the + button:
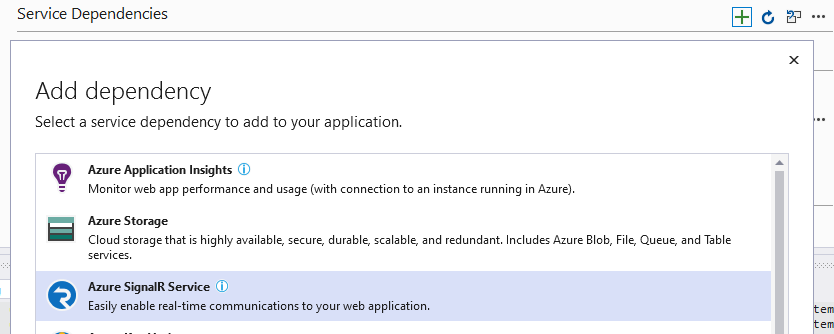
In the Azure SignalR Service dialog, select Create a new Azure SignalR Service instance.
Provide a Name, Resource Group, and Location. Return to the Azure SignalR Service dialog and select Add.
Visual Studio completes the following tasks:
- Creates a Publish Profile containing publish settings.
- Creates an Azure Web App with the provided details.
- Publishes the app.
- Launches a browser, which loads the web app.
The format of the app's URL is {APP SERVICE NAME}.azurewebsites.net. For example, an app named SignalRChatApp has a URL of https://signalrchatapp.azurewebsites.net.
If an HTTP 502.2 - Bad Gateway error occurs when deploying an app that targets a preview .NET release, see Deploy ASP.NET Core preview release to Azure App Service to resolve it.
Configure the app in Azure App Service
Note
This section only applies to apps not using the Azure SignalR Service.
If the app uses the Azure SignalR Service, the App Service doesn't require the configuration of WebSockets and session affinity, also called Application Request Routing (ARR) affinity, described in this section. Clients connect their WebSockets to the Azure SignalR Service, not directly to the app.
For apps hosted without the Azure SignalR Service, enable:
- WebSockets to allow the WebSockets transport to function. The default setting is Off.
- Session affinity (ARR affinity) to route requests from a user back to the same App Service instance. The default setting is On.
- In the Azure portal, navigate to the web app in App Services.
- Open Settings > Configuration.
- Set Web sockets to On.
- Verify that Session affinity is set to On.
App Service Plan limits
WebSockets and other transports are limited based on the App Service Plan selected. For more information, see the Azure Cloud Services limits and App Service limits sections of the Azure subscription and service limits, quotas, and constraints article.
Additional resources
Collaborate with us on GitHub
The source for this content can be found on GitHub, where you can also create and review issues and pull requests. For more information, see our contributor guide.
ASP.NET Core