Note
Access to this page requires authorization. You can try signing in or changing directories.
Access to this page requires authorization. You can try changing directories.
Note
This isn't the latest version of this article. For the current release, see the .NET 10 version of this article.
Warning
This version of ASP.NET Core is no longer supported. For more information, see the .NET and .NET Core Support Policy. For the current release, see the .NET 10 version of this article.
By Tim Deschryver and Rick Anderson
This tutorial teaches the basics of building a controller-based web API that uses a database. Another approach to creating APIs in ASP.NET Core is to create Minimal APIs. For help with choosing between Minimal APIs and controller-based APIs, see APIs overview. For a tutorial on creating a Minimal API, see Tutorial: Create a Minimal API with ASP.NET Core.
Overview
This tutorial creates the following API:
| API | Description | Request body | Response body |
|---|---|---|---|
GET /api/todoitems |
Get all to-do items | None | Array of to-do items |
GET /api/todoitems/{id} |
Get an item by ID | None | To-do item |
POST /api/todoitems |
Add a new item | To-do item | To-do item |
PUT /api/todoitems/{id} |
Update an existing item | To-do item | None |
DELETE /api/todoitems/{id} |
Delete an item | None | None |
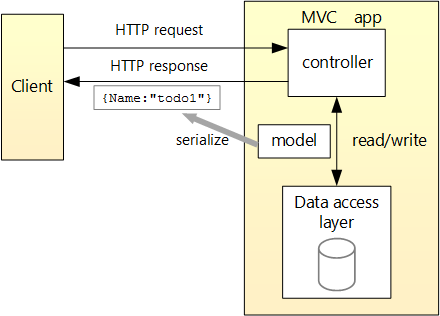
The following diagram shows the design of the app.
Prerequisites
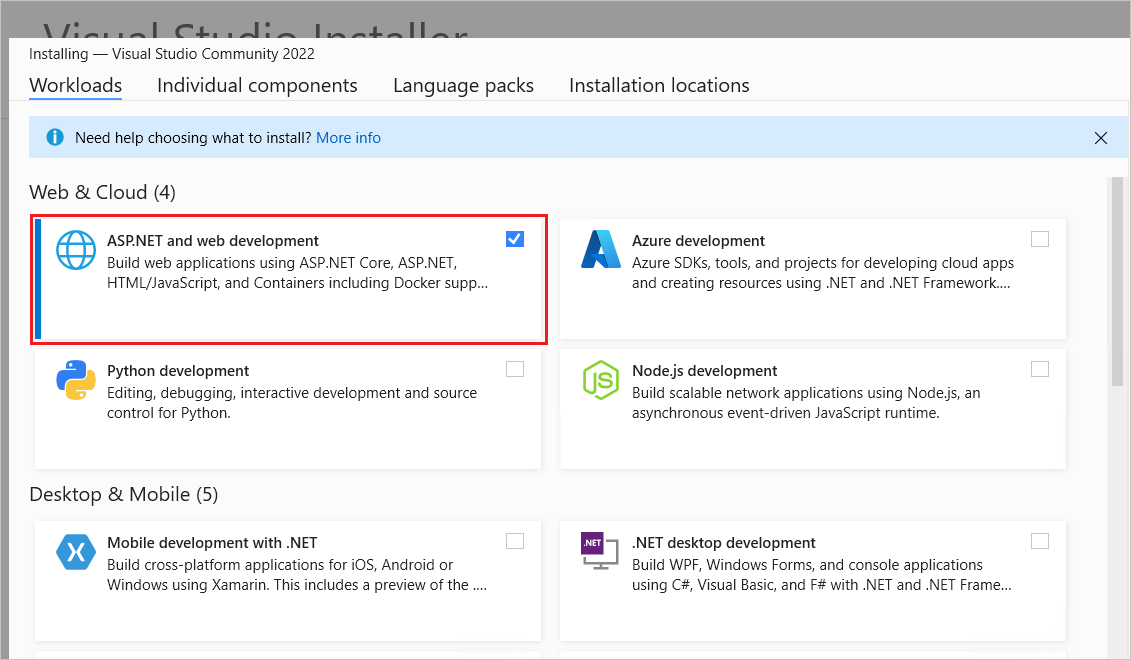
Visual Studio 2022 with the ASP.NET and web development workload.
Create a Web API project
- From the File menu, select New > Project.
- Enter Web API in the search box.
- Select the ASP.NET Core Web API template and select Next.
- In the Configure your new project dialog, name the project TodoApi and select Next.
- In the Additional information dialog:
- Confirm the Framework is .NET 9.0 (Standard Term Support).
- Confirm the checkbox for Enable OpenAPI support is checked.
- Confirm the checkbox for Use controllers (uncheck to use Minimal APIs) is checked.
- Select Create.
Add a NuGet package
A NuGet package must be added to support the database used in this tutorial.
- From the Tools menu, select NuGet Package Manager > Manage NuGet Packages for Solution.
- Select the Browse tab.
- Enter Microsoft.EntityFrameworkCore.InMemory in the search box, and then select
Microsoft.EntityFrameworkCore.InMemory. - Select the Project checkbox in the right pane and then select Install.
Note
For guidance on adding packages to .NET apps, see the articles under Install and manage packages at Package consumption workflow (NuGet documentation). Confirm correct package versions at NuGet.org.
Run the project
The project template creates a WeatherForecast API with support for OpenAPI.
Press Ctrl+F5 to run without the debugger.
Visual Studio displays the following dialog when a project is not yet configured to use SSL:

Select Yes if you trust the IIS Express SSL certificate.
The following dialog is displayed:

Select Yes if you agree to trust the development certificate.
For information on trusting the Firefox browser, see Firefox SEC_ERROR_INADEQUATE_KEY_USAGE certificate error.
Visual Studio launches a terminal window and displays the URL of the running app. The API is hosted at https://localhost:<port>, where <port> is a randomly chosen port number set at the project creation.
...
info: Microsoft.Hosting.Lifetime[14]
   Now listening on: https://localhost:7260
info: Microsoft.Hosting.Lifetime[14]
   Now listening on: http://localhost:7261
info: Microsoft.Hosting.Lifetime[0]
   Application started. Press Ctrl+C to shut down.
...
Ctrl+click the HTTPS URL in the output to test the web app in a browser. There's no endpoint at https://localhost:<port>, so the browser returns HTTP 404 Not Found.
Append /weatherforecast to the URL to test the WeatherForecast API.
The browser displays JSON similar to the following example:
[
    {
        "date": "2025-07-16",
        "temperatureC": 52,
        "temperatureF": 125,
        "summary": "Mild"
    },
    {
        "date": "2025-07-17",
        "temperatureC": 36,
        "temperatureF": 96,
        "summary": "Warm"
    },
    {
        "date": "2025-07-18",
        "temperatureC": 39,
        "temperatureF": 102,
        "summary": "Cool"
    },
    {
        "date": "2025-07-19",
        "temperatureC": 10,
        "temperatureF": 49,
        "summary": "Bracing"
    },
    {
        "date": "2025-07-20",
        "temperatureC": -1,
        "temperatureF": 31,
        "summary": "Chilly"
    }
]
Test the project
This tutorial uses Endpoints Explorer and .http files to test the API.
Add a model class
A model is a set of classes that represent the data that the app manages. The model for this app is the TodoItem class.
- In Solution Explorer, right-click the project. Select Add > New Folder. Name the folder
Models. - Right-click the
Modelsfolder and select Add > Class. Name the class TodoItem and select Add. - Replace the template code with the following:
namespace TodoApi.Models;

public class TodoItem
{
    public long Id { get; set; }
    public string? Name { get; set; }
    public bool IsComplete { get; set; }
}
The Id property functions as the unique key in a relational database.
Model classes can go anywhere in the project, but the Models folder is used by convention.
Add a database context
The database context is the main class that coordinates Entity Framework functionality for a data model. This class is created by deriving from the Microsoft.EntityFrameworkCore.DbContext class.
Right-click the
Modelsfolder and select Add > Class. Name the class TodoContext and click Add.Enter the following code:
using Microsoft.EntityFrameworkCore; namespace TodoApi.Models; public class TodoContext : DbContext { public TodoContext(DbContextOptions<TodoContext> options) : base(options) { } public DbSet<TodoItem> TodoItems { get; set; } = null!; }
Register the database context
In ASP.NET Core, services such as the DB context must be registered with the dependency injection (DI) container. The container provides the service to controllers.
Update Program.cs with the following highlighted code:
using Microsoft.EntityFrameworkCore;
using TodoApi.Models;
var builder = WebApplication.CreateBuilder(args);
builder.Services.AddControllers();
builder.Services.AddOpenApi();
builder.Services.AddDbContext<TodoContext>(opt =>
opt.UseInMemoryDatabase("TodoList"));
var app = builder.Build();
if (app.Environment.IsDevelopment())
{
app.MapOpenApi();
}
app.UseHttpsRedirection();
app.UseAuthorization();
app.MapControllers();
app.Run();
The preceding code:
- Adds
usingdirectives. - Adds the database context to the DI container.
- Specifies that the database context will use an in-memory database.
Scaffold a controller
Right-click the
Controllersfolder.Select Add > New Scaffolded Item.
Select API Controller with actions, using Entity Framework, and then select Add.
In the Add API Controller with actions, using Entity Framework dialog:
- Select TodoItem (TodoApi.Models) in the Model class.
- Select TodoContext (TodoApi.Models) in the Data context class.
- Select Add.
If the scaffolding operation fails, select Add to try scaffolding a second time.
This step adds the Microsoft.VisualStudio.Web.CodeGeneration.Design and Microsoft.EntityFrameworkCore.Tools NuGet packages to the project.
These packages are required for scaffolding.
The generated code:
- Marks the class with the
[ApiController]attribute. This attribute indicates that the controller responds to web API requests. For information about specific behaviors that the attribute enables, see Create web APIs with ASP.NET Core. - Uses DI to inject the database context (
TodoContext) into the controller. The database context is used in each of the CRUD methods in the controller.
The ASP.NET Core templates for:
- Controllers with views include
[action]in the route template. - API controllers don't include
[action]in the route template.
When the [action] token isn't in the route template, the action name (method name) isn't included in the endpoint. That is, the action's associated method name isn't used in the matching route.
Update the PostTodoItem create method
Update the return statement in the PostTodoItem to use the nameof operator:
[HttpPost]
public async Task<ActionResult<TodoItem>> PostTodoItem(TodoItem todoItem)
{
_context.TodoItems.Add(todoItem);
await _context.SaveChangesAsync();
// return CreatedAtAction("GetTodoItem", new { id = todoItem.Id }, todoItem);
return CreatedAtAction(nameof(GetTodoItem), new { id = todoItem.Id }, todoItem);
}
The preceding code is an HTTP POST method, as indicated by the [HttpPost] attribute. The method gets the value of the TodoItem from the body of the HTTP request.
For more information, see Attribute routing with Http[Verb] attributes.
The CreatedAtAction method:
- Returns an HTTP 201 status code if successful.
HTTP 201is the standard response for anHTTP POSTmethod that creates a new resource on the server. - Adds a Location header to the response. The
Locationheader specifies the URI of the newly created to-do item. For more information, see 10.2.2 201 Created. - References the
GetTodoItemaction to create theLocationheader's URI. The C#nameofkeyword is used to avoid hard-coding the action name in theCreatedAtActioncall.
Test PostTodoItem
Select View > Other Windows > Endpoints Explorer.
Right-click the POST endpoint and select Generate request.

A new file is created in the project folder named
TodoApi.http, with contents similar to the following example:@TodoApi_HostAddress = https://localhost:49738 POST {{TodoApi_HostAddress}}/api/todoitems Content-Type: application/json { //TodoItem } ###- The first line creates a variable that is used for all of the endpoints.
- The next line defines a POST request.
- The lines after the POST request line defines the headers, and a placeholder for the request body.
- The triple hashtag (
###) line is a request delimiter: what comes after it is for a different request.
The POST request expects a
TodoItem. To define the todo, replace the//TodoItemcomment with the following JSON:{ "name": "walk dog", "isComplete": true }The TodoApi.http file should now look like the following example, but with your port number:
@TodoApi_HostAddress = https://localhost:7260 Post {{TodoApi_HostAddress}}/api/todoitems Content-Type: application/json { "name": "walk dog", "isComplete": true } ###Run the app.
Select the Send request link that is above the
POSTrequest line.
The POST request is sent to the app and the response is displayed in the Response pane.


Test the location header URI
Test the app by calling the GET endpoints from a browser or by using Endpoints Explorer. The following steps are for Endpoints Explorer.
In Endpoints Explorer, right-click the first GET endpoint, and select Generate request.
The following content is added to the
TodoApi.httpfile:GET {{TodoApi_HostAddress}}/api/todoitems ###Select the Send request link that is above the new
GETrequest line.The GET request is sent to the app and the response is displayed in the Response pane.
The response body is similar to the following JSON:
[ { "id": 1, "name": "walk dog", "isComplete": true } ]In Endpoints Explorer, right-click the
/api/todoitems/{id}GET endpoint and select Generate request. The following content is added to theTodoApi.httpfile:@id=0 GET {{TodoApi_HostAddress}}/api/todoitems/{{id}} ###Assign
{@id}to1(instead of0).Select the Send request link that is above the new GET request line.
The GET request is sent to the app and the response is displayed in the Response pane.
The response body is similar to the following JSON:
{ "id": 1, "name": "walk dog", "isComplete": true }
Examine the GET methods
Two GET endpoints are implemented:
GET /api/todoitemsGET /api/todoitems/{id}
The previous section showed an example of the /api/todoitems/{id} route.
Follow the POST instructions to add another todo item, and then test the /api/todoitems route using Swagger.
This app uses an in-memory database. If the app is stopped and started, the preceding GET request doesn't return any data. If no data is returned, POST data to the app.
Routing and URL paths
The [HttpGet] attribute denotes a method that responds to an HTTP GET request. The URL path for each method is constructed as follows:
Start with the template string in the controller's
Routeattribute:[Route("api/[controller]")] [ApiController] public class TodoItemsController : ControllerBaseReplace
[controller]with the name of the controller, which by convention is the controller class name minus the "Controller" suffix. For this sample, the controller class name is TodoItemsController, so the controller name is "TodoItems". ASP.NET Core routing is case insensitive.If the
[HttpGet]attribute has a route template (for example,[HttpGet("products")]), append that to the path. This sample doesn't use a template. For more information, see Attribute routing with Http[Verb] attributes.
In the following GetTodoItem method, "{id}" is a placeholder variable for the unique identifier of the to-do item. When GetTodoItem is invoked, the value of "{id}" in the URL is provided to the method in its id parameter.
[HttpGet("{id}")]
public async Task<ActionResult<TodoItem>> GetTodoItem(long id)
{
var todoItem = await _context.TodoItems.FindAsync(id);
if (todoItem == null)
{
return NotFound();
}
return todoItem;
}
Return values
The return type of the GetTodoItems and GetTodoItem methods is ActionResult<T> type. ASP.NET Core automatically serializes the object to JSON and writes the JSON into the body of the response message. The response code for this return type is 200 OK, assuming there are no unhandled exceptions. Unhandled exceptions are translated into 5xx errors.
ActionResult return types can represent a wide range of HTTP status codes. For example, GetTodoItem can return two different status values:
- If no item matches the requested ID, the method returns a 404 status NotFound error code.
- Otherwise, the method returns 200 with a JSON response body. Returning
itemresults in anHTTP 200response.
The PutTodoItem method
Examine the PutTodoItem method:
[HttpPut("{id}")]
public async Task<IActionResult> PutTodoItem(long id, TodoItem todoItem)
{
if (id != todoItem.Id)
{
return BadRequest();
}
_context.Entry(todoItem).State = EntityState.Modified;
try
{
await _context.SaveChangesAsync();
}
catch (DbUpdateConcurrencyException)
{
if (!TodoItemExists(id))
{
return NotFound();
}
else
{
throw;
}
}
return NoContent();
}
PutTodoItem is similar to PostTodoItem, except it uses HTTP PUT. The response is 204 (No Content). According to the HTTP specification, a PUT request requires the client to send the entire updated entity, not just the changes. To support partial updates, use HTTP PATCH.
Test the PutTodoItem method
This sample uses an in-memory database that must be initialized each time the app is started. There must be an item in the database before you make a PUT call. Call GET to ensure there's an item in the database before making a PUT call.
Use the PUT method to update the TodoItem that has Id = 1 and set its name to "feed fish". Note the response is HTTP 204 No Content.
In Endpoints Explorer, right-click the PUT endpoint, and select Generate request.
The following content is added to the
TodoApi.httpfile:PUT {{TodoApi_HostAddress}}/api/todoitems/{{id}} Content-Type: application/json { //TodoItem } ###In the PUT request line, replace
{{id}}with1.Replace the
//TodoItemplaceholder with the following lines:PUT {{TodoApi_HostAddress}}/api/todoitems/1 Content-Type: application/json { "id": 1, "name": "feed fish", "isComplete": false }Select the Send request link that is above the new PUT request line.
The PUT request is sent to the app and the response is displayed in the Response pane. The response body is empty, and the status code is 204.
The DeleteTodoItem method
Examine the DeleteTodoItem method:
[HttpDelete("{id}")]
public async Task<IActionResult> DeleteTodoItem(long id)
{
var todoItem = await _context.TodoItems.FindAsync(id);
if (todoItem == null)
{
return NotFound();
}
_context.TodoItems.Remove(todoItem);
await _context.SaveChangesAsync();
return NoContent();
}
Test the DeleteTodoItem method
Use the DELETE method to delete the TodoItem that has Id = 1. Note the response is HTTP 204 No Content.
In Endpoints Explorer, right-click the DELETE endpoint and select Generate request.
A DELETE request is added to
TodoApi.http.Replace
{{id}}in the DELETE request line with1. The DELETE request should look like the following example:DELETE {{TodoApi_HostAddress}}/api/todoitems/{{id}} ###Select the Send request link for the DELETE request.
The DELETE request is sent to the app and the response is displayed in the Response pane. The response body is empty, and the status code is 204.
Test with other tools
There are many other tools that can be used to test web APIs, for example:
Prevent over-posting
Currently the sample app exposes the entire TodoItem object. Production apps typically limit the data that's input and returned using a subset of the model. There are multiple reasons behind this, and security is a major one. The subset of a model is usually referred to as a Data Transfer Object (DTO), input model, or view model. DTO is used in this tutorial.
A DTO may be used to:
- Prevent over-posting.
- Hide properties that clients are not supposed to view.
- Omit some properties in order to reduce payload size.
- Flatten object graphs that contain nested objects. Flattened object graphs can be more convenient for clients.
To demonstrate the DTO approach, update the TodoItem class to include a secret field:
namespace TodoApi.Models;
public class TodoItem
{
public long Id { get; set; }
public string? Name { get; set; }
public bool IsComplete { get; set; }
public string? Secret { get; set; }
}
The secret field needs to be hidden from this app, but an administrative app could choose to expose it.
Verify you can post and get the secret field.
Create a DTO model in a Models/TodoItemsDTO.cs file:
namespace TodoApi.Models;
public class TodoItemDTO
{
public long Id { get; set; }
public string? Name { get; set; }
public bool IsComplete { get; set; }
}
Update the TodoItemsController to use TodoItemDTO:
using Microsoft.AspNetCore.Mvc;
using Microsoft.EntityFrameworkCore;
using TodoApi.Models;
namespace TodoApi.Controllers;
[Route("api/[controller]")]
[ApiController]
public class TodoItemsController : ControllerBase
{
private readonly TodoContext _context;
public TodoItemsController(TodoContext context)
{
_context = context;
}
// GET: api/TodoItems
[HttpGet]
public async Task<ActionResult<IEnumerable<TodoItemDTO>>> GetTodoItems()
{
return await _context.TodoItems
.Select(x => ItemToDTO(x))
.ToListAsync();
}
// GET: api/TodoItems/5
// <snippet_GetByID>
[HttpGet("{id}")]
public async Task<ActionResult<TodoItemDTO>> GetTodoItem(long id)
{
var todoItem = await _context.TodoItems.FindAsync(id);
if (todoItem == null)
{
return NotFound();
}
return ItemToDTO(todoItem);
}
// </snippet_GetByID>
// PUT: api/TodoItems/5
// To protect from overposting attacks, see https://go.microsoft.com/fwlink/?linkid=2123754
// <snippet_Update>
[HttpPut("{id}")]
public async Task<IActionResult> PutTodoItem(long id, TodoItemDTO todoDTO)
{
if (id != todoDTO.Id)
{
return BadRequest();
}
var todoItem = await _context.TodoItems.FindAsync(id);
if (todoItem == null)
{
return NotFound();
}
todoItem.Name = todoDTO.Name;
todoItem.IsComplete = todoDTO.IsComplete;
try
{
await _context.SaveChangesAsync();
}
catch (DbUpdateConcurrencyException) when (!TodoItemExists(id))
{
return NotFound();
}
return NoContent();
}
// </snippet_Update>
// POST: api/TodoItems
// To protect from overposting attacks, see https://go.microsoft.com/fwlink/?linkid=2123754
// <snippet_Create>
[HttpPost]
public async Task<ActionResult<TodoItemDTO>> PostTodoItem(TodoItemDTO todoDTO)
{
var todoItem = new TodoItem
{
IsComplete = todoDTO.IsComplete,
Name = todoDTO.Name
};
_context.TodoItems.Add(todoItem);
await _context.SaveChangesAsync();
return CreatedAtAction(
nameof(GetTodoItem),
new { id = todoItem.Id },
ItemToDTO(todoItem));
}
// </snippet_Create>
// DELETE: api/TodoItems/5
[HttpDelete("{id}")]
public async Task<IActionResult> DeleteTodoItem(long id)
{
var todoItem = await _context.TodoItems.FindAsync(id);
if (todoItem == null)
{
return NotFound();
}
_context.TodoItems.Remove(todoItem);
await _context.SaveChangesAsync();
return NoContent();
}
private bool TodoItemExists(long id)
{
return _context.TodoItems.Any(e => e.Id == id);
}
private static TodoItemDTO ItemToDTO(TodoItem todoItem) =>
new TodoItemDTO
{
Id = todoItem.Id,
Name = todoItem.Name,
IsComplete = todoItem.IsComplete
};
}
Verify you can't post or get the secret field.
Call the web API with JavaScript
See Tutorial: Call an ASP.NET Core web API with JavaScript.
Web API video series
See Video: Beginner's Series to: Web APIs.
Enterprise web app patterns
For guidance on creating a reliable, secure, performant, testable, and scalable ASP.NET Core app, see Enterprise web app patterns. A complete production-quality sample web app that implements the patterns is available.
Add authentication support to a web API
ASP.NET Core Identity adds user interface (UI) login functionality to ASP.NET Core web apps. To secure web APIs and SPAs, use one of the following:
- Microsoft Entra ID
- Azure Active Directory B2C (Azure AD B2C)
- Duende Identity Server
Duende Identity Server is an OpenID Connect and OAuth 2.0 framework for ASP.NET Core. Duende Identity Server enables the following security features:
- Authentication as a Service (AaaS)
- Single sign-on/off (SSO) over multiple application types
- Access control for APIs
- Federation Gateway
Important
Duende Software might require you to pay a license fee for production use of Duende Identity Server. For more information, see Migrate from ASP.NET Core in .NET 5 to .NET 6.
For more information, see the Duende Identity Server documentation (Duende Software website).
Publish to Azure
For information on deploying to Azure, see Quickstart: Deploy an ASP.NET web app.
Additional resources
View or download sample code for this tutorial. See how to download.
For more information, see the following resources:
- Create web APIs with ASP.NET Core
- Tutorial: Create a Minimal API with ASP.NET Core
- Use the generated OpenAPI documents
- ASP.NET Core web API documentation with Swagger / OpenAPI
- Razor Pages with Entity Framework Core in ASP.NET Core - Tutorial 1 of 8
- Routing to controller actions in ASP.NET Core
- Controller action return types in ASP.NET Core web API
- Deploy ASP.NET Core apps to Azure App Service
- Host and deploy ASP.NET Core
- Create a web API with ASP.NET Core
This tutorial teaches the basics of building a controller-based web API that uses a database. Another approach to creating APIs in ASP.NET Core is to create Minimal APIs. For help with choosing between Minimal APIs and controller-based APIs, see APIs overview. For a tutorial on creating a Minimal API, see Tutorial: Create a Minimal API with ASP.NET Core.
Overview
This tutorial creates the following API:
| API | Description | Request body | Response body |
|---|---|---|---|
GET /api/todoitems |
Get all to-do items | None | Array of to-do items |
GET /api/todoitems/{id} |
Get an item by ID | None | To-do item |
POST /api/todoitems |
Add a new item | To-do item | To-do item |
PUT /api/todoitems/{id} |
Update an existing item | To-do item | None |
DELETE /api/todoitems/{id} |
Delete an item | None | None |
The following diagram shows the design of the app.
Prerequisites
Visual Studio 2022 with the ASP.NET and web development workload.
Create a web project
- From the File menu, select New > Project.
- Enter Web API in the search box.
- Select the ASP.NET Core Web API template and select Next.
- In the Configure your new project dialog, name the project TodoApi and select Next.
- In the Additional information dialog:
- Confirm the Framework is .NET 8.0 (Long Term Support).
- Confirm the checkbox for Use controllers(uncheck to use Minimal APIs) is checked.
- Confirm the checkbox for Enable OpenAPI support is checked.
- Select Create.
Add a NuGet package
A NuGet package must be added to support the database used in this tutorial.
- From the Tools menu, select NuGet Package Manager > Manage NuGet Packages for Solution.
- Select the Browse tab.
- Enter Microsoft.EntityFrameworkCore.InMemory in the search box, and then select
Microsoft.EntityFrameworkCore.InMemory. - Select the Project checkbox in the right pane and then select Install.
Note
For guidance on adding packages to .NET apps, see the articles under Install and manage packages at Package consumption workflow (NuGet documentation). Confirm correct package versions at NuGet.org.
Test the project
The project template creates a WeatherForecast API with support for Swagger.
Press Ctrl+F5 to run without the debugger.
Visual Studio displays the following dialog when a project is not yet configured to use SSL:
Select Yes if you trust the IIS Express SSL certificate.
The following dialog is displayed:
Select Yes if you agree to trust the development certificate.
For information on trusting the Firefox browser, see Firefox SEC_ERROR_INADEQUATE_KEY_USAGE certificate error.
Visual Studio launches the default browser and navigates to https://localhost:<port>/swagger/index.html, where <port> is a randomly chosen port number set at the project creation.
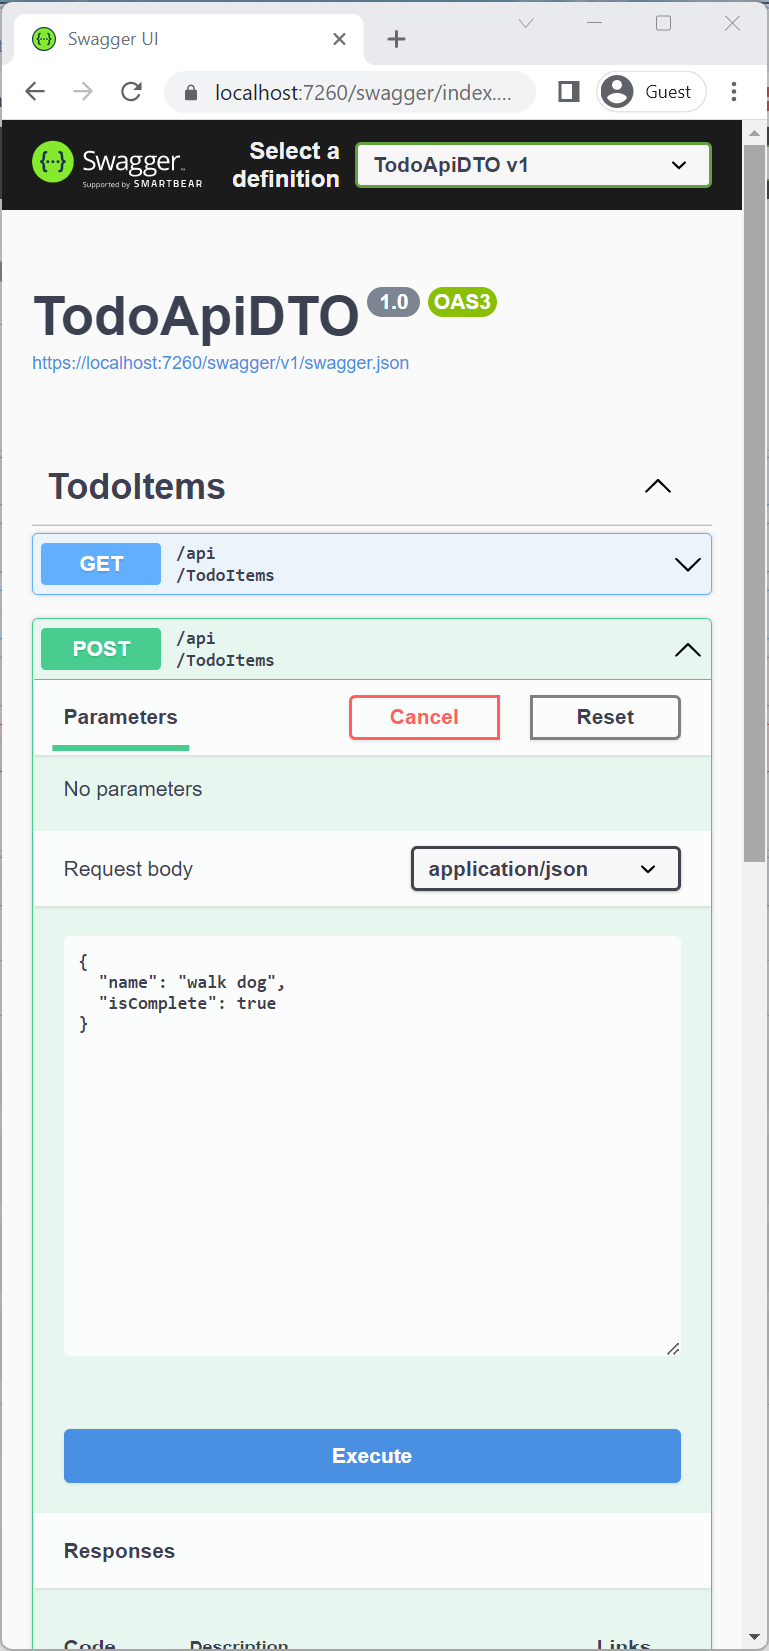
The Swagger page /swagger/index.html is displayed. Select GET > Try it out > Execute. The page displays:
- The Curl command to test the WeatherForecast API.
- The URL to test the WeatherForecast API.
- The response code, body, and headers.
- A drop-down list box with media types and the example value and schema.
If the Swagger page doesn't appear, see this GitHub issue.
Swagger is used to generate useful documentation and help pages for web APIs. This tutorial uses Swagger to test the app. For more information on Swagger, see ASP.NET Core web API documentation with Swagger / OpenAPI.
Copy and paste the Request URL in the browser: https://localhost:<port>/weatherforecast
JSON similar to the following example is returned:
[
{
"date": "2019-07-16T19:04:05.7257911-06:00",
"temperatureC": 52,
"temperatureF": 125,
"summary": "Mild"
},
{
"date": "2019-07-17T19:04:05.7258461-06:00",
"temperatureC": 36,
"temperatureF": 96,
"summary": "Warm"
},
{
"date": "2019-07-18T19:04:05.7258467-06:00",
"temperatureC": 39,
"temperatureF": 102,
"summary": "Cool"
},
{
"date": "2019-07-19T19:04:05.7258471-06:00",
"temperatureC": 10,
"temperatureF": 49,
"summary": "Bracing"
},
{
"date": "2019-07-20T19:04:05.7258474-06:00",
"temperatureC": -1,
"temperatureF": 31,
"summary": "Chilly"
}
]
Add a model class
A model is a set of classes that represent the data that the app manages. The model for this app is the TodoItem class.
- In Solution Explorer, right-click the project. Select Add > New Folder. Name the folder
Models. - Right-click the
Modelsfolder and select Add > Class. Name the class TodoItem and select Add. - Replace the template code with the following:
namespace TodoApi.Models;

public class TodoItem
{
    public long Id { get; set; }
    public string? Name { get; set; }
    public bool IsComplete { get; set; }
}
The Id property functions as the unique key in a relational database.
Model classes can go anywhere in the project, but the Models folder is used by convention.
Add a database context
The database context is the main class that coordinates Entity Framework functionality for a data model. This class is created by deriving from the Microsoft.EntityFrameworkCore.DbContext class.
- Right-click the
Modelsfolder and select Add > Class. Name the class TodoContext and click Add.
Enter the following code:
using Microsoft.EntityFrameworkCore;

namespace TodoApi.Models;

public class TodoContext : DbContext
{
    public TodoContext(DbContextOptions<TodoContext> options)
        : base(options)
    {
    }

    public DbSet<TodoItem> TodoItems { get; set; } = null!;
}
Register the database context
In ASP.NET Core, services such as the DB context must be registered with the dependency injection (DI) container. The container provides the service to controllers.
Update Program.cs with the following highlighted code:
using Microsoft.EntityFrameworkCore;
using TodoApi.Models;
var builder = WebApplication.CreateBuilder(args);
builder.Services.AddControllers();
builder.Services.AddDbContext<TodoContext>(opt =>
opt.UseInMemoryDatabase("TodoList"));
builder.Services.AddEndpointsApiExplorer();
builder.Services.AddSwaggerGen();
var app = builder.Build();
if (app.Environment.IsDevelopment())
{
app.UseSwagger();
app.UseSwaggerUI();
}
app.UseHttpsRedirection();
app.UseAuthorization();
app.MapControllers();
app.Run();
The preceding code:
- Adds
usingdirectives. - Adds the database context to the DI container.
- Specifies that the database context will use an in-memory database.
Scaffold a controller
Right-click the
Controllersfolder.Select Add > New Scaffolded Item.
Select API Controller with actions, using Entity Framework, and then select Add.
In the Add API Controller with actions, using Entity Framework dialog:
- Select TodoItem (TodoApi.Models) in the Model class.
- Select TodoContext (TodoApi.Models) in the Data context class.
- Select Add.
If the scaffolding operation fails, select Add to try scaffolding a second time.
The generated code:
- Marks the class with the
[ApiController]attribute. This attribute indicates that the controller responds to web API requests. For information about specific behaviors that the attribute enables, see Create web APIs with ASP.NET Core. - Uses DI to inject the database context (
TodoContext) into the controller. The database context is used in each of the CRUD methods in the controller.
The ASP.NET Core templates for:
- Controllers with views include
[action]in the route template. - API controllers don't include
[action]in the route template.
When the [action] token isn't in the route template, the action name (method name) isn't included in the endpoint. That is, the action's associated method name isn't used in the matching route.
Update the PostTodoItem create method
Update the return statement in the PostTodoItem to use the nameof operator:
[HttpPost]
public async Task<ActionResult<TodoItem>> PostTodoItem(TodoItem todoItem)
{
_context.TodoItems.Add(todoItem);
await _context.SaveChangesAsync();
// return CreatedAtAction("GetTodoItem", new { id = todoItem.Id }, todoItem);
return CreatedAtAction(nameof(GetTodoItem), new { id = todoItem.Id }, todoItem);
}
The preceding code is an HTTP POST method, as indicated by the [HttpPost] attribute. The method gets the value of the TodoItem from the body of the HTTP request.
For more information, see Attribute routing with Http[Verb] attributes.
The CreatedAtAction method:
- Returns an HTTP 201 status code if successful.
HTTP 201is the standard response for anHTTP POSTmethod that creates a new resource on the server. - Adds a Location header to the response. The
Locationheader specifies the URI of the newly created to-do item. For more information, see 10.2.2 201 Created. - References the
GetTodoItemaction to create theLocationheader's URI. The C#nameofkeyword is used to avoid hard-coding the action name in theCreatedAtActioncall.
Test PostTodoItem
Press Ctrl+F5 to run the app.
In the Swagger browser window, select POST /api/TodoItems, and then select Try it out.
In the Request body input window, update the JSON. For example,
{ "name": "walk dog", "isComplete": true }Select Execute
Test the location header URI
In the preceding POST, the Swagger UI shows the location header under Response headers. For example, location: https://localhost:7260/api/TodoItems/1. The location header shows the URI to the created resource.
To test the location header:
In the Swagger browser window, select GET /api/TodoItems/{id}, and then select Try it out.
Enter
1in theidinput box, and then select Execute.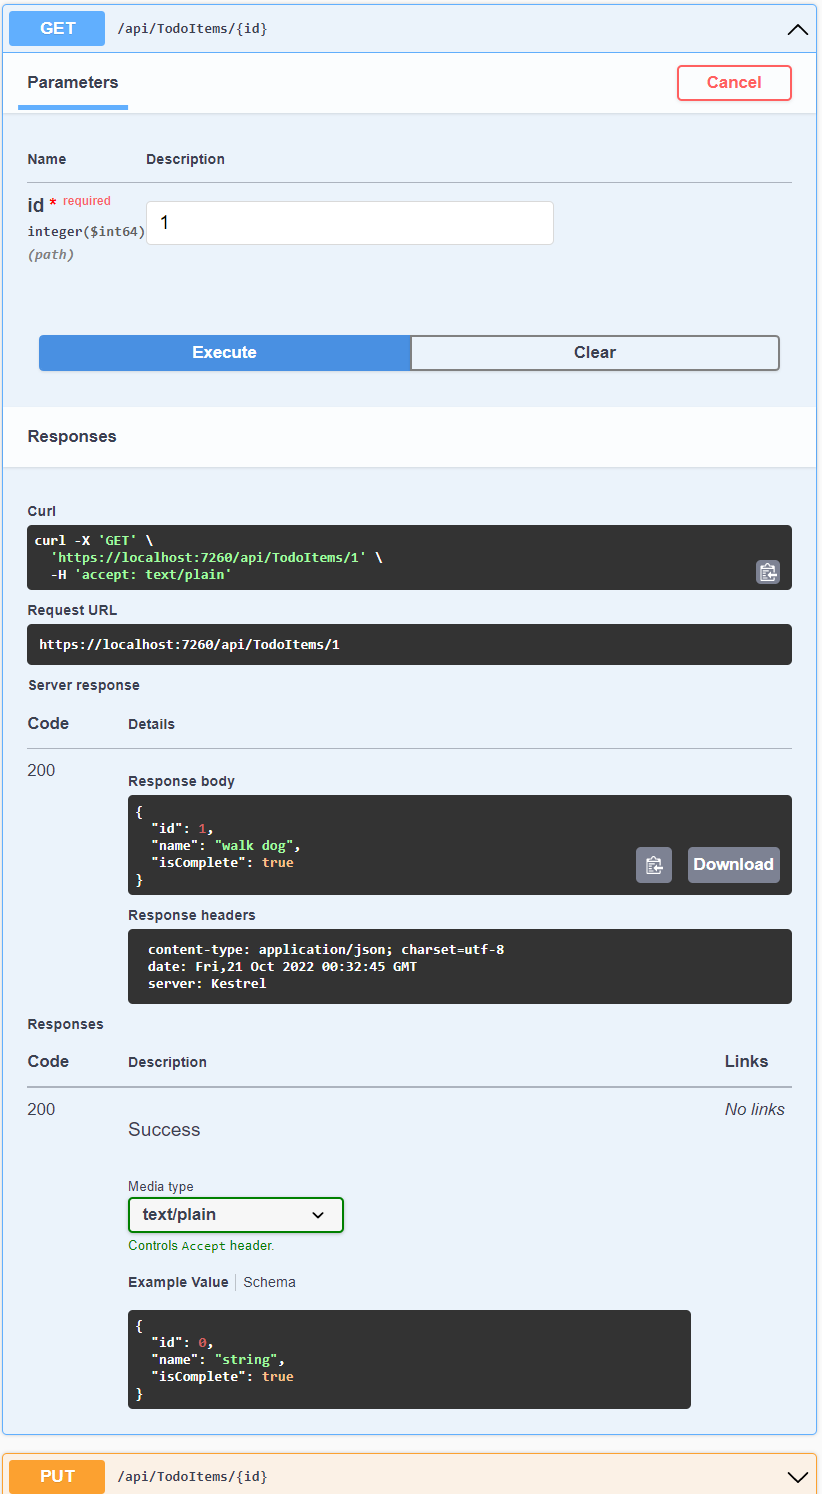
Examine the GET methods
Two GET endpoints are implemented:
GET /api/todoitemsGET /api/todoitems/{id}
The previous section showed an example of the /api/todoitems/{id} route.
Follow the POST instructions to add another todo item, and then test the /api/todoitems route using Swagger.
This app uses an in-memory database. If the app is stopped and started, the preceding GET request doesn't return any data. If no data is returned, POST data to the app.
Routing and URL paths
The [HttpGet] attribute denotes a method that responds to an HTTP GET request. The URL path for each method is constructed as follows:
Start with the template string in the controller's
Routeattribute:[Route("api/[controller]")] [ApiController] public class TodoItemsController : ControllerBaseReplace
[controller]with the name of the controller, which by convention is the controller class name minus the "Controller" suffix. For this sample, the controller class name is TodoItemsController, so the controller name is "TodoItems". ASP.NET Core routing is case insensitive.If the
[HttpGet]attribute has a route template (for example,[HttpGet("products")]), append that to the path. This sample doesn't use a template. For more information, see Attribute routing with Http[Verb] attributes.
In the following GetTodoItem method, "{id}" is a placeholder variable for the unique identifier of the to-do item. When GetTodoItem is invoked, the value of "{id}" in the URL is provided to the method in its id parameter.
[HttpGet("{id}")]
public async Task<ActionResult<TodoItem>> GetTodoItem(long id)
{
var todoItem = await _context.TodoItems.FindAsync(id);
if (todoItem == null)
{
return NotFound();
}
return todoItem;
}
Return values
The return type of the GetTodoItems and GetTodoItem methods is ActionResult<T> type. ASP.NET Core automatically serializes the object to JSON and writes the JSON into the body of the response message. The response code for this return type is 200 OK, assuming there are no unhandled exceptions. Unhandled exceptions are translated into 5xx errors.
ActionResult return types can represent a wide range of HTTP status codes. For example, GetTodoItem can return two different status values:
- If no item matches the requested ID, the method returns a 404 status NotFound error code.
- Otherwise, the method returns 200 with a JSON response body. Returning
itemresults in anHTTP 200response.
The PutTodoItem method
Examine the PutTodoItem method:
[HttpPut("{id}")]
public async Task<IActionResult> PutTodoItem(long id, TodoItem todoItem)
{
if (id != todoItem.Id)
{
return BadRequest();
}
_context.Entry(todoItem).State = EntityState.Modified;
try
{
await _context.SaveChangesAsync();
}
catch (DbUpdateConcurrencyException)
{
if (!TodoItemExists(id))
{
return NotFound();
}
else
{
throw;
}
}
return NoContent();
}
PutTodoItem is similar to PostTodoItem, except it uses HTTP PUT. The response is 204 (No Content). According to the HTTP specification, a PUT request requires the client to send the entire updated entity, not just the changes. To support partial updates, use HTTP PATCH.
Test the PutTodoItem method
This sample uses an in-memory database that must be initialized each time the app is started. There must be an item in the database before you make a PUT call. Call GET to ensure there's an item in the database before making a PUT call.
Using the Swagger UI, use the PUT button to update the TodoItem that has Id = 1 and set its name to "feed fish". Note the response is HTTP 204 No Content.
The DeleteTodoItem method
Examine the DeleteTodoItem method:
[HttpDelete("{id}")]
public async Task<IActionResult> DeleteTodoItem(long id)
{
var todoItem = await _context.TodoItems.FindAsync(id);
if (todoItem == null)
{
return NotFound();
}
_context.TodoItems.Remove(todoItem);
await _context.SaveChangesAsync();
return NoContent();
}
Test the DeleteTodoItem method
Use the Swagger UI to delete the TodoItem that has Id = 1. Note the response is HTTP 204 No Content.
Test with other tools
There are many other tools that can be used to test web APIs, for example:
- Visual Studio Endpoints Explorer and .http files
- http-repl
- curl. Swagger uses
curland shows thecurlcommands it submits. - Fiddler
For more information, see:
Prevent over-posting
Currently the sample app exposes the entire TodoItem object. Production apps typically limit the data that's input and returned using a subset of the model. There are multiple reasons behind this, and security is a major one. The subset of a model is usually referred to as a Data Transfer Object (DTO), input model, or view model. DTO is used in this tutorial.
A DTO may be used to:
- Prevent over-posting.
- Hide properties that clients are not supposed to view.
- Omit some properties in order to reduce payload size.
- Flatten object graphs that contain nested objects. Flattened object graphs can be more convenient for clients.
To demonstrate the DTO approach, update the TodoItem class to include a secret field:
namespace TodoApi.Models
{
public class TodoItem
{
public long Id { get; set; }
public string? Name { get; set; }
public bool IsComplete { get; set; }
public string? Secret { get; set; }
}
}
The secret field needs to be hidden from this app, but an administrative app could choose to expose it.
Verify you can post and get the secret field.
Create a DTO model:
namespace TodoApi.Models;
public class TodoItemDTO
{
public long Id { get; set; }
public string? Name { get; set; }
public bool IsComplete { get; set; }
}
Update the TodoItemsController to use TodoItemDTO:
using Microsoft.AspNetCore.Mvc;
using Microsoft.EntityFrameworkCore;
using TodoApi.Models;
namespace TodoApi.Controllers;
[Route("api/[controller]")]
[ApiController]
public class TodoItemsController : ControllerBase
{
private readonly TodoContext _context;
public TodoItemsController(TodoContext context)
{
_context = context;
}
// GET: api/TodoItems
[HttpGet]
public async Task<ActionResult<IEnumerable<TodoItemDTO>>> GetTodoItems()
{
return await _context.TodoItems
.Select(x => ItemToDTO(x))
.ToListAsync();
}
// GET: api/TodoItems/5
// <snippet_GetByID>
[HttpGet("{id}")]
public async Task<ActionResult<TodoItemDTO>> GetTodoItem(long id)
{
var todoItem = await _context.TodoItems.FindAsync(id);
if (todoItem == null)
{
return NotFound();
}
return ItemToDTO(todoItem);
}
// </snippet_GetByID>
// PUT: api/TodoItems/5
// To protect from overposting attacks, see https://go.microsoft.com/fwlink/?linkid=2123754
// <snippet_Update>
[HttpPut("{id}")]
public async Task<IActionResult> PutTodoItem(long id, TodoItemDTO todoDTO)
{
if (id != todoDTO.Id)
{
return BadRequest();
}
var todoItem = await _context.TodoItems.FindAsync(id);
if (todoItem == null)
{
return NotFound();
}
todoItem.Name = todoDTO.Name;
todoItem.IsComplete = todoDTO.IsComplete;
try
{
await _context.SaveChangesAsync();
}
catch (DbUpdateConcurrencyException) when (!TodoItemExists(id))
{
return NotFound();
}
return NoContent();
}
// </snippet_Update>
// POST: api/TodoItems
// To protect from overposting attacks, see https://go.microsoft.com/fwlink/?linkid=2123754
// <snippet_Create>
[HttpPost]
public async Task<ActionResult<TodoItemDTO>> PostTodoItem(TodoItemDTO todoDTO)
{
var todoItem = new TodoItem
{
IsComplete = todoDTO.IsComplete,
Name = todoDTO.Name
};
_context.TodoItems.Add(todoItem);
await _context.SaveChangesAsync();
return CreatedAtAction(
nameof(GetTodoItem),
new { id = todoItem.Id },
ItemToDTO(todoItem));
}
// </snippet_Create>
// DELETE: api/TodoItems/5
[HttpDelete("{id}")]
public async Task<IActionResult> DeleteTodoItem(long id)
{
var todoItem = await _context.TodoItems.FindAsync(id);
if (todoItem == null)
{
return NotFound();
}
_context.TodoItems.Remove(todoItem);
await _context.SaveChangesAsync();
return NoContent();
}
private bool TodoItemExists(long id)
{
return _context.TodoItems.Any(e => e.Id == id);
}
private static TodoItemDTO ItemToDTO(TodoItem todoItem) =>
new TodoItemDTO
{
Id = todoItem.Id,
Name = todoItem.Name,
IsComplete = todoItem.IsComplete
};
}
Verify you can't post or get the secret field.
Call the web API with JavaScript
See Tutorial: Call an ASP.NET Core web API with JavaScript.
Web API video series
See Video: Beginner's Series to: Web APIs.
Enterprise web app patterns
For guidance on creating a reliable, secure, performant, testable, and scalable ASP.NET Core app, see Enterprise web app patterns. A complete production-quality sample web app that implements the patterns is available.
Add authentication support to a web API
ASP.NET Core Identity adds user interface (UI) login functionality to ASP.NET Core web apps. To secure web APIs and SPAs, use one of the following:
- Microsoft Entra ID
- Azure Active Directory B2C (Azure AD B2C)
- Duende Identity Server
Duende Identity Server is an OpenID Connect and OAuth 2.0 framework for ASP.NET Core. Duende Identity Server enables the following security features:
- Authentication as a Service (AaaS)
- Single sign-on/off (SSO) over multiple application types
- Access control for APIs
- Federation Gateway
Important
Duende Software might require you to pay a license fee for production use of Duende Identity Server. For more information, see Migrate from ASP.NET Core in .NET 5 to .NET 6.
For more information, see the Duende Identity Server documentation (Duende Software website).
Publish to Azure
For information on deploying to Azure, see Quickstart: Deploy an ASP.NET web app.
Additional resources
View or download sample code for this tutorial. See how to download.
For more information, see the following resources:
- Create web APIs with ASP.NET Core
- Tutorial: Create a Minimal API with ASP.NET Core
- ASP.NET Core web API documentation with Swagger / OpenAPI
- Razor Pages with Entity Framework Core in ASP.NET Core - Tutorial 1 of 8
- Routing to controller actions in ASP.NET Core
- Controller action return types in ASP.NET Core web API
- Deploy ASP.NET Core apps to Azure App Service
- Host and deploy ASP.NET Core
- Create a web API with ASP.NET Core
This tutorial teaches the basics of building a controller-based web API that uses a database. Another approach to creating APIs in ASP.NET Core is to create Minimal APIs. For help with choosing between Minimal APIs and controller-based APIs, see APIs overview. For a tutorial on creating a Minimal API, see Tutorial: Create a Minimal API with ASP.NET Core.
Overview
This tutorial creates the following API:
| API | Description | Request body | Response body |
|---|---|---|---|
GET /api/todoitems |
Get all to-do items | None | Array of to-do items |
GET /api/todoitems/{id} |
Get an item by ID | None | To-do item |
POST /api/todoitems |
Add a new item | To-do item | To-do item |
PUT /api/todoitems/{id} |
Update an existing item | To-do item | None |
DELETE /api/todoitems/{id} |
Delete an item | None | None |
The following diagram shows the design of the app.
Prerequisites
Visual Studio 2022 with the ASP.NET and web development workload.
Create a web project
- From the File menu, select New > Project.
- Enter Web API in the search box.
- Select the ASP.NET Core Web API template and select Next.
- In the Configure your new project dialog, name the project TodoApi and select Next.
- In the Additional information dialog:
- Confirm the Framework is .NET 8.0 (Long Term Support).
- Confirm the checkbox for Use controllers(uncheck to use Minimal APIs) is checked.
- Confirm the checkbox for Enable OpenAPI support is checked.
- Select Create.
Add a NuGet package
A NuGet package must be added to support the database used in this tutorial.
- From the Tools menu, select NuGet Package Manager > Manage NuGet Packages for Solution.
- Select the Browse tab.
- Enter Microsoft.EntityFrameworkCore.InMemory in the search box, and then select
Microsoft.EntityFrameworkCore.InMemory. - Select the Project checkbox in the right pane and then select Install.
Note
For guidance on adding packages to .NET apps, see the articles under Install and manage packages at Package consumption workflow (NuGet documentation). Confirm correct package versions at NuGet.org.
Test the project
The project template creates a WeatherForecast API with support for Swagger.
Press Ctrl+F5 to run without the debugger.
Visual Studio displays the following dialog when a project is not yet configured to use SSL:
Select Yes if you trust the IIS Express SSL certificate.
The following dialog is displayed:
Select Yes if you agree to trust the development certificate.
For information on trusting the Firefox browser, see Firefox SEC_ERROR_INADEQUATE_KEY_USAGE certificate error.
Visual Studio launches the default browser and navigates to https://localhost:<port>/swagger/index.html, where <port> is a randomly chosen port number set at the project creation.
The Swagger page /swagger/index.html is displayed. Select GET > Try it out > Execute. The page displays:
- The Curl command to test the WeatherForecast API.
- The URL to test the WeatherForecast API.
- The response code, body, and headers.
- A drop-down list box with media types and the example value and schema.
If the Swagger page doesn't appear, see this GitHub issue.
Swagger is used to generate useful documentation and help pages for web APIs. This tutorial uses Swagger to test the app. For more information on Swagger, see ASP.NET Core web API documentation with Swagger / OpenAPI.
Copy and paste the Request URL in the browser: https://localhost:<port>/weatherforecast
JSON similar to the following example is returned:
[
{
"date": "2019-07-16T19:04:05.7257911-06:00",
"temperatureC": 52,
"temperatureF": 125,
"summary": "Mild"
},
{
"date": "2019-07-17T19:04:05.7258461-06:00",
"temperatureC": 36,
"temperatureF": 96,
"summary": "Warm"
},
{
"date": "2019-07-18T19:04:05.7258467-06:00",
"temperatureC": 39,
"temperatureF": 102,
"summary": "Cool"
},
{
"date": "2019-07-19T19:04:05.7258471-06:00",
"temperatureC": 10,
"temperatureF": 49,
"summary": "Bracing"
},
{
"date": "2019-07-20T19:04:05.7258474-06:00",
"temperatureC": -1,
"temperatureF": 31,
"summary": "Chilly"
}
]
Add a model class
A model is a set of classes that represent the data that the app manages. The model for this app is the TodoItem class.
- In Solution Explorer, right-click the project. Select Add > New Folder. Name the folder
Models. - Right-click the
Modelsfolder and select Add > Class. Name the class TodoItem and select Add. - Replace the template code with the following:
namespace TodoApi.Models;
public class TodoItem
{
public long Id { get; set; }
public string? Name { get; set; }
public bool IsComplete { get; set; }
}
The Id property functions as the unique key in a relational database.
Model classes can go anywhere in the project, but the Models folder is used by convention.
Add a database context
The database context is the main class that coordinates Entity Framework functionality for a data model. This class is created by deriving from the Microsoft.EntityFrameworkCore.DbContext class.
- Right-click the
Modelsfolder and select Add > Class. Name the class TodoContext and click Add.
Enter the following code:
using Microsoft.EntityFrameworkCore;

namespace TodoApi.Models;

public class TodoContext : DbContext
{
    public TodoContext(DbContextOptions<TodoContext> options)
        : base(options)
    {
    }

    public DbSet<TodoItem> TodoItems { get; set; } = null!;
}
Register the database context
In ASP.NET Core, services such as the DB context must be registered with the dependency injection (DI) container. The container provides the service to controllers.
Update Program.cs with the following highlighted code:
using Microsoft.EntityFrameworkCore;
using TodoApi.Models;
var builder = WebApplication.CreateBuilder(args);
builder.Services.AddControllers();
builder.Services.AddDbContext<TodoContext>(opt =>
opt.UseInMemoryDatabase("TodoList"));
builder.Services.AddEndpointsApiExplorer();
builder.Services.AddSwaggerGen();
var app = builder.Build();
if (app.Environment.IsDevelopment())
{
app.UseSwagger();
app.UseSwaggerUI();
}
app.UseHttpsRedirection();
app.UseAuthorization();
app.MapControllers();
app.Run();
The preceding code:
- Adds
usingdirectives. - Adds the database context to the DI container.
- Specifies that the database context will use an in-memory database.
Scaffold a controller
Right-click the
Controllersfolder.Select Add > New Scaffolded Item.
Select API Controller with actions, using Entity Framework, and then select Add.
In the Add API Controller with actions, using Entity Framework dialog:
- Select TodoItem (TodoApi.Models) in the Model class.
- Select TodoContext (TodoApi.Models) in the Data context class.
- Select Add.
If the scaffolding operation fails, select Add to try scaffolding a second time.
The generated code:
- Marks the class with the
[ApiController]attribute. This attribute indicates that the controller responds to web API requests. For information about specific behaviors that the attribute enables, see Create web APIs with ASP.NET Core. - Uses DI to inject the database context (
TodoContext) into the controller. The database context is used in each of the CRUD methods in the controller.
The ASP.NET Core templates for:
- Controllers with views include
[action]in the route template. - API controllers don't include
[action]in the route template.
When the [action] token isn't in the route template, the action name (method name) isn't included in the endpoint. That is, the action's associated method name isn't used in the matching route.
Update the PostTodoItem create method
Update the return statement in the PostTodoItem to use the nameof operator:
[HttpPost]
public async Task<ActionResult<TodoItem>> PostTodoItem(TodoItem todoItem)
{
    _context.TodoItems.Add(todoItem);
    await _context.SaveChangesAsync();

    //    return CreatedAtAction("GetTodoItem", new { id = todoItem.Id }, todoItem);
    return CreatedAtAction(nameof(GetTodoItem), new { id = todoItem.Id }, todoItem);
}
The preceding code is an HTTP POST method, as indicated by the [HttpPost] attribute. The method gets the value of the TodoItem from the body of the HTTP request.
For more information, see Attribute routing with Http[Verb] attributes.
The CreatedAtAction method:
- Returns an HTTP 201 status code if successful.
HTTP 201is the standard response for anHTTP POSTmethod that creates a new resource on the server. - Adds a Location header to the response. The
Locationheader specifies the URI of the newly created to-do item. For more information, see 10.2.2 201 Created. - References the
GetTodoItemaction to create theLocationheader's URI. The C#nameofkeyword is used to avoid hard-coding the action name in theCreatedAtActioncall.
Test PostTodoItem
Press Ctrl+F5 to run the app.
In the Swagger browser window, select POST /api/TodoItems, and then select Try it out.
In the Request body input window, update the JSON. For example,
{ "name": "walk dog", "isComplete": true }Select Execute
Test the location header URI
In the preceding POST, the Swagger UI shows the location header under Response headers. For example, location: https://localhost:7260/api/TodoItems/1. The location header shows the URI to the created resource.
To test the location header:
In the Swagger browser window, select GET /api/TodoItems/{id}, and then select Try it out.
Enter
1in theidinput box, and then select Execute.
Examine the GET methods
Two GET endpoints are implemented:
GET /api/todoitemsGET /api/todoitems/{id}
The previous section showed an example of the /api/todoitems/{id} route.
Follow the POST instructions to add another todo item, and then test the /api/todoitems route using Swagger.
This app uses an in-memory database. If the app is stopped and started, the preceding GET request doesn't return any data. If no data is returned, POST data to the app.
Routing and URL paths
The [HttpGet] attribute denotes a method that responds to an HTTP GET request. The URL path for each method is constructed as follows:
Start with the template string in the controller's
Routeattribute:[Route("api/[controller]")] [ApiController] public class TodoItemsController : ControllerBaseReplace
[controller]with the name of the controller, which by convention is the controller class name minus the "Controller" suffix. For this sample, the controller class name is TodoItemsController, so the controller name is "TodoItems". ASP.NET Core routing is case insensitive.If the
[HttpGet]attribute has a route template (for example,[HttpGet("products")]), append that to the path. This sample doesn't use a template. For more information, see Attribute routing with Http[Verb] attributes.
In the following GetTodoItem method, "{id}" is a placeholder variable for the unique identifier of the to-do item. When GetTodoItem is invoked, the value of "{id}" in the URL is provided to the method in its id parameter.
[HttpGet("{id}")]
public async Task<ActionResult<TodoItem>> GetTodoItem(long id)
{
var todoItem = await _context.TodoItems.FindAsync(id);
if (todoItem == null)
{
return NotFound();
}
return todoItem;
}
Return values
The return type of the GetTodoItems and GetTodoItem methods is ActionResult<T> type. ASP.NET Core automatically serializes the object to JSON and writes the JSON into the body of the response message. The response code for this return type is 200 OK, assuming there are no unhandled exceptions. Unhandled exceptions are translated into 5xx errors.
ActionResult return types can represent a wide range of HTTP status codes. For example, GetTodoItem can return two different status values:
- If no item matches the requested ID, the method returns a 404 status NotFound error code.
- Otherwise, the method returns 200 with a JSON response body. Returning
itemresults in anHTTP 200response.
The PutTodoItem method
Examine the PutTodoItem method:
[HttpPut("{id}")]
public async Task<IActionResult> PutTodoItem(long id, TodoItem todoItem)
{
if (id != todoItem.Id)
{
return BadRequest();
}
_context.Entry(todoItem).State = EntityState.Modified;
try
{
await _context.SaveChangesAsync();
}
catch (DbUpdateConcurrencyException)
{
if (!TodoItemExists(id))
{
return NotFound();
}
else
{
throw;
}
}
return NoContent();
}
PutTodoItem is similar to PostTodoItem, except it uses HTTP PUT. The response is 204 (No Content). According to the HTTP specification, a PUT request requires the client to send the entire updated entity, not just the changes. To support partial updates, use HTTP PATCH.
Test the PutTodoItem method
This sample uses an in-memory database that must be initialized each time the app is started. There must be an item in the database before you make a PUT call. Call GET to ensure there's an item in the database before making a PUT call.
Using the Swagger UI, use the PUT button to update the TodoItem that has Id = 1 and set its name to "feed fish". Note the response is HTTP 204 No Content.
The DeleteTodoItem method
Examine the DeleteTodoItem method:
[HttpDelete("{id}")]
public async Task<IActionResult> DeleteTodoItem(long id)
{
var todoItem = await _context.TodoItems.FindAsync(id);
if (todoItem == null)
{
return NotFound();
}
_context.TodoItems.Remove(todoItem);
await _context.SaveChangesAsync();
return NoContent();
}
Test the DeleteTodoItem method
Use the Swagger UI to delete the TodoItem that has Id = 1. Note the response is HTTP 204 No Content.
Test with other tools
There are many other tools that can be used to test web APIs, for example:
- Visual Studio Endpoints Explorer and .http files
- http-repl
- curl. Swagger uses
curland shows thecurlcommands it submits. - Fiddler
For more information, see:
Prevent over-posting
Currently the sample app exposes the entire TodoItem object. Production apps typically limit the data that's input and returned using a subset of the model. There are multiple reasons behind this, and security is a major one. The subset of a model is usually referred to as a Data Transfer Object (DTO), input model, or view model. DTO is used in this tutorial.
A DTO may be used to:
- Prevent over-posting.
- Hide properties that clients are not supposed to view.
- Omit some properties in order to reduce payload size.
- Flatten object graphs that contain nested objects. Flattened object graphs can be more convenient for clients.
To demonstrate the DTO approach, update the TodoItem class to include a secret field:
namespace TodoApi.Models
{
public class TodoItem
{
public long Id { get; set; }
public string? Name { get; set; }
public bool IsComplete { get; set; }
public string? Secret { get; set; }
}
}
The secret field needs to be hidden from this app, but an administrative app could choose to expose it.
Verify you can post and get the secret field.
Create a DTO model:
namespace TodoApi.Models;
public class TodoItemDTO
{
public long Id { get; set; }
public string? Name { get; set; }
public bool IsComplete { get; set; }
}
Update the TodoItemsController to use TodoItemDTO:
using Microsoft.AspNetCore.Mvc;
using Microsoft.EntityFrameworkCore;
using TodoApi.Models;
namespace TodoApi.Controllers;
[Route("api/[controller]")]
[ApiController]
public class TodoItemsController : ControllerBase
{
private readonly TodoContext _context;
public TodoItemsController(TodoContext context)
{
_context = context;
}
// GET: api/TodoItems
[HttpGet]
public async Task<ActionResult<IEnumerable<TodoItemDTO>>> GetTodoItems()
{
return await _context.TodoItems
.Select(x => ItemToDTO(x))
.ToListAsync();
}
// GET: api/TodoItems/5
// <snippet_GetByID>
[HttpGet("{id}")]
public async Task<ActionResult<TodoItemDTO>> GetTodoItem(long id)
{
var todoItem = await _context.TodoItems.FindAsync(id);
if (todoItem == null)
{
return NotFound();
}
return ItemToDTO(todoItem);
}
// </snippet_GetByID>
// PUT: api/TodoItems/5
// To protect from overposting attacks, see https://go.microsoft.com/fwlink/?linkid=2123754
// <snippet_Update>
[HttpPut("{id}")]
public async Task<IActionResult> PutTodoItem(long id, TodoItemDTO todoDTO)
{
if (id != todoDTO.Id)
{
return BadRequest();
}
var todoItem = await _context.TodoItems.FindAsync(id);
if (todoItem == null)
{
return NotFound();
}
todoItem.Name = todoDTO.Name;
todoItem.IsComplete = todoDTO.IsComplete;
try
{
await _context.SaveChangesAsync();
}
catch (DbUpdateConcurrencyException) when (!TodoItemExists(id))
{
return NotFound();
}
return NoContent();
}
// </snippet_Update>
// POST: api/TodoItems
// To protect from overposting attacks, see https://go.microsoft.com/fwlink/?linkid=2123754
// <snippet_Create>
[HttpPost]
public async Task<ActionResult<TodoItemDTO>> PostTodoItem(TodoItemDTO todoDTO)
{
var todoItem = new TodoItem
{
IsComplete = todoDTO.IsComplete,
Name = todoDTO.Name
};
_context.TodoItems.Add(todoItem);
await _context.SaveChangesAsync();
return CreatedAtAction(
nameof(GetTodoItem),
new { id = todoItem.Id },
ItemToDTO(todoItem));
}
// </snippet_Create>
// DELETE: api/TodoItems/5
[HttpDelete("{id}")]
public async Task<IActionResult> DeleteTodoItem(long id)
{
    var todoItem = await _context.TodoItems.FindAsync(id);
    if (todoItem == null)
    {
        return NotFound();
    }

    _context.TodoItems.Remove(todoItem);
    await _context.SaveChangesAsync();

    return NoContent();
}
private bool TodoItemExists(long id)
{
return _context.TodoItems.Any(e => e.Id == id);
}
private static TodoItemDTO ItemToDTO(TodoItem todoItem) =>
new TodoItemDTO
{
Id = todoItem.Id,
Name = todoItem.Name,
IsComplete = todoItem.IsComplete
};
}
Verify you can't post or get the secret field.
Call the web API with JavaScript
See Tutorial: Call an ASP.NET Core web API with JavaScript.
Web API video series
See Video: Beginner's Series to: Web APIs.
Enterprise web app patterns
For guidance on creating a reliable, secure, performant, testable, and scalable ASP.NET Core app, see Enterprise web app patterns. A complete production-quality sample web app that implements the patterns is available.
Add authentication support to a web API
ASP.NET Core Identity adds user interface (UI) login functionality to ASP.NET Core web apps. To secure web APIs and SPAs, use one of the following:
- Microsoft Entra ID
- Azure Active Directory B2C (Azure AD B2C)
- Duende Identity Server
Duende Identity Server is an OpenID Connect and OAuth 2.0 framework for ASP.NET Core. Duende Identity Server enables the following security features:
- Authentication as a Service (AaaS)
- Single sign-on/off (SSO) over multiple application types
- Access control for APIs
- Federation Gateway
Important
Duende Software might require you to pay a license fee for production use of Duende Identity Server. For more information, see Migrate from ASP.NET Core in .NET 5 to .NET 6.
For more information, see the Duende Identity Server documentation (Duende Software website).
Publish to Azure
For information on deploying to Azure, see Quickstart: Deploy an ASP.NET web app.
Additional resources
View or download sample code for this tutorial. See how to download.
For more information, see the following resources:
- Create web APIs with ASP.NET Core
- Tutorial: Create a Minimal API with ASP.NET Core
- ASP.NET Core web API documentation with Swagger / OpenAPI
- Razor Pages with Entity Framework Core in ASP.NET Core - Tutorial 1 of 8
- Routing to controller actions in ASP.NET Core
- Controller action return types in ASP.NET Core web API
- Deploy ASP.NET Core apps to Azure App Service
- Host and deploy ASP.NET Core
- Create a web API with ASP.NET Core
Collaborate with us on GitHub
The source for this content can be found on GitHub, where you can also create and review issues and pull requests. For more information, see our contributor guide.
ASP.NET Core