Note
Access to this page requires authorization. You can try signing in or changing directories.
Access to this page requires authorization. You can try changing directories.
By Rico Suter and Dave Brock
View or download sample code (how to download)
NSwag offers the following capabilities:
- The ability to utilize the Swagger UI and Swagger generator.
- Flexible code generation capabilities.
With NSwag, you don't need an existing API—you can use third-party APIs that incorporate Swagger and generate a client implementation. NSwag allows you to expedite the development cycle and easily adapt to API changes.
Package installation
Install NSwag to:
- Generate the Swagger specification for the implemented web API.
- Serve the Swagger UI to browse and test the web API.
- Serve the Redoc to add API documentation for the Web API.
To use the NSwag ASP.NET Core middleware, install the NSwag.AspNetCore NuGet package. This package contains the middleware to generate and serve the Swagger specification, Swagger UI (v2 and v3), and ReDoc UI. NSwag 14 supports only v3 of the Swagger UI spec.
Use one of the following approaches to install the NSwag NuGet package:
From the Package Manager Console window:
Go to View > Other Windows > Package Manager Console
Navigate to the directory in which the
NSwagSample.csprojfile existsExecute the following command:
Install-Package NSwag.AspNetCore
From the Manage NuGet Packages dialog:
- Right-click the project in Solution Explorer > Manage NuGet Packages
- Set the Package source to "nuget.org"
- Enter "NSwag.AspNetCore" in the search box
- Select the "NSwag.AspNetCore" package from the Browse tab and click Install
Add and configure Swagger middleware
Add and configure Swagger in your ASP.NET Core app by performing the following steps:
- Add the OpenApi generator to the services collection in
Program.cs:
var builder = WebApplication.CreateBuilder(args);

builder.Services.AddControllers();
builder.Services.AddOpenApiDocument();
- Enable the middleware for serving the generated OpenApi specification, the Swagger UI, and the Redoc UI, also in
Program.cs:
if (app.Environment.IsDevelopment())
{
    // Add OpenAPI 3.0 document serving middleware
    // Available at: http://localhost:<port>/swagger/v1/swagger.json
    app.UseOpenApi();

    // Add web UIs to interact with the document
    // Available at: http://localhost:<port>/swagger
    app.UseSwaggerUi(); // UseSwaggerUI Protected by if (env.IsDevelopment())
}
- Launch the app. Navigate to:
http://localhost:<port>/swaggerto view the Swagger UI.http://localhost:<port>/swagger/v1/swagger.jsonto view the Swagger specification.
Code generation
You can take advantage of NSwag's code generation capabilities by choosing one of the following options:
- NSwagStudio: A Windows desktop app for generating API client code in C# or TypeScript.
- The NSwag.CodeGeneration.CSharp or NSwag.CodeGeneration.TypeScript NuGet packages for code generation inside your project.
- NSwag from the command line.
- The NSwag.MSBuild NuGet package.
- The Unchase OpenAPI (Swagger) Connected Service: A Visual Studio Connected Service for generating API client code in C# or TypeScript. Also generates C# controllers for OpenAPI services with NSwag.
Generate code with NSwagStudio
- Install NSwagStudio by following the instructions at the NSwagStudio GitHub repository. On the NSwag release page, you can download an xcopy version which can be started without installation and admin privileges.
- Launch NSwagStudio and enter the
swagger.jsonfile URL in the Swagger Specification URL text box. For example,http://localhost:5232/swagger/v1/swagger.json. - Click the Create local Copy button to generate a JSON representation of your Swagger specification.
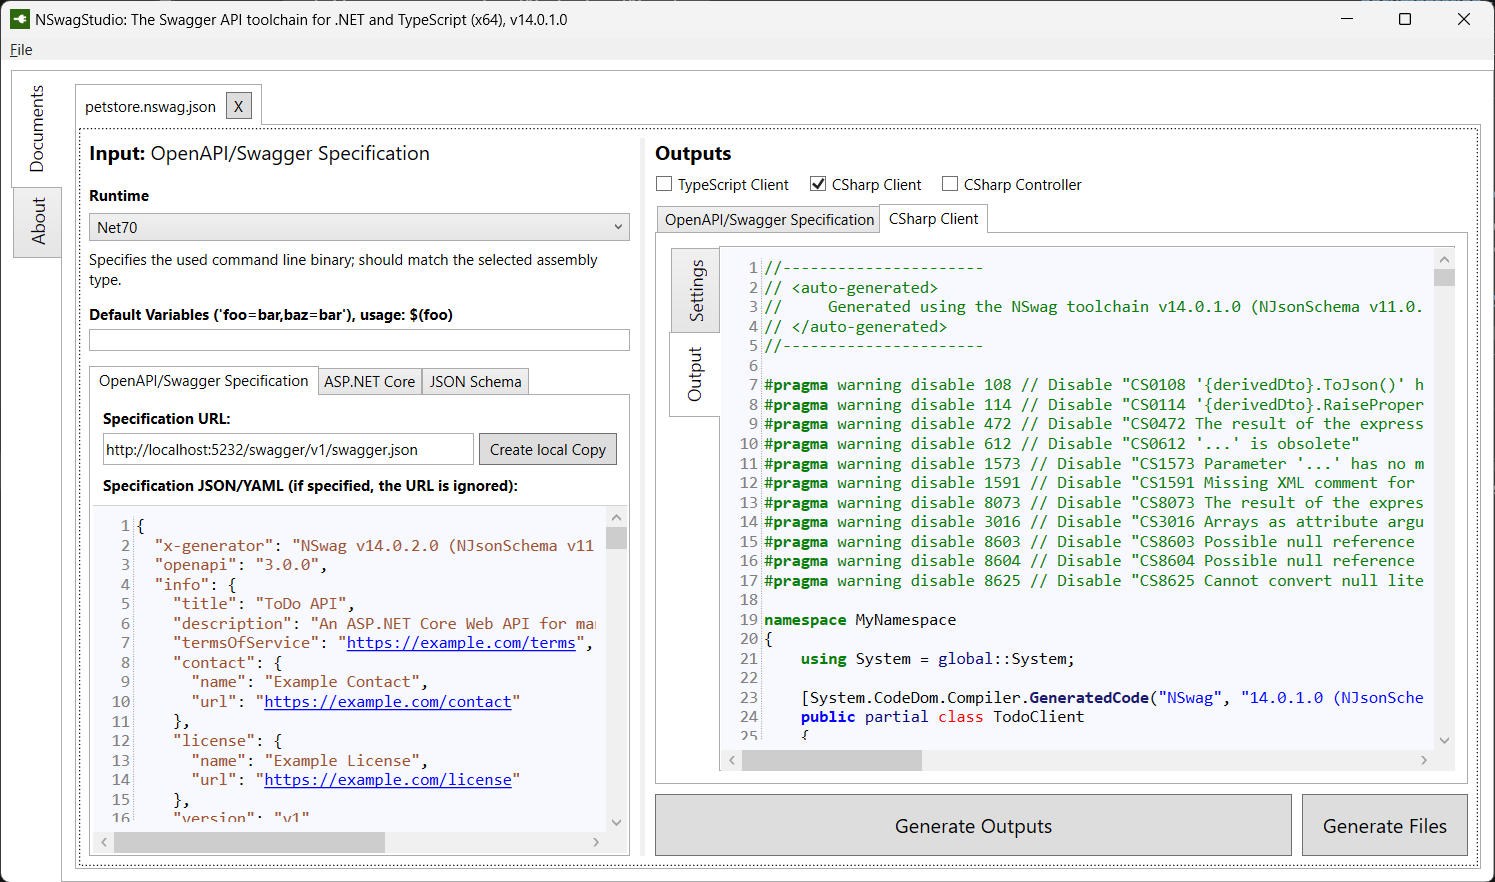
- In the Outputs area, click the CSharp Client checkbox. Depending on your project, you can also choose TypeScript Client or CSharp Web API Controller. If you select CSharp Web API Controller, a service specification rebuilds the service, serving as a reverse generation.
- Click Generate Outputs to produce a complete C# client implementation of the TodoApi.NSwag project. To see the generated client code, click the CSharp Client tab:
namespace MyNamespace
{
    using System = global::System;

    [System.CodeDom.Compiler.GeneratedCode("NSwag", "14.0.1.0 (NJsonSchema v11.0.0.0 (Newtonsoft.Json v13.0.0.0))")]
    public partial class TodoClient
    {
    #pragma warning disable 8618 // Set by constructor via BaseUrl property
        private string _baseUrl;
    #pragma warning restore 8618 // Set by constructor via BaseUrl property
        private System.Net.Http.HttpClient _httpClient;
        private static System.Lazy<Newtonsoft.Json.JsonSerializerSettings> _settings = new System.Lazy<Newtonsoft.Json.JsonSerializerSettings>(CreateSerializerSettings, true);

        public TodoClient(System.Net.Http.HttpClient httpClient)
        {
            BaseUrl = "http://localhost:5232";
            _httpClient = httpClient;
        }

        private static Newtonsoft.Json.JsonSerializerSettings CreateSerializerSettings()
        {
            var settings = new Newtonsoft.Json.JsonSerializerSettings();
            UpdateJsonSerializerSettings(settings);
            return settings;
        }

        public string BaseUrl
        {
            get { return _baseUrl; }
            set
            {
                _baseUrl = value;
                if (!string.IsNullOrEmpty(_baseUrl) && !_baseUrl.EndsWith("/"))
                    _baseUrl += '/';
            }
        }
        // code omitted for brevity
Tip
The C# client code is generated based on selections in the Settings tab. Modify the settings to perform tasks such as default namespace renaming and synchronous method generation.
- Copy the generated C# code into a file in the client project that will consume the API.
- Start consuming the web API:
var todoClient = new TodoClient(new HttpClient());

// Gets all to-dos from the API
var allTodos = await todoClient.GetAsync();

// Create a new TodoItem, and save it via the API.
await todoClient.CreateAsync(new TodoItem());

// Get a single to-do by ID
var foundTodo = await todoClient.GetByIdAsync(1);
Customize API documentation
OpenApi provides options for documenting the object model to ease the consumption of the web API.
API info and description
In Program.cs, update AddOpenApiDocument to configure the document info of the Web API and include more information such as the author, license, and description.
Import the NSwag namespace first to use the OpenApi classes.
using NSwag;

var builder = WebApplication.CreateBuilder(args);

builder.Services.AddOpenApiDocument(options => {
     options.PostProcess = document =>
     {
         document.Info = new OpenApiInfo
         {
             Version = "v1",
             Title = "ToDo API",
             Description = "An ASP.NET Core Web API for managing ToDo items",
             TermsOfService = "https://example.com/terms",
             Contact = new OpenApiContact
             {
                 Name = "Example Contact",
                 Url = "https://example.com/contact"
             },
             License = new OpenApiLicense
             {
                 Name = "Example License",
                 Url = "https://example.com/license"
             }
         };
     };
});
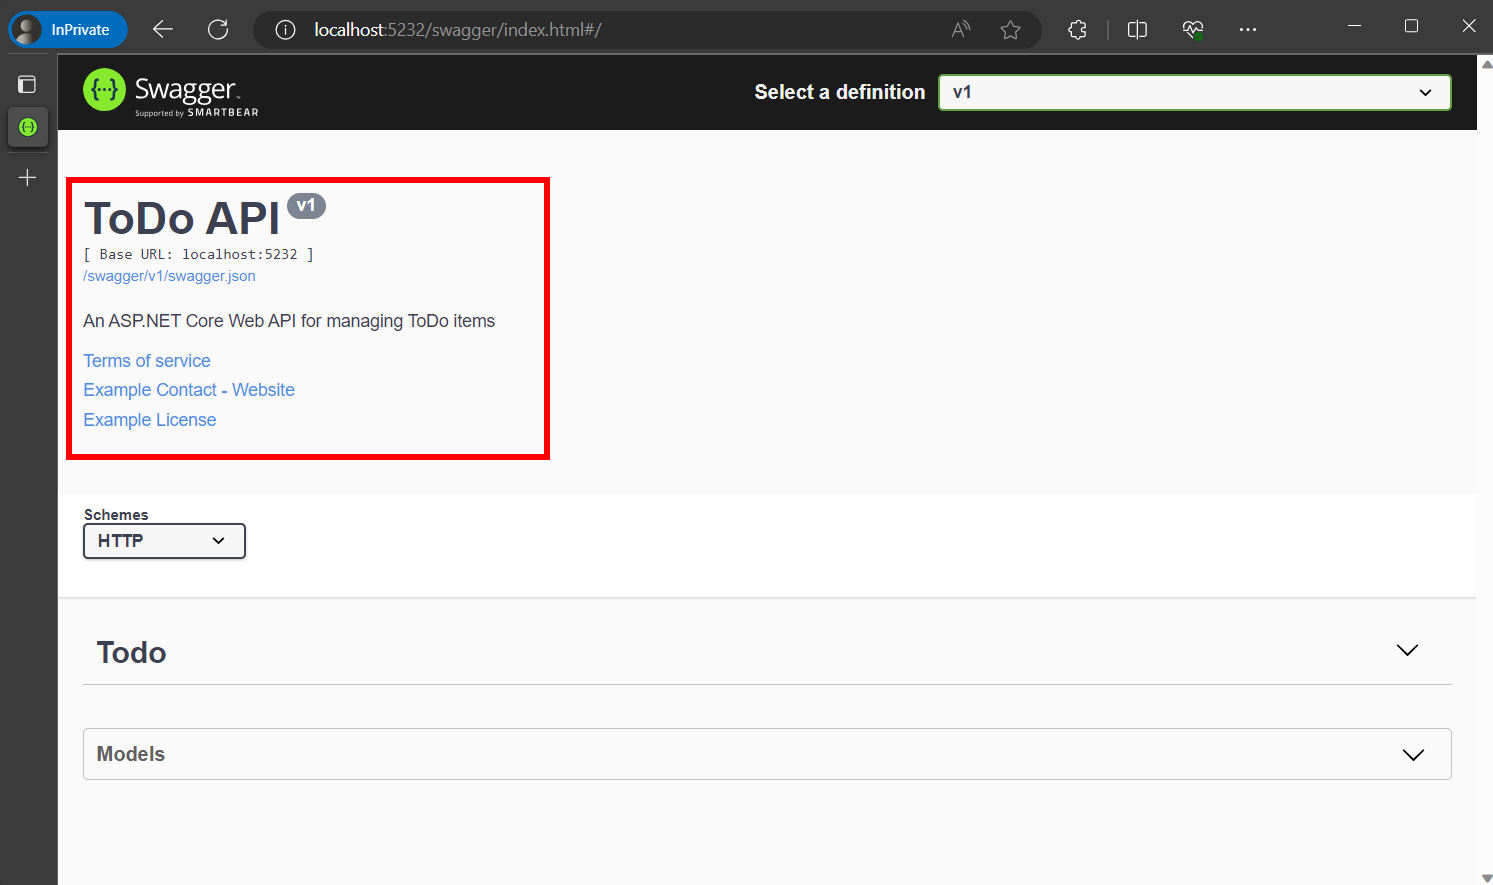
The Swagger UI displays the version's information:
XML comments
To enable XML comments, perform the following steps:
- Right-click the project in Solution Explorer and select
Edit <project_name>.csproj. - Manually add the highlighted lines to the
.csprojfile:
<PropertyGroup>
  <GenerateDocumentationFile>true</GenerateDocumentationFile>
</PropertyGroup>
Enabling XML comments provides debug information for undocumented public types and members. Undocumented types and members are indicated by the warning message. For example, the following message indicates a violation of warning code 1591:
warning CS1591: Missing XML comment for publicly visible type or member 'TodoContext'
To suppress warnings project-wide, define a semicolon-delimited list of warning codes to ignore in the project file. Appending the warning codes to $(NoWarn); applies the C# default values too.
<PropertyGroup>
  <GenerateDocumentationFile>true</GenerateDocumentationFile>
  <NoWarn>$(NoWarn);1591</NoWarn>
</PropertyGroup>
To suppress warnings only for specific members, enclose the code in #pragma warning preprocessor directives. This approach is useful for code that shouldn't be exposed via the API docs. In the following example, warning code CS1591 is ignored for the entire TodoContext class. Enforcement of the warning code is restored at the close of the class definition. Specify multiple warning codes with a comma-delimited list.
namespace NSwagSample.Models;

#pragma warning disable CS1591
public class TodoContext : DbContext
{
    public TodoContext(DbContextOptions<TodoContext> options) : base(options) { }

    public DbSet<TodoItem> TodoItems => Set<TodoItem>();
}
#pragma warning restore CS1591
Data annotations
Mark the model with attributes, found in the System.ComponentModel.DataAnnotations namespace, to help drive the Swagger UI components.
Add the [Required] attribute to the Name property of the TodoItem class:
using System.ComponentModel;
using System.ComponentModel.DataAnnotations;

namespace NSwagSample.Models;

public class TodoItem
{
    public long Id { get; set; }

    [Required]
    public string Name { get; set; } = null!;

    [DefaultValue(false)]
    public bool IsComplete { get; set; }
}
The presence of this attribute changes the UI behavior and alters the underlying JSON schema:
"TodoItem": {
  "type": "object",
  "additionalProperties": false,
  "required": [
    "name"
  ],
  "properties": {
    "id": {
      "type": "integer",
      "format": "int64"
    },
    "name": {
      "type": "string",
      "minLength": 1
    },
    "isComplete": {
      "type": "boolean",
      "default": false
    }
  }
}
As the usage of data annotations in the web API increases, the UI and API help pages become more descriptive and useful.
Describe response types
Developers consuming a web API are most concerned with what's returned—specifically response types and error codes (if not standard). The response types and error codes are denoted in the XML comments and data annotations.
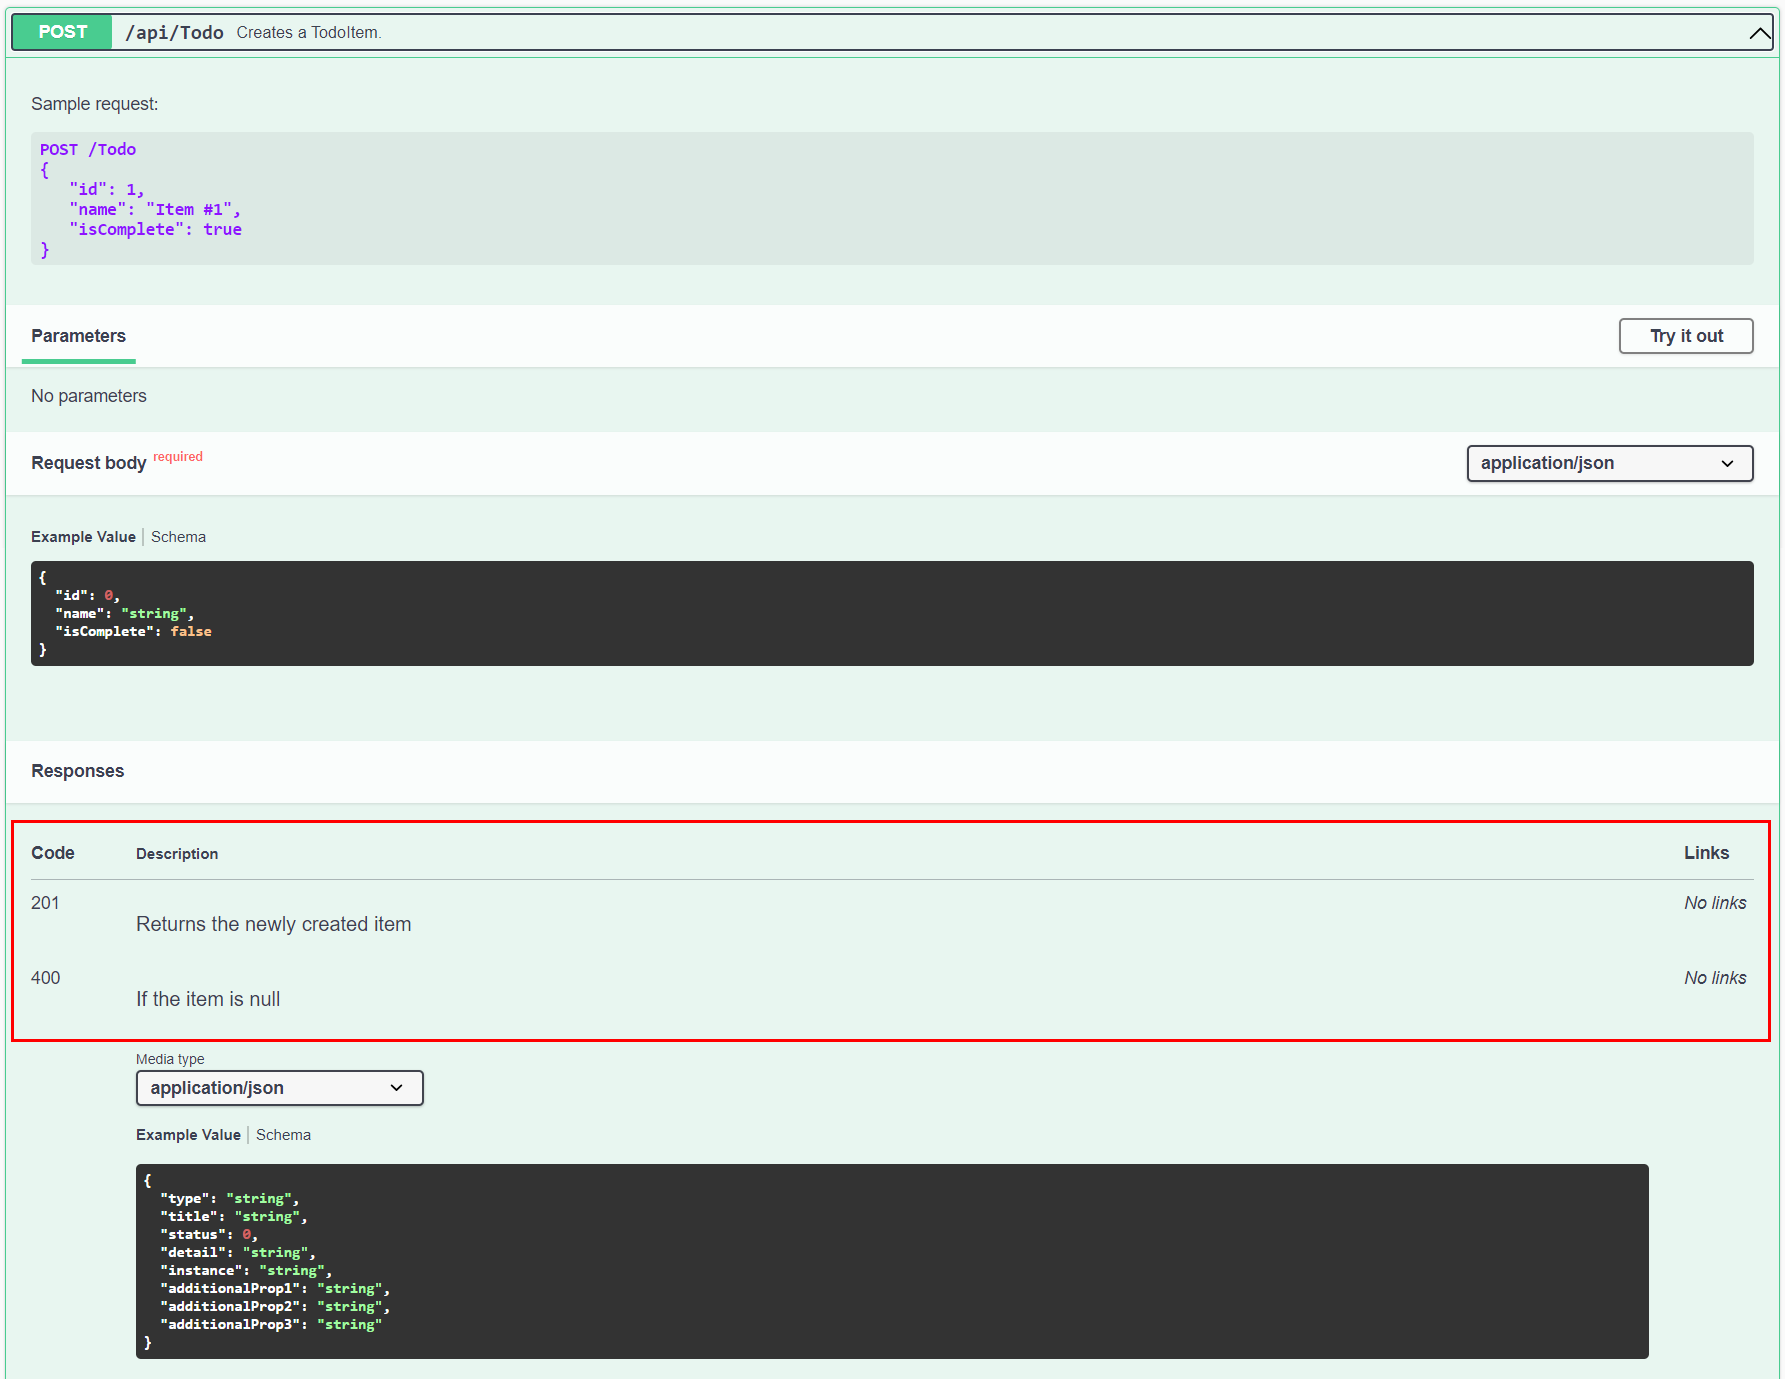
The Create action returns an HTTP 201 status code on success. An HTTP 400 status code is returned when the posted request body is null. Without proper documentation in the Swagger UI, the consumer lacks knowledge of these expected outcomes. Fix that problem by adding the highlighted lines in the following example:
/// <summary>
/// Creates a TodoItem.
/// </summary>
/// <param name="item"></param>
/// <returns>A newly created TodoItem</returns>
/// <remarks>
/// Sample request:
///
///     POST /Todo
///     {
///        "id": 1,
///        "name": "Item #1",
///        "isComplete": true
///     }
///
/// </remarks>
/// <response code="201">Returns the newly created item</response>
/// <response code="400">If the item is null</response>
[HttpPost]
[ProducesResponseType(StatusCodes.Status201Created)]
[ProducesResponseType(StatusCodes.Status400BadRequest)]
public async Task<IActionResult> Create(TodoItem item)
{
    _context.TodoItems.Add(item);
    await _context.SaveChangesAsync();

    return CreatedAtAction(nameof(Get), new { id = item.Id }, item);
}
The Swagger UI now clearly documents the expected HTTP response codes (and the XML comments are also displayed):
Conventions can be used as an alternative to explicitly decorating individual actions with [ProducesResponseType]. For more information, see Use web API conventions.
Redoc
Redoc is an alternative to the Swagger UI. It's similar because it also provides a documentation page for the Web API using the OpenAPI specification. The difference is that Redoc UI is more focused on the documentation, and doesn't provide an interactive UI to test the API.
To enable Redoc, add its middleware to Program.cs:
if (app.Environment.IsDevelopment())
{
    // Add OpenAPI 3.0 document serving middleware
    // Available at: http://localhost:<port>/swagger/v1/swagger.json
    app.UseOpenApi();

    // Add web UIs to interact with the document
    // Available at: http://localhost:<port>/swagger
    app.UseSwaggerUi(); // UseSwaggerUI is called only in Development.

    // Add ReDoc UI to interact with the document
    // Available at: http://localhost:<port>/redoc
    app.UseReDoc(options =>
    {
        options.Path = "/redoc";
    });
}
Run the application and navigate to http://localhost:<port>/redoc to view the Redoc UI:

By Rico Suter and Dave Brock
View or download sample code (how to download)
NSwag offers the following capabilities:
- The ability to utilize the Swagger UI and Swagger generator.
- Flexible code generation capabilities.
With NSwag, you don't need an existing API—you can use third-party APIs that incorporate Swagger and generate a client implementation. NSwag allows you to expedite the development cycle and easily adapt to API changes.
Register the NSwag middleware
Register the NSwag middleware to:
- Generate the Swagger specification for the implemented web API.
- Serve the Swagger UI to browse and test the web API.
To use the NSwag ASP.NET Core middleware, install the NSwag.AspNetCore NuGet package. This package contains the middleware to generate and serve the Swagger specification, Swagger UI (v2 and v3), and ReDoc UI.
Use one of the following approaches to install the NSwag NuGet package:
From the Package Manager Console window:
Go to View > Other Windows > Package Manager Console
Navigate to the directory in which the
TodoApi.csprojfile existsExecute the following command:
Install-Package NSwag.AspNetCore
From the Manage NuGet Packages dialog:
- Right-click the project in Solution Explorer > Manage NuGet Packages
- Set the Package source to "nuget.org"
- Enter "NSwag.AspNetCore" in the search box
- Select the "NSwag.AspNetCore" package from the Browse tab and click Install
Add and configure Swagger middleware
Add and configure Swagger in your ASP.NET Core app by performing the following steps:
- In the
Startup.ConfigureServicesmethod, register the required Swagger services:
public void ConfigureServices(IServiceCollection services)
{
    services.AddDbContext<TodoContext>(opt =>
        opt.UseInMemoryDatabase("TodoList"));
    services.AddMvc();

    // Register the Swagger services
    services.AddSwaggerDocument();
}
- In the
Startup.Configuremethod, enable the middleware for serving the generated Swagger specification and the Swagger UI:
public void Configure(IApplicationBuilder app)
{
    app.UseStaticFiles();

    // Register the Swagger generator and the Swagger UI middlewares
    app.UseOpenApi();
    app.UseOpenApi();
    if (env.IsDevelopment())
    {
        app.UseSwaggerUi3();
    }
    app.UseMvc();
}
- Launch the app. Navigate to:
http://localhost:<port>/swaggerto view the Swagger UI.http://localhost:<port>/swagger/v1/swagger.jsonto view the Swagger specification.
Code generation
You can take advantage of NSwag's code generation capabilities by choosing one of the following options:
- NSwagStudio: A Windows desktop app for generating API client code in C# or TypeScript.
- The NSwag.CodeGeneration.CSharp or NSwag.CodeGeneration.TypeScript NuGet packages for code generation inside your project.
- NSwag from the command line.
- The NSwag.MSBuild NuGet package.
- The Unchase OpenAPI (Swagger) Connected Service: A Visual Studio Connected Service for generating API client code in C# or TypeScript. Also generates C# controllers for OpenAPI services with NSwag.
Generate code with NSwagStudio
Install NSwagStudio by following the instructions at the NSwagStudio GitHub repository. On the NSwag release page you can download an xcopy version which can be started without installation and admin privileges.
Launch NSwagStudio and enter the
swagger.jsonfile URL in the Swagger Specification URL text box. For example,http://localhost:44354/swagger/v1/swagger.json.Click the Create local Copy button to generate a JSON representation of your Swagger specification.

In the Outputs area, click the CSharp Client checkbox. Depending on your project, you can also choose TypeScript Client or CSharp Web API Controller. If you select CSharp Web API Controller, a service specification rebuilds the service, serving as a reverse generation.
Click Generate Outputs to produce a complete C# client implementation of the TodoApi.NSwag project. To see the generated client code, click the CSharp Client tab:
//----------------------
// <auto-generated>
//     Generated using the NSwag toolchain v12.0.9.0 (NJsonSchema v9.13.10.0 (Newtonsoft.Json v11.0.0.0)) (http://NSwag.org)
// </auto-generated>
//----------------------

namespace MyNamespace
{
    #pragma warning disable

    [System.CodeDom.Compiler.GeneratedCode("NSwag", "12.0.9.0 (NJsonSchema v9.13.10.0 (Newtonsoft.Json v11.0.0.0))")]
    public partial class TodoClient
    {
        private string _baseUrl = "https://localhost:44354";
        private System.Net.Http.HttpClient _httpClient;
        private System.Lazy<Newtonsoft.Json.JsonSerializerSettings> _settings;

        public TodoClient(System.Net.Http.HttpClient httpClient)
        {
            _httpClient = httpClient;
            _settings = new System.Lazy<Newtonsoft.Json.JsonSerializerSettings>(() =>
            {
                var settings = new Newtonsoft.Json.JsonSerializerSettings();
                UpdateJsonSerializerSettings(settings);
                return settings;
            });
        }

        public string BaseUrl
        {
            get { return _baseUrl; }
            set { _baseUrl = value; }
        }

        // code omitted for brevity
Tip
The C# client code is generated based on selections in the Settings tab. Modify the settings to perform tasks such as default namespace renaming and synchronous method generation.
- Copy the generated C# code into a file in the client project that will consume the API.
- Start consuming the web API:
 var todoClient = new TodoClient();

// Gets all to-dos from the API
 var allTodos = await todoClient.GetAllAsync();

 // Create a new TodoItem, and save it via the API.
var createdTodo = await todoClient.CreateAsync(new TodoItem());

// Get a single to-do by ID
var foundTodo = await todoClient.GetByIdAsync(1);
Customize API documentation
Swagger provides options for documenting the object model to ease consumption of the web API.
API info and description
In the Startup.ConfigureServices method, a configuration action passed to the AddSwaggerDocument method adds information such as the author, license, and description:
services.AddSwaggerDocument(config =>
{
    config.PostProcess = document =>
    {
        document.Info.Version = "v1";
        document.Info.Title = "ToDo API";
        document.Info.Description = "A simple ASP.NET Core web API";
        document.Info.TermsOfService = "None";
        document.Info.Contact = new NSwag.OpenApiContact
        {
            Name = "Shayne Boyer",
            Email = string.Empty,
            Url = "https://twitter.com/spboyer"
        };
        document.Info.License = new NSwag.OpenApiLicense
        {
            Name = "Use under LICX",
            Url = "https://example.com/license"
        };
    };
});
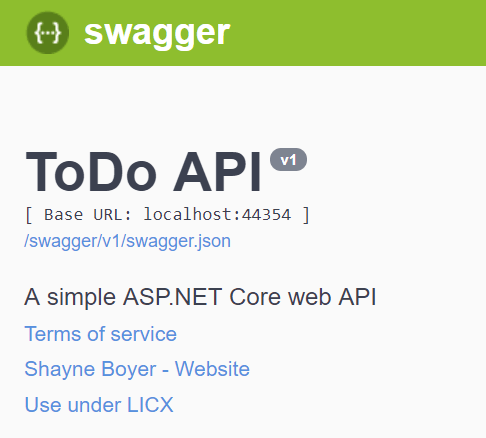
The Swagger UI displays the version's information:
XML comments
To enable XML comments, perform the following steps:
- Right-click the project in Solution Explorer and select
Edit <project_name>.csproj. - Manually add the highlighted lines to the
.csprojfile:
<PropertyGroup>
  <GenerateDocumentationFile>true</GenerateDocumentationFile>
  <NoWarn>$(NoWarn);1591</NoWarn>
</PropertyGroup>
Data annotations
Because NSwag uses Reflection, and the recommended return type for web API actions is ActionResult<T>, it can only infer the return type defined by T. You can't automatically infer other possible return types.
Consider the following example:
[HttpPost]
public ActionResult<TodoItem> Create(TodoItem item)
{
    _context.TodoItems.Add(item);
    _context.SaveChanges();

    return CreatedAtRoute("GetTodo", new { id = item.Id }, item);
}
The preceding action returns ActionResult<T>. Inside the action, it's returning CreatedAtRoute. Since the controller has the [ApiController] attribute, a BadRequest response is possible, too. For more information, see Automatic HTTP 400 responses. Use data annotations to tell clients which HTTP status codes this action is known to return. Mark the action with the following attributes:
[ProducesResponseType(StatusCodes.Status201Created)]     // Created
[ProducesResponseType(StatusCodes.Status400BadRequest)]  // BadRequest
In ASP.NET Core 2.2 or later, you can use conventions instead of explicitly decorating individual actions with [ProducesResponseType]. For more information, see Use web API conventions.
The Swagger generator can now accurately describe this action, and generated clients know what they receive when calling the endpoint. As a recommendation, mark all actions with these attributes.
For guidelines on what HTTP responses your API actions should return, see RFC 9110: HTTP Semantics (Section 9.3. Method Definitions).
Collaborate with us on GitHub
The source for this content can be found on GitHub, where you can also create and review issues and pull requests. For more information, see our contributor guide.
ASP.NET Core