Using the Entity Framework 4.0 and the ObjectDataSource Control, Part 3: Sorting and Filtering
by Tom Dykstra
This tutorial series builds on the Contoso University web application that is created by the Getting Started with the Entity Framework 4.0 tutorial series. If you didn't complete the earlier tutorials, as a starting point for this tutorial you can download the application that you would have created. You can also download the application that is created by the complete tutorial series. If you have questions about the tutorials, you can post them to the ASP.NET Entity Framework forum.
In the previous tutorial you implemented the repository pattern in an n-tier web application that uses the Entity Framework and the ObjectDataSource control. This tutorial shows how to do sorting and filtering and handle master-detail scenarios. You'll add the following enhancements to the Departments.aspx page:
- A text box to allow users to select departments by name.
- A list of courses for each department that's shown in the grid.
- The ability to sort by clicking column headings.

Adding the Ability to Sort GridView Columns
Open the Departments.aspx page and add a SortParameterName="sortExpression" attribute to the ObjectDataSource control named DepartmentsObjectDataSource. (Later you'll create a GetDepartments method that takes a parameter named sortExpression.) The markup for the opening tag of the control now resembles the following example.
<asp:ObjectDataSource ID="DepartmentsObjectDataSource" runat="server"
        TypeName="ContosoUniversity.BLL.SchoolBL" DataObjectTypeName="ContosoUniversity.DAL.Department"
        SelectMethod="GetDepartments" DeleteMethod="DeleteDepartment" UpdateMethod="UpdateDepartment"
        ConflictDetection="CompareAllValues" OldValuesParameterFormatString="orig{0}"
        OnUpdated="DepartmentsObjectDataSource_Updated" SortParameterName="sortExpression" >
Add the AllowSorting="true" attribute to the opening tag of the GridView control. The markup for the opening tag of the control now resembles the following example.
<asp:GridView ID="DepartmentsGridView" runat="server" AutoGenerateColumns="False"
        DataSourceID="DepartmentsObjectDataSource" DataKeyNames="DepartmentID"
        OnRowUpdating="DepartmentsGridView_RowUpdating"
        AllowSorting="true" >
In Departments.aspx.cs, set the default sort order by calling the GridView control's Sort method from the Page_Load method:
protected void Page_Load(object sender, EventArgs e)
{
    if (!IsPostBack)
    {
        DepartmentsGridView.Sort("Name", SortDirection.Ascending);
    }
}
You can add code that sorts or filters in either the business logic class or the repository class. If you do it in the business logic class, the sorting or filtering work will be done after the data is retrieved from the database, because the business logic class is working with an IEnumerable object returned by the repository. If you add sorting and filtering code in the repository class and you do it before a LINQ expression or object query has been converted to an IEnumerable object, your commands will be passed through to the database for processing, which is typically more efficient. In this tutorial you'll implement sorting and filtering in a way that causes the processing to be done by the database — that is, in the repository.
To add sorting capability, you must add a new method to the repository interface and repository classes as well as to the business logic class. In the ISchoolRepository.cs file, add a new GetDepartments method that takes a sortExpression parameter that will be used to sort the list of departments that's returned:
IEnumerable<Department> GetDepartments(string sortExpression);
The sortExpression parameter will specify the column to sort on and the sort direction.
Add code for the new method to the SchoolRepository.cs file:
public IEnumerable<Department> GetDepartments(string sortExpression)
{
    if (String.IsNullOrWhiteSpace(sortExpression))
    {
        sortExpression = "Name";
    }
    return context.Departments.Include("Person").OrderBy("it." + sortExpression).ToList();
}
Change the existing parameterless GetDepartments method to call the new method:
public IEnumerable<Department> GetDepartments()
{
    return GetDepartments("");
}
In the test project, add the following new method to MockSchoolRepository.cs:
public IEnumerable<Department> GetDepartments(string sortExpression)
{
    return departments;
}
If you were going to create any unit tests that depended on this method returning a sorted list, you would need to sort the list before returning it. You won't be creating tests like that in this tutorial, so the method can just return the unsorted list of departments.
In the SchoolBL.cs file, add the following new method to the business logic class:
public IEnumerable<Department> GetDepartments(string sortExpression)
{
    return schoolRepository.GetDepartments(sortExpression);
}
This code passes the sort parameter to the repository method.
Run the Departments.aspx page.

You can now click any column heading to sort by that column. If the column is already sorted, clicking the heading reverses the sort direction.
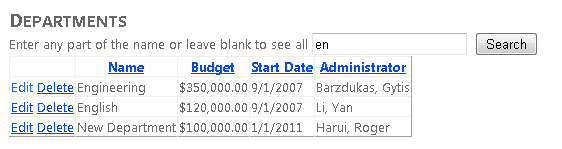
Adding a Search Box
In this section you'll add a search text box, link it to the ObjectDataSource control using a control parameter, and add a method to the business logic class to support filtering.
Open the Departments.aspx page and add the following markup between the heading and the first ObjectDataSource control:
Enter any part of the name or leave the box blank to see all names:
    <asp:TextBox ID="SearchTextBox" runat="server" AutoPostBack="true"></asp:TextBox>
     <asp:Button ID="SearchButton" runat="server" Text="Search" />
In the ObjectDataSource control named DepartmentsObjectDataSource, do the following:
- Add a
SelectParameterselement for a parameter namednameSearchStringthat gets the value entered in theSearchTextBoxcontrol. - Change the
SelectMethodattribute value toGetDepartmentsByName. (You'll create this method later.)
The markup for the ObjectDataSource control now resembles the following example:
<asp:ObjectDataSource ID="DepartmentsObjectDataSource" runat="server" TypeName="ContosoUniversity.BLL.SchoolBL"
        SelectMethod="GetDepartmentsByName" DeleteMethod="DeleteDepartment" UpdateMethod="UpdateDepartment"
        DataObjectTypeName="ContosoUniversity.DAL.Department" ConflictDetection="CompareAllValues"
        SortParameterName="sortExpression" OldValuesParameterFormatString="orig{0}"
        OnUpdated="DepartmentsObjectDataSource_Updated">
        <SelectParameters>
            <asp:ControlParameter ControlID="SearchTextBox" Name="nameSearchString" PropertyName="Text"
                Type="String" />
        </SelectParameters>
    </asp:ObjectDataSource>
In ISchoolRepository.cs, add a GetDepartmentsByName method that takes both sortExpression and nameSearchString parameters:
IEnumerable<Department> GetDepartmentsByName(string sortExpression, string nameSearchString);
In SchoolRepository.cs, add the following new method:
public IEnumerable<Department> GetDepartmentsByName(string sortExpression, string nameSearchString)
{
    if (String.IsNullOrWhiteSpace(sortExpression))
    {
        sortExpression = "Name";
    }
    if (String.IsNullOrWhiteSpace(nameSearchString))
    {
        nameSearchString = "";
    }
    return context.Departments.Include("Person").OrderBy("it." + sortExpression).Where(d => d.Name.Contains(nameSearchString)).ToList();
}
This code uses a Where method to select items that contain the search string. If the search string is empty, all records will be selected. Note that when you specify method calls together in one statement like this (Include, then OrderBy, then Where), the Where method must always be last.
Change the existing GetDepartments method that takes a sortExpression parameter to call the new method:
public IEnumerable<Department> GetDepartments(string sortExpression)
{
    return GetDepartmentsByName(sortExpression, "");
}
In MockSchoolRepository.cs in the test project, add the following new method:
public IEnumerable<Department> GetDepartmentsByName(string sortExpression, string nameSearchString)
{
    return departments;
}
In SchoolBL.cs, add the following new method:
public IEnumerable<Department> GetDepartmentsByName(string sortExpression, string nameSearchString)
{
    return schoolRepository.GetDepartmentsByName(sortExpression, nameSearchString);
}
Run the Departments.aspx page and enter a search string to make sure that the selection logic works. Leave the text box empty and try a search to make sure that all records are returned.
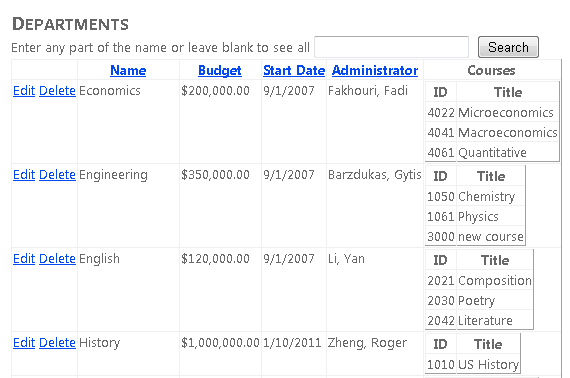
Adding a Details Column for Each Grid Row
Next, you want to see all of the courses for each department displayed in the right-hand cell of the grid. To do this, you'll use a nested GridView control and databind it to data from the Courses navigation property of the Department entity.
Open Departments.aspx and in the markup for the GridView control, specify a handler for the RowDataBound event. The markup for the opening tag of the control now resembles the following example.
<asp:GridView ID="DepartmentsGridView" runat="server" AutoGenerateColumns="False"
        DataSourceID="DepartmentsObjectDataSource" DataKeyNames="DepartmentID"
        OnRowUpdating="DepartmentsGridView_RowUpdating"
        OnRowDataBound="DepartmentsGridView_RowDataBound"
        AllowSorting="True" >
Add a new TemplateField element after the Administrator template field:
<asp:TemplateField HeaderText="Courses">
                <ItemTemplate>
                    <asp:GridView ID="CoursesGridView" runat="server" AutoGenerateColumns="False">
                        <Columns>
                            <asp:BoundField DataField="CourseID" HeaderText="ID" />
                            <asp:BoundField DataField="Title" HeaderText="Title" />
                        </Columns>
                    </asp:GridView>
                </ItemTemplate>
            </asp:TemplateField>
This markup creates a nested GridView control that shows the course number and title of a list of courses. It does not specify a data source because you'll databind it in code in the RowDataBound handler.
Open Departments.aspx.cs and add the following handler for the RowDataBound event:
protected void DepartmentsGridView_RowDataBound(object sender, GridViewRowEventArgs e)
{
    if (e.Row.RowType == DataControlRowType.DataRow)
    {
        var department = e.Row.DataItem as Department;
        var coursesGridView = (GridView)e.Row.FindControl("CoursesGridView");
        coursesGridView.DataSource = department.Courses.ToList();
        coursesGridView.DataBind();
    }
}
This code gets the Department entity from the event arguments, converts the Courses navigation property to a List collection, and databinds the nested GridView to the collection.
Open the SchoolRepository.cs file and specify eager loading for the Courses navigation property by calling the Include method in the object query that you create in the GetDepartmentsByName method. The return statement in the GetDepartmentsByName method now resembles the following example.
return context.Departments.Include("Person").Include("Courses").
    OrderBy("it." + sortExpression).Where(d => d.Name.Contains(nameSearchString)).ToList();
Run the page. In addition to the sorting and filtering capability that you added earlier, the GridView control now shows nested course details for each department.
This completes the introduction to sorting, filtering, and master-detail scenarios. In the next tutorial, you'll see how to handle concurrency.
Feedback
Coming soon: Throughout 2024 we will be phasing out GitHub Issues as the feedback mechanism for content and replacing it with a new feedback system. For more information see: https://aka.ms/ContentUserFeedback.
Submit and view feedback for