Note
Access to this page requires authorization. You can try signing in or changing directories.
Access to this page requires authorization. You can try changing directories.
This tutorial shows you how to use layouts to create a consistent look for the pages on a site that uses ASP.NET Web Pages. It assumes you have completed the series through Deleting Database Data in ASP.NET Web Pages.
What you'll learn:
- What a layout page is.
- How to combine layout pages with dynamic content.
- How to pass values to a layout page.
About Layouts
The pages you've created so far have all been complete, standalone pages. They all belong to the same site, but they don't have any common elements or a standard look.
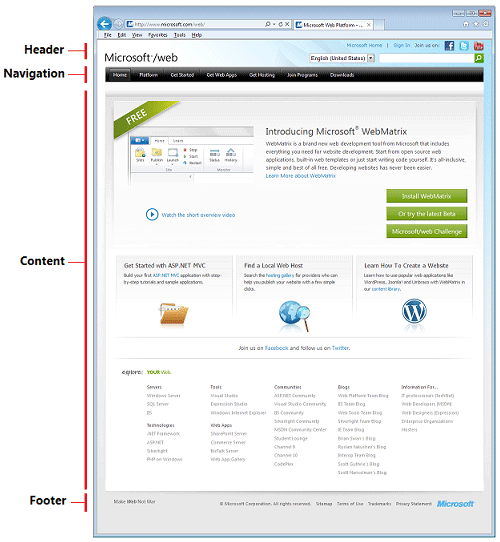
Most sites do have a consistent look and layout. For example, if you go to the Microsoft.com/web site and look around, you see that the pages all adhere to an overall layout and to a visual theme:
An inefficient way to create this layout would be to define a header, navigation bar, and footer separately on each of your pages. You'd be duplicating the same markup each time. If you wanted to change something (for example, update the footer), you'd have to change each page separately.
That's where layout pages come in. In ASP.NET Web Pages, you can define a layout page that provides an overall container for pages on your site. For example, the layout page can contain the header, navigation area, and footer. The layout page includes a placeholder where the main content goes.
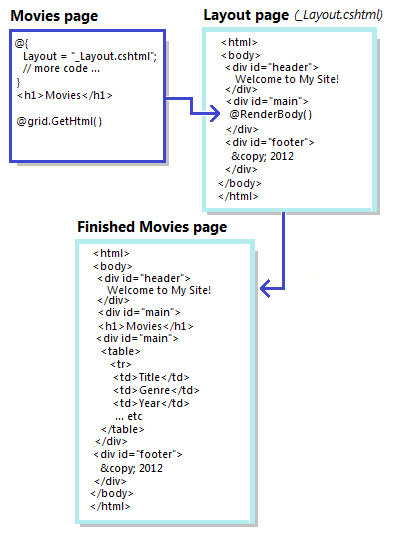
You can then define individual content pages that contain the markup and the code for only that page. Content pages don't have to be complete HTML pages; they don't even have to have a <body> element. They also have a line of code that tells ASP.NET what layout page you want to display the content in. Here's a picture that shows roughly how this relationship works:
This interaction is easy to understand when you see it in action. In this tutorial, you'll change your movies pages to use a layout.
Adding a Layout Page
You'll start by creating a layout page that defines a typical page layout with a header, footer, and an area for the main content. In the WebPagesMovies site, add a CSHTML page named _Layout.cshtml.
The leading underscore ( _ ) character is significant. If a page's name starts with an underscore, ASP.NET won't directly send that page to the browser. This convention lets you define pages that are required for your site but that users shouldn't be able to request directly.
Replace the content in the page with the following:
<!DOCTYPE html>
<html>
<head>
<title>My Movie Site</title>
<link href="~/Styles/Movies.css" rel="stylesheet" type="text/css" />
</head>
<body>
<div id="container">
<div id="header">
<h1>My Movie Site</h1>
</div>
<div id="main">
@RenderBody()
</div>
<div id="footer">
© @DateTime.Now.Year My Movie Site
</div>
</div>
</body>
</html>
As you can see, this markup is just HTML that uses <div> elements to define three sections in the page plus one more <div> element to hold the three sections. The footer contains a bit of Razor code: @DateTime.Now.Year, which will render the current year at that location in the page.
Notice that there's a link to a style sheet named Movies.css. The style sheet is where the details of the physical layout of the elements will be defined. You'll create that in a moment.
The only unusual feature in this _Layout.cshtml page is the @Render.Body() line. That's the placeholder where the content will go when this layout is merged with another page.
Adding a .css File
The preferred way to define the actual arrangement (that is, appearance) of elements on the page is to use cascading style sheet (CSS) rules. So you'll create a .css file that has the rules for your new layout.
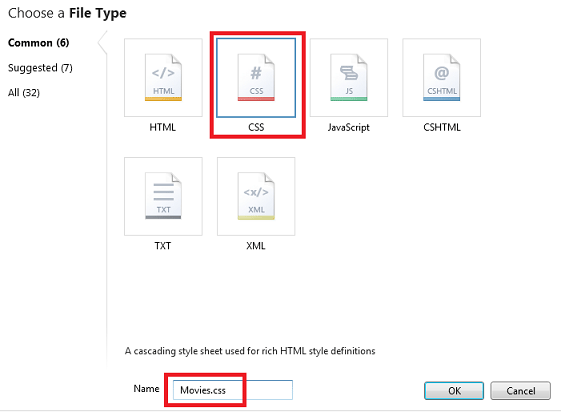
In WebMatrix, select the root of your site. Then in the Files tab of the ribbon, click the arrow under the New button and then click New Folder.
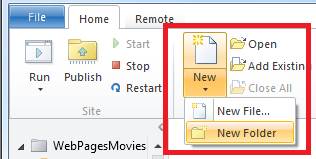
Name the new folder Styles.
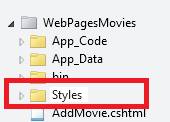
Inside the new Styles folder, create a file named Movies.css.
Replace the contents of the new .css file with the following:
html{ height:100%; margin:0; padding:0; }

body {
  height:60%;
  font-family:'Trebuchet MS',  'Arial', 'Helvetica', 'sans-serif';
  font-size:10pt;
  background-color: LightGray;
  line-height:1.6em;
}

h1{ font-size:1.6em; }
h2{ font-size:1.4em; }

#container{
   min-height:100%;
   position:relative;
   left:10%;
}

#header{
  padding:8px;
  width:80%;
  background-color:#4b6c9e;
  color:White;
}

#main{
  width:80%;
  padding: 8px;
  padding-bottom:4em;
  background-color:White;
}

#footer{
  width:80%;
  height:2em;
  padding:8px;
  margin-top:-2em;
  background-color:LightGray;
}

.head { background-color: #E8E8E8; font-weight: bold; color: #FFF; }
.grid th, .grid td { border: 1px solid #C0C0C0; padding: 5px; }
.alt { background-color: #E8E8E8; color: #000; }
.selected {background-color:Yellow;}
span.caption {width:100px;}
span.dataDisplay {font-weight:bold;}
We won't say much about these CSS rules, except to note two things. One is that in addition to setting fonts and sizes, the rules use absolute positioning to establish the location of the header, footer, and main content area. If you're new to positioning in CSS, you can read the CSS Positioning tutorial at the W3Schools site.
The other thing to note is that at the bottom, we've copied the style rules that were originally defined individually in the Movies.cshtml file. These rules were used in the Introduction to Displaying Data by Using ASP.NET Web Pages tutorial to make the WebGrid helper render markup that added stripes to the table. (If you're going to use a .css file for style definitions, you might as well put the style rules for the whole site in it.)
Updating the Movies File to Use the Layout
Now you can update the existing files in your site to use the new layout. Open the Movies.cshtml file. At the top, as the first line of code, add the following:
Layout = "~/_Layout.cshtml";
The page now starts out this way:
@{
    Layout = "~/_Layout.cshtml";

    var db = Database.Open("WebPagesMovies") ;
    var selectCommand = "SELECT * FROM Movies";
    var searchTerm = "";

    // Etc.
This one line of code tells ASP.NET that when the Movies page runs, it should be merged with the _Layout.cshtml file.
Since the Movies.cshtml file now uses a layout page, you can remove the markup from the Movies.cshtml page that's taken care of by the _Layout.cshtml file. Take out the <!DOCTYPE>, <html>, and <body> opening and closing tags. Take out the entire <head> element and its contents, which includes the style rules for the grid, since you've now got those rules in a .css file. While you're at it, change the existing <h1> element to an <h2> element; you have an <h1> element in the layout page already. Change the <h2> text to "List Movies".
Normally you wouldn't have to make these sorts of changes in a content page. When you start your site out with a layout page, you create content pages without all these elements to begin with. In this case, though, you're converting a standalone page to one that uses a layout, so there's a bit of cleanup.
When you're finished, the Movies.cshtml page will look like the following:
@{
    Layout = "~/_Layout.cshtml";

    var db = Database.Open("WebPagesMovies") ;
    var selectCommand = "SELECT * FROM Movies";
    var searchTerm = "";

    if(!Request.QueryString["searchGenre"].IsEmpty() ) {
        selectCommand = "SELECT * FROM Movies WHERE Genre = @0";
        searchTerm = Request.QueryString["searchGenre"];
    }

    if(!Request.QueryString["searchTitle"].IsEmpty() ) {
      selectCommand = "SELECT * FROM Movies WHERE Title LIKE @0";
      searchTerm = "%" + Request.QueryString["searchTitle"] + "%";
    }

    var selectedData = db.Query(selectCommand, searchTerm);
    var grid = new WebGrid(source: selectedData, defaultSort: "Genre", rowsPerPage:3);
}
  <h2>List Movies</h2>
  <form method="get">
    <div>
      <label for="searchGenre">Genre to look for:</label>
      <input type="text" name="searchGenre"
         value="@Request.QueryString["searchGenre"]" />
      <input type="Submit" value="Search Genre" /><br/>
      (Leave blank to list all movies.)<br/>
    </div>
    <div>
       <label for="SearchTitle">Movie title contains the following:</label>
       <input type="text" name="searchTitle" value="@Request.QueryString["searchTitle"]" />
       <input type="Submit" value="Search Title" /><br/>
    </div>
  </form>
  <div>
    @grid.GetHtml(
        tableStyle: "grid",
        headerStyle: "head",
        alternatingRowStyle: "alt",
        columns: grid.Columns(
            grid.Column(format: @<a href="~/EditMovie?id=@item.ID">Edit</a>),
            grid.Column("Title"),
            grid.Column("Genre"),
            grid.Column("Year"),
            grid.Column(format: @<a href="~/DeleteMovie?id=@item.ID">Delete</a>)
       )
    )
  </div>
  <p><a href="~/AddMovie">Add a movie</a></p>
Testing the Layout
Now you can see what the layout looks like. In WebMatrix, right-click the Movies.cshtml page and select Launch in browser. When the browser displays the page, it looks like this page:
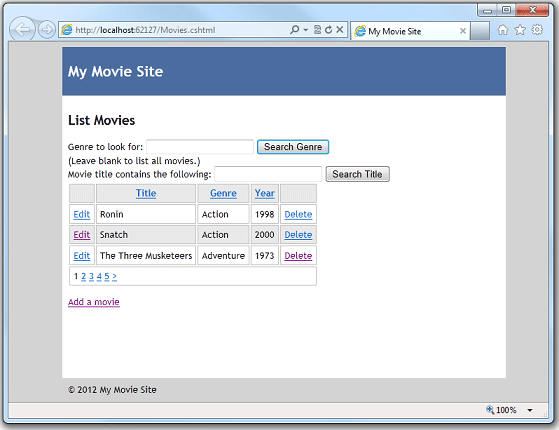
ASP.NET has merged the content of the Movies.cshtml page into the _Layout.cshtml page right where the RenderBody method is. And of course the _Layout.cshtml page references a .css file that defines the look of the page.
Updating the AddMovie Page to Use the Layout
The real benefit of layouts is that you can use them for all the pages in your site. Open the AddMovie.cshtml page.
You might remember that the AddMovie.cshtml page originally had some CSS rules in it to define the look of validation error messages. Since you have a .css file for your site now, you can move those rules to the .css file. Remove them from the AddMovie.cshtml file and add them to the bottom of the Movies.css file. You are moving the following rules:
.field-validation-error {
  font-weight:bold;
  color:red;
  background-color:yellow;
 }
.validation-summary-errors{
  border:2px dashed red;
  color:red;
  background-color:yellow;
  font-weight:bold;
  margin:12px;
}
Now make the same sorts of changes in AddMovie.cshtml that you did for Movies.cshtml — add Layout="~/_Layout.cshtml; and remove the HTML markup that's now extraneous. Change the <h1> element to <h2>. When you're done, the page will look like this example:
@{
    Layout = "~/_Layout.cshtml";
    Validation.RequireField("title", "You must enter a title");
    Validation.RequireField("genre", "Genre is required");
    Validation.RequireField("year", "You haven't entered a year");

    var title = "";
    var genre = "";
    var year = "";

    if(IsPost){
        if(Validation.IsValid()){
            title = Request.Form["title"];
            genre = Request.Form["genre"];
            year = Request.Form["year"];

            var db = Database.Open("WebPagesMovies");
            var insertCommand =
                "INSERT INTO Movies (Title, Genre, Year) Values(@0, @1, @2)";
            db.Execute(insertCommand, title, genre, year);
            Response.Redirect("~/Movies");
        }
    }
}
  <h2>Add a Movie</h2>
    @Html.ValidationSummary()
 <form method="post">
  <fieldset>
    <legend>Movie Information</legend>
    <p><label for="title">Title:</label>
      <input type="text" name="title" value="@Request.Form["title"]" />
      @Html.ValidationMessage("title")
    </p>

    <p><label for="genre">Genre:</label>
      <input type="text" name="genre" value="@Request.Form["genre"]" />
      @Html.ValidationMessage("genre")
    </p>

    <p><label for="year">Year:</label>
      <input type="text" name="year" value="@Request.Form["year"]" />
      @Html.ValidationMessage("year")
    </p>

    <p><input type="submit" name="buttonSubmit" value="Add Movie" /></p>
  </fieldset>
  </form>
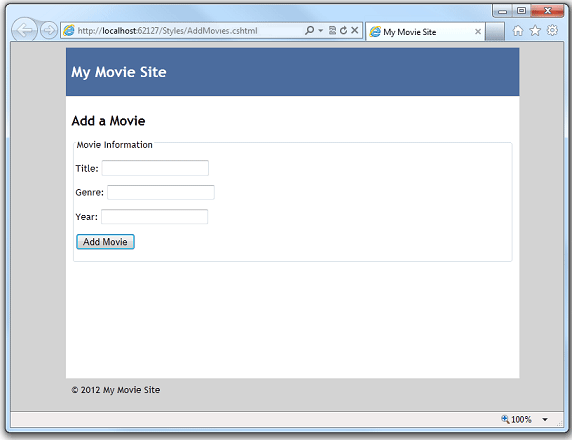
Run the page. Now it looks like this illustration:
You want to make similar changes to the pages in the site — EditMovie.cshtml and DeleteMovie.cshtml. However, before you do, you can make another change to the layout that makes it a little more flexible.
Passing Title Information to the Layout Page
The _Layout.cshtml page that you created has a <title> element that's set to "My Movie Site". Most browsers display the content of this element as the text on a tab:

This title information is generic. Suppose that you want the title text to be more specific to the current page. (The title text is also used by search engines to determine what your page is about.) You can pass information from a content page like Movies.cshtml or AddMovie.cshtml to the layout page, and then use that information to customize what the layout page renders.
Open the Movies.cshtml page again. In the code at the top, add the following line:
Page.Title = "List Movies";
The Page object is available on all .cshtml pages and is for this purpose, namely to share information between a page and its layout.
Open the _Layout.cshtml page. Change the <title> element so that it looks like this markup:
<title>@Page.Title</title>
This code renders whatever is in the Page.Title property right at that location in the page.
Run the Movies.cshtml page. This time the browser tab shows what you passed as the value of Page.Title:

If you want, view the page source in the browser. You can see that the <title> element is rendered as <title>List Movies</title>.
Tip
The Page Object
A useful feature of Page is that it's a dynamic object — the Title property is not a fixed or reserved name. You can use any name for a value of the Page object. For example, you could as easily have passed the title by using a property named Page.CurrentName or Page.MyPage. The only restriction is that the name has to follow the normal rules for what properties can be named. (For example, the name can't contain a space.)
You can pass any number of values by using the Page object. If you wanted to pass movie information to the layout page, you could pass values by using something like Page.MovieTitle and Page.Genre and Page.MovieYear. (Or any other names that you invented to store the information.) The only requirement — which is probably obvious — is that you have to use the same names in the content page and the layout page.
The information you pass by using the Page object isn't limited to just text to display on the layout page. You can pass a value to the layout page, and then code in the layout page can use the value to decide whether to display a section of the page, what .css file to use, and so on. The values you pass in the Page object are like any other values that you use in code. It's just that the values originate in the content page and are passed to the layout page.
Open the AddMovie.cshtml page and add a line to the top of the code that provides a title for the AddMovie.cshtml page:
Page.Title = "Add a Movie";
Run the AddMovie.cshtml page. You see the new title there:

Updating the Remaining Pages to Use the Layout
Now you can finish the remaining pages in your site so that they use the new layout. Open EditMovie.cshtml and DeleteMovie.cshtml in turn and make the same changes in each.
Add the line of code that links to the layout page:
Layout = "~/_Layout.cshtml";
Add a line to set the title of the page:
Page.Title = "Edit a Movie";
or:
Page.Title = "Delete a Movie";
Remove all the extraneous HTML markup — basically, leave only the bits that are inside the <body> element (plus the code block at the top).
Change the <h1> element to be an <h2> element.
When you've made these changes, test each and make sure that it's displaying properly and that the title is correct.
Parting Thoughts About Layout Pages
In this tutorial you created a _Layout.cshtml page and used the RenderBody method to merge content from another page. That's the basic pattern for using layouts in Web Pages.
Layout pages have additional features that we didn't cover here. For example, you can nest layout pages — one layout page can in turn reference another. Nested layouts can be useful if you're working with subsections of a site that require different layouts. You can also use additional methods (for example, RenderSection) to set up named sections in the layout page.
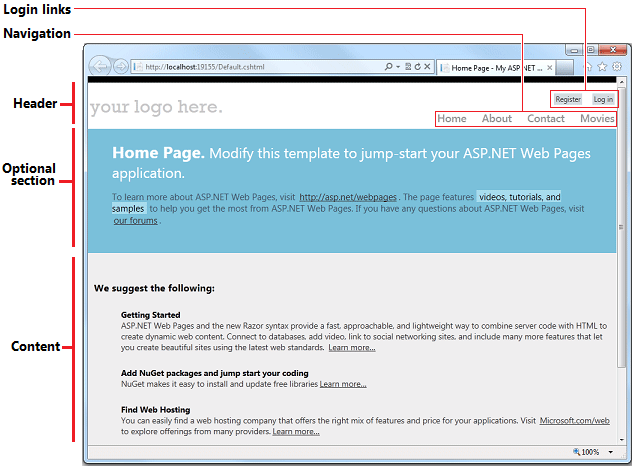
The combination of layout pages and .css files is powerful. As you'll see in the next tutorial series, in WebMatrix you can create a site based on a template, which gives you a site that has prebuilt functionality in it. The templates make good use of layout pages and CSS to create sites that look great and that have features like menus. Here's a screenshot of the home page from a site based on a template, showing features that use layout pages and CSS:
Complete Listing for Movie Page (Updated to Use a Layout Page)
@{
    Layout = "~/_Layout.cshtml";
    Page.Title = "List Movies";

    var db = Database.Open("WebPagesMovies") ;
    var selectCommand = "SELECT * FROM Movies";
    var searchTerm = "";

    if(!Request.QueryString["searchGenre"].IsEmpty() ) {
        selectCommand = "SELECT * FROM Movies WHERE Genre = @0";
        searchTerm = Request.QueryString["searchGenre"];
    }

    if(!Request.QueryString["searchTitle"].IsEmpty() ) {
        selectCommand = "SELECT * FROM Movies WHERE Title LIKE @0";
        searchTerm = "%" + Request.QueryString["searchTitle"] + "%";
    }

    var selectedData = db.Query(selectCommand, searchTerm);
    var grid = new WebGrid(source: selectedData, defaultSort: "Genre", rowsPerPage:3);
}

<h2>List Movies</h2>
    <form method="get">
      <div>
        <label for="searchGenre">Genre to look for:</label>
        <input type="text" name="searchGenre" value="@Request.QueryString["searchGenre"]" />
        <input type="Submit" value="Search Genre" /><br/>
        (Leave blank to list all movies.)<br/>
      </div>

      <div>
        <label for="SearchTitle">Movie title contains the following:</label>
        <input type="text" name="searchTitle" value="@Request.QueryString["searchTitle"]" />
        <input type="Submit" value="Search Title" /><br/>
      </div>
    </form>

<div>
    @grid.GetHtml(
        tableStyle: "grid",
        headerStyle: "head",
        alternatingRowStyle: "alt",
        columns: grid.Columns(
    grid.Column(format: @<a href="~/EditMovie?id=@item.ID">Edit</a>),
    grid.Column("Title"),
    grid.Column("Genre"),
    grid.Column("Year"),
    grid.Column(format: @<a href="~/DeleteMovie?id=@item.ID">Delete</a>)
        )
    )
</div>
<p><a href="~/AddMovie">Add a movie</a></p>
Complete Page Listing for Add Movie Page (Updated for Layout)
@{
    Layout = "~/_Layout.cshtml";
    Page.Title = "Add a Movie";

    Validation.RequireField("title", "You must enter a title");
    Validation.RequireField("genre", "Genre is required");
    Validation.RequireField("year", "You haven't entered a year");

    var title = "";
    var genre = "";
    var year = "";

    if(IsPost){
        if(Validation.IsValid()){
            title = Request.Form["title"];
            genre = Request.Form["genre"];
            year = Request.Form["year"];

            var db = Database.Open("WebPagesMovies");
            var insertCommand = "INSERT INTO Movies (Title, Genre, Year) VALUES(@0, @1, @2)";
            db.Execute(insertCommand, title, genre, year);

            Response.Redirect("~/Movies");
        }
    }
}

<h2>Add a Movie</h2>
@Html.ValidationSummary()
<form method="post">
<fieldset>
    <legend>Movie Information</legend>
    <p><label for="title">Title:</label>
        <input type="text" name="title" value="@Request.Form["title"]" />
        @Html.ValidationMessage("title")

    <p><label for="genre">Genre:</label>
        <input type="text" name="genre" value="@Request.Form["genre"]" />
        @Html.ValidationMessage("genre")

    <p><label for="year">Year:</label>
        <input type="text" name="year" value="@Request.Form["year"]" />
        @Html.ValidationMessage("year")

    <p><input type="submit" name="buttonSubmit" value="Add Movie" /></p>
</fieldset>
</form>
Complete Page Listing for Delete Movie Page (Updated for Layout)
@{
    Layout = "~/_Layout.cshtml";
    Page.Title = "Delete a Movie";

    var title = "";
    var genre = "";
    var year = "";
    var movieId = "";

    if(!IsPost){
        if(!Request.QueryString["ID"].IsEmpty() && Request.QueryString["ID"].AsInt() > 0){
            movieId = Request.QueryString["ID"];
            var db = Database.Open("WebPagesMovies");
            var dbCommand = "SELECT * FROM Movies WHERE ID = @0";
            var row = db.QuerySingle(dbCommand, movieId);
            if(row != null) {
                title = row.Title;
                genre = row.Genre;
                year = row.Year;
            }
            else{
                Validation.AddFormError("No movie was found for that ID.");
                // If you are using a version of ASP.NET Web Pages 2 that's
                // earlier than the RC release, comment out the preceding
                // statement and uncomment the following one.
                //ModelState.AddFormError("No movie was found for that ID.");
            }
        }
        else{
            Validation.AddFormError("No movie was found for that ID.");
            // If you are using a version of ASP.NET Web Pages 2 that's
            // earlier than the RC release, comment out the preceding
            // statement and uncomment the following one.
            //ModelState.AddFormError("No movie was found for that ID.");
        }
    }

    if(IsPost && !Request["buttonDelete"].IsEmpty()){
        movieId = Request.Form["movieId"];
        var db = Database.Open("WebPagesMovies");
        var deleteCommand = "DELETE FROM Movies WHERE ID = @0";
        db.Execute(deleteCommand, movieId);
        Response.Redirect("~/Movies");
    }

}

<h2>Delete a Movie</h2>
@Html.ValidationSummary()
<p><a href="~/Movies">Return to movie listing</a></p>

<form method="post">
<fieldset>
<legend>Movie Information</legend>

<p><span>Title:</span>
    <span>@title</span></p>

<p><span>Genre:</span>
    <span>@genre</span></p>

<p><span>Year:</span>
    <span>@year</span></p>

<input type="hidden" name="movieid" value="@movieId" />
<p><input type="submit" name="buttonDelete" value="Delete Movie" /></p>
</fieldset>
</form>
Complete Page Listing for Edit Movie Page (Updated for Layout)
@{
    Layout = "~/_Layout.cshtml";
    Page.Title = "Edit a Movie";

    var title = "";
    var genre = "";
    var year = "";
    var movieId = "";

    if(!IsPost){
        if(!Request.QueryString["ID"].IsEmpty() && Request.QueryString["ID"].IsInt()) {
            movieId = Request.QueryString["ID"];
            var db = Database.Open("WebPagesMovies");
            var dbCommand = "SELECT * FROM Movies WHERE ID = @0";
            var row = db.QuerySingle(dbCommand, movieId);

            if(row != null) {
                title = row.Title;
                genre = row.Genre;
                year = row.Year;
            }
            else{
                Validation.AddFormError("No movie was selected.");
                // If you are using a version of ASP.NET Web Pages 2 that's
                // earlier than the RC release, comment out the preceding
                // statement and uncomment the following one.
                //ModelState.AddFormError("No movie was selected.");
            }
        }
        else{
            Validation.AddFormError("No movie was selected.");
            // If you are using a version of ASP.NET Web Pages 2 that's
            // earlier than the RC release, comment out the preceding
            // statement and uncomment the following one.
            //ModelState.AddFormError("No movie was selected.");
        }
    }

    if(IsPost){
        Validation.RequireField("title", "You must enter a title");
        Validation.RequireField("genre", "Genre is required");
        Validation.RequireField("year", "You haven't entered a year");
        Validation.RequireField("movieid", "No movie ID was submitted!");

        title = Request.Form["title"];
        genre = Request.Form["genre"];
        year = Request.Form["year"];
        movieId = Request.Form["movieId"];

        if(Validation.IsValid()){
            var db = Database.Open("WebPagesMovies");
            var updateCommand = "UPDATE Movies SET Title=@0, Genre=@1, Year=@2 WHERE Id=@3";
            db.Execute(updateCommand, title, genre, year, movieId);
            Response.Redirect("~/Movies");
        }
    }
}

<h2>Edit a Movie</h2>
@Html.ValidationSummary()
<form method="post">
<fieldset>
    <legend>Movie Information</legend>

    <p><label for="title">Title:</label>
        <input type="text" name="title" value="@title" /></p>

    <p><label for="genre">Genre:</label>
        <input type="text" name="genre" value="@genre" /></p>

    <p><label for="year">Year:</label>
        <input type="text" name="year" value="@year" /></p>

    <input type="hidden" name="movieid" value="@movieId" />

    <p><input type="submit" name="buttonSubmit" value="Submit Changes" /></p>
</fieldset>
</form>
<p><a href="~/Movies">Return to movie listing</a></p>
Coming Up Next
In the next tutorial, you'll learn how to publish your site to the Internet so everyone can see it.
Additional Resources
- Creating a Consistent Look — An article that provides some more detail on working with layouts. It also describes how to pass a value to a layout page that shows or hides some of the content.
- Nested Layout Pages with Razor — Mike Brind blogs an example of how to nest layout pages. (Includes a download of the pages.)