Post deployment configurations for ASDK
After you install the Azure Stack Development Kit (ASDK), you should make a few recommended post deployment configuration changes while signed in as AzureStack\AzureStackAdmin on the ASDK host computer.
Install Azure Stack PowerShell
Azure Stack compatible Azure PowerShell modules are required to work with Azure Stack.
PowerShell commands for Azure Stack are installed through the PowerShell Gallery. To register the PSGallery repository, open an elevated PowerShell session and run the following command:
Set-PSRepository -Name "PSGallery" -InstallationPolicy Trusted
Use API version profiles to specify Azure Stack compatible Az modules. API version profiles provide a way to manage version differences between Azure and Azure Stack. An API version profile is a set of Az PowerShell modules with specific API versions. The Az.BootStrapper module that's available through the PowerShell Gallery provides PowerShell cmdlets that are required to work with API version profiles.
You can install the latest Azure Stack PowerShell module with or without internet connectivity to the ASDK host computer.
- Validate your prerequisites on your Windows machine. For instructions see Prerequisites for Windows.
- Before installing the required PowerShell version, make sure that you uninstall any existing Azure PowerShell modules.
- With an internet connection from the ASDK host computer: Run the following PowerShell script to install these modules on your ASDK installation:
  [Net.ServicePointManager]::SecurityProtocol = [Net.SecurityProtocolType]::Tls12

  Install-Module -Name Az.BootStrapper -Force
  Install-AzProfile -Profile 2020-09-01-hybrid -Force
  Install-Module -Name AzureStack -RequiredVersion 2.1.0

  Get-Module -Name "Az*" -ListAvailable
  Get-Module -Name "Azs*" -ListAvailable
If the installation is successful, the Az and AzureStack modules are displayed in the output.
- Without an internet connection from the ASDK host computer: In a disconnected scenario, you must first download the PowerShell modules to a machine that has internet connectivity using the following PowerShell commands:
$Path = "<Path that is used to save the packages>"

Save-Package `
  -ProviderName NuGet -Source https://www.powershellgallery.com/api/v2 -Name Az -Path $Path -Force -RequiredVersion 1.10.0

Save-Package `
  -ProviderName NuGet -Source https://www.powershellgallery.com/api/v2 -Name AzureStack -Path $Path -Force -RequiredVersion 2.1.0
Next, copy the downloaded packages to the ASDK computer and register the location as the default repository and install the Az and AzureStack modules from this repository:
$SourceLocation = "<Location on the development kit that contains the PowerShell packages>"
$RepoName = "MyNuGetSource"

Register-PSRepository -Name $RepoName -SourceLocation $SourceLocation -InstallationPolicy Trusted

Install-Module Az -Repository $RepoName

Install-Module AzureStack -Repository $RepoName
Download the Azure Stack tools
AzureStack-Tools is a GitHub repository that hosts PowerShell modules for managing and deploying resources to Azure Stack. You use the tools using the Az PowerShell modules, or the AzureRM modules.
To get these tools, clone the GitHub repository from the az branch or download the AzureStack-Tools folder by running the following script:
# Change directory to the root directory.
cd \

# Download the tools archive.
[Net.ServicePointManager]::SecurityProtocol = [Net.SecurityProtocolType]::Tls12
invoke-webrequest `
  https://github.com/Azure/AzureStack-Tools/archive/az.zip `
  -OutFile az.zip

# Expand the downloaded files.
expand-archive az.zip `
  -DestinationPath . `
  -Force

# Change to the tools directory.
cd AzureStack-Tools-az
Validate the ASDK installation
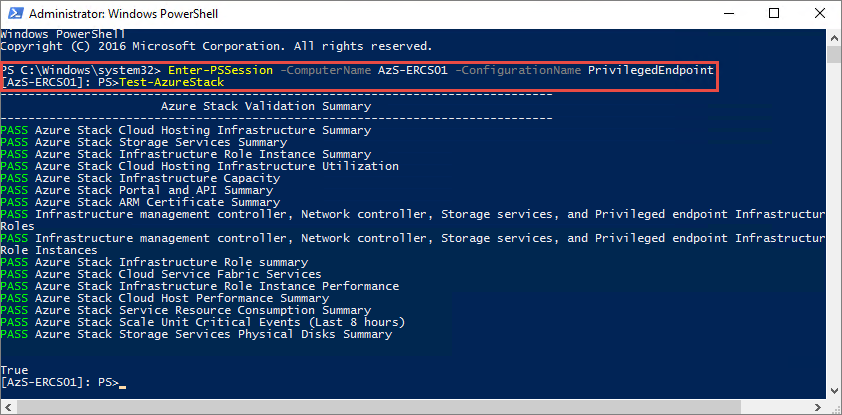
To ensure that your ASDK deployment was successful, use the Test-AzureStack cmdlet by following these steps:
- Sign in as AzureStack\AzureStackAdmin on the ASDK host computer.
- Open PowerShell as an admin (not PowerShell ISE).
- Run:
Enter-PSSession -ComputerName AzS-ERCS01 -ConfigurationName PrivilegedEndpoint - Run:
Test-AzureStack
The tests take a few minutes to complete. If the installation was successful, the output looks something like:
If there was a failure, follow the troubleshooting steps to get help.
Enable multi-tenancy
For deployments using Microsoft Entra ID, you need to enable multi-tenancy for your ASDK installation.
Note
When admin or user accounts from domains other than the one used to register Azure Stack are used to log in to an Azure Stack portal, the domain name used to register Azure Stack must be appended to the portal URL. For example, if Azure Stack has been registered with fabrikam.onmicrosoft.com and the user account logging in is admin@contoso.com, the URL to use to log in to the user portal would be: https://portal.local.azurestack.external/fabrikam.onmicrosoft.com.