Note
Access to this page requires authorization. You can try signing in or changing directories.
Access to this page requires authorization. You can try changing directories.
Applies to: Azure Stack HCI, versions 22H2 and 21H2; Windows Server 2022 Datacenter, Windows Server 2019 Datacenter
Important
Azure Stack HCI is now part of Azure Local. However, older versions of Azure Stack HCI, for example 22H2 will continue to reference Azure Stack HCI and won't reflect the name change. Learn more.
This article describes how to deploy Software Defined Networking (SDN) through Windows Admin Center after you configured your Azure Stack HCI cluster. Windows Admin Center enables you to deploy all the SDN infrastructure components on your existing Azure Stack HCI cluster, in the following deployment order:
- Network Controller
- Software Load Balancer (SLB)
- Gateway
To deploy SDN Network Controller during cluster creation, see Step 5: SDN (optional) of the Create cluster wizard.
Alternatively, you can deploy the entire SDN infrastructure through the SDN Express scripts.
You can also deploy an SDN infrastructure using System Center Virtual Machine Manager (VMM). For more information, see Manage SDN resources in the VMM fabric.
Important
You can't use Microsoft System Center VMM 2019 to manage clusters running Azure Stack HCI, version 21H2 or Windows Server 2022. Instead, you can use Microsoft System Center VMM 2022.
Important
You can't use Microsoft System Center VMM 2019 and Windows Admin Center to manage SDN at the same time.
Important
You can’t manage SDN on the Standard edition of Windows Server 2022 or Windows Server 2019. This is due to the limitations in the Remote Server Administration Tools (RSAT) installation on Windows Admin Center. However, you can manage SDN on the Datacenter edition of Windows Server 2022 and Windows Server 2019 and also on the Datacenter: Azure Edition of Windows Server 2022.
Before you begin
Before you begin an SDN deployment, plan out and configure your physical and host network infrastructure. Reference the following articles:
- Physical network requirements
- Host network requirements
- Create a cluster using Windows Admin Center
- Create a cluster using Windows PowerShell
- Plan a Software Defined Network infrastructure
- The Phased deployment section of Plan a Software Defined Network infrastructure to determine the capabilities enabled by deploying Network Controller
Requirements
The following requirements must be met for a successful SDN deployment:
- All server nodes must have Hyper-V enabled.
- All server nodes must be joined to Active Directory.
- A virtual switch must be created.
- The physical network must be configured.
Download the VHDX file
SDN uses a VHDX file containing either the Azure Stack HCI or Windows Server operating system (OS) as a source for creating the SDN virtual machines (VMs).
Note
The version of the OS in your VHDX must match the version used by the Azure Local Hyper-V machines. This VHDX file is used by all SDN infrastructure components.
Download an English-language version of the VHDX file.
Currently, a non-English VHDX file isn't available for download. If you require a non-English version, download the corresponding ISO file and convert it to VHDX using the Convert-WindowsImage cmdlet. You must run this script from a Windows client computer. You'll probably need to run this script as Administrator and modify the execution policy for scripts using the Set-ExecutionPolicy command.
The following syntax shows an example of using Convert-WindowsImage:
Install-Module -Name Convert-WindowsImage
Import-Module Convert-WindowsImage

$wimpath = "E:\sources\install.wim"
$vhdpath = "D:\temp\AzureStackHCI.vhdx"
$edition=1
Convert-WindowsImage -SourcePath $wimpath -Edition $edition -VHDPath $vhdpath -SizeBytes 500GB -DiskLayout UEFI
Deploy SDN Network Controller
SDN Network Controller deployment is a functionality of the SDN Infrastructure extension in Windows Admin Center. Complete the following steps to deploy Network Controller on your existing Azure Stack HCI cluster.
In Windows Admin Center, under Tools, select Settings, and then select Extensions.
On the Installed Extensions tab, verify that the SDN Infrastructure extension is installed. If not, install it.
In Windows Admin Center, under Tools, select SDN Infrastructure, then click Get Started.
Under Cluster settings, under Host, enter a name for the Network Controller. This is the DNS name used by management clients (such as Windows Admin Center) to communicate with Network Controller. You can also use the default populated name.
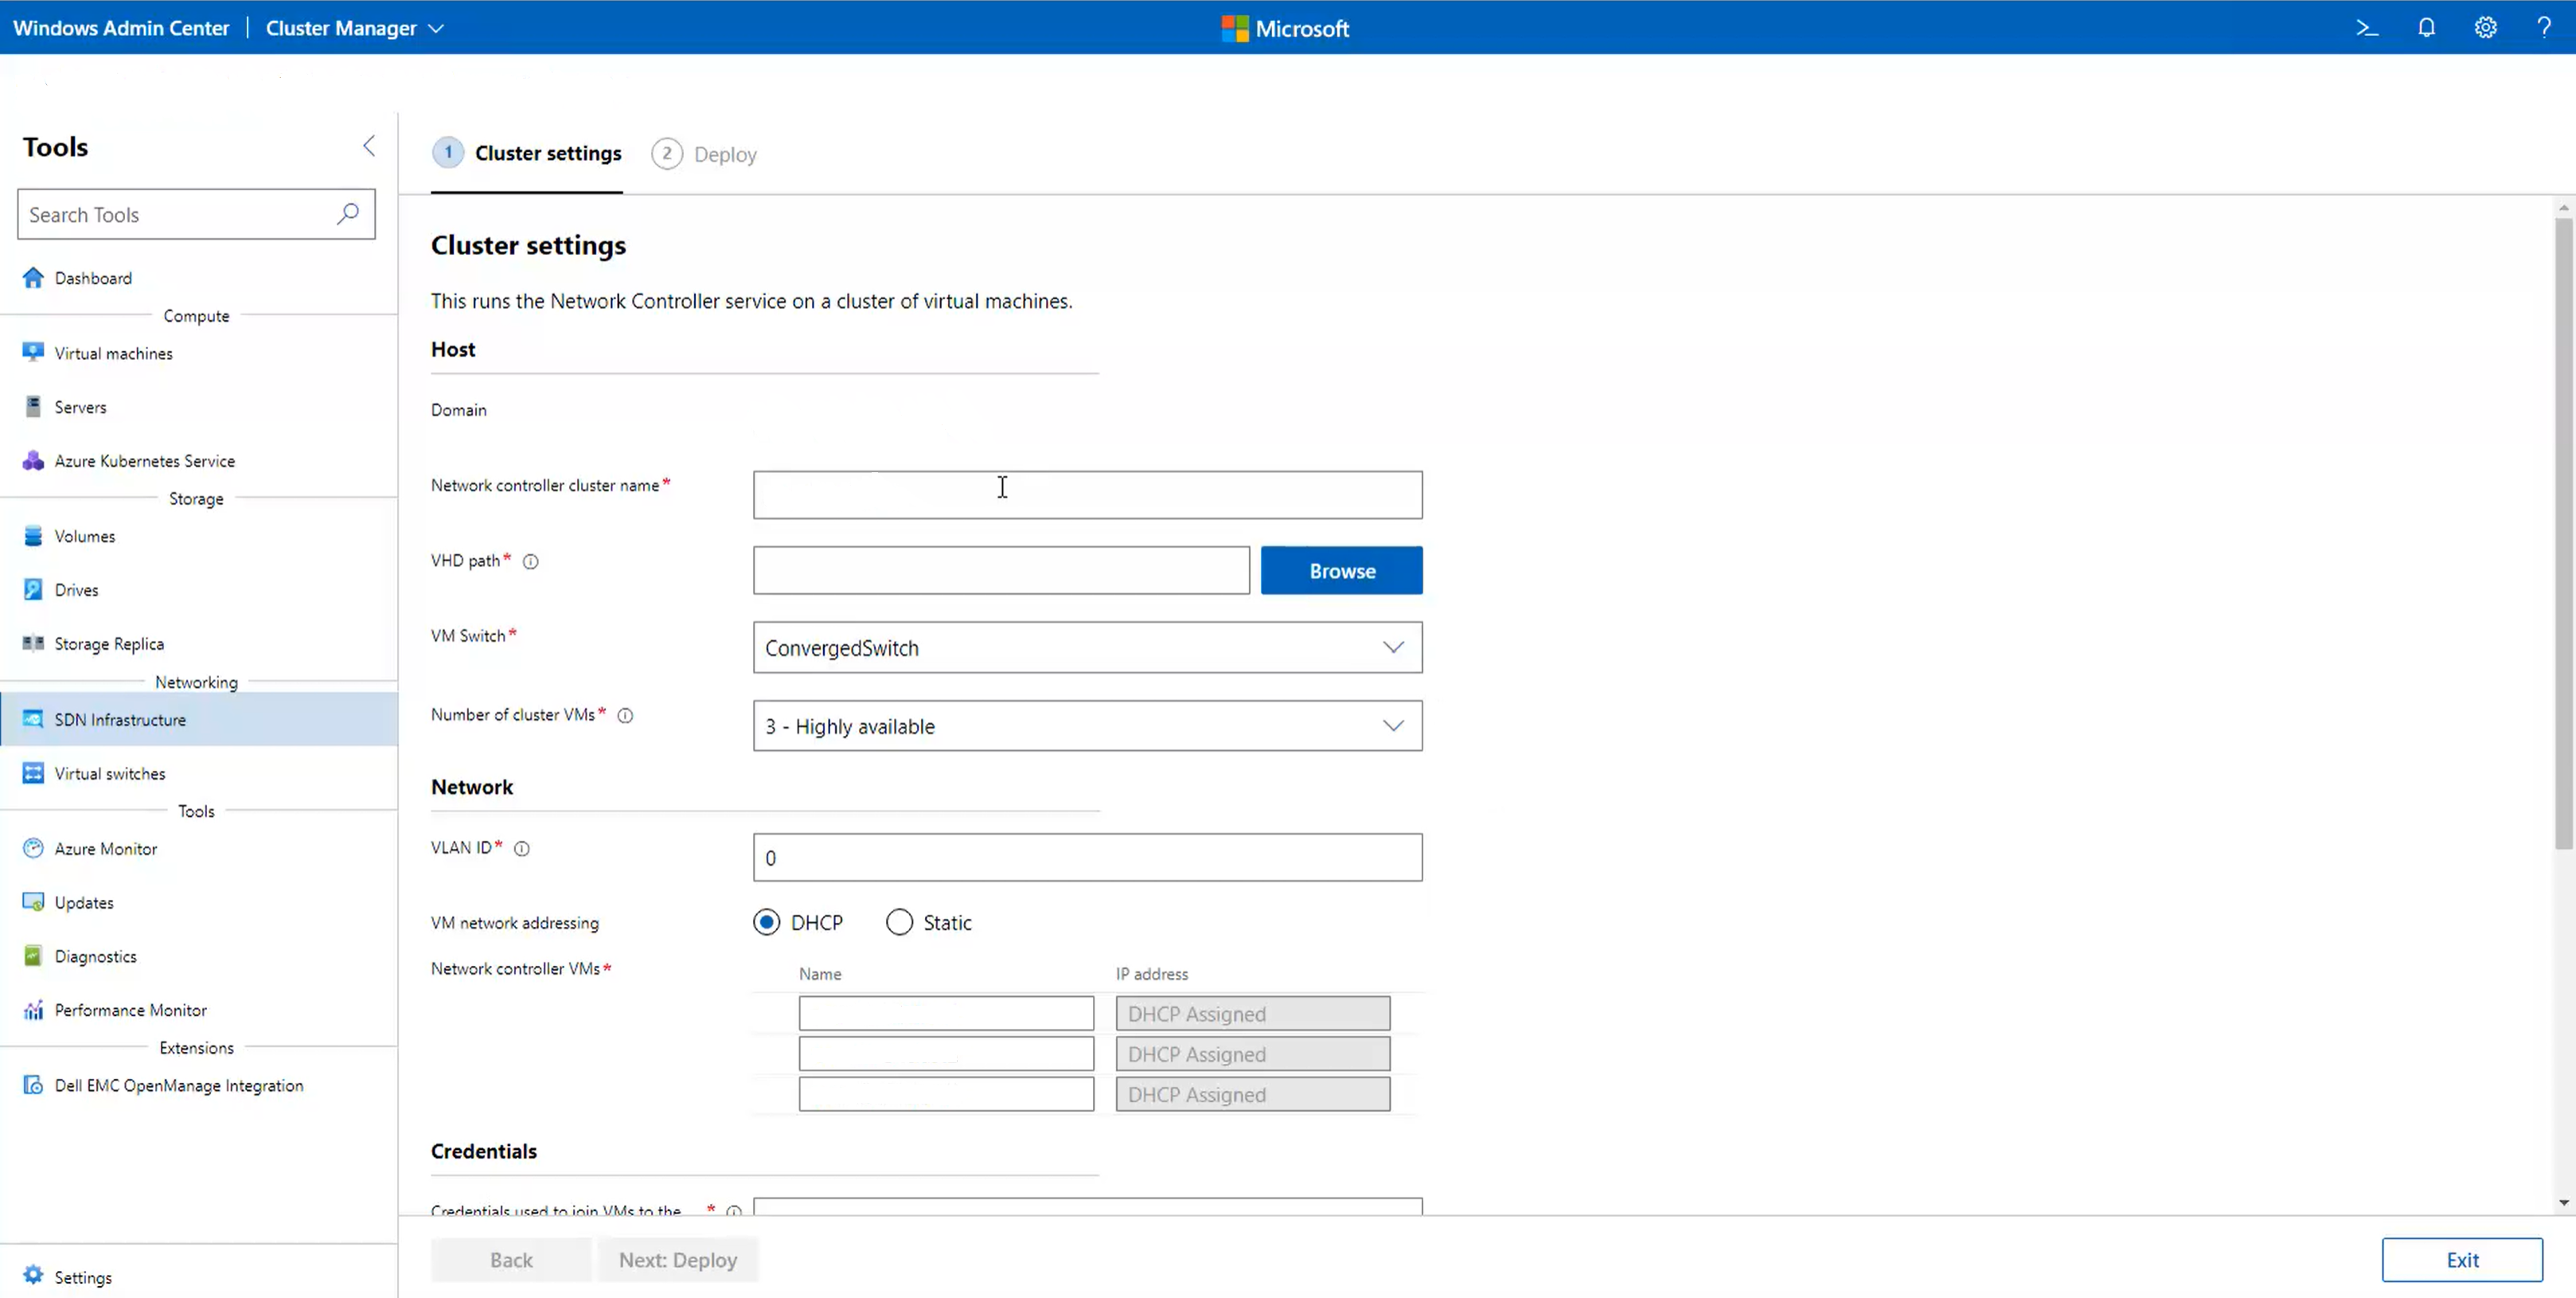
Specify a path to the Azure Stack HCI VHD file. Use Browse to find it quicker.
Specify the number of VMs to be dedicated for Network Controller. We strongly recommend three VMs for production deployments.
Under Network, enter the VLAN ID of the management network. Network Controller needs connectivity to same management network as the Hyper-V hosts so that it can communicate and configure the hosts.
For VM network addressing, select either DHCP or Static.
For DHCP, enter the name for the Network Controller VMs. You can also use the default populated names.
For Static, do the following:
- Specify an IP address.
- Specify a subnet prefix.
- Specify the default gateway.
- Specify one or more DNS servers. Click Add to add additional DNS servers.
Under Credentials, enter the username and password used to join the Network Controller VMs to the cluster domain.
Note
You must enter the username in the following format:
domainname\username. For example, if the domain iscontoso.com, enter the username ascontoso\<username>. Don't use formats likecontoso.com\<username>orusername@contoso.com.Enter the local administrative password for these VMs.
Under Advanced, enter the path to the VMs. You can also use the default populated path.
Note
Universal Naming Convention (UNC) paths aren't supported. For cluster storage-based paths, use a format like
C:\ClusterStorage\....Enter values for MAC address pool start and MAC address pool end. You can also use the default populated values. This is the MAC pool used to assign MAC addresses to VMs attached to SDN networks.
When finished, click Next: Deploy.
Wait until the wizard completes its job. Stay on this page until all progress tasks are complete, and then click Finish.
After the Network Controller VMs are created, configure dynamic DNS updates for the Network Controller cluster name on the DNS server. For more information, see Dynamic DNS updates.

Redeploy SDN Network Controller
If the Network Controller deployment fails or you want to deploy it again, do the following:
Delete all Network Controller VMs and their VHDs from all machines.
Remove the following registry keys from all machines by running this command:
 Remove-ItemProperty -path 'HKLM:\SYSTEM\CurrentControlSet\Services\NcHostAgent\Parameters\' -Name Connections
 Remove-ItemProperty -path 'HKLM:\SYSTEM\CurrentControlSet\Services\NcHostAgent\Parameters\' -Name NetworkControllerNodeNames
After removing the registry key, remove the cluster from the Windows Admin Center management, and then add it back.
Note
If you don't do this step, you may not see the SDN deployment wizard in Windows Admin Center.
(Additional step only if you plan to uninstall Network Controller and not deploy it again) Run the following cmdlet on all the machines in your Azure Local instance, and then skip the last step.
Disable-VMSwitchExtension -VMSwitchName "<Compute vmswitch name>" -Name "Microsoft Azure VFP Switch Extension"Run the deployment wizard again.
Deploy SDN Software Load Balancer
SDN SLB deployment is a functionality of the SDN Infrastructure extension in Windows Admin Center. Complete the following steps to deploy SLB on your existing Azure Stack HCI cluster.
Note
Network Controller must be set up before you configure SLB.
In Windows Admin Center, under Tools, select Settings, and then select Extensions.
On the Installed Extensions tab, verify that the SDN Infrastructure extension is installed. If not, install it.
In Windows Admin Center, under Tools, select SDN Infrastructure, then click Get Started on the Load Balancer tab.
Under Load Balancer Settings, under Front-End subnets, provide the following:
Public VIP subnet prefix. This could be public Internet subnets. They serve as the front end IP addresses for accessing workloads behind the load balancer, which use IP addresses from a private backend network.
Private VIP subnet prefix. These don’t need to be routable on the public Internet because they are used for internal load balancing.
Under BGP Router Settings, enter the SDN ASN for the SLB. This ASN is used to peer the SLB infrastructure with the Top of the Rack switches to advertise the Public VIP and Private VIP IP addresses.
Under BGP Router Settings, enter the IP Address and ASN of the Top of Rack switch. SLB infrastructure needs these settings to create a BGP peer with the switch. If you have an additional Top of Rack switch that you want to peer the SLB infrastructure with, add IP Address and ASN for that switch as well.
Under VM Settings, specify a path to the Azure Stack HCI VHDX file. Use Browse to find it quicker.
Specify the number of VMs to be dedicated for software load balancing. We strongly recommend at least two VMs for production deployments.
Under Network, enter the VLAN ID of the management network. SLB needs connectivity to same management network as the Hyper-V hosts so that it can communicate and configure the hosts.
For VM network addressing, select either DHCP or Static.
For DHCP, enter the name for the Network Controller VMs. You can also use the default populated names.
For Static, do the following:
- Specify an IP address.
- Specify a subnet prefix.
- Specify the default gateway.
- Specify one or more DNS servers. Click Add to add additional DNS servers.
Under Credentials, enter the username and password that you used to join the Software Load Balancer VMs to the cluster domain.
Note
You must enter the username in the following format:
domainname\username. For example, if the domain iscontoso.com, enter the username ascontoso\<username>. Don't use formats likecontoso.com\<username>orusername@contoso.com.Enter the local administrative password for these VMs.
Under Advanced, enter the path to the VMs. You can also use the default populated path.
Note
Universal Naming Convention (UNC) paths aren't supported. For cluster storage-based paths, use a format like
C:\ClusterStorage\....When finished, click Next: Deploy.
Wait until the wizard completes its job. Stay on this page until all progress tasks are complete, and then click Finish.
Deploy SDN Gateway
SDN Gateway deployment is a functionality of the SDN Infrastructure extension in Windows Admin Center. Complete the following steps to deploy SDN Gateways on your existing Azure Stack HCI cluster.
Note
Network Controller and SLB must be set up before you configure Gateways.
In Windows Admin Center, under Tools, select Settings, then select Extensions.
On the Installed Extensions tab, verify that the SDN Infrastructure extension is installed. If not, install it.
In Windows Admin Center, under Tools, select SDN Infrastructure, then click Get Started on the Gateway tab.
Under Define the Gateway Settings, under Tunnel subnets, provide the GRE Tunnel Subnets. IP addresses from this subnet are used for provisioning on the SDN gateway VMs for GRE tunnels. If you don't plan to use GRE tunnels, put any placeholder subnets in this field.
Under BGP Router Settings, enter the SDN ASN for the Gateway. This ASN is used to peer the gateway VMs with the Top of the Rack switches to advertise the GRE IP addresses. This field is auto populated to the SDN ASN used by SLB.
Under BGP Router Settings, enter the IP Address and ASN of the Top of Rack switch. Gateway VMs need these settings to create a BGP peer with the switch. These fields are auto populated from the SLB deployment wizard. If you have an additional Top of Rack switch that you want to peer the gateway VMs with, add IP Address and ASN for that switch as well.
Under Define the Gateway VM Settings, specify a path to the Azure Stack HCI VHDX file. Use Browse to find it quicker.
Specify the number of VMs to be dedicated for gateways. We strongly recommend at least two VMs for production deployments.
Enter the value for Redundant Gateways. Redundant gateways don't host any gateway connections. In event of failure or restart of an active gateway VM, gateway connections from the active VM are moved to the redundant gateway and the redundant gateway is then marked as active. In a production deployment, we strongly recommend to have at least one redundant gateway.
Note
Ensure that the total number of gateway VMs is at least one more than the number of redundant gateways. Otherwise, you won't have any active gateways to host gateway connections.
Under Network, enter the VLAN ID of the management network. Gateways needs connectivity to same management network as the Hyper-V hosts and Network Controller VMs.
For VM network addressing, select either DHCP or Static.
For DHCP, enter the name for the Gateway VMs. You can also use the default populated names.
For Static, do the following:
- Specify an IP address.
- Specify a subnet prefix.
- Specify the default gateway.
- Specify one or more DNS servers. Click Add to add additional DNS servers.
Under Credentials, enter the username and password used to join the Gateway VMs to the cluster domain.
Note
You must enter the username in the following format:
domainname\username. For example, if the domain iscontoso.com, enter the username ascontoso\<username>. Don't use formats likecontoso.com\<username>orusername@contoso.com.Enter the local administrative password for these VMs.
Under Advanced, provide the Gateway Capacity. It is auto populated to 10 Gbps. Ideally, you should set this value to approximate throughput available to the gateway VM. This value may depend on various factors, such as physical NIC speed on the host machine, other VMs on the host machine and their throughput requirements.
Note
Universal Naming Convention (UNC) paths aren't supported. For cluster storage-based paths, use a format like
C:\ClusterStorage\....Enter the path to the VMs. You can also use the default populated path.
When finished, click Next: Deploy the Gateway.
Wait until the wizard completes its job. Stay on this page until all progress tasks are complete, and then click Finish.
Next steps
- Manage SDN logical networks. See Manage tenant logical networks.
- Manage SDN virtual networks. See Manage tenant virtual networks.
- Manage microsegmentation with datacenter firewall. See Use Datacenter Firewall to configure ACLs.
- Manage your VMs. See Manage VMs.
- Manage Software Load Balancers. See Manage Software Load Balancers.
- Manage Gateway connections. See Manage Gateway Connections.
- Troubleshoot SDN deployment. See Troubleshoot Software Defined Networking deployment via Windows Admin Center.