Note
Access to this page requires authorization. You can try signing in or changing directories.
Access to this page requires authorization. You can try changing directories.
Applies to: Azure Stack HCI, versions 22H2 and 21H2; Windows Server 2022, Windows Server 2019.
Important
Azure Stack HCI is now part of Azure Local. However, older versions of Azure Stack HCI, for example 22H2 will continue to reference Azure Stack HCI and won't reflect the name change. Learn more.
Warning
The deployment instructions provided in this article apply to an older version, Azure Stack HCI, version 22H2. For new deployments, we recommend that you use the latest generally available version of Azure Local, see About Azure Local deployment.
Validate DCB is no longer the recommended tool to set up or test your host networking configuration on Azure Stack HCI. We recommend using Network ATC to configure your host networking set-up for Azure Stack HCI. Network ATC always supersedes Validate DCB on Azure Stack HCI.
Although the Create cluster wizard in Windows Admin Center performs certain validations to create a working cluster with the selected hardware, cluster validation performs additional checks to make sure the cluster will work in a production environment. This how-to article focuses on why cluster validation is important, and when to run it on an Azure Stack HCI cluster.
We recommend performing cluster validation for the following primary scenarios:
- After deploying a server cluster, run the Validate-DCB tool to test networking.
- After updating a server cluster, depending on your scenario, run both validation options to troubleshoot cluster issues.
- After setting up replication with Storage Replica, validate that the replication is proceeding normally by checking some specific events and running a couple commands.
- After creating a server cluster, run the Validate-DCB tool before placing it into production.
What is cluster validation?
Cluster validation is intended to catch hardware or configuration problems before a cluster goes into production. Cluster validation helps to ensure that the Azure Stack HCI solution that you're about to deploy is truly dependable. You can also use cluster validation on configured failover clusters as a diagnostic tool.
Specific validation scenarios
This section describes scenarios in which validation is also needed or useful.
Validation before the cluster is configured:
A set of servers ready to become a failover cluster: This is the most straightforward validation scenario. The hardware components (systems, networks, and storage) are connected, but the systems aren't yet functioning as a cluster. Running tests in this situation has no effect on availability.
Server VMs: For virtualized servers in a cluster, run cluster validation as you would on any other new cluster. The requirement to run the feature is the same whether you have:
- A "host cluster" where failover occurs between two physical computers.
- A "guest cluster" where failover occurs between guest operating systems on the same physical computer.
Validation after the cluster is configured and in use:
Before adding a server to the cluster: When you add a server to a cluster, we strongly recommend validating the cluster. Specify both the existing cluster members and the new server when you run cluster validation.
When adding drives: When you add additional drives to the cluster, which is different from replacing failed drives or creating virtual disks or volumes that rely on the existing drives, run cluster validation to confirm that the new storage will function correctly.
When making changes that affect firmware or drivers: If you upgrade or make changes to the cluster that affect firmware or drivers, you must run cluster validation to confirm that the new combination of hardware, firmware, drivers, and software supports failover cluster functionality.
After restoring a system from backup: After you restore a system from backup, run cluster validation to confirm that the system functions correctly as part of a cluster.
Validate networking
The Microsoft Validate-DCB tool is designed to validate the Data Center Bridging (DCB) configuration on the cluster. To do this, the tool takes an expected configuration as input, and then tests each server in the cluster. This section covers how to install and run the Validate-DCB tool, review results, and resolve networking errors that the tool identifies.
Note
Microsoft recommends deploying and managing your configuration with Network ATC, which eliminates most of the configuration challenges that the Validate-DCB tool checks for. To learn more about Network ATC, which provides an intent-based approach to host network deployment, see Simplify host networking with Network ATC.
On the network, remote direct memory access (RDMA) over Converged Ethernet (RoCE) requires DCB technologies to make the network fabric lossless. With iWARP, DCB is optional. However, configuring DCB can be complex, with exact configuration required across:
- Each server in the cluster
- Each network port that RDMA traffic passes through on the fabric
Prerequisites
- Network setup information of the server cluster that you want to validate, including:
- Host or server cluster name
- Virtual switch name
- Network adapter names
- Priority Flow Control (PFC) and Enhanced Transmission Selection (ETS) settings
- An internet connection to download the tool module in Windows PowerShell from Microsoft.
Install and run the Validate-DCB tool
To install and run the Validate-DCB tool:
On your management PC, open a Windows PowerShell session as an Administrator, and then use the following command to install the tool.
Install-Module Validate-DCBAccept the requests to use the NuGet provider and access the repository to install the tool.
After PowerShell connects to the Microsoft network to download the tool, type
Validate-DCBand press Enter to start the tool wizard.Note
If you cannot run the Validate-DCB tool script, you might need to adjust your PowerShell execution policies. Use the Get-ExecutionPolicy cmdlet to view your current script execution policy settings. For information on setting execution policies in PowerShell, see About Execution Policies.
On the Welcome to the Validate-DCB configuration wizard page, select Next.
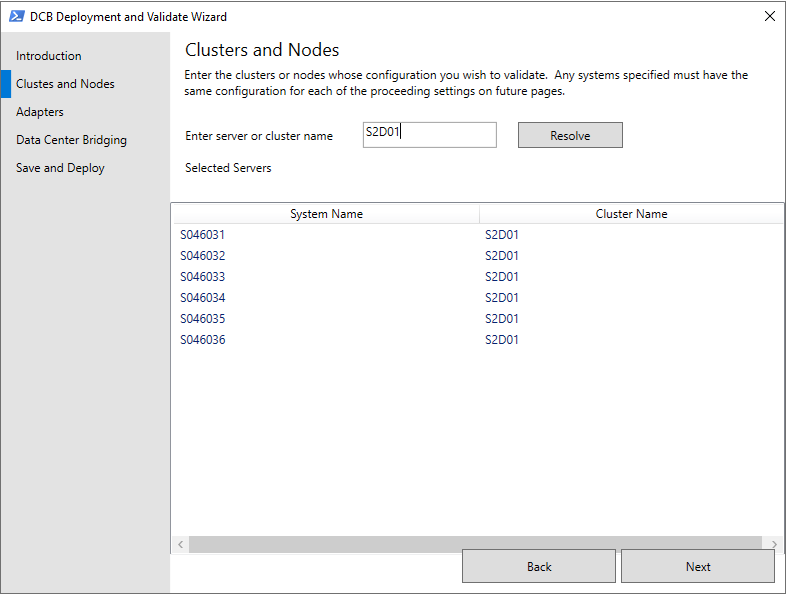
On the Clusters and Nodes page, type the name of the server cluster that you want to validate, select Resolve to list it on the page, and then select Next.
On the Adapters page:
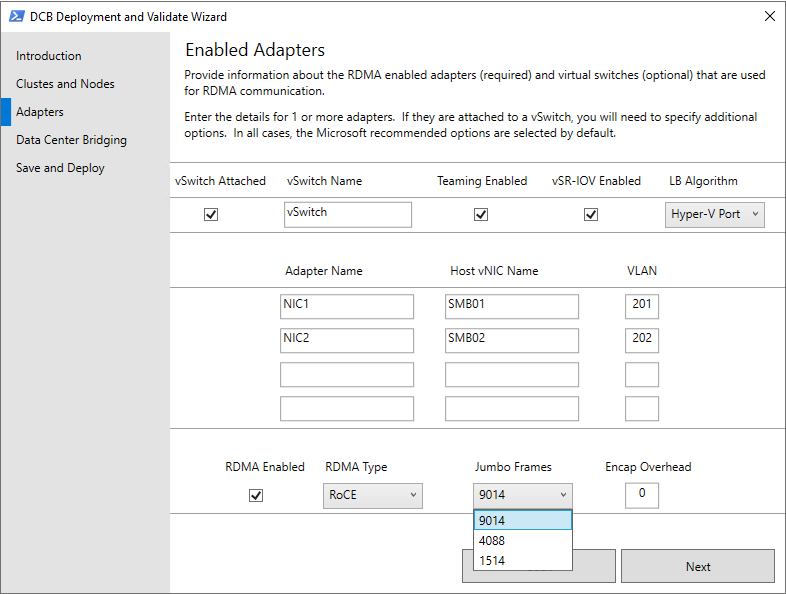
- Select the vSwitch attached checkbox and type the name of the vSwitch.
- Under Adapter Name, type the name of each physical NIC, under Host vNIC Name, the name of each virtual NIC (vNIC), and under VLAN, the VLAN ID in use for each adapter.
- Expand the RDMA Type drop-down list box and select the appropriate protocol: RoCE or iWARP. Also set Jumbo Frames to the appropriate value for your network, and then select Next.
Note
- To learn more about how SR-IOV improves network performance, see Overview of Single Root I/O Virtualization (SR-IOV).
On the Data Center Bridging page, modify the values to match your organization's settings for Priority, Policy Name, and Bandwidth Reservation, and then select Next.
Note
Selecting RDMA over RoCE on the previous wizard page requires DCB for network reliability on all NICs and switchports.
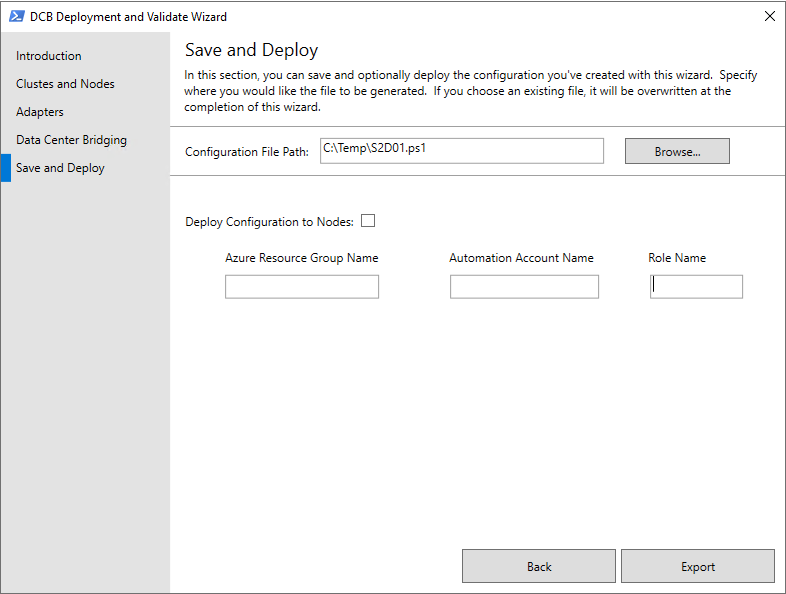
On the Save and Deploy page, in the Configuration File Path box, save the configuration file using .ps1 extension to a location where you can use it again later if needed, and then select Export to start running the Validate-DCB tool.
- You can optionally deploy your configuration file by completing the Deploy Configuration to Nodes section of the page, which includes the ability to use an Azure Automation account to deploy the configuration and then validate it. See Create an Azure Automation account to get started with Azure Automation.
Review results and fix errors
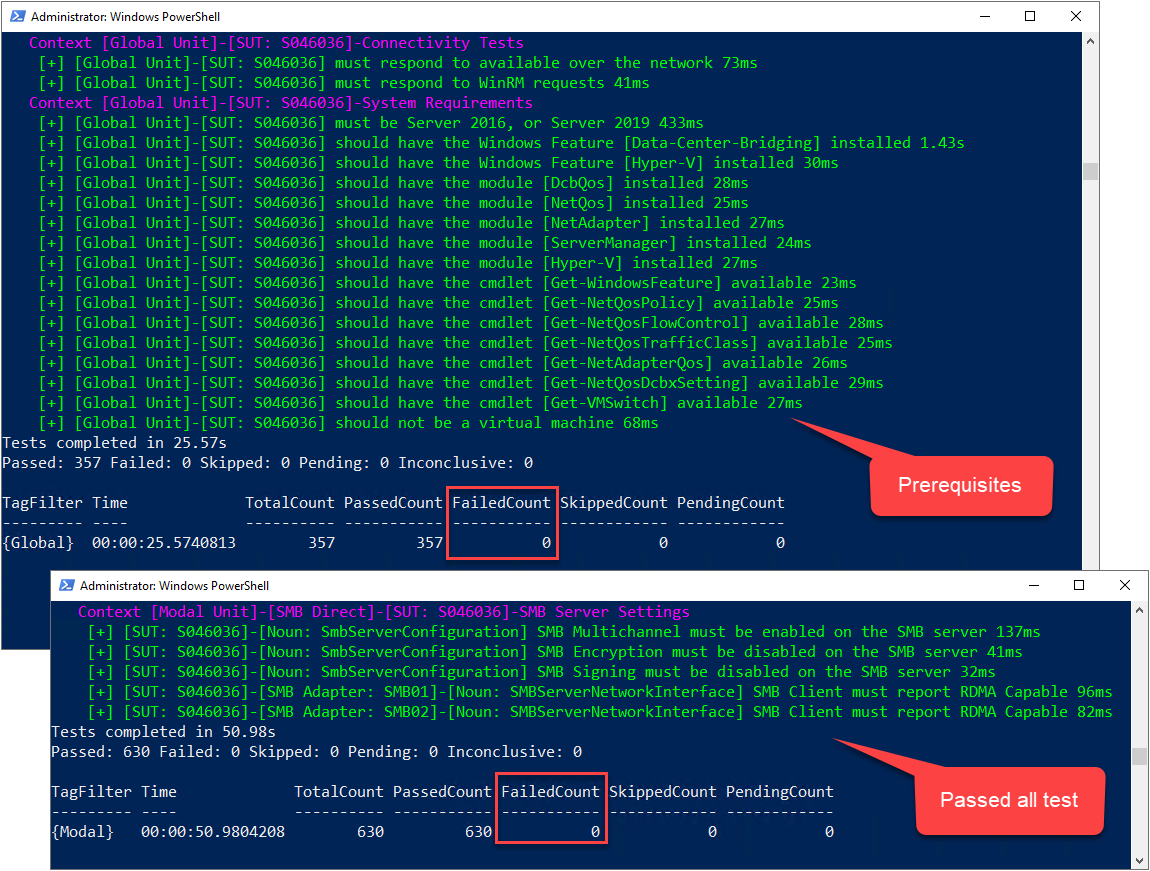
The Validate-DCB tool produces results in two units:
- [Global Unit] results list prerequisites and requirements to run the modal tests.
- [Modal Unit] results provide feedback on each cluster host configuration and best practices.
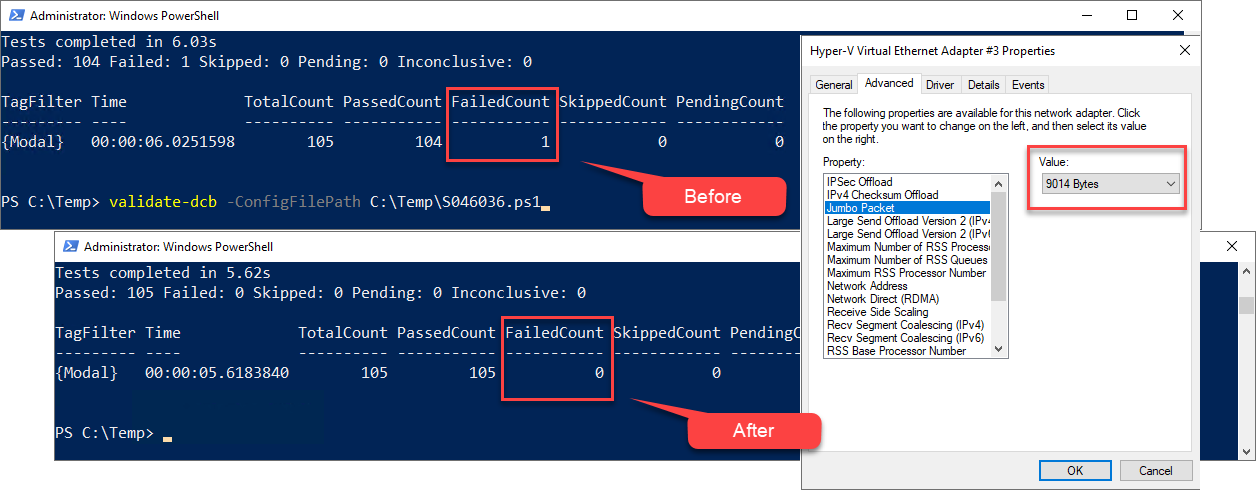
This example shows successful scan results of a single server for all prerequisites and modal unit tests by indicating a Failed Count of 0.
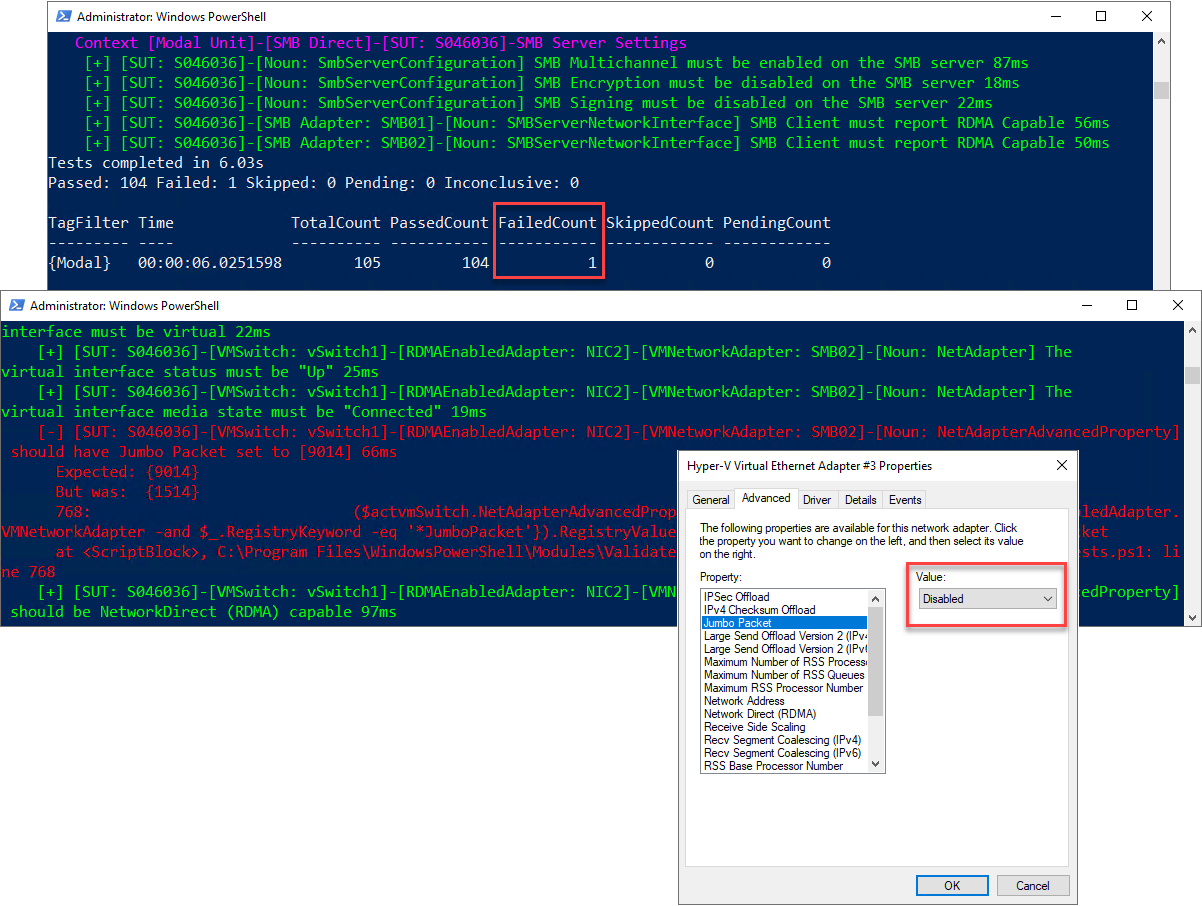
The following steps show how to identify a Jumbo Packet error from vNIC SMB02 and fix it:
The results of the Validate-DCB tool scans show a Failed Count error of 1.
Scrolling back through the results shows an error in red indicating that the Jumbo Packet for vNIC SMB02 on Host S046036 is set at the default size of 1514, but should be set to 9014.
Reviewing the Advanced properties of vNIC SMB02 on Host S046036 shows that the Jumbo Packet is set to the default of Disabled.
Fixing the error requires enabling the Jumbo Packet feature and changing its size to 9014 bytes. Running the scan again on host S046036 confirms this change by returning a Failed Count of 0.
To learn more about resolving errors that the Validate-DCB tool identifies, see the following video.
You can also install the tool offline. For disconnected systems, use Save-Module -Name Validate-DCB -Path c:\temp\Validate-DCB and then move the modules in c:\temp\Validate-DCB to your disconnected system. For more information, see the following video.
Validate the cluster
Use the following steps to validate the servers in an existing cluster in Windows Admin Center.
In Windows Admin Center, under All connections, select the Azure Stack HCI cluster that you want to validate, and then select Connect.
The Cluster Manager Dashboard displays overview information about the cluster.
On the Cluster Manager Dashboard, under Tools, select Servers.
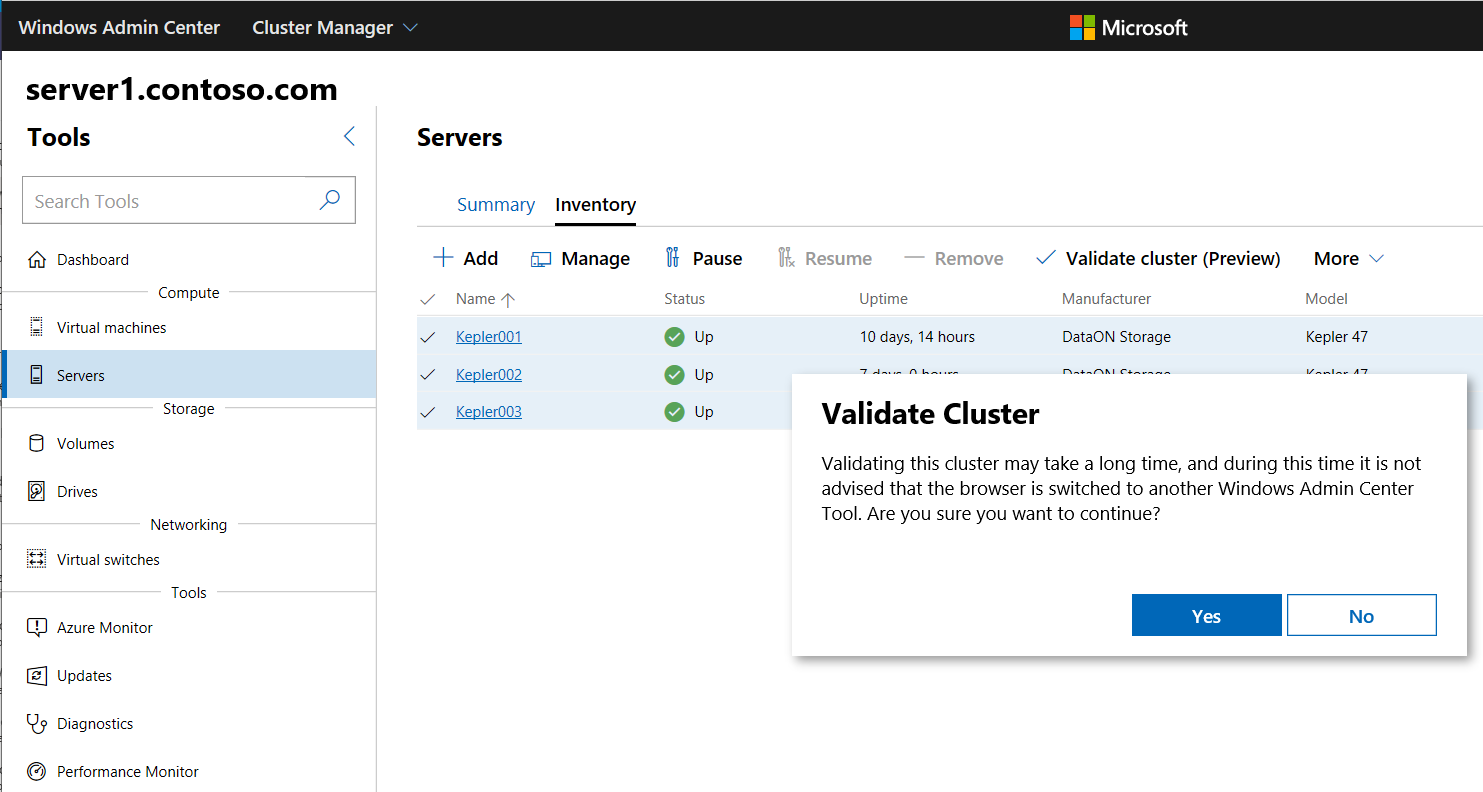
On the Inventory page, select the servers in the cluster, then expand the More submenu and select Validate cluster.
On the Validate Cluster pop-up window, select Yes.
On the Credential Security Service Provider (CredSSP) pop-up window, select Yes.
Provide your credentials to enable CredSSP and then select Continue.
Cluster validation runs in the background and gives you a notification when it's complete, at which point you can view the validation report, as described in the next section.
Note
After your cluster servers have been validated, you will need to disable CredSSP for security reasons.
Disable CredSSP
After your server cluster is successfully validated, you'll need to disable the Credential Security Support Provider (CredSSP) protocol on each server for security purposes. For more information, see CVE-2018-0886.
In Windows Admin Center, under All connections, select the first server in your cluster, and then select Connect.
On the Overview page, select Disable CredSSP, and then on the Disable CredSSP pop-up window, select Yes.
The result of Step 2 removes the red CredSSP ENABLED banner at the top of the server's Overview page, and disables CredSSP on the other servers.
View validation reports
Now you're ready to view your cluster validation report.
There are a couple ways to access validation reports:
On the Inventory page, expand the More submenu, and then select View validation reports.
At the top right of Windows Admin Center, select the Notifications bell icon to display the Notifications pane. Select the Successfully validated cluster notice, and then select Go to Failover Cluster validation report.
Note
The server cluster validation process may take some time to complete. Don't switch to another tool in Windows Admin Center while the process is running. In the Notifications pane, a status bar below your Validate cluster notice indicates when the process is done.
Validate the cluster using PowerShell
You can also use Windows PowerShell to run validation tests on your server cluster and view the results. You can run tests both before and after a cluster is set up.
To run a validation test on a server cluster, issue the Get-Cluster and Test-Cluster <server clustername> PowerShell cmdlets from your management PC, or run only the Test-Cluster cmdlet directly on the cluster:
$Cluster = Get-Cluster -Name 'server-cluster1'
Test-Cluster -InputObject $Cluster -Verbose
For more examples and usage information, see the Test-Cluster reference documentation.
Test-NetStack is a PowerShell-based testing tool available from GitHub that you can use to perform ICMP, TCP, and RDMA traffic testing of networks and identify potential network fabric and host misconfigurations or operational instability. Use Test-NetStack to validate network data paths by testing native, synthetic, and hardware offloaded (RDMA) network data paths for issues with connectivity, packet fragmentation, low throughput, and congestion.
Validate replication for Storage Replica
If you're using Storage Replica to replicate volumes in a stretched cluster or cluster-to-cluster, there are several events and cmdlets that you can use to get the state of replication.
In the following scenario, we configured Storage Replica by creating replication groups (RGs) for two sites, and then specified the data volumes and log volumes for both the source server nodes in Site1 (Server1, Server2), and the destination (replicated) server nodes in Site2 (Server3, Server4).
To determine the replication progress for Server1 in Site1, run the Get-WinEvent command and examine events 5015, 5002, 5004, 1237, 5001, and 2200:
Get-WinEvent -ComputerName Server1 -ProviderName Microsoft-Windows-StorageReplica -max 20
For Server3 in Site2, run the following Get-WinEvent command to see the Storage Replica events that show creation of the partnership. This event states the number of copied bytes and the time taken. For example:
Get-WinEvent -ComputerName Server3 -ProviderName Microsoft-Windows-StorageReplica | Where-Object {$_.ID -eq "1215"} | FL
For Server3 in Site2, run the Get-WinEvent command and examine events 5009, 1237, 5001, 5015, 5005, and 2200 to understand the processing progress. There should be no warnings of errors in this sequence. There will be many 1237 events - these indicate progress.
Get-WinEvent -ComputerName Server3 -ProviderName Microsoft-Windows-StorageReplica | FL
Alternately, the destination server group for the replica states the number of byte remaining to copy at all times, and can be queried through PowerShell with Get-SRGroup. For example:
(Get-SRGroup).Replicas | Select-Object numofbytesremaining
For node Server3 in Site2, run the following command and examine events 5009, 1237, 5001, 5015, 5005, and 2200 to understand the replication progress. There should be no warnings of errors. However, there will be many "1237" events - these simply indicate progress.
Get-WinEvent -ComputerName Server3 -ProviderName Microsoft-Windows-StorageReplica | FL
As a progress script that will not terminate:
while($true) {
$v = (Get-SRGroup -Name "Replication2").replicas | Select-Object numofbytesremaining
[System.Console]::Write("Number of bytes remaining: {0}`r", $v.numofbytesremaining)
Start-Sleep -s 5
}
To get replication state within the stretched cluster, use Get-SRGroup and Get-SRPartnership:
Get-SRGroup -Cluster ClusterS1
Get-SRPartnership -Cluster ClusterS1
(Get-SRGroup).replicas -Cluster ClusterS1
Once successful data replication is confirmed between sites, you can create your VMs and other workloads.
See also
- Performance testing against synthetic workloads in a newly created storage space using DiskSpd.exe. To learn more, see Test Storage Spaces Performance Using Synthetic Workloads in Windows Server.
- Windows Server Assessment is a Premier Service available for customers who want Microsoft to review their installations. For more information, contact Microsoft Premier Support. To learn more, see Getting Started with the Windows Server On-Demand Assessment (Server, Security, Hyper-V, Failover Cluster, IIS).
