Troubleshoot issues migrating Hyper-V VMs to Azure Stack HCI via Azure Migrate (preview)
Applies to: Azure Stack HCI, version 23H2
This article describes how to troubleshoot any potential issues that you may experience when migrating Hyper-V VMs to your Azure Stack HCI using Azure Migrate.
Important
This feature is currently in PREVIEW. See the Supplemental Terms of Use for Microsoft Azure Previews for legal terms that apply to Azure features that are in beta, preview, or otherwise not yet released into general availability.
Check if required services are running
Make sure that the source appliance VM and the target appliance VM have a healthy configuration by ensuring the following services are running.
Open PowerShell as an Administrator and run the following command for each of the services listed in parentheses for the source appliance and target appliance to verify they are running:
Get-Service -Name <name_of_service>
On the source appliance VM:
- Microsoft Azure Gateway Service (asrgwy)
- Microsoft Azure Hyper-V Discovery Service (amhvdiscoverysvc)
- Azure Site Recovery Management Service (asrmgmtsvc)
On the target appliance VM:
- Microsoft Azure Gateway Service (asrgwy)
- Azure Site Recovery Management Service (asrmgmtsvc)
Configuration data can be found at C:\ProgramData\Microsoft Azure\Config.
Collect logs and information
If you experience any issues, before you open a Support ticket, collect the following information about your issues and share them with the Microsoft Support team for analysis.
- Logs from Azure Migrate appliance
- Description of the issue or feedback
- Subscription ID
- Tenant ID
- Azure Migrate project name
- Azure Migrate project region or geography
- VM name for issues in replication and migration
- Correlation ID for deployment or job ID
The following sections describe how to gather this information based on the operation or the issue type.
For user triggered operations from Azure portal
To troubleshoot user triggered operations, correlation ID or a job ID are needed.
Get correlation ID for a deployment
Failures in operations like creating or deleting a migrate project, creation of appliance artifacts, entities and storage accounts, errors are shown as failures in Deployments section of the migrate project resource group. Each deployment operation also has a Correlation ID that is useful for troubleshooting.
Additionally failed operations in the session are shown as notifications or in activity logs from older history.
Follow these steps to identify the correlation ID for your deployment in Azure portal:
Go to the resource group for your Azure Migrate project and then go to Overview. In the right-pane, select the hyperlink that shows failed and successful deployments.
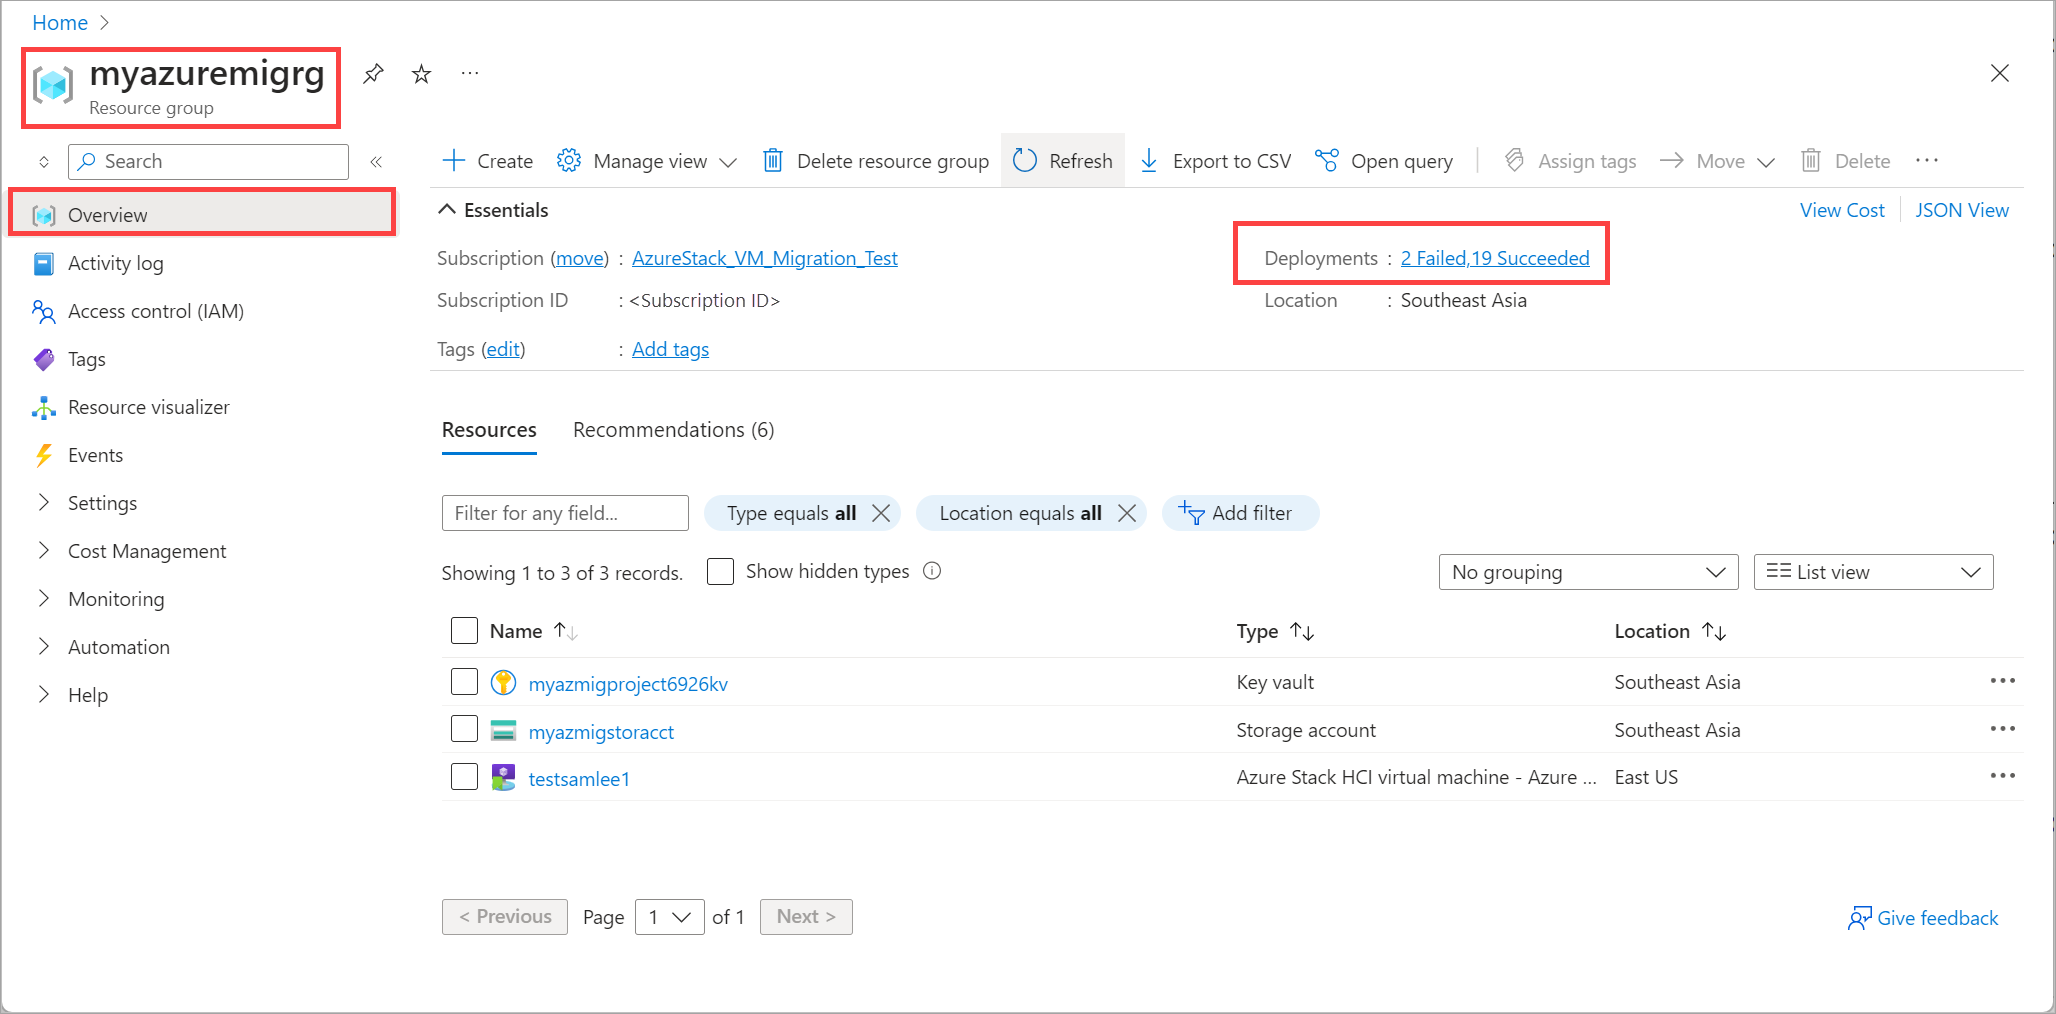
Identify the deployment that you want the correlation ID for and select the deployment name.
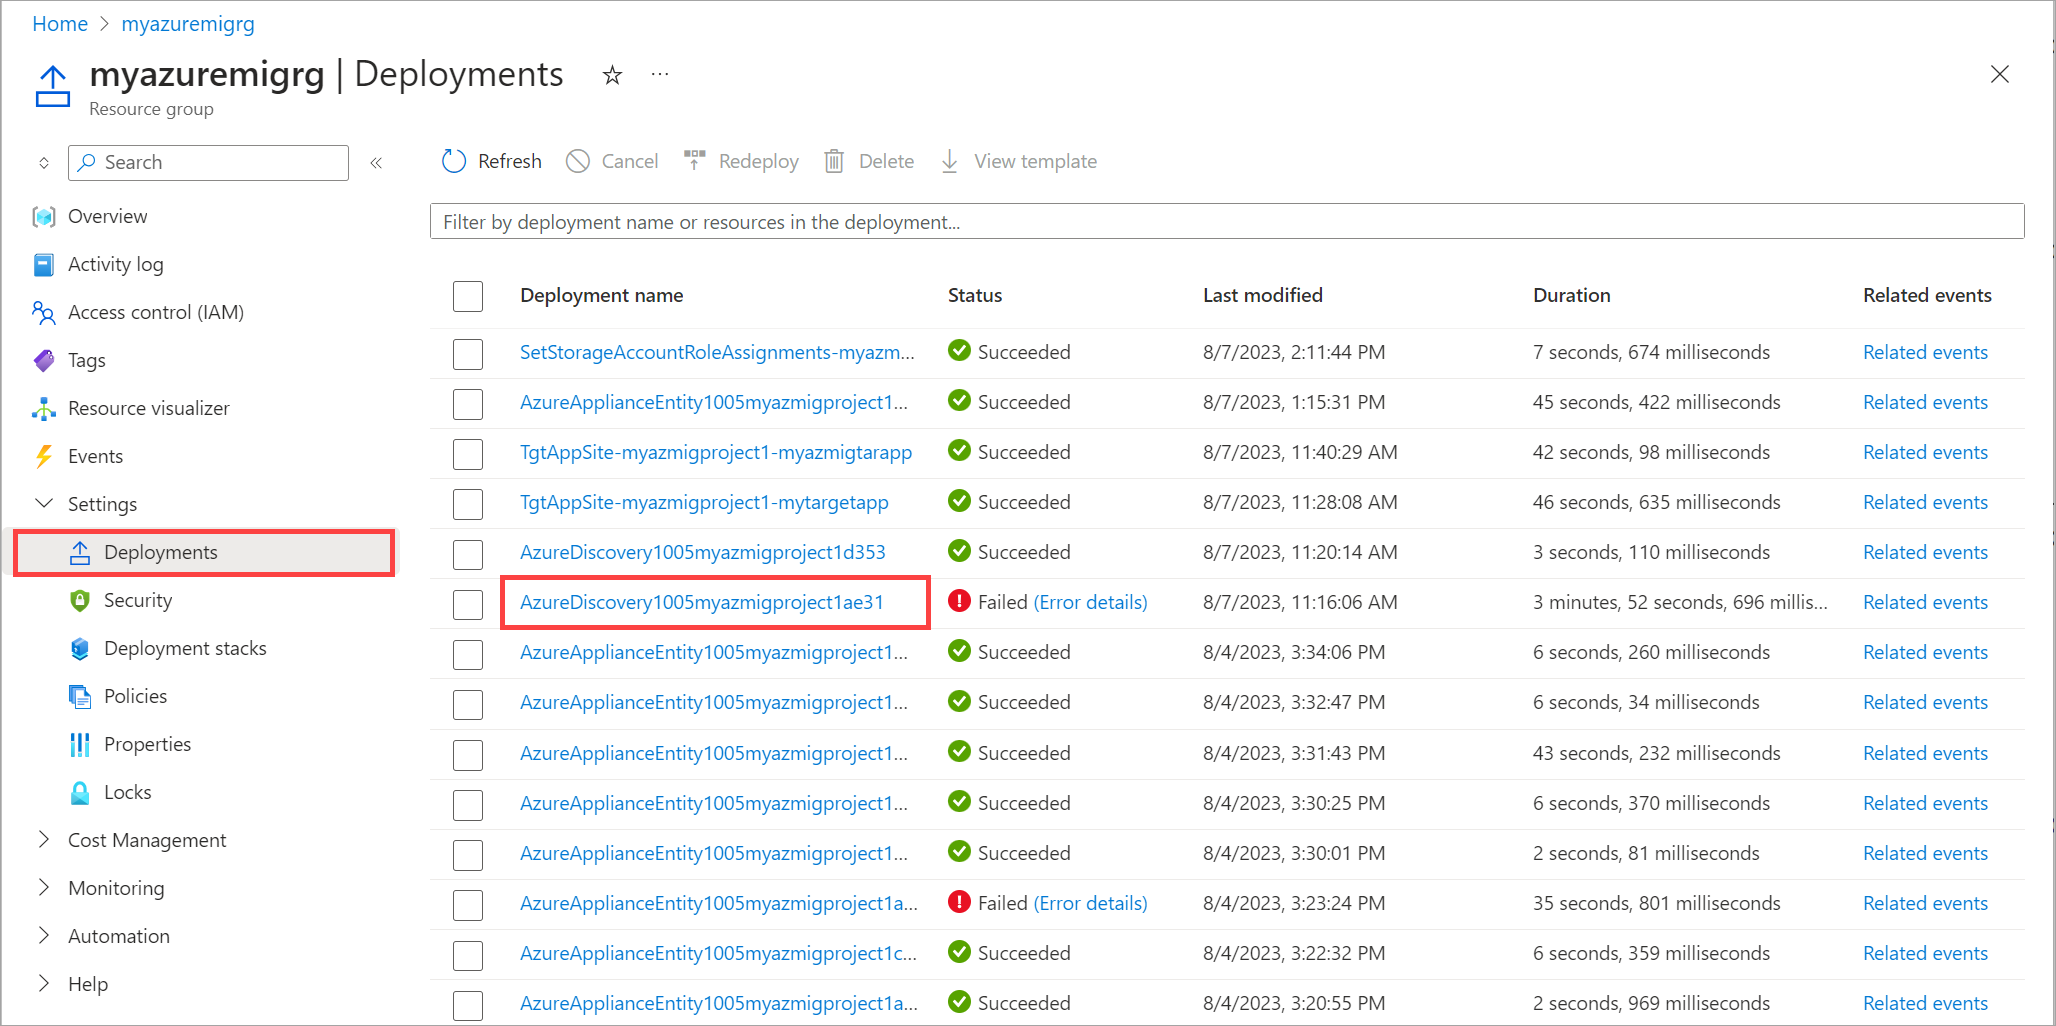
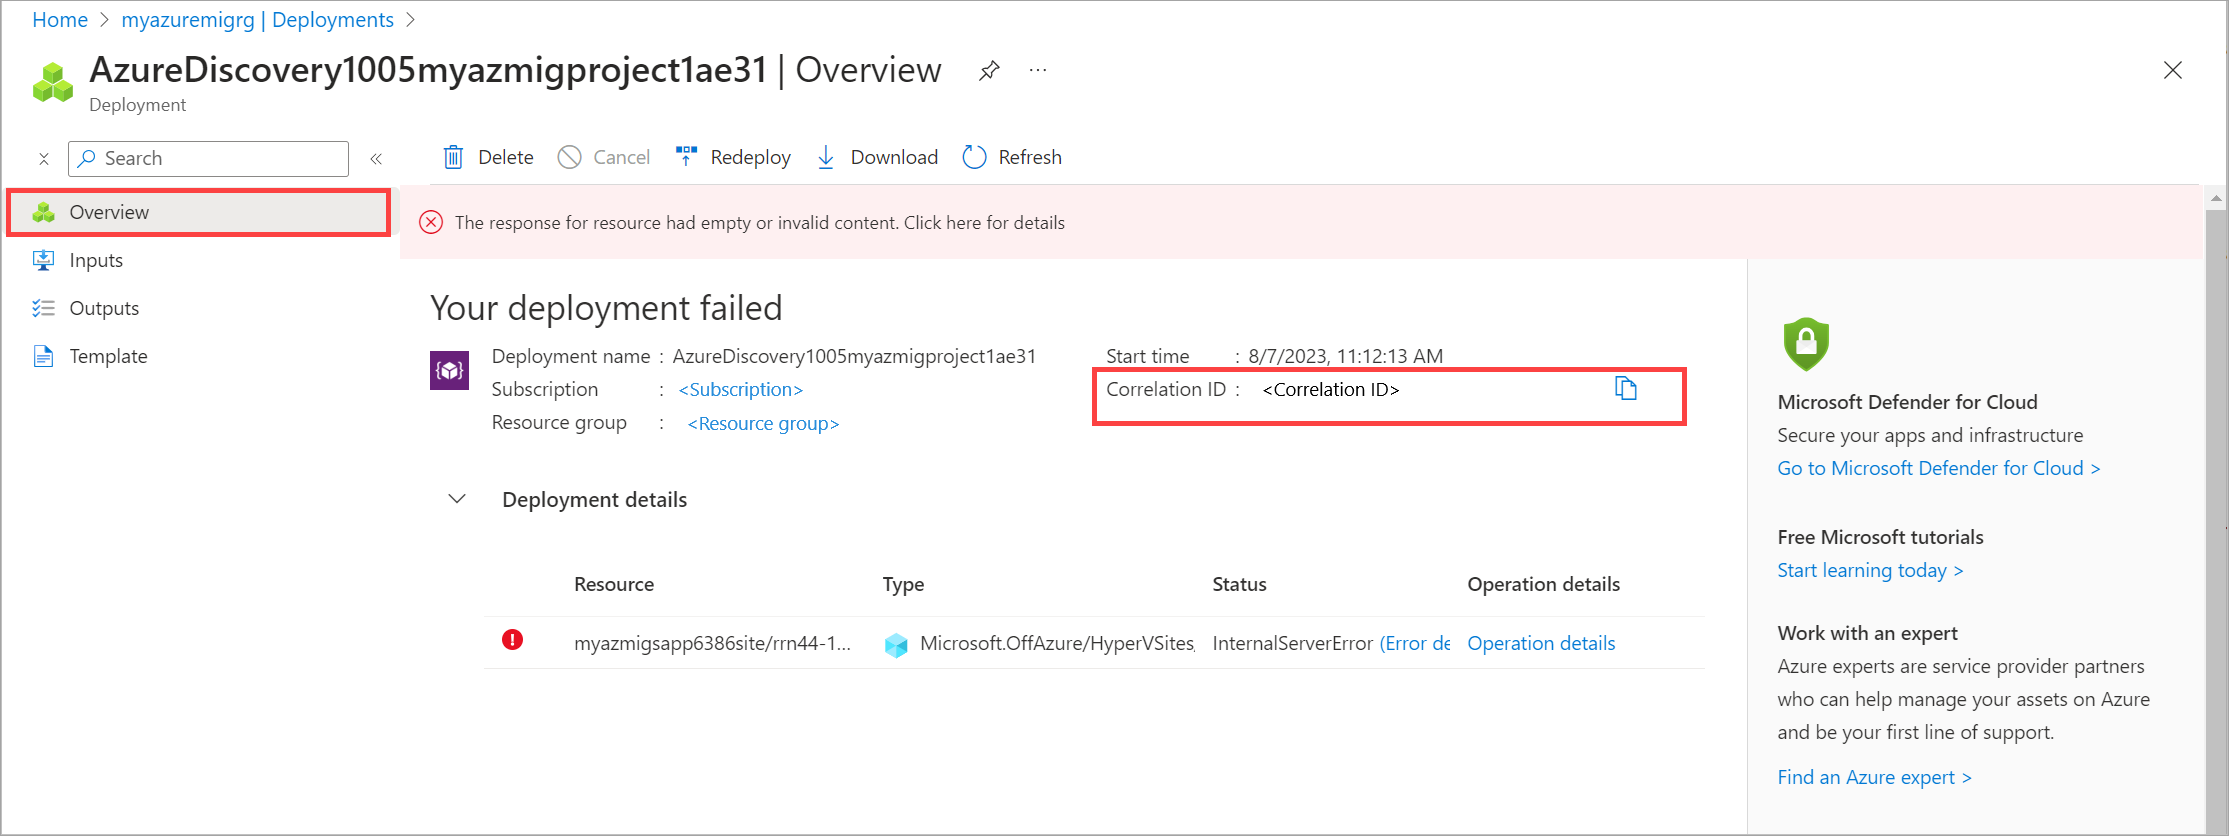
Find the correlation ID.
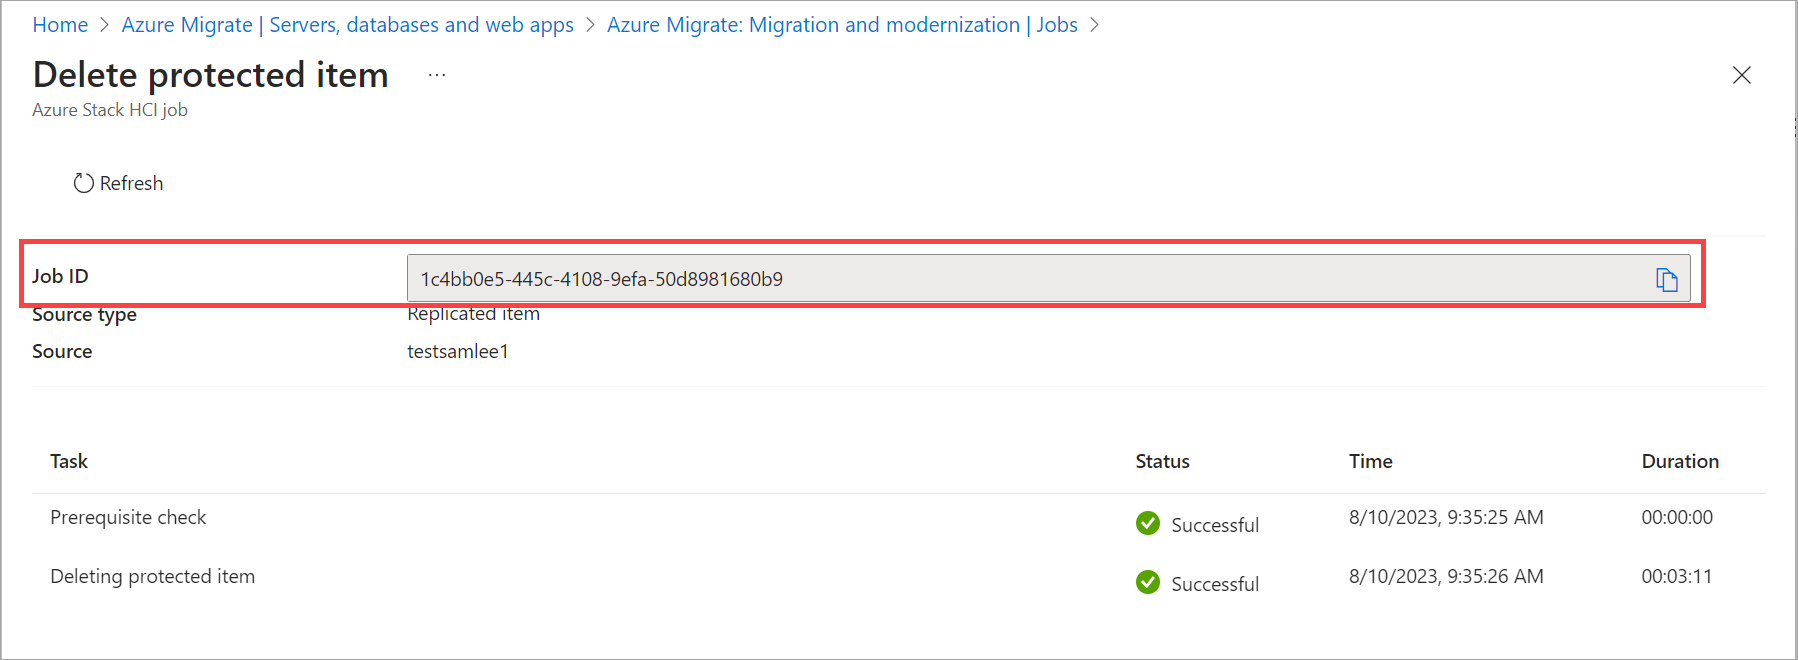
Get job ID for replication or migration
Operations such as creating and deleting a protected item (also known as creating and deleting a replication) and planned failover (also known as migration) are also listed as Jobs in the Azure Stack HCI migration section of the portal.
In these cases, the Job ID needs to be collected as well.
Follow these steps to get the job ID:
In your Azure Migrate project in the Azure portal, go to Overview under Migration tools.
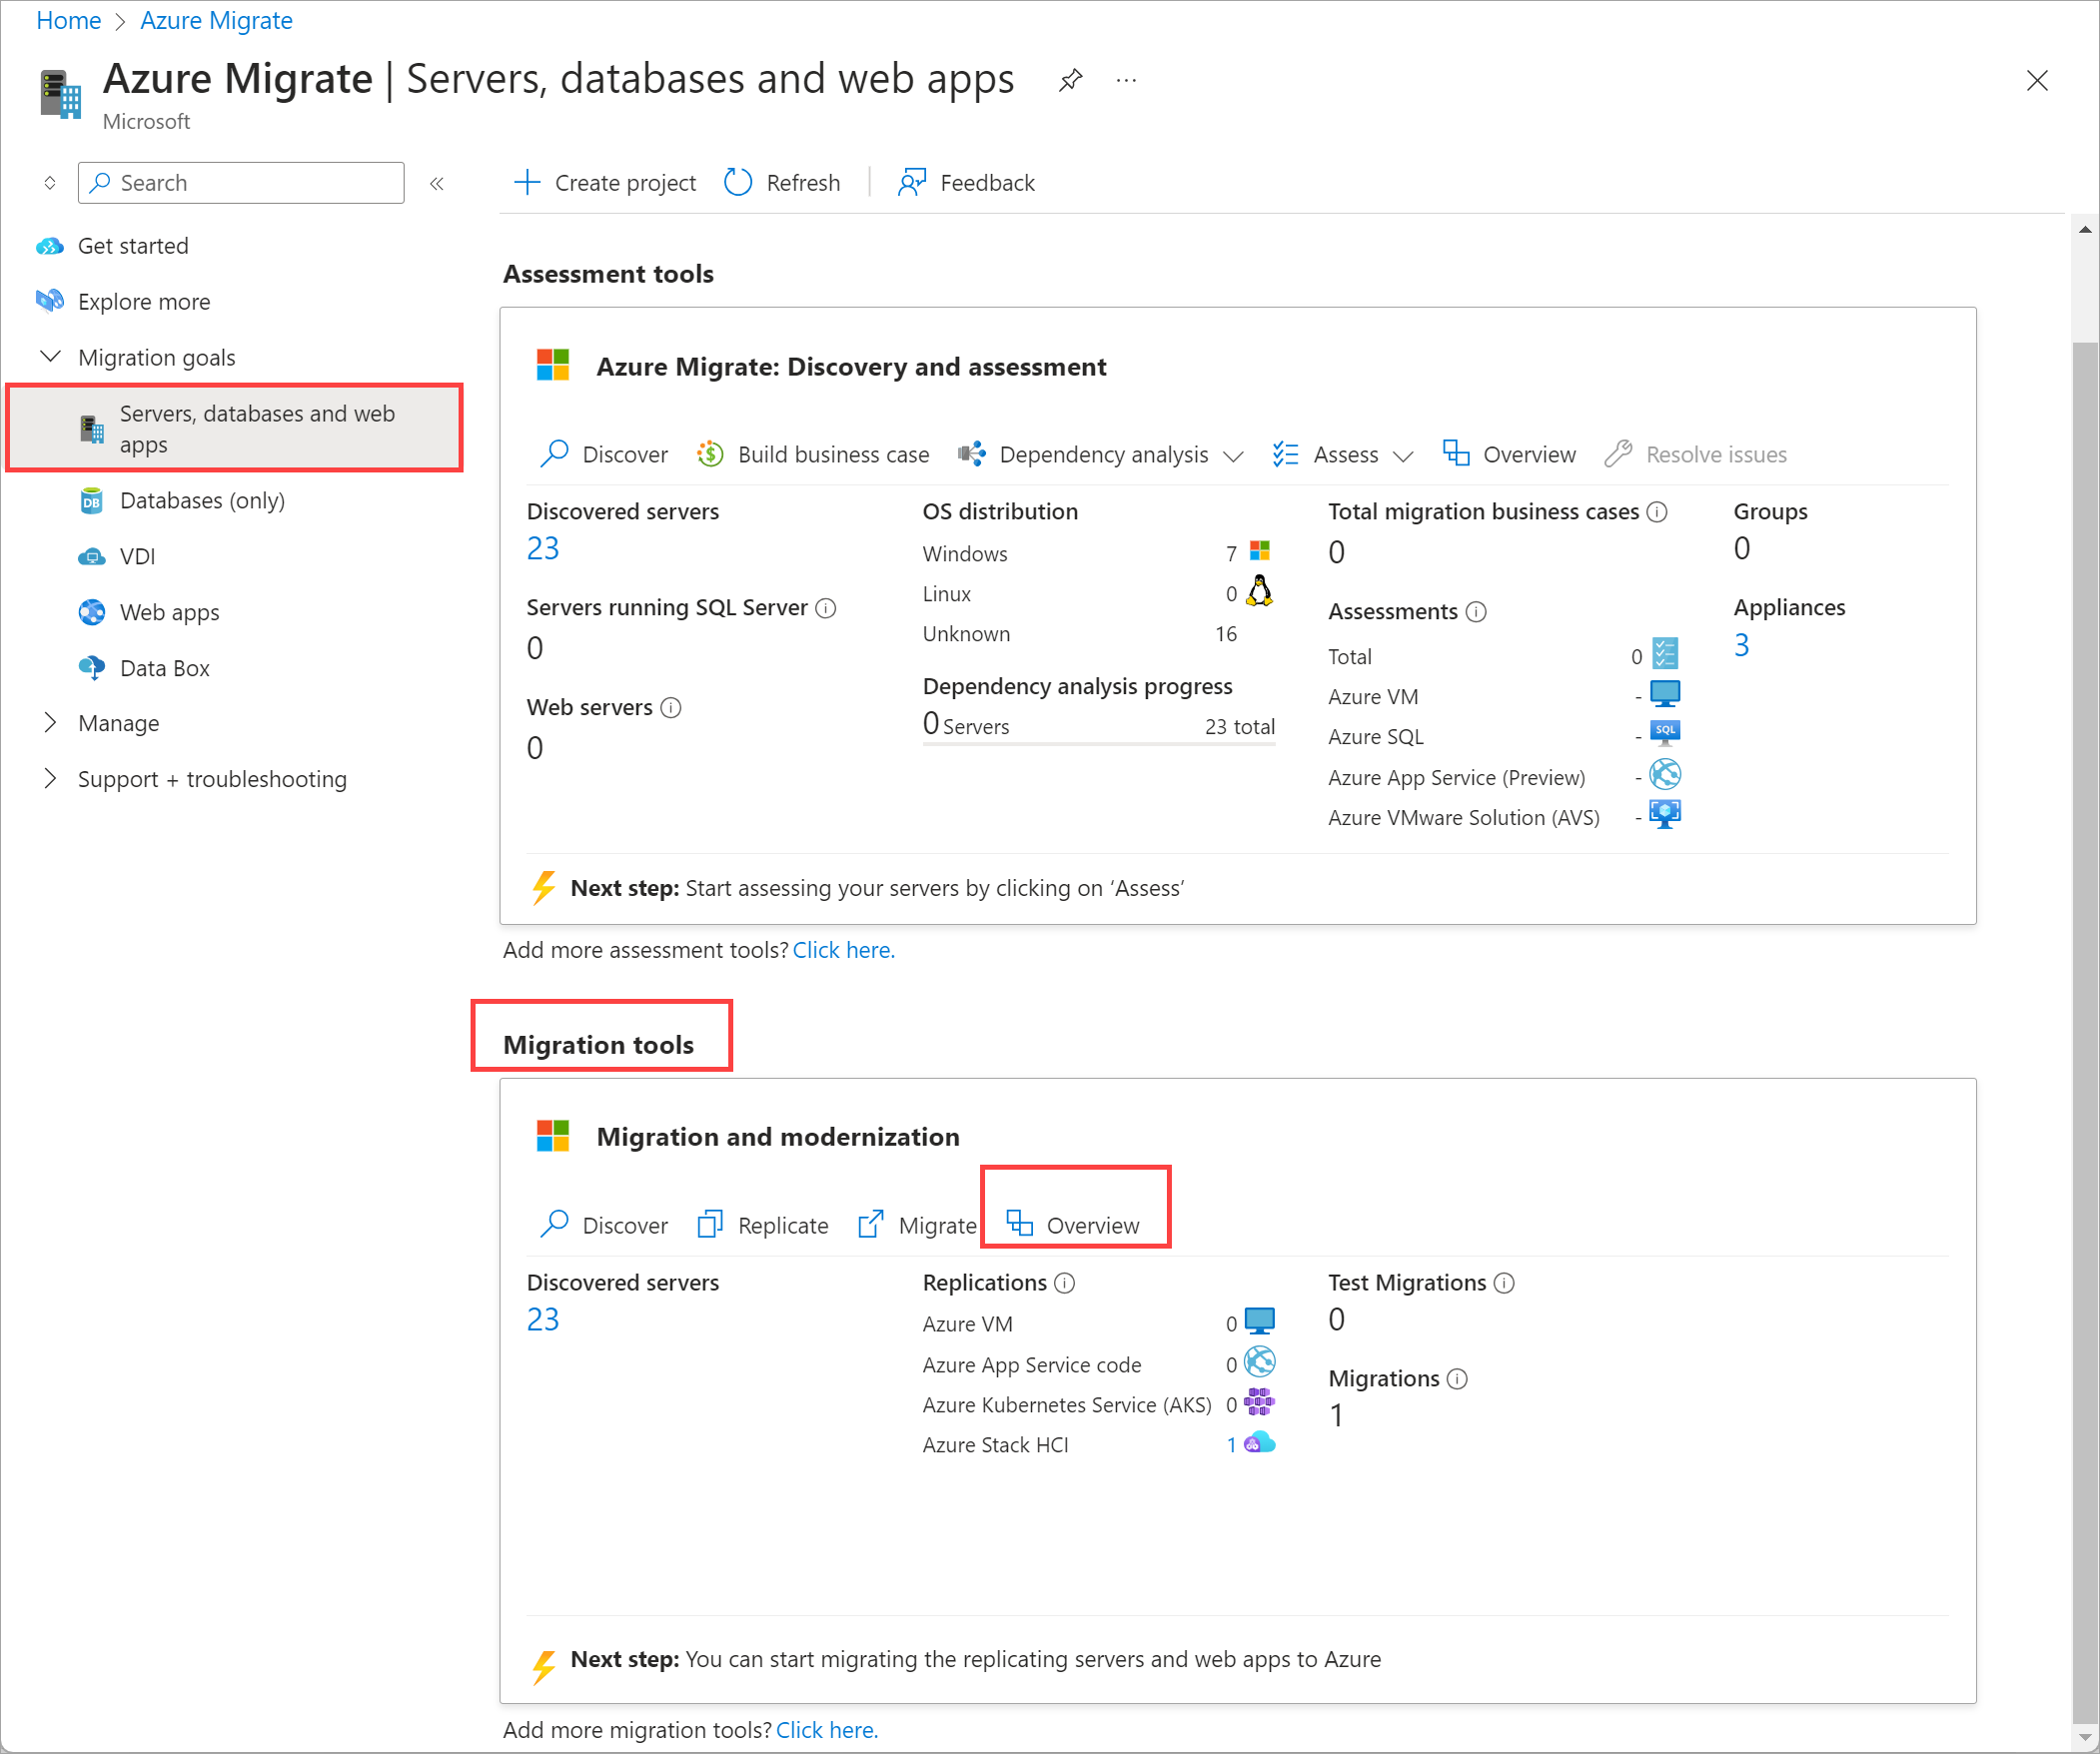
In the left-pane, go to Azure Stack HCI migration > Jobs.
Identify the job that you want the job ID for and select the job name.
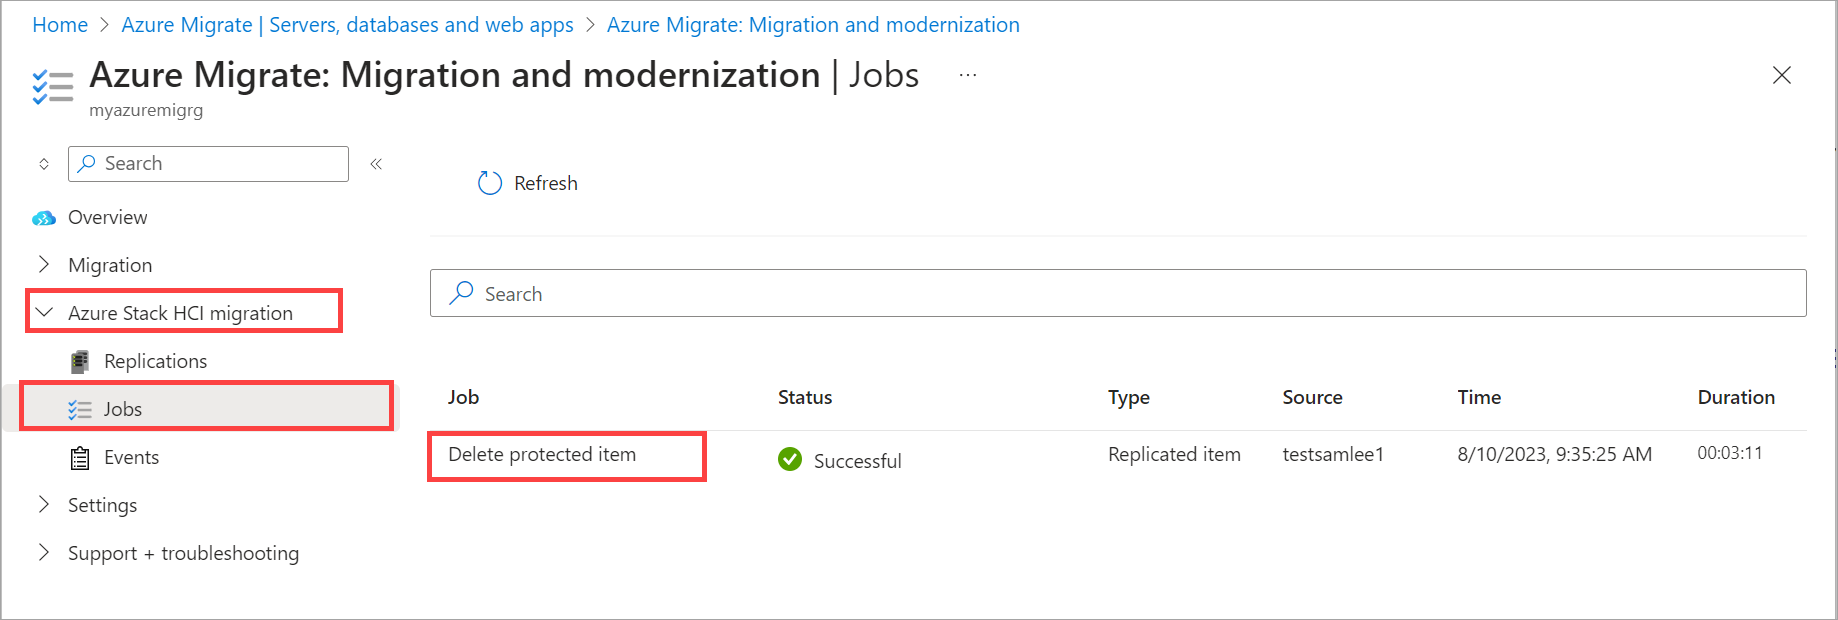
Find the Job Id.
For scheduled replication operations
Failures in scheduled operations like hourly replication cycle failures are listed as Events under Azure Stack HCI migration section of the portal.
To troubleshoot replication issues, collect the following information:
- Error details shown in the events that include Time, Error ID, Error message, VM ID.
- Screenshots of Azure portal if possible.
For UX issues in portal
To troubleshoot UX issues in portal, collect the following information:
- Screenshots from Azure portal.
- Record the operations in browser developer mode. Export the HAR file and share it.
For appliance registration issues
To troubleshoot appliance registration issues, collect the following information:
- All the available logs on the appliance at C:\ProgramData\MicrosoftAzure\Logs.
For discovery issues
To troubleshoot discovery issues, collect the following information:
- All available logs on the source appliance at C:\ProgramData\MicrosoftAzure\Logs\HyperV\Discovery.
For more information, see Troubleshoot Discovery.
For special issues
If needed, Microsoft Support may also request component event viewer logs, or system event logs such as Hyper-V logs and SMB logs.
Common issues and resolutions
Azure Migrate project creation fails
Root cause
The Azure Migrate project creation fails if the Azure subscription isn't registered for Azure Migrate or if the user doesn't have the required permissions to create a project.
Recommended resolution
Verify the following:
- Make sure that you have Application Administrator role on the Azure AD tenant.
- Make sure that you have the Contributor and User Access Administrator roles on the Azure subscription.
- Make sure that you're selecting one of the supported regions for Azure Migrate project creation. For a list of supported regions, see Supported geographies.
Deleting or changing target cluster information from Source Appliance Configuration Manager doesn't work.
Root cause When providing information in the Source Appliance Configuration Manager, the target cluster name can't be changed once entered.
Recommended resolution Follow these steps to delete or change the target cluster from the Source Appliance Configuration Manager:
On your source appliance, open Explorer. Go to C:\ProgramData\Microsoft Azure\CredStore and delete the TargetClusterCredentials.json.
Reload Appliance Configuration Manager and you are able to enter new values for the target cluster.
Note
This workaround is not recommended if you have started the replication.
This workaround can be used only if the appliance is not registered. If the appliance is registered, you must Remove the appliance from the project. You should then generate a new project key and reinstall the appliance.
Target appliance registration fails
Root cause
The target appliance registration fails.
Recommended resolution
Refresh the page and try registering again.
Target appliance issues
Root cause
In some instances, you may need to remove the target appliance from the project. For example, if you want to move the appliance to a different subscription or region. That would require you to remove the target appliance and create a new one in the new subscription or region.
Recommended resolution
To remove the target appliance from the project, follow these steps:
Run PowerShell as an administrator.
Run the following command to remove the appliance:
.\AzureMigrateInstaller.ps1 -RemoveAzMigrate
VM replication fails
Root cause
Replication of VMs can fail because of one or more of the following reasons:
- The cluster shared volume or the storage container is full.
- The VMs aren't highly available. All VMs must be highly available clustered to be discovered for replication and migration. If VMs aren't highly available, these don't show up in the list and are excluded for migration.
Recommended resolution
To enable replication and migration, make sure that the cluster shared volume or the storage container has enough space.
Also, to migrate a non-HA VM, follow these steps:
- You first need to make the VM highly available. For more information, see Make Hyper-V VMs highly available.
- Wait for discovery agent to sync the data.
Alternatively, go to Azure Migrate and select Refresh to manually refresh Servers, databases, and web apps to help expedite the discovery agent synchronization.
Replication or migration fails with error value can't be null
Root cause
Replication or migration fails with the following error message:
Value can't be null. Parameter name: FetchingHyperVDiskPropertiesFailed.
The component fails to fetch the disk properties from the source Hyper-V host. This can happen if the underlying cluster virtual disk is offline or if the disk isn't in a healthy state.
Recommended resolution
Make sure the cluster disks are operational and verify that you can fetch disk properties.
On the source appliance, run PowerShell as an administrator. Run the following steps after replacing the content in {} with the actual values.
$ImageMgmtService = Get-WmiObject -Class "Msvm_ImageManagementService" -Namespace "root\virtualization\v2" -ComputerName "{HyperVHostOwningTheVM}" -Credential {$CredentialsToHyperVHost}

$ImageMgmtService.GetVirtualHardDiskSettingData("{DiskPathShownInTheMessage}").
In the output that is returned, verify the properties
MaxInternalSizeandParentPathinSettingDataXML are appropriate.
Disks on migrated VMs are offline
Root cause
The disks on the migrated Windows VMs may not come online.
Migration creates a new VHD/VHDX, which results in a new disk for the Windows OS on the migrated VM. The OS sees this as a new drive and applies SAN policy. The OS will then not make the disk online as it is considered a shared disk.
Recommended resolution
To work around this issue, choose one of the following options:
Set SAN policy as
OnlineAllfor migrated Windows VMs. Reboot the VMs. This should bring all the disks online. For detailed instructions, see how to Configure a SAN policy to bring disks online.Manually bring the drives online on migrated VMs.
Migration fails with unable to delete snapshot error
Root cause
Unable to migrate due to the following error:
Error: Failed to delete snapshot with Id(s)
The Hyper-V VM manual operations on the system were failing with the same error and no manual operations on VM could be done on this server.
Recommended resolution
To mitigate this error, make sure that the VM is operational.
Connect to your source appliance and try the following steps to ensure that your migration is smooth.
Get the VM ID in error info.
$VmId= '146a690f-2e88-4c54-a662-c4e7da70b5e9'Make sure that get-VM is working fine and returning the information from the source appliance.
Get-VM -Id $VmIdMake sure that get-VHD is working fine and returning the correct information.
Get-VHD -VMId $VmIdIf snapshot creation operation is failing, make sure that manual snapshot creation is working fine on the VM.
Get-VM -Id $VmId | Checkpoint-VMIf the snapshot deletion operation is failing, make sure snapshot deletion manually is working fine on the VM.
Get-VMCheckpoint -Id "TemporarilyCreatedCheckpointIdGuid" | Remove-VMSnapshot
Turning off VM on Hyper-V host fails
Root cause
During the planned failover, the VM is turned off on the source Hyper-V host via a WMI call. You see error ID: 1000001 or an error message: An internal error has occurred.
Recommended resolution
You can turn off the VM manually on the source Hyper-V host via PowerShell.
# Replace Guid '146..' In below command with actual VM ID.
$Vm = Get-WmiObject -Namespace root\virtualization\v2  -Query "Select * From Msvm_ComputerSystem Where Name ='146a690f-2e88-4c54-a662-c4e7da70b5ef'"

$ShutdownIC = Get-WmiObject -Namespace root\virtualization\v2  -Query "Associators of {$Vm} Where AssocClass=Msvm_SystemDevice ResultClass=Msvm_ShutdownComponent"

$ShutdownIC.InitiateShutdown("TRUE", "Need to shutdown")
Next steps
Depending upon the phase of migration you are in, you may need to review one of the following articles to troubleshoot issues:
Feedback
Coming soon: Throughout 2024 we will be phasing out GitHub Issues as the feedback mechanism for content and replacing it with a new feedback system. For more information see: https://aka.ms/ContentUserFeedback.
Submit and view feedback for