Deployment worksheet for Azure Stack Hub integrated systems
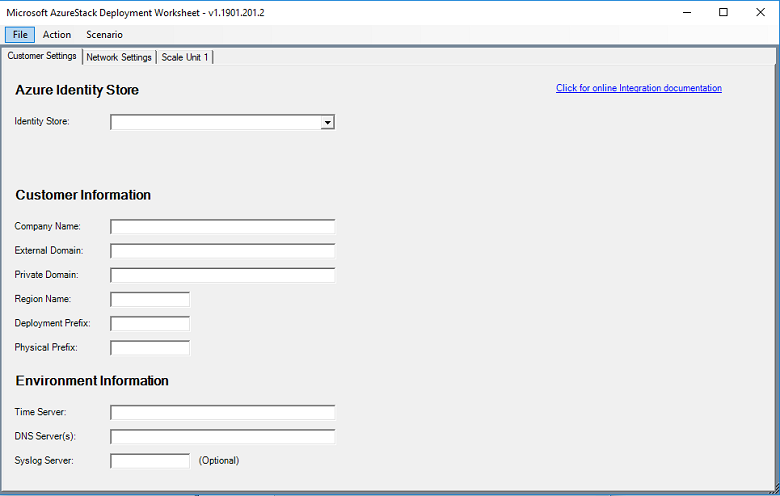
The Azure Stack Hub deployment worksheet is a Windows Forms app that aggregates all necessary deployment information and decisions in one place. You can complete the deployment worksheet during the planning process and review it before the deployment starts.
The information required by the worksheet covers networking, security, and identity information. This information may require specific knowledge in certain areas so we recommend you consult with experts to complete the worksheet.
While filling out the worksheet, you might need to make some pre-deployment configuration changes to your network environment. These changes can include reserving IP address spaces for the Azure Stack Hub solution, and configuring routers, switches, and firewalls to prepare for connectivity to the new Azure Stack Hub solution.
Note
For more information on how to complete the deployment worksheet tool, see Datacenter integration planning considerations for Azure Stack Hub integrated systems.
Installing the Windows PowerShell module
For each release of the deployment worksheet, you must do a one-time installation of a PowerShell module for each machine on which you want to use the deployment worksheet.
Note
The computer must be connected to the internet for this method to work.
Open an elevated PowerShell prompt.
In the PowerShell window, install the module from the PowerShell gallery:
Install-Module -Name Azs.Deployment.Worksheet -Repository PSGallery
If you receive a message about installing from an untrusted repository, press Y to continue installation.
Use the deployment worksheet tool
To launch and use the deployment worksheet on a computer on which you've installed the deployment worksheet PowerShell module, do the following steps:
Start Windows PowerShell (don't use the PowerShell ISE, as unexpected results can occur). It's not necessary to run PowerShell as an administrator.
Import the AzS.Deployment.Worksheet PowerShell module:
Import-Module AzS.Deployment.WorksheetOnce the module is imported, launch the deployment worksheet:
Start-DeploymentWorksheet
The deployment worksheet consists of separate tabs for collecting environment settings, like Customer Settings, Network Settings, and Scale Unit #. You must supply all values (except for any marked Optional) on all tabs before any configuration data files can be generated. After all required values have been entered into the tool, you can use the Action menu to Import, Export, and Generate. The JSON files required for deployment are as follows:
Import: Enables you to import an Azure Stack Hub configuration data file (ConfigurationData.json) that was generated by this tool or those files created by any previous release of the deployment worksheet. Doing an import resets the forms and deletes any previously entered setting or generated data.
Export: Validates the data currently entered into the forms, generates the IP subnets and assignments, and then saves the content as JSON-formatted configuration files. You can then use these files to generate the network configuration and install Azure Stack Hub.
Generate: Validates the currently entered data and generates the network map without exporting the deployment JSON files. Two new tabs are created if Generate is successful: Subnet Summary and IP Assignments. You can analyze the data on these tabs to ensure the network assignments are as expected.
Clear All: Clears all data currently entered in the forms and returns them to default values.
Save or Open your work in-progress: You can save and open partially entered data as you're working on it using the File->Save and File->Open menus. This function differs from the Import and Export functions because they require all data to be entered and validated. Open/save doesn't validate and doesn't require all fields to be entered to save your work in progress.
Logging and Warning messages: While the form is being used, you might see non-critical warning messages displayed in the PowerShell window. Critical errors are displayed as a pop-up message. Optional detailed logging, including a log written to disk, can be enabled to assist in troubleshooting problems.
To start the tool with verbose logging:
Start-DeploymentWorksheet -EnableLogging
You can find the saved log in the current user's Temp directory; for example: C:\Users\me\AppData\Local\Temp\Microsoft_AzureStack\DeploymentWorksheet_Log.txt.
