Note
Access to this page requires authorization. You can try signing in or changing directories.
Access to this page requires authorization. You can try changing directories.
This article describes the general process to replace a physical disk in Azure Stack Hub. If a physical disk fails, you should replace it as soon as possible.
Note
Replacing a physical data drive does not require the scale unit node to be put into maintenance mode (drain) upfront. Also after the physical drive has been replaced the scale unit node doesn't need to be repaired using the Azure Stack Hub administrator portal. The following article has more information when a repair is required Replace a hardware component on an Azure Stack Hub scale unit node.
You can use this procedure for deployments that have hot-swappable disks.
Actual disk replacement steps will vary based on your original equipment manufacturer (OEM) hardware vendor. See your vendor's field replaceable unit (FRU) documentation for detailed steps that are specific to your system.
Review disk alert information
When a disk fails, you receive an alert that tells you that connectivity has been lost to a physical disk.
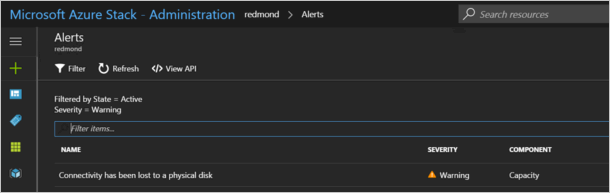
If you open the alert, the alert description contains the scale unit node and the exact physical slot location for the disk that you must replace. Azure Stack Hub further helps you to identify the failed disk by using LED indicator capabilities.
Replace the physical disk
Follow your OEM hardware vendor's FRU instructions for actual disk replacement.
Note
Replace disks for one scale unit node at a time. Wait for the virtual disk repair jobs to complete before moving on to the next scale unit node.
To prevent the use of an unsupported disk in an integrated system, the system blocks disks that aren't supported by your vendor. If you try to use an unsupported disk, a new alert tells you a disk has been quarantined because of an unsupported model or firmware.
After you replace the disk, Azure Stack Hub automatically discovers the new disk and starts the virtual disk repair process.
Check the status of virtual disk repair using Azure Stack Hub PowerShell
After you replace the disk, you can monitor the virtual disk health status and repair job progress by using Azure Stack Hub PowerShell.
Check that you have Azure Stack Hub PowerShell installed. For more information, see Install PowerShell for Azure Stack Hub.
Connect to Azure Stack Hub with PowerShell as an operator. For more information, see Connect to Azure Stack Hub with PowerShell as an operator.
Run the following cmdlets to verify the virtual disk health and repair status:
$scaleunit=Get-AzsScaleUnit
$StorageSubSystem=Get-AzsStorageSubSystem -ScaleUnit $scaleunit.Name
Get-AzsVolume -StorageSubSystem $StorageSubSystem.Name -ScaleUnit $scaleunit.name | Select-Object VolumeLabel, OperationalStatus, RepairStatus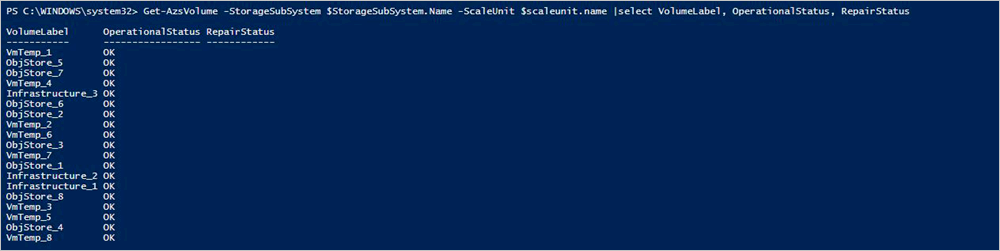
Validate Azure Stack Hub system state. For instructions, see Validate Azure Stack Hub system state.
Optionally, you can run the following command to verify the status of the replaced physical disk.
$scaleunit=Get-AzsScaleUnit
$StorageSubSystem=Get-AzsStorageSubSystem -ScaleUnit $scaleunit.Name

Get-AzsDrive -StorageSubSystem $StorageSubSystem.Name -ScaleUnit $scaleunit.name | Sort-Object StorageNode,MediaType,PhysicalLocation | Format-Table Storagenode, Healthstatus, PhysicalLocation, Model, MediaType,  CapacityGB, CanPool, CannotPoolReason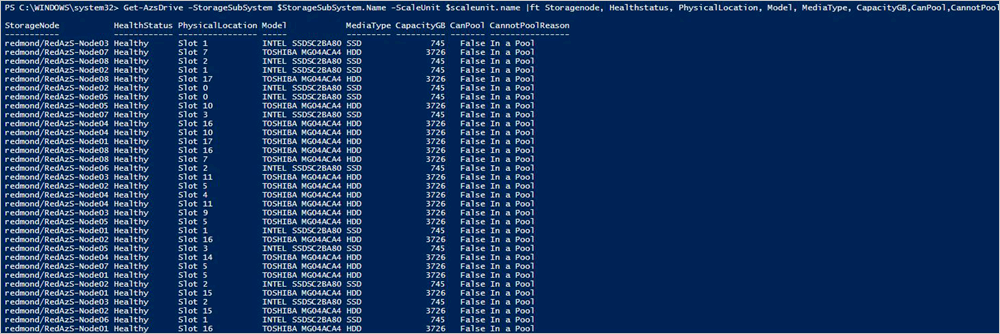
Check the status of virtual disk repair using the privileged endpoint
After you replace the disk, you can monitor the virtual disk health status and repair job progress by using the privileged endpoint. Follow these steps from any computer that has network connectivity to the privileged endpoint.
Open a Windows PowerShell session and connect to the privileged endpoint.
    $cred = Get-Credential
    Enter-PSSession -ComputerName <IP_address_of_ERCS>`
      -ConfigurationName PrivilegedEndpoint -Credential $cred
Run the following command to view virtual disk health:
Get-VirtualDisk -CimSession s-cluster
Run the following command to view current storage job status:
Get-VirtualDisk -CimSession s-cluster | Get-StorageJob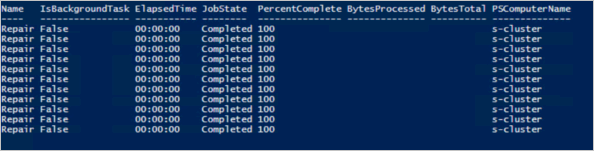
Validate the Azure Stack Hub system state. For instructions, see Validate Azure Stack Hub system state.
Troubleshoot virtual disk repair using the privileged endpoint
If the virtual disk repair job appears stuck, run the following command to restart the job:
Get-VirtualDisk -CimSession s-cluster | Repair-VirtualDisk