Deploy a Linux VM to host a web app in Azure Stack Hub
You can create and deploy a basic Linux virtual machine (VM) by using the Ubuntu image in the Azure Marketplace to host a web app that you've created with a web framework.
This VM can host web apps by using:
- Python: Common Python web frameworks include Flask, Bottle, and Django.
- Go: Common Go frameworks include Revel, Martini, Gocraft/web, and Gorilla.
- Ruby: Set up Ruby on Rails as a framework to deliver your Ruby web apps.
- Java: Use Java to develop web apps that you post to an Apache Tomcat Server. You can install Tomcat on Linux and then deploy your Java WAR files directly to the server.
Use the instructions in this article to get up and running with any web app, framework, and back-end technology that uses the Linux OS. You can then use Azure Stack Hub to manage your infrastructure and use the management tools within your technology to handle maintenance tasks for your app.
Deploy a Linux VM for a web app
In this process, you create a secret key, use the base image of the Linux VM, specify the particular attributes of the VM, and then create the VM. After you create the VM, you open the ports that are necessary for working with the VM and for the VM to host your app. Next, you create the DNS name. Finally, you connect to the VM and update the machine by using the apt-get utility. After you've completed the process, you'll have a VM in your Azure Stack Hub instance that's ready to host your web app.
Before you begin, make sure that you have everything you need in place.
Prerequisites
- An Azure Stack Hub subscription, with access to the Ubuntu Server 16.04 LTS image. You can use a later version of the image, but these instructions are written with the 16.04 LTS in mind. If you don't have this image, contact your cloud operator to get the image into the Azure Stack Hub Marketplace.
Deploy the VM by using the portal
To deploy the VM, follow the instructions in the next several sections.
Create your VM
Create a Secure Shell (SSH) public key for your server. For more information, see How to use an SSH public key.
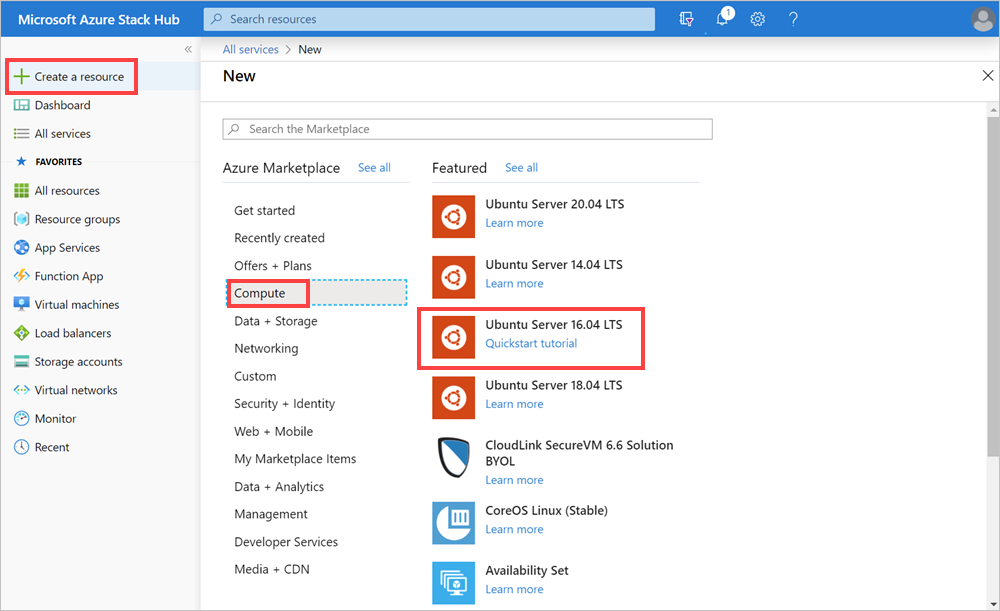
In the Azure Stack Hub portal, select Create a resource > Compute > Ubuntu Server 16.04 LTS.
In the Create a virtual machine pane, for 1. Configure basic settings:
a. Enter the Name of your VM.
b. Select the VM disk type, either Premium SSD (for Premium disks [SSD]) or Standard HDD (for Standard disks [HDD]).
c. Enter your Username.
d. Select the Authentication type as SSH Public key.
e. Retrieve the SSH public key that you created. Open it in a text editor, copy the key, and then paste it into the SSH public key box. Include the text from
---- BEGIN SSH2 PUBLIC KEY ----to---- END SSH2 PUBLIC KEY ----. Paste the entire block of text into the key box:---- BEGIN SSH2 PUBLIC KEY ---- Comment: "rsa-key-20190207" <Your key block> ---- END SSH2 PUBLIC KEY ----f. Select the subscription for your Azure Stack Hub instance.
g. Create a new resource group or use an existing one, depending on how you want to organize the resources for your app.
h. Select your location. The Azure Stack Development Kit (ASDK) is usually in a local region. The location depends on your Azure Stack Hub instance.
For 2. Size, type:
- Select the size of data and RAM for your VM that's available in your Azure Stack Hub instance.
- You can either browse the list or filter for the size of your VM by Compute type, CPUs, and Storage space.
Note
- The prices presented are estimates in your local currency. They include only Azure infrastructure costs and any discounts for the subscription and location. They don't include any applicable software costs.
- The recommended sizes are determined by the publisher of the selected image and are based on hardware and software requirements.
- Using Standard disks (HDD) rather than Premium disks (SSD) might affect operating system performance.
In 3. Configure optional features, type:
a. For High availability, select an availability set. To provide redundancy to your application, group two or more virtual machines in an availability set. This configuration ensures that during a planned or unplanned maintenance event, at least one virtual machine will be available and meet the 99.95% Azure service-level agreement (SLA). The availability set of a virtual machine can't be changed after it's created.
b. For Storage, select Premium disks (SSD) or Standard disks (HDD). Premium disks (SSD) are backed by solid-state drives and offer consistent, low-latency performance. They provide the best balance between price and performance and are ideal for I/O-intensive applications and production workloads. Standard disks are backed by magnetic drives and are preferable for applications where data is accessed infrequently. Zone-redundant disks are backed by zone-redundant storage (ZRS), which replicates your data across multiple zones, and they're available even if a single zone is down.
c. Select Use managed disks. When you enable this feature, Azure automatically manages the availability of disks. You benefit from data redundancy and fault tolerance, without having to create and manage storage accounts on your own. Managed disks might not be available in all regions. For more information, see Introduction to Azure managed disks.
d. To configure your network, select virtual network. Virtual networks are logically isolated from each other in Azure. You can configure their IP address ranges, subnets, route tables, gateways, and security settings, much like a traditional network in your datacenter. Virtual machines in the same virtual network can access each other by default.
e. To configure your subnet, select subnet. A subnet is a range of IP addresses in your virtual network. You can use a subnet to isolate virtual machines from each other or from the internet.
f. To configure access to your VM or to services running on your VM, select Public IP address. Use a public IP address to communicate with the virtual machine from outside the virtual network.
g. Select Network Security Group, Basic, or Advanced. Set rules that allow or deny network traffic to the VM.
h. To set access for common or custom protocols to your VM, select public inbound ports. The service specifies the destination protocol and port range for this rule. You can choose a predefined service, such as Remote Desktop Protocol (RDP) or SSH, or provide a custom port range. For the web server, use HTTP (80), HTTPS (443), and SSH (22) open. If you plan to manage the machine by using an RDP connection, open port 3389.
i. To add extensions to your VM, select Extensions. Extensions add new features, such as configuration management or antivirus protection, to your virtual machine.
j. Disable or enable Monitoring. To help diagnose startup issues, you can use monitoring to capture the serial console output and screenshots of a virtual machine that's running on a host.
k. To specify the storage account that holds your metrics, select diagnostics storage account. Metrics are written to a storage account so that you can analyze them with your own tools.
l. Select OK.
Review 4. Summary:
- The portal validates your settings.
- To reuse your settings with an Azure Resource Manager workflow, you can download the Azure Resource Manager template for your VM.
- When the validation has passed, select OK. VM deployment takes several minutes.
Specify the open ports and DNS name
To make your web app accessible to users on your network, open the ports that are used to connect to the machine and add a friendly DNS name, such as mywebapp.local.cloudapp.azurestack.external, that users can use in their web browsers.
Open inbound ports
You can modify the destination protocol and port range for a predefined service, such as RDP or SSH, or provide a custom port range. For example, you might want to work with the port range of your web framework. GO, for example, communicates on port 3000.
Open the Azure Stack Hub portal for your tenant.
Search for your VM. You might have pinned the VM to your dashboard, or you can search for it in the Search resources box.
Select Networking in your VM pane.
Select Add inbound port rule to open a port.
For Source, leave the default selection, Any.
For Source port range, leave the wildcard (*).
For Destination port range, enter the port that you want to open, such as 3000.
For Protocol, leave the default selection, Any.
For Action, select Allow.
For Priority, leave the default selection.
Enter a Name and Description to help you remember why the port is open.
Select Add.
Add a DNS name for your server
In addition, you can create a DNS name for your server, so that users can connect to your website by using a URL.
Open the Azure Stack Hub portal for your tenant.
Search for your VM. You might have pinned the VM to your dashboard, or you can search for it in the Search resources box.
Select Overview.
Under VM, select Configure.
For Assignment, select Dynamic.
Enter the DNS name label, such as mywebapp, so that your full URL becomes mywebapp.local.cloudapp.azurestack.external (for an ASDK app).
Connect via SSH to update your VM
On the same network as your Azure Stack Hub instance, open your SSH client. For more information, see Use an SSH key pair with Azure Stack Hub.
Enter the following commands:
    sudo apt-get update
    sudo apt-get -y upgrade
Next steps
Learn how to Set up a development environment in Azure Stack Hub.