Note
Access to this page requires authorization. You can try signing in or changing directories.
Access to this page requires authorization. You can try changing directories.
Applies to: ✔️ SMB file shares
This article explains how to authorize access to Azure Files data when browsing file shares in the Azure portal. It doesn't cover setting up identity-based authentication for SMB access to file shares. For that information, see Overview of Azure Files identity-based authentication.
When you access file data by using the Azure portal, the portal makes requests to the Azure Files service. You can authorize access to file data in the Azure portal by using either your Microsoft Entra account (recommended) or the storage account access key (less secure). The portal shows which method you're using and lets you switch between the two methods if you have the appropriate permissions. By default, the portal uses whichever method you're already using to authorize all file shares. You can change this setting for individual file share operations.
Warning
Accessing a file share by using storage account keys has inherent security risks. Always authenticate by using Microsoft Entra when possible. For information on how to protect and manage your keys, see Manage storage account access keys.
Get permissions to access file data
Depending on how you want to authorize access to file data in the Azure portal, you need specific permissions. In most cases, you get these permissions through Azure role-based access control (Azure RBAC).
| Authentication method | Required role | Additional permissions |
|---|---|---|
| Microsoft Entra account (recommended) | Storage File Data Privileged Reader or Storage File Data Privileged Contributor, plus Azure Resource Manager Reader | readFileBackupSemantics and writeFileBackupSemantics actions |
| Storage account access key | Any role with Microsoft.Storage/storageAccounts/listkeys/action |
None |
Use your Microsoft Entra account (recommended)
To access file data from the Azure portal by using your Entra account, both of the following statements must be true:
- You're assigned either a built-in or custom role that provides access to file data.
- You're assigned the Azure Resource Manager Reader role, at a minimum, scoped to the level of the storage account or higher. The Reader role grants the most restricted permissions, but another Azure Resource Manager role that grants access to storage account management resources is also acceptable.
The Azure Resource Manager Reader role permits users to view storage account resources, but not modify them. It doesn't provide read permissions to data in Azure Storage, but only to account management resources. The Reader role is necessary so that users can go to file shares in the Azure portal.
Two built-in roles have the required permissions to access file data by using OAuth:
For information about the built-in roles that support access to file data, see Access Azure file shares using Microsoft Entra ID with Azure Files OAuth over REST.
Note
The Storage File Data Privileged Contributor role has permissions to read, write, delete, and modify ACLs/NTFS permissions on files and directories in Azure file shares. Modifying ACLs/NTFS permissions isn't supported through the Azure portal.
Custom roles can support different combinations of the same permissions that the built-in roles provide. For more information, see Azure custom roles and Understand role definitions for Azure resources.
Use the storage account access key (not recommended)
To access file data by using the storage account access key, you must have an Azure role assigned to you that includes the Azure RBAC action Microsoft.Storage/storageAccounts/listkeys/action. This Azure role can be built in or custom.
The following built-in roles support Microsoft.Storage/storageAccounts/listkeys/action. They're listed in order from least to greatest permissions.
- Reader and Data Access
- Storage Account Contributor
- Azure Resource Manager Contributor
- Azure Resource Manager Owner
When you attempt to access file data in the Azure portal, the portal first checks whether you have a role with Microsoft.Storage/storageAccounts/listkeys/action. If you have a role with this action, the portal uses the storage account key to access file data. If you don't have a role with this action, the portal attempts to access data by using your Microsoft Entra account.
Important
When you lock a storage account by using a Resource Manager ReadOnly lock, you can't perform the listKeys operation for that storage account. The listKeys operation is a POST operation, and all POST operations are prevented when a ReadOnly lock is configured for the account.
For this reason, when you lock the account by using a ReadOnly lock, you must use your Microsoft Entra account to access file data in the portal. For information about accessing file data in the Azure portal by using Microsoft Entra ID, see Use your Microsoft Entra account.
The classic subscription administrator roles Service Administrator and Co-Administrator include the equivalent of the Azure Resource Manager Owner role. The Owner role includes all actions, including the Microsoft.Storage/storageAccounts/listkeys/action action. If you're assigned one of these administrative roles, you can also access file data by using the storage account key. For more information, see Azure roles, Microsoft Entra roles, and classic subscription administrator roles.
Specify how to authorize operations on a specific file share
You can change the authentication method for individual file shares. By default, the portal uses the current authentication method. To determine the current authentication method, follow these steps:
In the Azure portal, go to your storage account.
On the service menu, under Data storage, select Classic file shares.
Select a file share.
Select Browse.
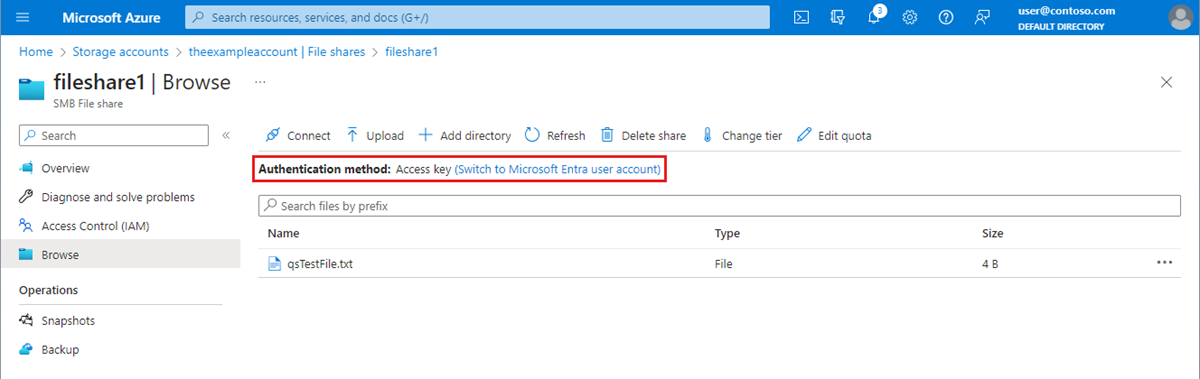
Authentication method shows whether you're currently using the storage account access key or your Entra account to authenticate and authorize file share operations.
If you're currently authenticating by using the storage account access key, Access key is specified as the authentication method, as shown in the following image. If you're authenticating by using your Entra account, Microsoft Entra user account is specified instead.
Authenticate by using your Microsoft Entra account (recommended)
To use your Microsoft Entra account, select Switch to Microsoft Entra user account. If you have the appropriate permissions through your assigned Azure roles, you can proceed. If you lack the necessary permissions, an error message says you don't have permissions to list the data by using your user account with Microsoft Entra ID.
Your Microsoft Entra account also needs two additional RBAC permissions:
Microsoft.Storage/storageAccounts/fileServices/readFileBackupSemantics/actionMicrosoft.Storage/storageAccounts/fileServices/writeFileBackupSemantics/action
These permissions enable the Azure portal to browse file share contents. They aren't included in the Storage File Data Privileged Reader or Contributor roles, so you need to assign them separately.
No file shares appear in the list if your Entra account lacks permissions to view them.
Authenticate by using the storage account access key (not recommended)
To switch to using the account access key, select the link that says Switch to access key. If you have access to the storage account key, you can proceed. If you don't have access to the account key, an error message says you don't have permissions to use the access key to list data.
No file shares appear in the list if you don't have access to the storage account access key.
Default to Microsoft Entra authorization in the Azure portal
When you create a new storage account, you can specify that the Azure portal defaults to authorization by using Microsoft Entra ID when you access file data. You can also configure this setting for an existing storage account. This setting specifies the default authorization method only. You can override this setting and choose to authorize data access by using the storage account key.
To specify that the portal uses Entra authorization by default for data access when you create a storage account, follow these steps:
Create a new storage account by following the instructions in Create an Azure storage account.
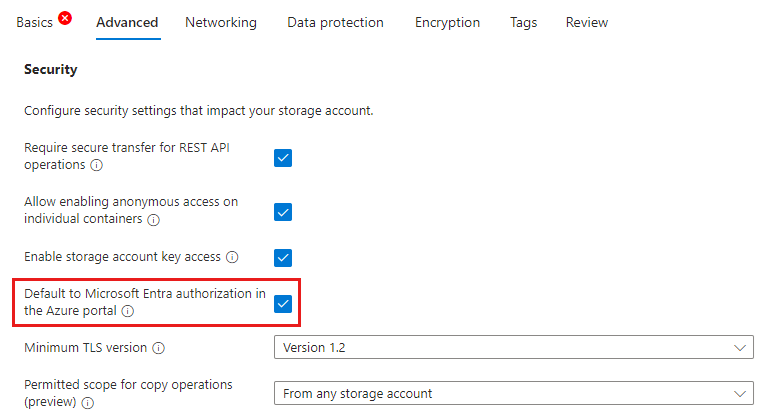
On the Advanced tab, in the Security section, select the Default to Microsoft Entra authorization in the Azure portal checkbox.
Select Review + create to run validation and create the storage account.
To update this setting for an existing storage account, follow these steps:
Go to the storage account overview in the Azure portal.
Under Settings, select Configuration.
Set Default to Microsoft Entra authorization in the Azure portal to Enabled.