Note
Access to this page requires authorization. You can try signing in or changing directories.
Access to this page requires authorization. You can try changing directories.
This page describes how to set up managed disaster recovery (DR), from an empty secondary region to a failover group that replicates continuously. For how managed DR works and what it replicates, see Managed disaster recovery.
Most of the work is storage and network configuration, which you finish before you create the failover group.
Requirements
- A workspace on the Premium plan in both the primary and secondary regions.
- Managed DR enabled on your account. Managed DR is gated. Apply for access through your Azure Databricks account team.
- The Mission Critical add-on enabled on both workspaces. See Enable Mission Critical on a workspace.
- Serverless compute enabled on both workspaces. Serverless compute is available by default in most Unity Catalog-enabled workspaces. See Connect to serverless compute.
- The account admin role, with ALL PRIVILEGES on every external location used by the catalogs you plan to replicate.
How managed table data replication works
Replication of Unity Catalog managed table data uses a pull model. The replication job runs on serverless compute in the secondary region, reads from the primary region's storage, and writes to the secondary region's storage. The following diagram shows the three input/output (IO) paths used in each replication cycle, in an example with server-side data file copying. The numbers identify recurring activities within the cycle.
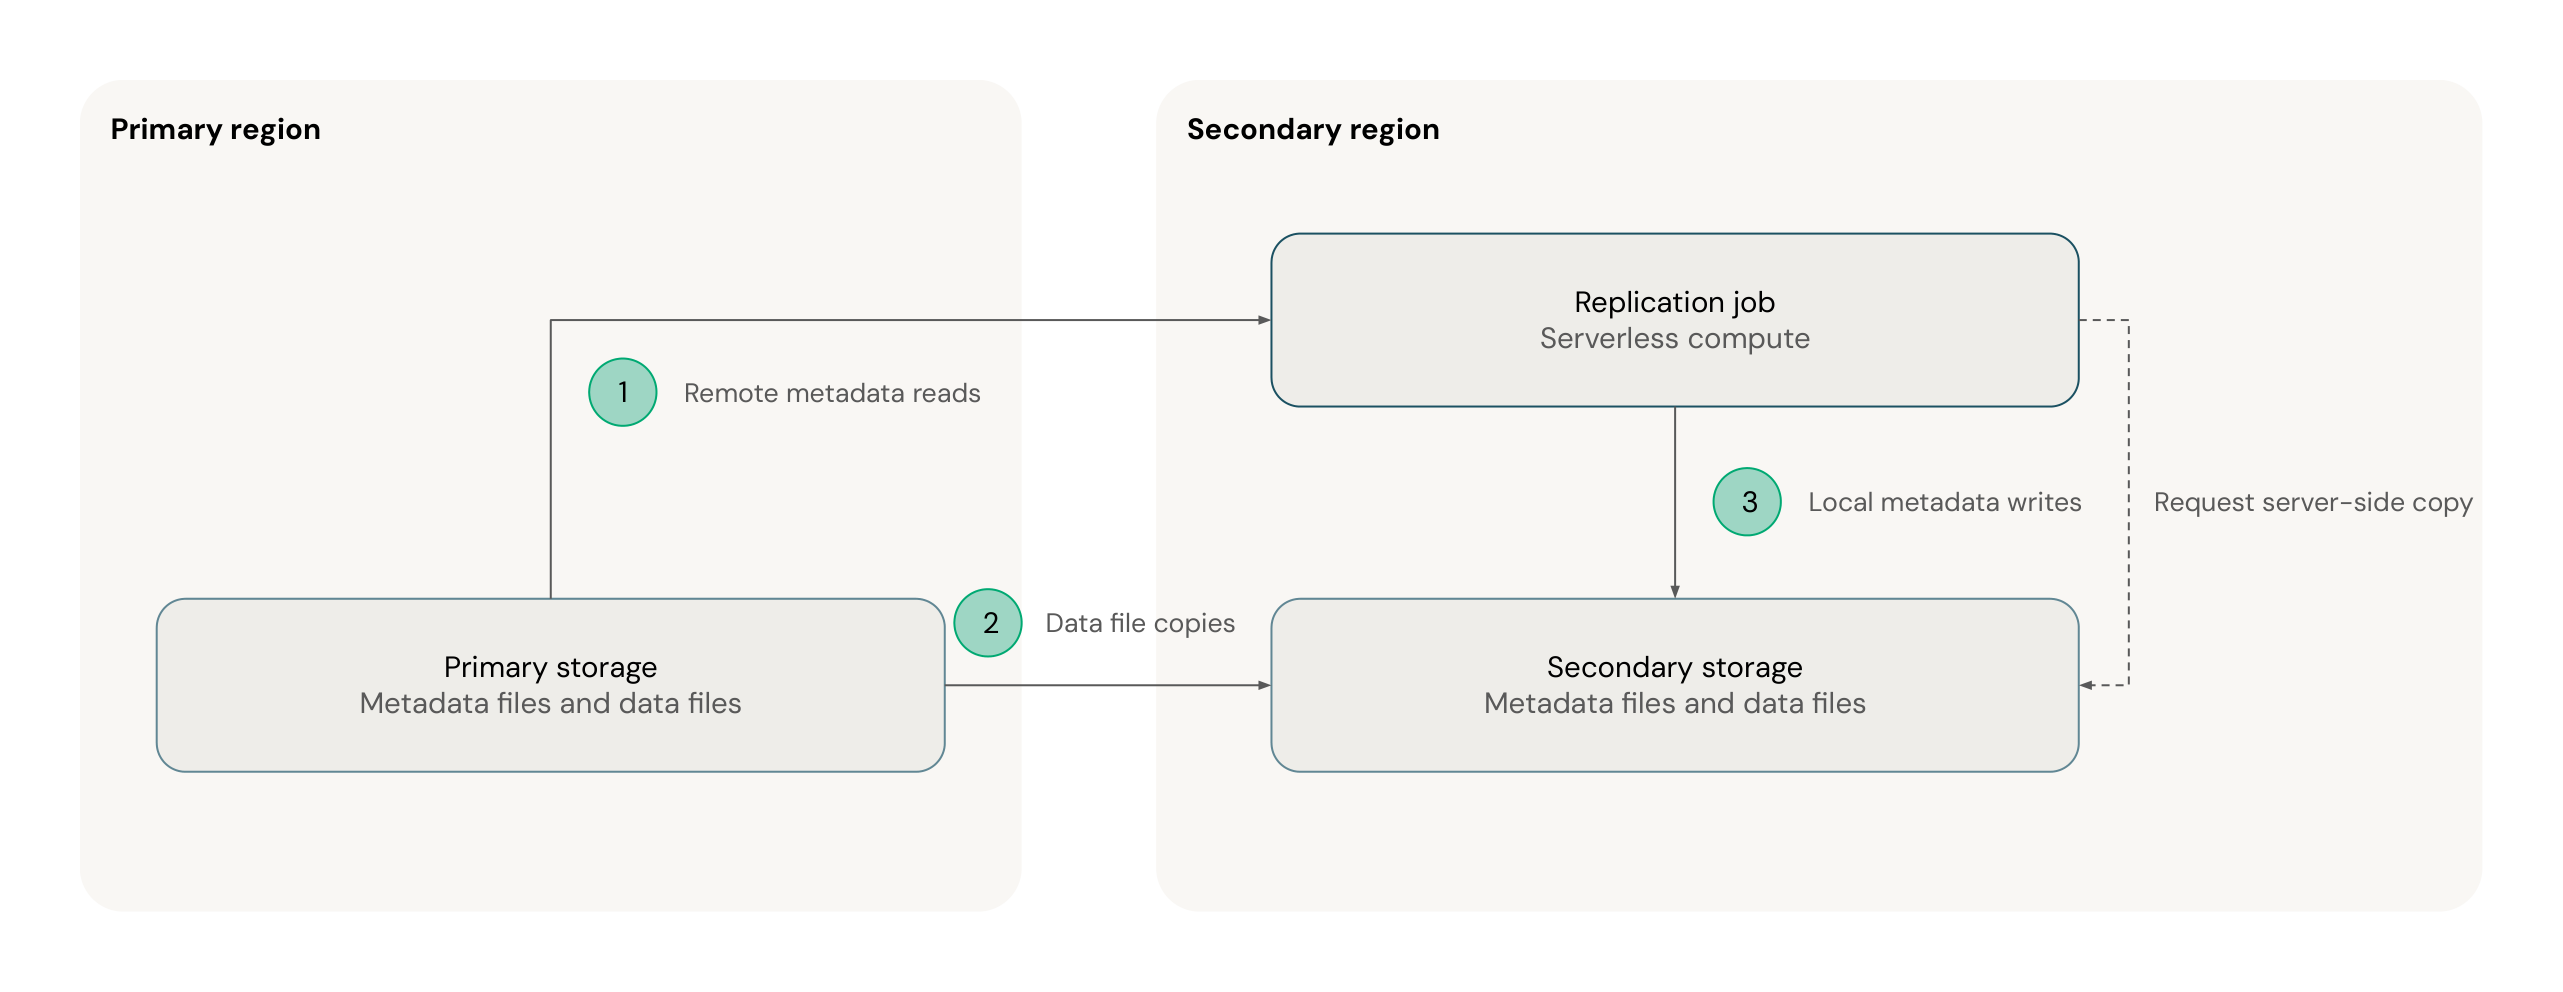
- Remote metadata reads: The job lists and reads the Delta Lake log files in the primary storage to find what changed. These reads are cross-region.
- Data file copies: The job copies data files from the primary storage to the secondary storage. This path is cross-region and carries most of the traffic. Depending on your account and storage configuration, the job either requests the copy and the cloud provider copies the data files directly between the storage locations, or the job copies the data files itself.
- Local metadata writes: The job writes new Delta Lake log files to the secondary storage. These writes stay in the secondary region.
After a failover, the roles swap: replication runs from the new primary to the new secondary, so the new secondary must be able to read the new primary's storage. For this reason, setup covers storage and network access in both directions.
Each IO path is routed differently, depending on whether you use private connectivity to your storage:
| IO path | Without private connectivity | With private connectivity |
|---|---|---|
| Remote metadata reads | Network address translation (NAT) or service endpoint | Private endpoint |
| Data file copies | Cloud provider backbone network | Cloud provider backbone network |
| Local metadata writes | Service endpoint | Private endpoint |
Managed DR replicates external table and external volume metadata only. It doesn't copy their data, so the cross-region storage and network setup applies to managed table data. External tables and volumes still need a storage mapping whose target is covered by an external location in the secondary metastore.
Set up managed DR
Prepare the workspaces
- Create a workspace and a Unity Catalog metastore in the secondary region, in the same Azure Databricks account and on the same cloud as your primary. The secondary metastore must not contain catalogs that share names with the catalogs you plan to replicate.
- Configure account-level single sign-on (SSO) with all workspaces enabled, and sync identities to the account through automatic identity management (AIM) or System for Cross-domain Identity Management (SCIM), so users, groups, and service principals exist in both regions.
- Associate the account-level serverless usage policy (formerly serverless budget policy) with both the primary and secondary workspaces.
- For tables that you query by timestamp, using time travel or the change data feed, enable in-commit timestamps before you set up replication. See Limitations.
Warning
The secondary workspace doesn't need to be empty, but if you turn on workspace asset replication, Azure Databricks deletes any existing in-scope assets in the secondary when initial replication completes. Out-of-scope assets are not affected.
Configure storage
Managed DR doesn't create your cloud storage or replicate external locations and storage credentials. You create the secondary storage and register it in Unity Catalog.
- Create storage accounts in the secondary region for the replicated data.
- Create an access connector for Azure Databricks in the secondary region. Grant its managed identity the Storage Blob Data Contributor role on the secondary storage accounts, and add it as a storage credential in the secondary metastore.
- In the secondary metastore, create an external location and storage credential for each external location that your primary catalogs use.
- If you use serverless egress control, also register the remote-region storage in each metastore, so the serverless firewall allows replication traffic to it. Managed DR doesn't read or write data through these external locations, but to create one, you must provide a storage credential whose access connector can access the storage account:
- In the secondary metastore, create an external location for the primary storage, with a storage credential whose access connector can access the primary storage account.
- In the primary metastore, create an external location for the secondary storage, with a storage credential whose access connector can access the secondary storage account.
Example
Your primary region is eastus2, with data in abfss://data@primaryeus2.dfs.core.windows.net. You add westus as the secondary region.
- Create a storage account in
westuswith a container:abfss://data@replicawus.dfs.core.windows.net. - Create an access connector in
westusand grant its managed identity the Storage Blob Data Contributor role on thereplicawusstorage account. - In the
westusmetastore, add the access connector as a storage credential, then create an external location forabfss://data@replicawus.dfs.core.windows.net.
When you create the failover group, you map abfss://data@primaryeus2.dfs.core.windows.net/* to abfss://data@replicawus.dfs.core.windows.net/*. See Plan your storage mappings.
Plan your storage mappings
A storage mapping tells managed DR which secondary path to use for each primary storage path. Managed DR decides where to place a replicated table, volume, or managed location by applying the failover group's storage mappings to its source path. You add the mappings when you create the failover group, and you can update them later.
The following diagram shows how a failover group's storage mapping relates a primary path prefix to a secondary path prefix, including their child paths.
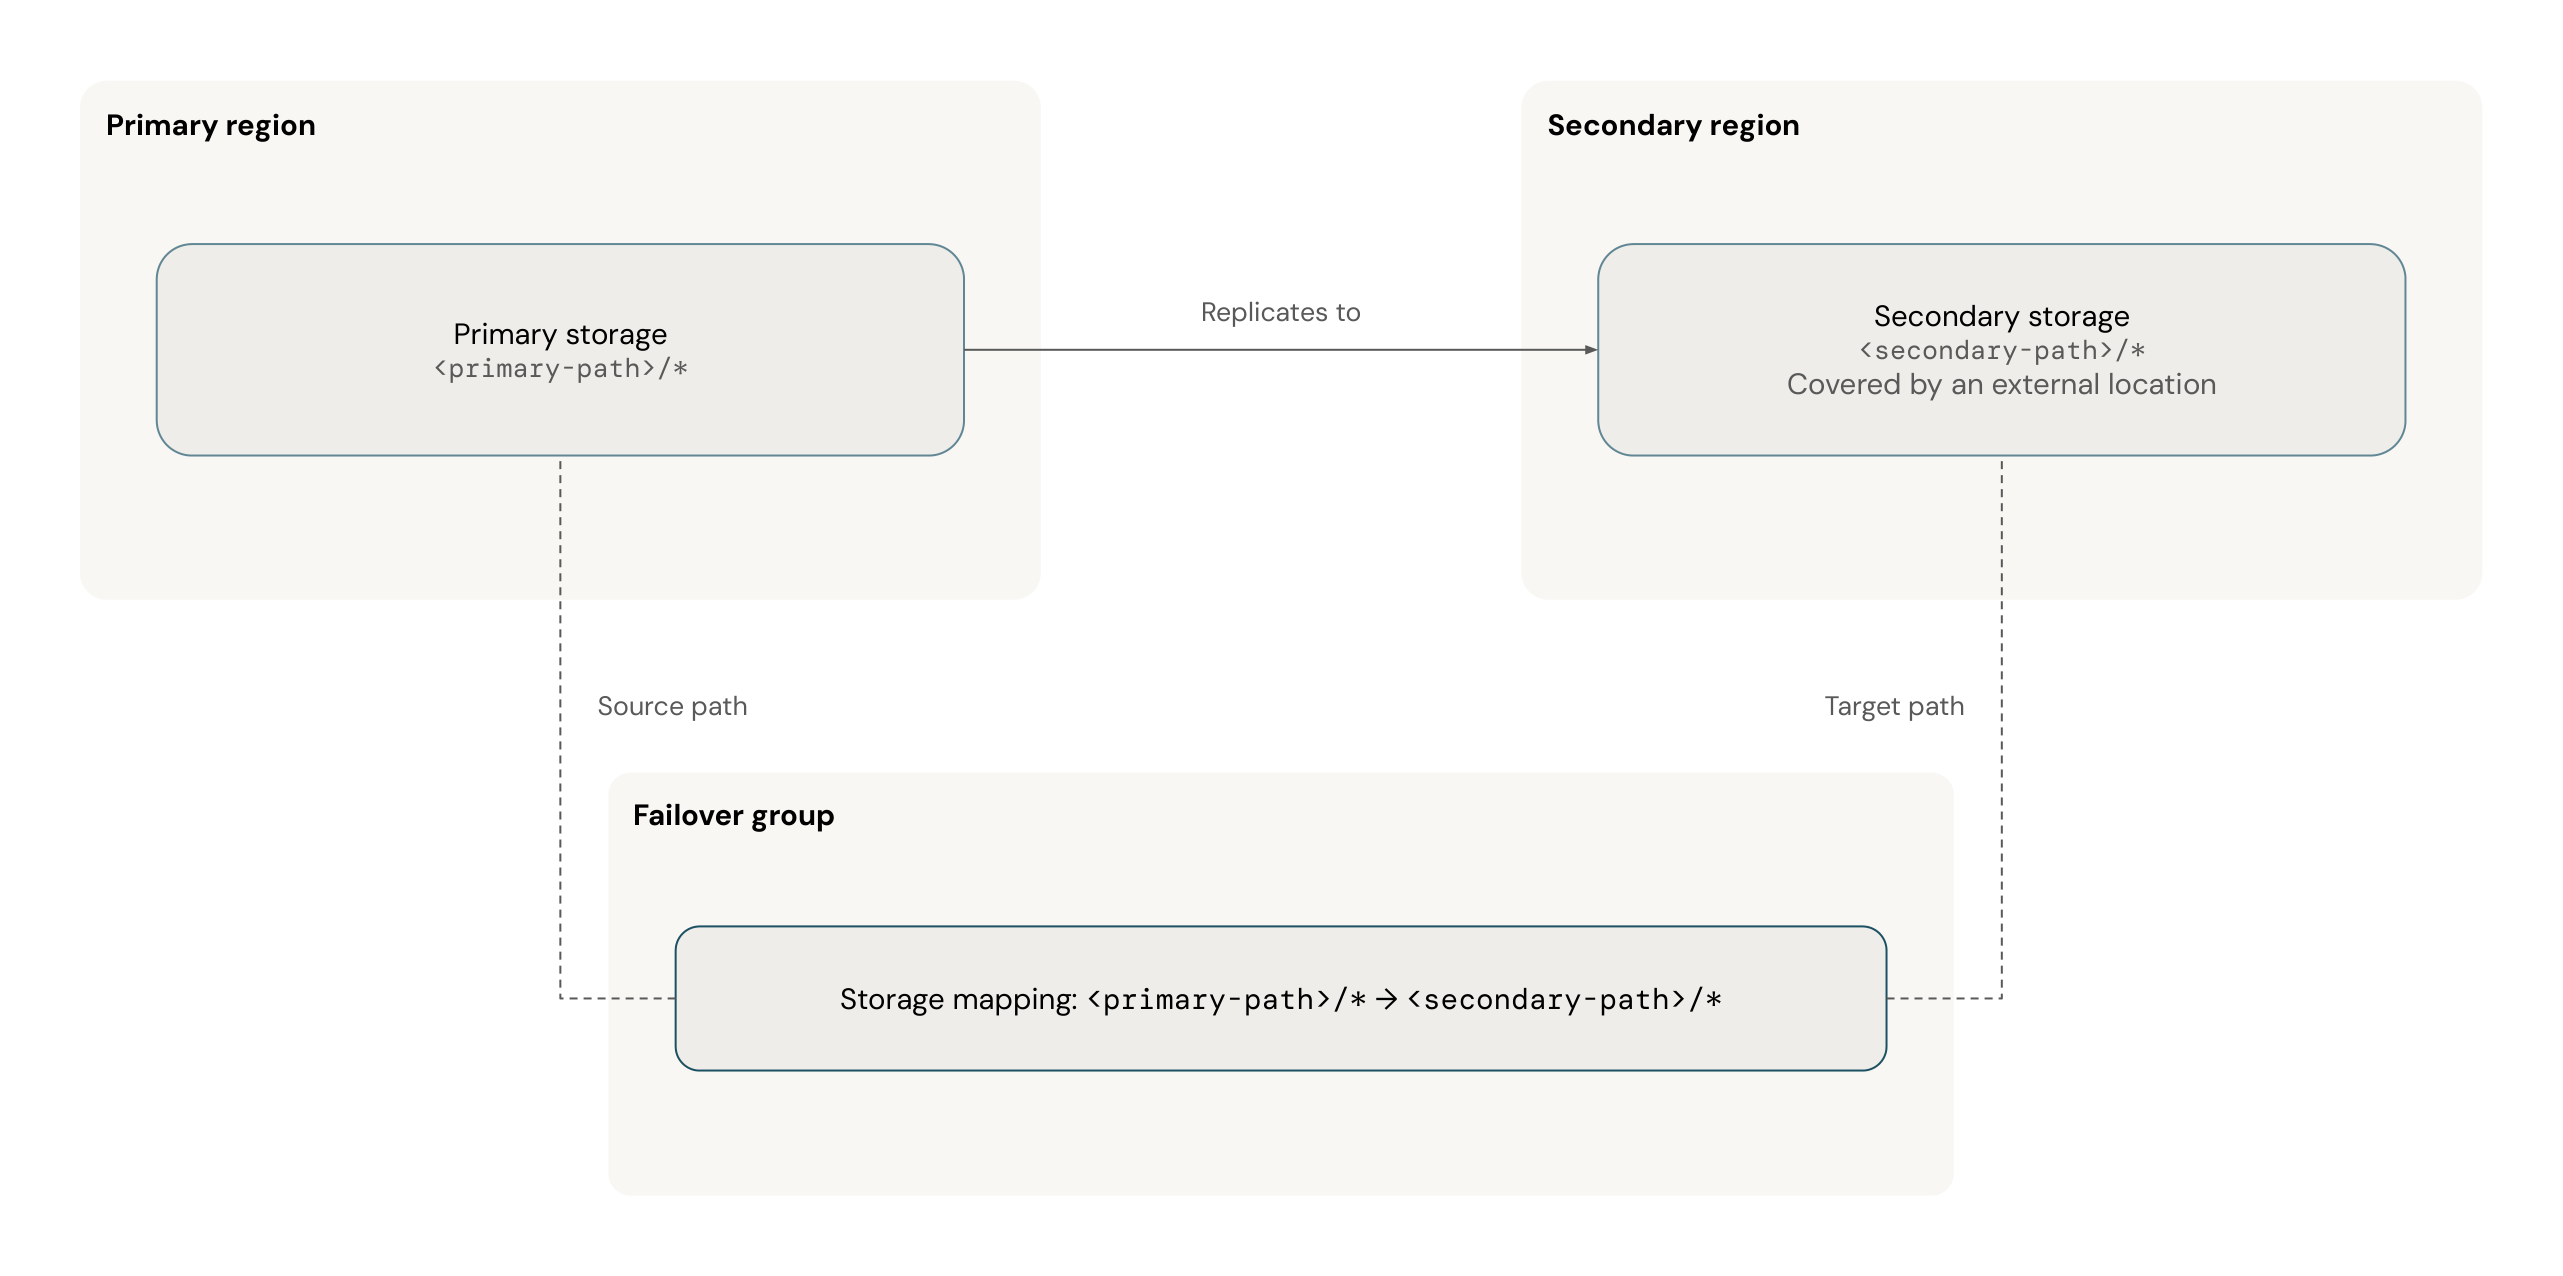
A valid set of mappings meets two rules:
- The mappings cover every source storage path that your replicated catalogs use, including the managed locations of catalogs and schemas and the locations of external tables and volumes. A mapping matches a path exactly, or as a prefix that also covers child paths when you add the
/*suffix. Assets on an unmapped path are not replicated, and replication reportsDR_INVALID_CONFIGURATION.MISSING_LOCATION_MAPPING. - Each target path is covered by an external location in the secondary metastore, which you created in Configure storage. The failover group rejects a mapping whose target isn't under an existing external location.
For example, map abfss://data@primary.dfs.core.windows.net/* to abfss://data@secondary.dfs.core.windows.net/*.
Use a dedicated target path for replicated data. A target that overlaps existing storage in the secondary, such as another external location or the workspace's default Databricks File System (DBFS) storage, fails with DR_INVALID_CONFIGURATION.OVERLAPPING_EXTERNAL_LOCATIONS.
Configure network access
Configure network access in both directions now, because replication reverses after a failover. See How managed table data replication works.
Associate the following account-level objects with both the primary and secondary workspaces: network connectivity configuration (NCC), network policy (serverless egress), and IP access list.
Without private connectivity
Serverless compute reaches storage over the serverless network, and no private endpoints are needed. Confirm that the firewalls on both the primary and secondary storage accounts allow Azure Databricks serverless network access. See Configure a firewall for serverless compute access.
With private connectivity
If you use private connectivity to the storage accounts that hold your source or replicated data:
- Create an NCC in the secondary region and assign it to the secondary workspace. The NCC holds advanced networking configuration such as private connectivity, so the secondary NCC must mirror the primary NCC.
- Make sure each workspace has four private endpoints:
blobanddfsto the primary storage account, andblobanddfsto the secondary storage account. Across the two regions, that's eight private endpoints. - Approve the private endpoints in the Azure portal.
The private endpoints on the two storage accounts must match. If they don't, replication fails with DR_INVALID_CONFIGURATION.MISSING_STORAGE_PRIVATE_ENDPOINT.
The following diagram shows the four private endpoints used from the secondary region for metadata reads and writes. The primary region needs the same configuration. Data file copies use the cloud provider backbone, as described in How managed table data replication works.
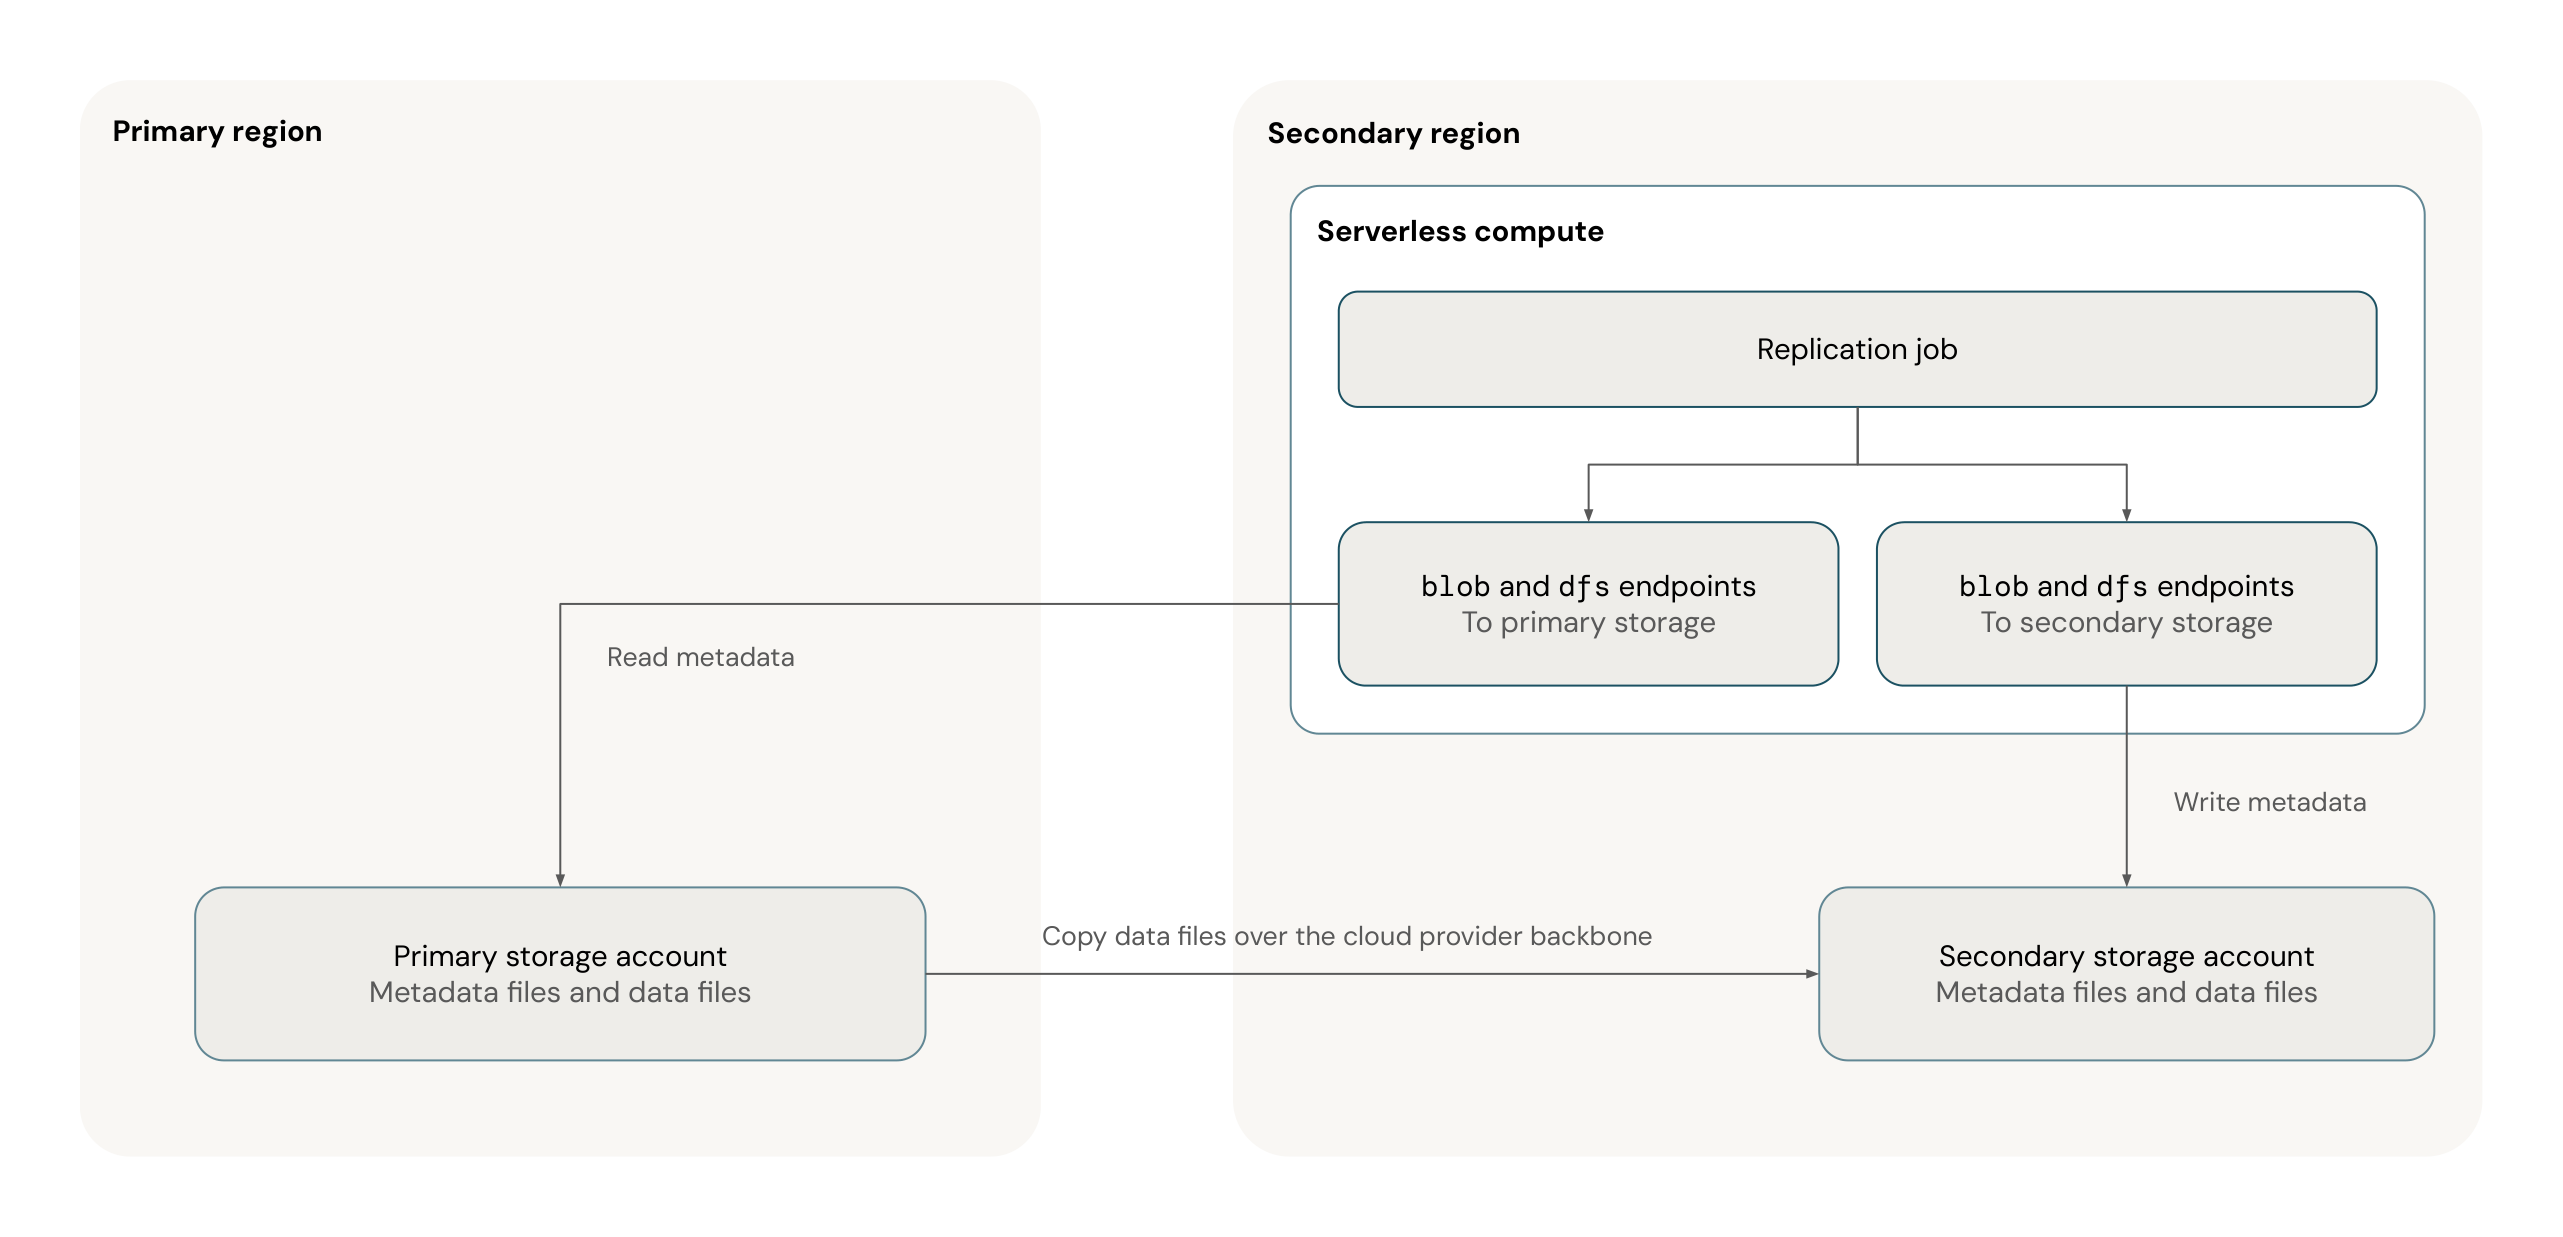
With serverless egress control
If serverless egress control is enabled, each metastore needs an external location for the remote-region storage account, so the serverless firewall allows traffic to it. You create these in Configure storage.
(Optional) Create a stable URL
A stable URL resolves to the current primary workspace, so clients that connect through it don't need to be reconfigured after a failover. Databricks recommends using one. Stable URLs require a custom URL provisioned for your Azure Databricks domain (contact your account team) and account-level OAuth.
- In the account console, click Resilience.
- Click the Stable URLs tab, then Create stable URL.
- Enter a name, select the current primary workspace, and create the stable URL.
Use the stable URL instead of the original workspace URL for the Azure Databricks web UI, JDBC and ODBC connections to SQL warehouses, and REST API requests. The original workspace URL remains valid, but after a failover it keeps pointing to the old primary.
Stable URLs are supported with front-end (inbound) Private Link. With inbound Private Link, the stable URL uses your custom URL with a stable connection ID, in the form <my-custom-url>.azuredatabricks.net/?w=stable_connection_id. See Configure inbound Private Link for workspaces with managed disaster recovery.
Clients connect through the stable URL the same way they connect to a workspace URL, with two differences: use the stable URL's host, and identify the workspace with the stable connection ID in the w query parameter. Authenticate with account-level OAuth.
- JDBC and ODBC: Set the Server hostname to the stable URL's host, then append
?w=stable_connection_idto the warehouse HTTP path, for example/sql/1.0/warehouses/<warehouse-id>?w=stable_connection_id. Get the warehouse ID from the HTTP path on the warehouse's Connection details tab (see Get connection details for an Azure Databricks compute resource). Use the same port and driver settings as with the original workspace URL. - REST API: Send requests to the stable URL's host with the
w=stable_connection_idquery parameter, for exampleGET https://<my-custom-url>/api/2.0/clusters/list?w=stable_connection_id.
To deploy with Declarative Automation Bundles or Terraform through the stable URL, see Deploy with Declarative Automation Bundles and Terraform.
Create a failover group
- In the account console, click Resilience.
- Click the Failover groups tab, then Create failover group.
- Fill in the form:
- Failover group name: A name you choose for the failover group.
- Primary workspace: The workspace that is your primary.
- Secondary workspace: The workspace in the secondary region.
- Replicate workspace assets (optional): Off by default. Turn on to replicate workspace assets and their access control lists (ACLs) from the primary to the secondary.
- Stable URL (optional): The stable URL you created in (Optional) Create a stable URL.
- Replication scope: The catalogs to replicate. You must select a primary workspace before this field is available.
- Storage mappings: The mappings you planned in Plan your storage mappings. You can use
*as a wildcard for prefix matching.
- Click Create failover group.
Wait for initial replication
The first replication cycle copies all in-scope data to the secondary. For large workspaces, the initial workspace asset bootstrap can take up to five days. Failover becomes available when the failover group reaches ACTIVE. See Initial replication.
During initial replication, the failover group's progress percentage updates about one time per day and might not change for several hours.
To run validation queries in the secondary region, Databricks recommends a separate read-only monitor workspace there. The secondary workspace can't run compute while managed DR is enabled. See Limitations.