Note
Access to this page requires authorization. You can try signing in or changing directories.
Access to this page requires authorization. You can try changing directories.
Before you begin, use the Choose a policy type selector at the top of this page to choose the type of policy you’re setting up. Azure Active Directory B2C offers two methods to define how users interact with your applications: through predefined user flows or through fully configurable custom policies. The steps required in this article are different for each method.
Single sign-on (SSO) adds security and convenience when users sign in across applications in Azure Active Directory B2C (Azure AD B2C). This article describes the single sign-on methods used in Azure AD B2C and helps you choose the most appropriate SSO method when configuring your policy.
With single sign-on, users sign in once with a single account and get access to multiple applications. The application can be a web, mobile, or single page application, regardless of platform or domain name.
When the user initially signs in to an application, Azure AD B2C persists a cookie-based session. Upon subsequent authentication requests, Azure AD B2C reads and validates the cookie-based session, and issues an access token without prompting the user to sign in again. If the cookie-based session expires or becomes invalid, the user is prompted to sign-in again.
Note
If the user uses a browser that blocks third-party cookies, there are limitations with SSO due to limited access to the cookie-based session. The most user-visible impact is that there are more interactions required for sign-in. Additionally, the front channel sign-out doesn't immediately clear authentication state from federated applications. Check our recommended ways about how to handle third-party cookie blocking in browsers.
Prerequisites
- Create a user flow so users can sign up and sign in to your application.
- Register a web application.
- Complete the steps in Get started with custom policies in Active Directory B2C. This tutorial guides you how to update custom policy files to use your Azure AD B2C tenant configuration.
- Register a web application.
Azure AD B2C session overview
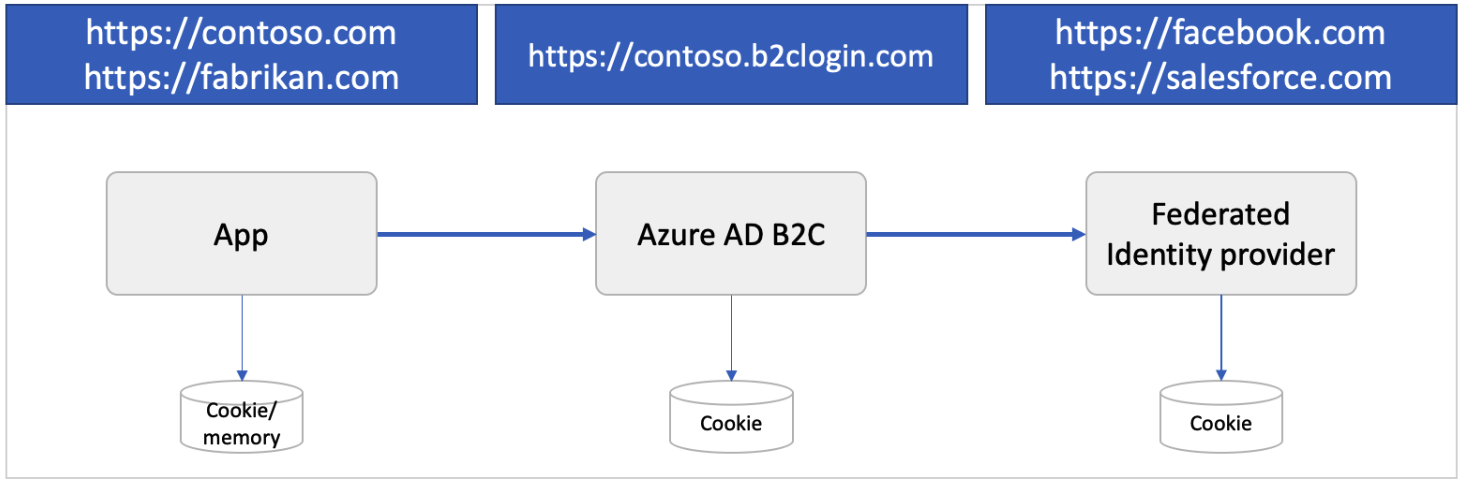
Integration with Azure AD B2C involves three types of SSO sessions:
- Azure AD B2C - Session managed by Azure AD B2C
- Federated identity provider - Session managed by the identity provider, for example Facebook, Salesforce, or Microsoft account
- Application - Session managed by the web, mobile, or single page application
Azure AD B2C session
When a user successfully authenticates with a local or social account, Azure AD B2C stores a cookie-based session on the user's browser. The cookie is stored under the Azure AD B2C tenant domain name, such as https://contoso.b2clogin.com.
When a user signs in with a federated account, a session time window, also known as time-to-live (TTL), starts. If the user signs in to the same or a different app within this TTL, Azure AD B2C attempts to acquire a new access token from the federated identity provider. If the federated identity provider session is expired or invalid, the federated identity provider prompts the user for their credentials. If the user’s session is ongoing, or if the user is signed in using a local account instead of a federated one, Azure AD B2C authorizes the user and prevents any further prompts.
You can configure the session behavior, including the session TTL and how Azure AD B2C shares the session across policies and applications.
Federated identity provider session
A social or enterprise identity provider manages its own session. The cookie is stored under the identity provider's domain name, such as https://login.salesforce.com. Azure AD B2C doesn't control the federated identity provider session. Instead, session behavior is determined by the federated identity provider.
Consider the following scenario:
- A user signs into Facebook to check their feed.
- Later, the user opens your application and starts the sign-in process. The application redirects the user to Azure AD B2C to complete the sign-in process.
- On the Azure AD B2C sign-up or sign-in page, the user chooses to sign-in with their Facebook account. The user is redirected to Facebook. If there's an active session at Facebook, the user isn't prompted to provide their credentials and is immediately redirected to Azure AD B2C with a Facebook token.
Application session
An OAuth2 access token, ID token, or SAML token can protect a web, mobile, or single page application. When a user tries to access a protected resource on the app, the app checks whether there's an active session on the application side. If an app session doesn't exist or the session expires, the app directs the user to the Azure AD B2C sign-in page.
The application session can be a cookie-based session stored under the application domain name, such as https://contoso.com. Mobile applications might store the session in a different way but using a similar approach.
Configure Azure AD B2C session behavior
You can configure the Azure AD B2C session behavior, including:
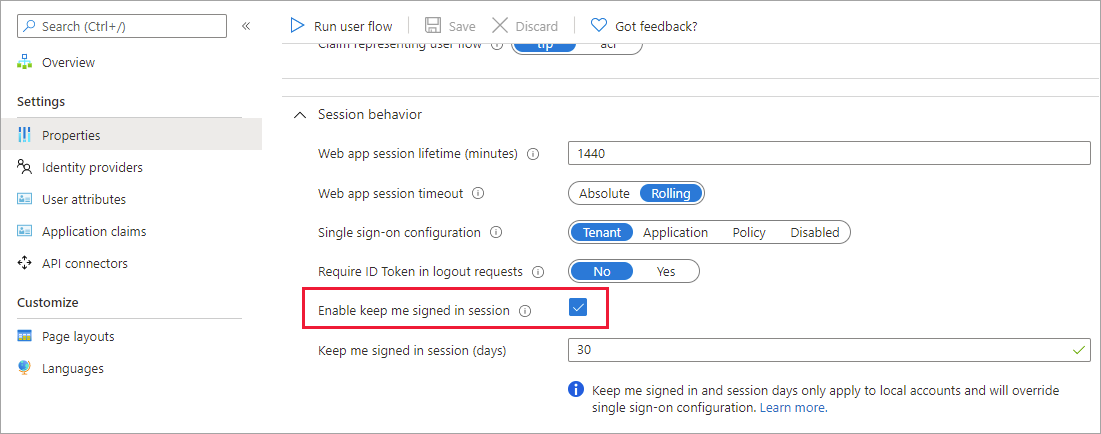
Web app session lifetime (minutes) - The amount of time the Azure AD B2C session cookie is stored on the user's browser after successful authentication. You can set the session lifetime up to 24 hours.
Web app session timeout - Indicates how a session is extended by the session lifetime setting or the Keep me signed in (KMSI) setting.
- Rolling - Indicates that the session is extended every time the user performs a cookie-based authentication (default).
- Absolute - Indicates that the user is forced to reauthenticate after the time period specified.
Single sign-on configuration - The Azure AD B2C session can be configured with the following scopes:
- Tenant - This setting is the default. Using this setting allows multiple applications and user flows in your B2C tenant to share the same user session. For example, once a user signs into an application, the user can also seamlessly sign into another one upon accessing it.
- Application - This setting allows you to maintain a user session exclusively for an application, independent of other applications. For example, you can use this setting if you want the user to sign in to Contoso Pharmacy regardless of whether the user is already signed into Contoso Groceries.
- Policy - This setting allows you to maintain a user session exclusively for a user flow, independent of the applications using it. For instance, Azure AD B2C grants the user access to higher-security parts of multiple applications if the user has already signed in and completed a multifactor authentication (MFA) step. This access continues as long as the session associated with the user flow remains active.
- Suppressed - This setting forces the user to run through the entire user flow upon every execution of the policy.
Configure the user flow
To configure the session behavior in your user flow, follow these steps:
- Sign in to the Azure portal.
- If you have access to multiple tenants, select the Settings icon in the top menu to switch to your Azure AD B2C tenant from the Directories + subscriptions menu.
- Choose All services in the top-left corner of the Azure portal, and then search for and select Azure AD B2C.
- Select User flows.
- Open the user flow that you previously created.
- Select Properties.
- Configure Web app session lifetime (minutes), Web app session timeout, Single sign-on configuration, and Require ID Token in logout requests as needed.
- Select Save.
Configure the custom policy
To configure the session behavior in your custom policy, follow these steps:
Open the relying party (RP) file, for example SignUpOrSignin.xml
If it doesn't already exist, add the following
<UserJourneyBehaviors>element to the<RelyingParty>element. It must be located immediately after<DefaultUserJourney ReferenceId="UserJourney Id"/>.<UserJourneyBehaviors> <SingleSignOn Scope="Application" /> <SessionExpiryType>Absolute</SessionExpiryType> <SessionExpiryInSeconds>86400</SessionExpiryInSeconds> </UserJourneyBehaviors>After you add the user journey behavior elements, the
RelyingPartyelement should look like the following example:<RelyingParty> <DefaultUserJourney ReferenceId="SignUpOrSignIn" /> <UserJourneyBehaviors> <SingleSignOn Scope="Application" /> <SessionExpiryType>Absolute</SessionExpiryType> <SessionExpiryInSeconds>86400</SessionExpiryInSeconds> </UserJourneyBehaviors> <TechnicalProfile Id="PolicyProfile"> <DisplayName>PolicyProfile</DisplayName> <Protocol Name="OpenIdConnect" /> <OutputClaims> <OutputClaim ClaimTypeReferenceId="displayName" /> <OutputClaim ClaimTypeReferenceId="givenName" /> ... </OutputClaims> <SubjectNamingInfo ClaimType="sub" /> </TechnicalProfile> </RelyingParty>Change the value of the
Scopeattribute to one of the possible value:Suppressed,Tenant,Application, orPolicy. For more information, check out the RelyingParty reference article.Set the
SessionExpiryTypeelement toRollingorAbsolute. For more information, check out the RelyingParty reference article.Set the
SessionExpiryInSecondselement to a numeric value between 900 seconds (15 minutes) and 86,400 seconds(24 hours). For more information, check out the RelyingParty reference article.
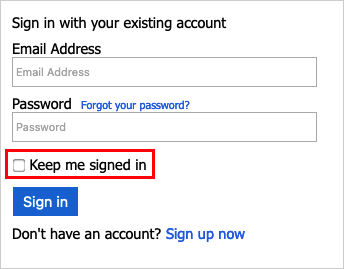
Enable Keep me signed in (KMSI)
You can enable the KMSI feature for users of your web and native applications who have local accounts in your Azure AD B2C directory. When you enable the feature, users can opt to stay signed in so the session remains active after they close the browser. The session is maintained by setting a persistent cookie. Users who select KMSI, can reopen the browser without being prompted to reenter their username and password. This access (persistent cookie) is revoked when a user signs out. For more information, check out the Live demo.
KMSI is configurable at the individual user flow level. Before enabling KMSI for your user flows, consider the following:
- KMSI is supported only for the Recommended versions of sign-up and sign-in (SUSI), sign-in, and profile editing user flows. If you currently have Standard (Legacy) or Legacy preview - v2 versions of these user flows and want to enable KMSI, you need to create new, Recommended versions of these user flows.
- KMSI isn't supported with password reset or sign-up user flows.
- If you want to enable KMSI for all applications in your tenant, we recommend that you enable KMSI for all user flows in your tenant. Because a user can be presented with multiple policies during a session, it's possible they could encounter one that doesn't have KMSI enabled, which would remove the KMSI cookie from the session.
- KMSI shouldn't be enabled on public computers.
Configure KMSI for a user flow
To enable KMSI for your user flow:
Sign in to the Azure portal.
If you have access to multiple tenants, select the Settings icon in the top menu to switch to your Azure AD B2C tenant from the Directories + subscriptions menu.
Choose All services in the top-left corner of the Azure portal, and then search for and select Azure AD B2C.
Select User flows (policies).
Open the user flow that you previously created.
Select Properties.
Under Session behavior, select Enable keep me signed in session. Next to Keep me signed in session (days), enter a value from 1 to 90 to specify the number of days a session can remain open.
Users shouldn't enable this option on public computers.
Configure the page identifier
To enable KMSI, set the content definition DataUri element to page identifier unifiedssp and page version 1.1.0 or above.
Open the extension file of your policy. For example,
SocialAndLocalAccounts/TrustFrameworkExtensions.xml. This extension file is one of the policy files included in the custom policy starter pack, which you obtain in the prerequisite, Get started with custom policies.Search for the BuildingBlocks element. If the element doesn't exist, add it.
Add the ContentDefinitions element to the BuildingBlocks element of the policy.
Your custom policy should look like the following code snippet:
<BuildingBlocks>
  <ContentDefinitions>
    <ContentDefinition Id="api.signuporsignin">
      <DataUri>urn:com:microsoft:aad:b2c:elements:unifiedssp:1.1.0</DataUri>
    </ContentDefinition>
  </ContentDefinitions>
</BuildingBlocks>
Add the metadata to the self-asserted technical profile
To add the KMSI checkbox to the sign-up and sign-in page, set the setting.enableRememberMe metadata to true. Override the SelfAsserted-LocalAccountSignin-Email technical profiles in the extension file.
Find the ClaimsProviders element. If the element doesn't exist, add it.
Add the following claims provider to the ClaimsProviders element:
<ClaimsProvider>
  <DisplayName>Local Account</DisplayName>
  <TechnicalProfiles>
    <TechnicalProfile Id="SelfAsserted-LocalAccountSignin-Email">
      <Metadata>
        <Item Key="setting.enableRememberMe">True</Item>
      </Metadata>
    </TechnicalProfile>
  </TechnicalProfiles>
</ClaimsProvider>
Save the extensions file.
Configure a relying party file
Update the relying party (RP) file that initiates the user journey that you created. The keepAliveInDays parameter allows you to configure how the long the keep me signed in (KMSI) session cookie should persist. For example, if you set the value to 30, then KMSI session cookie persists for 30 days. The range for the value is from 1 to 90 days. Setting the value to 0 turns off KMSI functionality.
Open your custom policy file. For example, SignUpOrSignin.xml.
If it doesn't already exist, add a
<UserJourneyBehaviors>child node to the<RelyingParty>node. It must be located immediately after<DefaultUserJourney ReferenceId="User journey Id" />, for example:<DefaultUserJourney ReferenceId="SignUpOrSignIn" />.Add the following node as a child of the
<UserJourneyBehaviors>element.<UserJourneyBehaviors> <SingleSignOn Scope="Tenant" KeepAliveInDays="30" /> <SessionExpiryType>Absolute</SessionExpiryType> <SessionExpiryInSeconds>1200</SessionExpiryInSeconds> </UserJourneyBehaviors>
You set both KeepAliveInDays and SessionExpiryInSeconds so that during a sign-in, if a user enables KMSI, the KeepAliveInDays is used to set the cookies, otherwise the value specified in the SessionExpiryInSeconds parameter is used. We recommend that you set the value of SessionExpiryInSeconds to be a short period (1200 seconds), while the value of KeepAliveInDays can be set to a relatively long period (30 days), as shown in the following example:
<RelyingParty>
<DefaultUserJourney ReferenceId="SignUpOrSignIn" />
<UserJourneyBehaviors>
  <SingleSignOn Scope="Tenant" KeepAliveInDays="30" />
  <SessionExpiryType>Absolute</SessionExpiryType>
  <SessionExpiryInSeconds>1200</SessionExpiryInSeconds>
</UserJourneyBehaviors>
<TechnicalProfile Id="PolicyProfile">
<DisplayName>PolicyProfile</DisplayName>
<Protocol Name="OpenIdConnect" />
<OutputClaims>
<OutputClaim ClaimTypeReferenceId="displayName" />
<OutputClaim ClaimTypeReferenceId="givenName" />
<OutputClaim ClaimTypeReferenceId="surname" />
<OutputClaim ClaimTypeReferenceId="email" />
<OutputClaim ClaimTypeReferenceId="objectId" PartnerClaimType="sub"/>
<OutputClaim ClaimTypeReferenceId="identityProvider" />
<OutputClaim ClaimTypeReferenceId="tenantId" AlwaysUseDefaultValue="true" DefaultValue="{Policy:TenantObjectId}" />
</OutputClaims>
<SubjectNamingInfo ClaimType="sub" />
</TechnicalProfile>
</RelyingParty>
Sign out
When you want to sign the user out of the application, it isn't enough to clear the application's cookies or otherwise end the session with the user. You must redirect the user to Azure AD B2C to sign out. Otherwise, the user might be able to reauthenticate to your applications without entering their credentials again.
Upon a sign-out request, Azure AD B2C:
- Invalidates the Azure AD B2C cookie-based session.
- Attempts to sign out from federated identity providers.
- Invalidates the Azure AD B2C cookie-based session.
- Attempts to sign out from federated identity providers:
- OpenId Connect - If the identity provider well-known configuration endpoint specifies an
end_session_endpointlocation. The sign-out request doesn't pass theid_token_hintparameter. If the federated identity provider requires this parameter, the sign-out request fails. - OAuth2 - If the identity provider metadata contains the
end_session_endpointlocation. - SAML - If the identity provider metadata contains the
SingleLogoutServicelocation.
- OpenId Connect - If the identity provider well-known configuration endpoint specifies an
- Optionally, signs-out from other applications. For more information, see the Single sign-out section.
Note
You can disable the sign out from federated identity providers, by setting the identity provider technical profile metadata SingleLogoutEnabled to false.
The sign-out clears the user's single sign-on state with Azure AD B2C, but it might not sign the user out of their social identity provider session. If the user selects the same identity provider during a subsequent sign-in, they might reauthenticate without entering their credentials. If a user wants to sign out of the application, it doesn't necessarily mean they want to sign out of their Facebook account. However, if local accounts are used, the user's session ends properly.
Single sign-out
When you redirect the user to the Azure AD B2C sign-out endpoint (for both OAuth2 and OpenID Connect) or send a LogoutRequest (for SAML), Azure AD B2C clears the user's session from the browser. However, the user might still be signed in to other applications that use Azure AD B2C for authentication. To sign the user out of all applications, which have an active session, Azure AD B2C supports single sign-out, also known as Single Log-Out (SLO).
During the sign-out, Azure AD B2C simultaneously sends an HTTP request to the registered logout URL of all the applications that the user is currently signed in to.
Configure your custom policy
To support single sign-out, the token issuer technical profiles for both JWT and SAML must specify:
- The protocol name, such as
<Protocol Name="OpenIdConnect" /> - The reference to the session technical profile, such as
UseTechnicalProfileForSessionManagement ReferenceId="SM-jwt-issuer" />.
The following example illustrates the JWT and SAML token issuers with single sign-out:
<ClaimsProvider>
  <DisplayName>Local Account SignIn</DisplayName>
  <TechnicalProfiles>
    <!-- JWT Issuer -->
    <TechnicalProfile Id="JwtIssuer">
      <DisplayName>JWT Issuer</DisplayName>
      <Protocol Name="OpenIdConnect" />
      <OutputTokenFormat>JWT</OutputTokenFormat>
      ...
      <UseTechnicalProfileForSessionManagement ReferenceId="SM-jwt-issuer" />
    </TechnicalProfile>

    <!-- Session management technical profile for OIDC based tokens -->
    <TechnicalProfile Id="SM-jwt-issuer">
      <DisplayName>Session Management Provider</DisplayName>
      <Protocol Name="Proprietary" Handler="Web.TPEngine.SSO.OAuthSSOSessionProvider, Web.TPEngine, Version=1.0.0.0, Culture=neutral, PublicKeyToken=null" />
    </TechnicalProfile>

    <!--SAML token issuer-->
    <TechnicalProfile Id="Saml2AssertionIssuer">
      <DisplayName>SAML token issuer</DisplayName>
      <Protocol Name="SAML2" />
      <OutputTokenFormat>SAML2</OutputTokenFormat>
      ...
      <UseTechnicalProfileForSessionManagement ReferenceId="SM-Saml-issuer" />
    </TechnicalProfile>

    <!-- Session management technical profile for SAML based tokens -->
    <TechnicalProfile Id="SM-Saml-issuer">
      <DisplayName>Session Management Provider</DisplayName>
      <Protocol Name="Proprietary" Handler="Web.TPEngine.SSO.SamlSSOSessionProvider, Web.TPEngine, Version=1.0.0.0, Culture=neutral, PublicKeyToken=null" />
    </TechnicalProfile>
  </TechnicalProfiles>
</ClaimsProvider>
Configure your application
In order for an application to participate in single sign-out:
- For SAML service providers, configure the application with the SingleLogoutService location in its SAML metadata document. You can also configure the app registration
logoutUrl. For more information, see set the logout URL. - For OpenID Connect or OAuth2 applications, set the
logoutUrlattribute of your app registration manifest. To configure the logout URL:- From the Azure AD B2C menu, select App registrations.
- Select your application registration.
- Under Manage, select Authentication.
- Under the Front-channel logout URL, configure your logout URL.
Handling single sign-out requests
When Azure AD B2C receives the logout request, it uses a front-channel HTML iframe to send an HTTP request to the registered logout URL of each participating application that the user is currently signed in to. Note, the application that triggers the sign-out request gets this log-out message. Your applications must respond to the sign-out request by clearing the application session that identifies the user.
- For OpenID Connect and OAuth2 applications, Azure AD B2C sends an HTTP GET request to the registered logout URL.
- For SAML applications, Azure AD B2C sends a SAML logout request to the registered logout URL.
When Azure AD B2C notifies all applications about the sign-out, it proceeds to do one of the following:
- For OpenID Connect or OAuth2 applications, it redirects the user to the requested
post_logout_redirect_uriincluding the (optional)stateparameter specified in the initial request. For examplehttps://contoso.com/logout?state=foo. - For SAML applications, it sends a SAML logout response via HTTP POST to the application that initially sent the logout request.
Secure your logout redirect
After logout, the user is redirected to the URI specified in the post_logout_redirect_uri parameter, regardless of the reply URLs that you specify for the application. However, if a valid id_token_hint is passed and the Require ID Token in logout requests is turned on, Azure AD B2C verifies that the value of post_logout_redirect_uri matches one of the application's configured redirect URIs before performing the redirect. If no matching reply URL was configured for the application, an error message is displayed and the user isn't redirected.
To require an ID Token in logout requests:
- Sign in to the Azure portal.
- If you have access to multiple tenants, select the Settings icon in the top menu to switch to your Azure AD B2C tenant from the Directories + subscriptions menu.
- Choose All services in the top-left corner of the Azure portal, and then search for and select Azure AD B2C.
- Select User flows.
- Open the user flow that you previously created.
- Select Properties.
- Enable the Require ID Token in logout requests.
To require an ID Token in logout requests, add a UserJourneyBehaviors element inside of the RelyingParty element. Then set the EnforceIdTokenHintOnLogout of the SingleSignOn element to true. For more information, check out the Live demo. Your UserJourneyBehaviors element should look like this example:
<UserJourneyBehaviors>
  <SingleSignOn Scope="Tenant" EnforceIdTokenHintOnLogout="true"/>
</UserJourneyBehaviors>
To configure your application Logout URL:
- Select App registrations, and then select your application.
- Select Authentication.
- In the Logout URL text box, type your post logout redirect URI, and then select Save.
Related content
- Learn how to configure tokens in Azure AD B2C.