Note
Access to this page requires authorization. You can try signing in or changing directories.
Access to this page requires authorization. You can try changing directories.
Important
Effective May 1, 2025, Azure AD B2C will no longer be available to purchase for new customers. Learn more in our FAQ.
Before you begin, use the Choose a policy type selector at the top of this page to choose the type of policy you’re setting up. Azure Active Directory B2C offers two methods to define how users interact with your applications: through predefined user flows or through fully configurable custom policies. The steps required in this article are different for each method.
Overview
As a developer or IT administrator, you can use API connectors to integrate your sign-up user flows with REST APIs to customize the sign-up experience and integrate with external systems. For example, with API connectors, you can:
- Validate user input data. Validate against malformed or invalid user data. For example, you can validate user-provided data against existing data in an external data store or list of permitted values. If invalid, you can ask a user to provide valid data or block the user from continuing the sign-up flow.
- Verify user identity. Use an identity verification service or external identity data sources to add an extra level of security to account creation decisions.
- Integrate with a custom approval workflow. Connect to a custom approval system for managing and limiting account creation.
- Augment tokens with attributes from external sources. Enrich tokens with user attributes from sources that are external to Azure AD B2C such as cloud systems, custom user stores, custom permission systems, legacy identity services, and more.
- Overwrite user attributes. Reformat or assign a value to an attribute collected from the user. For example, if a user enters the first name in all lowercase or all uppercase letters, you can format the name with only the first letter capitalized.
- Run custom business logic. You can trigger downstream events in your cloud systems to send push notifications, update corporate databases, manage permissions, audit databases, and perform other custom actions.
An API connector provides Azure AD B2C with the information needed to call API endpoint by defining the HTTP endpoint URL and authentication for the API call. Once you configure an API connector, you can enable it for a specific step in a user flow. When a user reaches that step in the sign up flow, the API connector is invoked and materializes as an HTTP POST request to your API, sending user information ("claims") as key-value pairs in a JSON body. The API response can affect the execution of the user flow. For example, the API response can block a user from signing up, ask the user to reenter information, or overwrite user attributes.
Where you can enable an API connector in a user flow
There are three places in a user flow where you can enable an API connector:
- After federating with an identity provider during sign-up - applies to sign-ups experiences only
- Before creating the user - applies to sign-ups experiences only
- Before sending the token (preview) - applies to sign-ups and sign-ins
After federating with an identity provider during sign-up
An API connector at this step in the sign-up process is invoked immediately after the user authenticates with an identity provider (like Google, Facebook, and Microsoft Entra ID). This step precedes the attribute collection page, which is the form presented to the user to collect user attributes. This step isn't invoked if a user is registering with a local account. The following are examples of API connector scenarios you might enable at this step:
- Use the email or federated identity that the user provided to look up claims in an existing system. Return these claims from the existing system, prefill the attribute collection page, and make them available to return in the token.
- Implement an allow or blocklist based on social identity.
Before creating the user
An API connector at this step in the sign-up process is invoked after the attribute collection page, if one is included. This step is always invoked before a user account is created. The following are examples of scenarios you might enable at this point during sign-up:
- Validate user input data and ask a user to resubmit data.
- Block a user sign-up based on data entered by the user.
- Verify user identity.
- Query external systems for existing data about the user to return it in the application token or store it in Microsoft Entra ID.
Before sending the token (preview)
Note
This feature is in public preview.
An API connector at this step in the sign-up or sign-in process is invoked before a token is issued. The following are examples of scenarios you might enable at this step:
- Enriching the token with attributes about the user from sources different than the directory including legacy identity systems, HR systems, external user stores, and more.
- Enriching the token with group or role attributes that you store and manage in your own permission system.
- Applying claims transformations or manipulations to values of claims in the directory.
The Identity Experience Framework, which underlies Azure Active Directory B2C (Azure AD B2C), can integrate with RESTful APIs within a user journey. This article shows how to create a user journey that interacts with a RESTful service using a RESTful technical profile.
Using Azure AD B2C, you can add your own business logic to a user journey by calling your own RESTful service. The Identity Experience Framework can send and receive data from your RESTful service to exchange claims. For example, you can:
- Use external identity data source to validate user input data. For example, you can verify that the email address provided by the user exists in your customer's database, and if not, present an error. You can as well think of API connectors as a way of supporting outbound webhooks because the call is made when an event occurs, for example, a sign up.
- Process claims. If a user enters their first name in all lowercase or all uppercase letters, your REST API can format the name with only the first letter capitalized and return it to Azure AD B2C. However, when using a custom policy, ClaimsTransformations is preferred over calling a RESTful API.
- Dynamically enrich user data by further integrating with corporate line-of-business applications. Your RESTful service can receive the user's email address, query the customer's database, and return the user's loyalty number to Azure AD B2C. Then return claims can be stored in the user's Microsoft Entra account, evaluated in the next orchestration steps, or included in the access token.
- Run custom business logic. You can send push notifications, update corporate databases, run a user migration process, manage permissions, audit databases, and perform any other workflows.

Note
HTTP requests may be cancelled if there is a slow or no response from the RESTful service to Azure AD B2C. The default timeout is 10 seconds for custom policies and 5 seconds for user flows. The default retry count is one (meaning there are 2 tries in total).
Calling a RESTful service
The interaction includes a claims exchange of information between the REST API claims and Azure AD B2C. You can design the integration with the RESTful services in the following ways:
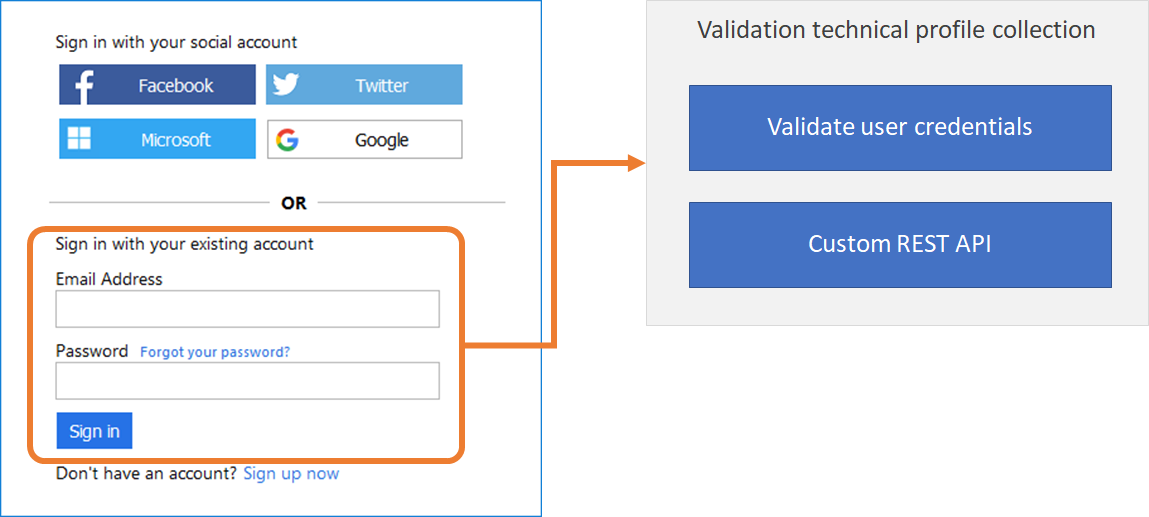
Validation technical profile. The call to the RESTful service happens within a validation technical profile of the specified self-asserted technical profile, or a verification display control of a display control. The validation technical profile validates the user-provided data before the user journey moves forward. With the validation technical profile, you can:
- Send claims to your REST API.
- Validate claims, and throw custom error messages that are displayed to the user.
- Send back claims from the REST API to next orchestration steps.
Claims exchange. A direct claims exchange can be configured by calling a REST API technical profile directly from an orchestration step of a user journey. This definition is limited to:
- Send claims to your REST API.
- Validate claims, and throw custom error messages that are returned to the application.
- Send back claims from the REST API to next orchestration steps.
You can add a REST API call at any step in the user journey defined by a custom policy. For example, you can call a REST API:
- During sign-in, just before Azure AD B2C validates the credentials.
- Immediately after sign-in.
- Before Azure AD B2C creates a new account in the directory.
- After Azure AD B2C creates a new account in the directory.
- Before Azure AD B2C issues an access token.
Sending data
In the RESTful technical profile, the InputClaims element contains a list of claims to send to your RESTful service. You can map the name of your claim to the name defined in the RESTful service, set a default value, and use claims resolvers.
You can configure how the input claims are sent to the RESTful claims provider by using the SendClaimsIn attribute. The possible values are:
- Body, sent in the HTTP POST request body in JSON format.
- Form, sent in the HTTP POST request body in an ampersand '&' separated key value format.
- Header, sent in the HTTP GET request header.
- QueryString, sent in the HTTP GET request query string.
When the Body option is configured, the REST API technical profile allows you to send a complex JSON payload to an endpoint. For more information, see Send a JSON payload.
Receiving data
The OutputClaims element of the RESTful technical profile contains a list of claims returned by the REST API. You may need to map the name of the claim defined in your policy to the name defined in the REST API. You can also include claims that aren't returned by the REST API identity provider, as long as you set the DefaultValue attribute.
The output claims parsed by the RESTful claims provider always expect to parse a flat JSON Body response, such as:
{
  "name": "Emily Smith",
  "email": "emily@outlook.com",
  "loyaltyNumber":  1234
}
The output claims should look like the following xml snippet:
<OutputClaims>
  <OutputClaim ClaimTypeReferenceId="displayName" PartnerClaimType="name" />
  <OutputClaim ClaimTypeReferenceId="email" />
  <OutputClaim ClaimTypeReferenceId="loyaltyNumber" />
</OutputClaims>
Handling null values
A null value in a database is used when the value in a column is unknown or missing. Don't include JSON keys with a null value. In the following example, the email returns null value:
{
  "name": "Emily Smith",
  "email": null,
  "loyaltyNumber":  1234
}
When an element is null, either:
- Omit the key-value pair from the JSON.
- Return a value that corresponds to the Azure AD B2C claim data type. For example, for a
stringdata type, return empty string"". For anintegerdata type, return a zero value0. For adateTimedata type, return a minimum value0001-01-01T00:00:00.0000000Z.
The following example demonstrates how to handle a null value. The email is omitted from the JSON:
{
  "name": "Emily Smith",
  "loyaltyNumber":  1234
}
Parse a nested JSON body
To parse a nested JSON body response, set the ResolveJsonPathsInJsonTokens metadata to true. In the output claim, set the PartnerClaimType to the JSON path element you want to output.
"contacts": [
  {
    "id": "MAINCONTACT_1",
    "person": {
      "name": "Emily Smith",
      "loyaltyNumber":  1234,
      "emails": [
        {
          "id": "EMAIL_1",
          "type": "WORK",
          "email": "email@domain.com"
        }
      ]
    }
  }
],
The output claims should look like following xml snippet:
<OutputClaims>
  <OutputClaim ClaimTypeReferenceId="displayName" PartnerClaimType="contacts[0].person.name" />
  <OutputClaim ClaimTypeReferenceId="email" PartnerClaimType="contacts[0].person.emails[0].email" />
  <OutputClaim ClaimTypeReferenceId="loyaltyNumber" PartnerClaimType="contacts[0].person.loyaltyNumber" />
</OutputClaims>
Localize the REST API
In a RESTful technical profile, you may want to send the current session's language/locale, and if necessary, raise a localized error message. Using the claims resolver, you can send a contextual claim, such as the user language. The following example shows a RESTful technical profile demonstrating this scenario.
<TechnicalProfile Id="REST-ValidateUserData">
  <DisplayName>Validate user input data</DisplayName>
  <Protocol Name="Proprietary" Handler="Web.TPEngine.Providers.RestfulProvider, Web.TPEngine, Version=1.0.0.0, Culture=neutral, PublicKeyToken=null" />
  <Metadata>
    <Item Key="ServiceUrl">https://your-app.azurewebsites.net/api/identity</Item>
    <Item Key="AuthenticationType">None</Item>
    <Item Key="SendClaimsIn">Body</Item>
    <Item Key="IncludeClaimResolvingInClaimsHandling">true</Item>
  </Metadata>
  <InputClaims>
    <InputClaim ClaimTypeReferenceId="userLanguage" DefaultValue="{Culture:LCID}" AlwaysUseDefaultValue="true" />
    <InputClaim ClaimTypeReferenceId="email" PartnerClaimType="emailAddress" />
  </InputClaims>
  <UseTechnicalProfileForSessionManagement ReferenceId="SM-Noop" />
</TechnicalProfile>
Handling error messages
Your REST API may need to return an error message, such as "The user wasn't found in the CRM system." If an error occurs, the REST API should return an HTTP 409 error message (Conflict response status code). For more information, see the RESTful technical profile.
This behavior can only be achieved by calling a REST API technical profile from a validation technical profile. Letting the user to correct the data on the page and run the validation again upon page submission.
If you reference a REST API technical profile directly from a user journey, the user is redirected back to the relying party application with the relevant error message.
Development of your REST API
Your REST API can be developed on any platform and written in any programming language, as long as it's secure and can send and receive claims in JSON format.
The request to your REST API service comes from Azure AD B2C servers. The REST API service must be published to a publicly accessible HTTPS endpoint. The REST API call arrives from an Azure data center IP address.
You can use serverless cloud functions, like HTTP triggers in Azure Functions for ease of development.
Your should design your REST API service and its underlying components (such as the database and file system) to be highly available.
Important
Your endpoints must comply with the Azure AD B2C security requirements. Older TLS versions and ciphers are deprecated. For more information, see Azure AD B2C TLS and cipher suite requirements.
Next steps
- Learn how to add an API connector to modify sign-up experiences
- Learn how to add an API connector to enrich tokens with external claims
- Learn how to secure your API Connector
- Get started with our samples
See the following articles for examples of using a RESTful technical profile:
- Learn how to build resilience when Interfacing with external processes
- Learn how to build Resilience through developer best practices.