Note
Access to this page requires authorization. You can try signing in or changing directories.
Access to this page requires authorization. You can try changing directories.
Important
Effective May 1, 2025, Azure AD B2C will no longer be available to purchase for new customers. Learn more in our FAQ.
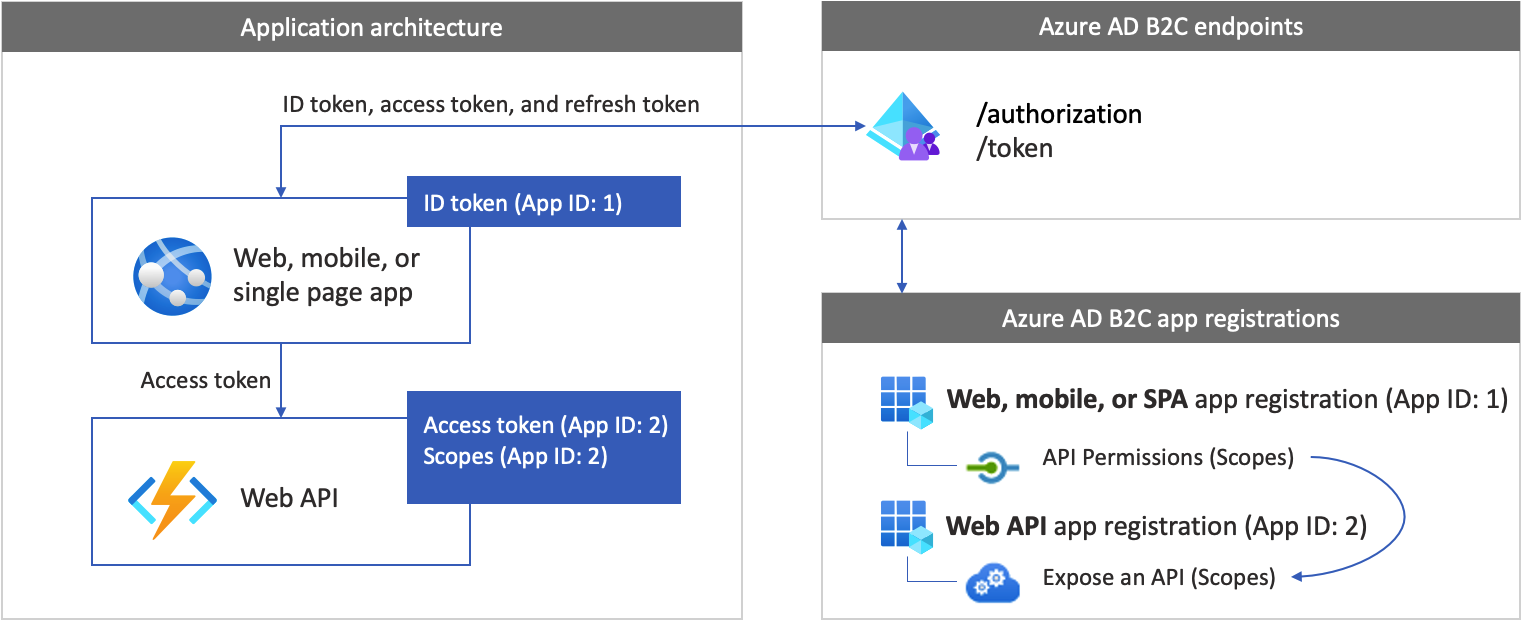
In this article, you'll learn how to configure a sample Node.js web application to call a sample Node.js web API. The web API needs to be protected by Azure AD B2C itself. In this setup, a web app, such as App ID: 1 calls a web API, such as App ID: 2. Users authenticate into the web app to acquire an access token, which is then used to call a protected web API.
Overview
Token-based authentication ensures that requests to a web API are accompanied by a valid access token.
The web app completes the following events:
It authenticates users with Azure AD B2C.
It acquires an access token with the required permissions (scopes) for the web API endpoint.
It passes the access token as a bearer token in the authentication header of the HTTP request. It uses the format:
Authorization: Bearer <token>
The web API completes the following events:
It reads the bearer token from the authorization header in the HTTP request.
It validates the token.
It validates the permissions (scopes) in the token.
It responds to the HTTP request. If the token isn't valid, the web API endpoint responds with a
401 UnauthorizedHTTP error.
App registration overview
To enable your app to sign in with Azure AD B2C and call a web API, you must register two applications in the Azure AD B2C directory.
The web application registration enables your app to sign in with Azure AD B2C. During registration, you specify the redirect URI. The redirect URI is the endpoint to which users are redirected by Azure AD B2C after they complete authentication. The app registration process generates an application ID, also known as the client ID, which uniquely identifies your app. You'll also generate a client secret for your app. Your app uses the client secret to exchange an authorization code for an access token.
The web API registration enables your app to call a secure web API. The registration includes the web API scopes. The scopes provide a way to manage permissions to protected resources, such as your web API. You grant the web application permissions to the web API scopes. When an access token is requested, your app specifies the desired permissions in the scope parameter of the request.
The application registrations and the application architecture are described in the following diagram:
Prerequisites
Visual Studio Code or another code editor.
Step 1: Configure your user flow
When users try to sign in to your app, the app starts an authentication request to the authorization endpoint via a user flow. The user flow defines and controls the user experience. After users complete the user flow, Azure AD B2C generates a token and then redirects users back to your application.
If you haven't done so already, create a user flow or a custom policy. Repeat the steps to create three separate user flows as follows:
- A combined Sign in and sign up user flow, such as
susi. This user flow also supports the Forgot your password experience. - A Profile editing user flow, such as
edit_profile. - A Password reset user flow, such as
reset_password.
Azure AD B2C prepends B2C_1_ to the user flow name. For example, susi becomes B2C_1_susi.
Step 2: Register your web app and API
In this step, you create the web and the web API application registrations, and you specify the scopes of your web API.
Step 2.1: Register the web API application
To create the web API app registration (App ID: 2), follow these steps:
Sign in to the Azure portal.
Make sure you're using the directory that contains your Azure AD B2C tenant. Select the Directories + subscriptions icon in the portal toolbar.
On the Portal settings | Directories + subscriptions page, find your Azure AD B2C directory in the Directory name list, and then select Switch.
In the Azure portal, search for and select Azure AD B2C.
Select App registrations, and then select New registration.
For Name, enter a name for the application (for example, my-api1). Leave the default values for Redirect URI and Supported account types.
Select Register.
After the app registration is completed, select Overview.
Record the Application (client) ID value for later use when you configure the web application.

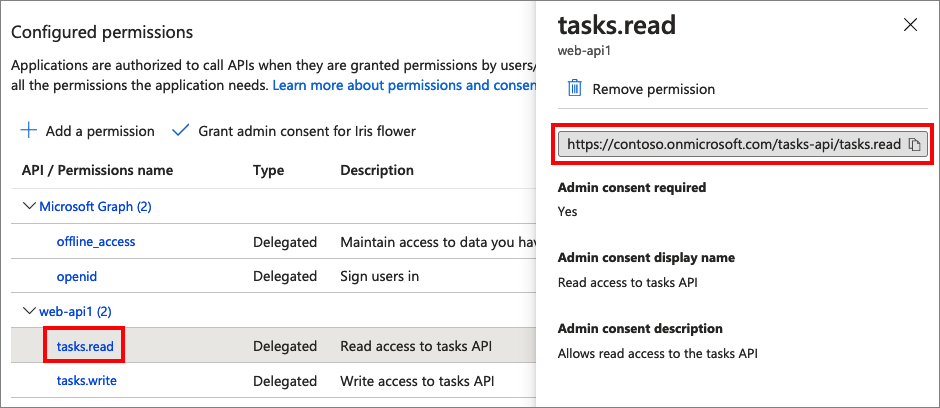
Step 2.2: Configure scopes
Select the my-api1 application that you created (App ID: 2) to open its Overview page.
Under Manage, select Expose an API.
Next to Application ID URI, select the Set link. Replace the default value (GUID) with a unique name (for example, tasks-api), and then select Save.
When your web application requests an access token for the web API, it should add this URI as the prefix for each scope that you define for the API.
Under Scopes defined by this API, select Add a scope.
To create a scope that defines read access to the API:
- For Scope name, enter tasks.read.
- For Admin consent display name, enter Read access to tasks API.
- For Admin consent description, enter Allows read access to the tasks API.
Select Add scope.
Select Add a scope, and then add a scope that defines write access to the API:
- For Scope name, enter tasks.write.
- For Admin consent display name, enter Write access to tasks API.
- For Admin consent description, enter Allows write access to the tasks API.
Select Add scope.
Step 2.3: Register the web app
To create the SPA registration, do the following:
- Sign in to the Azure portal.
- If you have access to multiple tenants, select the Settings icon in the top menu to switch to your Azure AD B2C tenant from the Directories + subscriptions menu.
- Search for and select Azure AD B2C.
- Select App registrations, and then select New registration.
- Enter a Name for the application (for example, App ID: 1).
- Under Supported account types, select Accounts in any identity provider or organizational directory (for authenticating users with user flows).
- Under Redirect URI, select Web, and then enter
http://localhost:3000/redirectin the URL text box - Under Permissions, select the Grant admin consent to openid and offline access permissions checkbox.
- Select Register.
Step 2.4: Create a client secret
- In the Azure AD B2C - App registrations page, select the application you created, for example App ID: 1.
- In the left menu, under Manage, select Certificates & secrets.
- Select New client secret.
- Enter a description for the client secret in the Description box. For example, clientsecret1.
- Under Expires, select a duration for which the secret is valid, and then select Add.
- Record the secret's Value for use in your client application code. This secret value is never displayed again after you leave this page. You use this value as the application secret in your application's code.
Step 2.5: Grant API permissions to the web app
To grant your app (App ID: 1) permissions, follow these steps:
Select App registrations, and then select the app that you created (App ID: 1).
Under Manage, select API permissions.
Under Configured permissions, select Add a permission.
Select the My APIs tab.
Select the API (App ID: 2) to which the web application should be granted access. For example, enter my-api1.
Under Permission, expand tasks, and then select the scopes that you defined earlier (for example, tasks.read and tasks.write).
Select Add permissions.
Select Grant admin consent for <your tenant name>.
Select Yes.
Select Refresh, and then verify that Granted for ... appears under Status for both scopes.
From the Configured permissions list, select your scope, and then copy the scope full name.
Step 3: Get the web app sample code
This sample demonstrates how a web application can use Azure AD B2C for user sign-up and sign-in. Then the app acquires an access token and calls a protected web API.
To get the web app sample code, you can do either of the following:
Download a zip file. You'll extract the zip file to get the sample web app.
Clone the sample from GitHub by running the following command:
git clone https://github.com/Azure-Samples/active-directory-b2c-msal-node-sign-in-sign-out-webapp.git
Step 3.1: Install app dependencies
Open a console window, and change to the directory that contains the Node.js sample app. For example:
cd active-directory-b2c-msal-node-sign-in-sign-out-webapp/call-protected-apiRun the following commands to install app dependencies:
npm install && npm update
Step 3.2: Configure the sample web app
Open your web app in a code editor such as Visual Studio Code. Under the call-protected-api folder, open the .env file. This file contains information about your Azure AD B2C identity provider. Update the following app settings:
| Key | Value |
|---|---|
APP_CLIENT_ID |
The Application (client) ID for the web app you registered in step 2.3. |
APP_CLIENT_SECRET |
The client secret value for the web app you created in step 2.4 |
SIGN_UP_SIGN_IN_POLICY_AUTHORITY |
The Sign in and sign up user flow authority for the user flow you created in step 1 such as https://<your-tenant-name>.b2clogin.com/<your-tenant-name>.onmicrosoft.com/<sign-in-sign-up-user-flow-name>. Replace <your-tenant-name> with the name of your tenant and <sign-in-sign-up-user-flow-name> with the name of your Sign in and Sign up user flow such as B2C_1_susi. Learn how to Get your tenant name. |
AUTHORITY_DOMAIN |
The Azure AD B2C authority domain such as https://<your-tenant-name>.b2clogin.com. Replace <your-tenant-name> with the name of your tenant. |
APP_REDIRECT_URI |
The application redirect URI where Azure AD B2C will return authentication responses (tokens). It matches the Redirect URI you set while registering your app in Azure portal. This URL need to be publicly accessible. Leave the value as is. |
LOGOUT_ENDPOINT |
The Azure AD B2C sign out endpoint such as https://<your-tenant-name>.b2clogin.com/<your-tenant-name>.onmicrosoft.com/<sign-in-sign-up-user-flow-name>/oauth2/v2.0/logout?post_logout_redirect_uri=http://localhost:3000. Replace <your-tenant-name> with the name of your tenant and <sign-in-sign-up-user-flow-name> with the name of your Sign in and Sign up user flow such as B2C_1_susi. |
After the update, your final configuration file should look similar to the following sample:
SERVER_PORT=3000
#web apps client ID
APP_CLIENT_ID=<You app client ID here>
#session secret
SESSION_SECRET=sessionSecretHere
#web app client secret
APP_CLIENT_SECRET=<Your app client secret here>
#tenant name
TENANT_NAME=<your-tenant-name>
#B2C sign up and sign in user flow/policy name and authority
SIGN_UP_SIGN_IN_POLICY_AUTHORITY=https://<your-tenant-name>.b2clogin.com/<your-tenant-name>.onmicrosoft.com/<sign-in-sign-up-user-flow-name>
AUTHORITY_DOMAIN=https://<your-tenant-name>.b2clogin.com
#client redorect url
APP_REDIRECT_URI=http://localhost:3000/redirect
LOGOUT_ENDPOINT=https://<your-tenant-name>.b2clogin.com/<your-tenant-name>.onmicrosoft.com/<sign-in-sign-up-user-flow-name>/oauth2/v2.0/logout?post_logout_redirect_uri=http://localhost:3000
Step 4: Get the web API sample code
Now that the web API is registered and you've defined its scopes, configure the web API code to work with your Azure AD B2C tenant.
To get the web API sample code, do one of the following:
Clone the sample web API project from GitHub by running the following command:
git clone https://github.com/Azure-Samples/active-directory-b2c-javascript-nodejs-webapi.gitYou can also go directly to the Azure-Samples/active-directory-b2c-javascript-nodejs-webapi project on GitHub.
Step 4.1: Update the web API
In your code editor, open the
config.jsonfile.Modify the variable values with the user flow and application registration you created earlier:
For
tenantName, use the name of your tenant name such asfabrikamb2c.For
clientID, use the Application (Client) ID for the web API you created in step 2.1.For
policyName, use the name of the Sing in and sign up user flow you created in step 1 such asB2C_1_susi.
After the update, your code should look similar to the following sample:
config.json:
{
    "credentials": {
        "tenantName": "fabrikamb2c",
        "clientID": "Enter_the_Application_Id_Here"
    },
    "policies": {
        "policyName": "B2C_1_susi"
    },
    "resource": {
        "scope": ["tasks.read"]
    },
    "metadata": {
        "authority": "login.microsoftonline.com",
        "discovery": ".well-known/openid-configuration",
        "version": "v2.0"
    },
    "settings": {
        "isB2C": true,
        "validateIssuer": true,
        "passReqToCallback": false,
        "loggingLevel": "info"
    }
}
Step 4.2: Install app dependencies
Open a console window, and change to the directory that contains the Node.js web API sample. For example:
cd active-directory-b2c-javascript-nodejs-webapiRun the following commands:
npm install && npm update
Step 5: Run the web app and API
You're now ready to test the web application's scoped access to the web API. Run both the Node.js web API and the sample web application on your local machine.
In your terminal, navigate to the sample web API and run start the Node.js web API server. For example: `
cd active-directory-b2c-javascript-nodejs-webapi
node index.js
The console window displays the port number of where the application is hosted.
Listening on port 5000...In another terminal instance, navigate to the sample web app and run start the Node.js web app server. For example:
    cd active-directory-b2c-msal-node-sign-in-sign-out-webapp/call-protected-api
    node index.js
The console window displays the port number of where the application is hosted.
Msal Node Auth Code Sample app listening on port !3000In your browser, go to
http://localhost:3000. You should see the page with two buttons, Sign in to call PROTECTED API and Or call the ANONYMOUS API.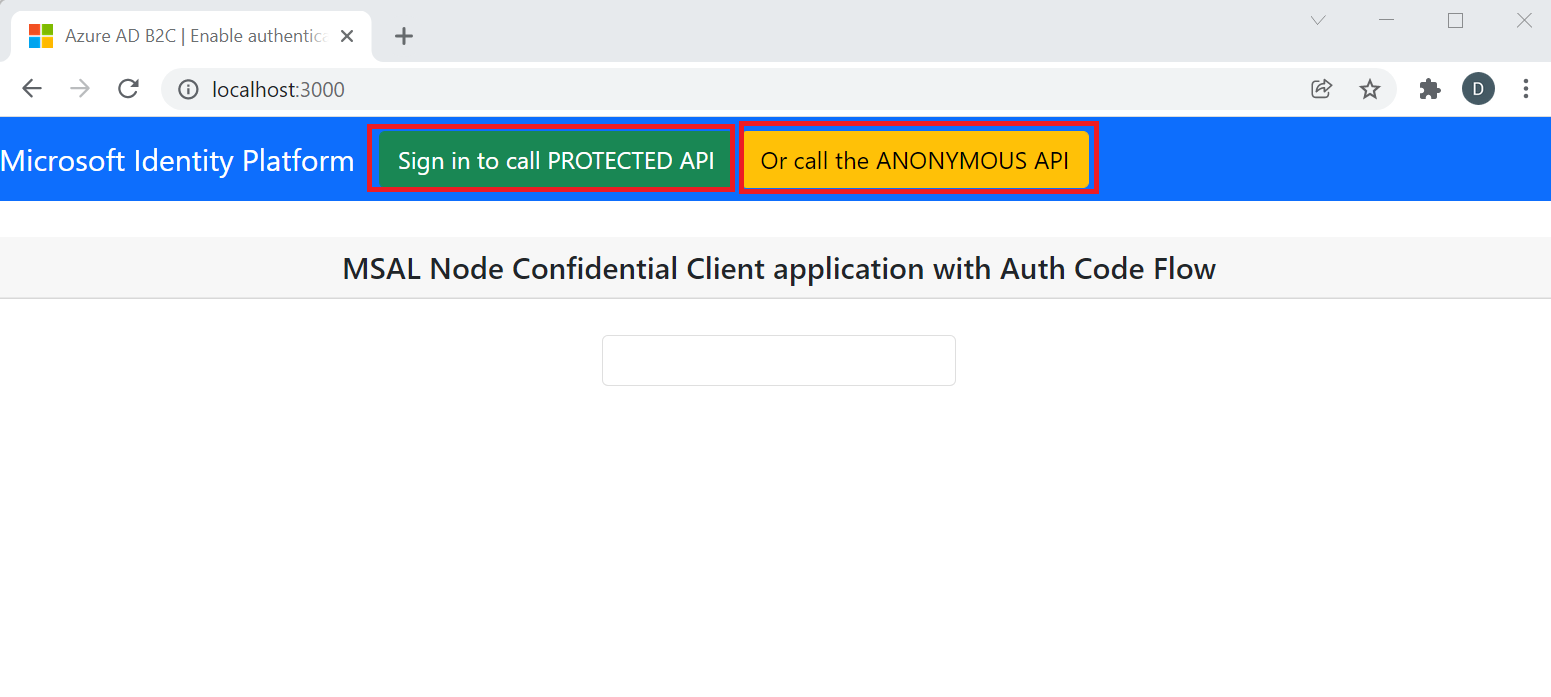
To call the anonymous API, select the Or call the ANONYMOUS API. The API responds with JSON object with
datekey such as:{"date":"2022-01-27T14:21:22.681Z"}The anonymous API is an unprotected endpoint in the web API. You don't need an access token to access it.
To call the protected API endpoint, select the Sign in to call PROTECTED API button. You're prompted to sign in.
Enter your sign-in credentials, such as email address and password. If you don't have an account, select Sign up now to create an account. After you successfully sign in or sign up, you should see the following page with Call the PROTECTED API button.
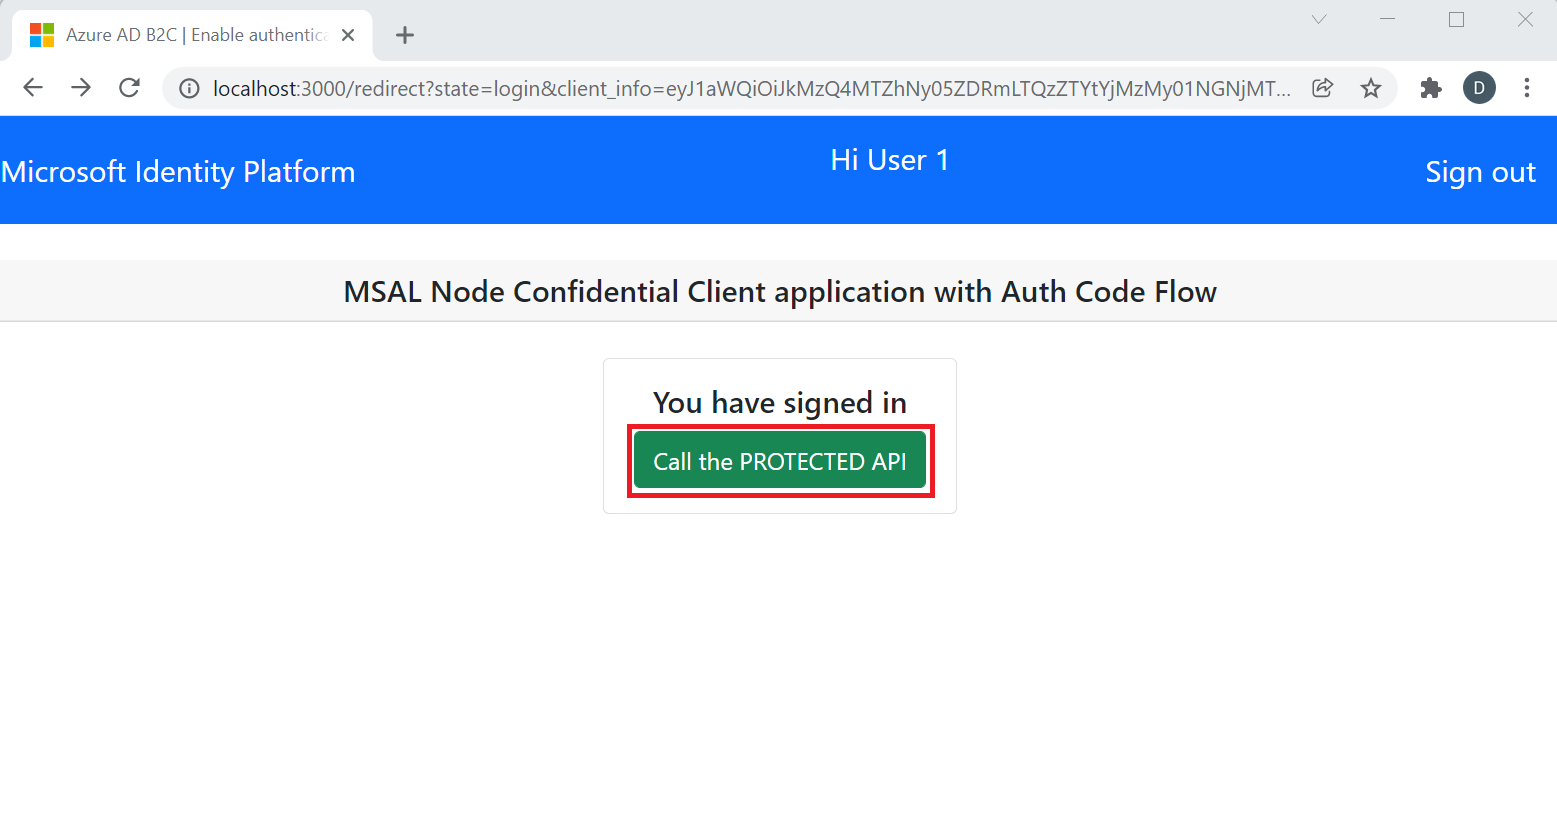
To call the protected API, select the Call the PROTECTED API button. The API responds with JSON object with a
namekey whose value is your account's surname such as:{"name": "User 1"}
Next steps
Learn how to Enable authentication in your own web API by using Azure AD B2C