Note
Access to this page requires authorization. You can try signing in or changing directories.
Access to this page requires authorization. You can try changing directories.
Important
Effective May 1, 2025, Azure AD B2C will no longer be available to purchase for new customers. Learn more in our FAQ.
Azure Active Directory B2C (Azure AD B2C) custom policy not only allows you to make user inputs mandatory but also to validate them. You can mark user inputs as required, such as <DisplayClaim ClaimTypeReferenceId="givenName" Required="true"/>, but it doesn't mean your users will enter valid data. Azure AD B2C provides various ways to validate a user input. In this article, you learn how to write a custom policy that collects the user inputs and validates them by using the following approaches:
Restrict the data a user enters by providing a list of options to pick from. This approach uses Enumerated Values, which you add when you declare a claim.
Define a pattern that a user input must match. This approach uses Regular Expressions, which you add when you declare a claim.
Define a set of rules and require that a user input obeys one or more of the rules. This approach uses Predicates, which you add when you declare a claim.
Use the special claim type reenterPassword to validate that the user correctly re-entered their password during user input collection.
Configure a Validation Technical Profile that defines complex business rules that aren't possible to define at claim declaration level. For example, you collect a user input, which needs to be validated against a value or a set values in another claim.
Prerequisites
If you don't have one already, create an Azure AD B2C tenant that is linked to your Azure subscription.
You must have Visual Studio Code (VS Code) installed in your computer.
Complete the steps in Collect and manipulate user inputs by using Azure AD B2C custom policy. This article is a part of Create and run your own custom policies how-to guide series.
Note
This article is part of the Create and run your own custom policies in Azure Active Directory B2C how-to guide series. We recommend that you start this series from the first article.
Step 1 - Validate user input by limiting user input options
If you know all the possible values that a user can enter for a given input, you can provide a finite set of values that a user must select from. You can use DropdownSingleSelect, CheckboxMultiSelect, and RadioSingleSelect UserInputType for this purpose. In this article, you'll use a RadioSingleSelect input type:
In VS Code, open the file
ContosoCustomPolicy.XML.In the
ClaimsSchemaelement of theContosoCustomPolicy.XMLfile, declare the following Claim Type:<ClaimType Id="accountType"> <DisplayName>Account Type</DisplayName> <DataType>string</DataType> <UserHelpText>The type of account used by the user</UserHelpText> <UserInputType>RadioSingleSelect</UserInputType> <Restriction> <Enumeration Text="Contoso Employee Account" Value="work" SelectByDefault="true"/> <Enumeration Text="Personal Account" Value="personal" SelectByDefault="false"/> </Restriction> </ClaimType>We've declared accountType claim. When the claim's value is collected from the user, the user must select either Contoso Employee Account for a value work or Personal Account for a value personal.
Azure AD B2C also allows you to accommodate your policy to different languages and provides the account type restrictions for multiple languages. For more information, check out the Localize the UI of the Add user attributes article.
Locate the technical profile with
Id="UserInformationCollector", add the accountType claim as display claim by using the following code:<DisplayClaim ClaimTypeReferenceId="accountType" Required="true"/>In the technical profile with
Id="UserInformationCollector", add the accountType claim as an output claim by using the following code:<OutputClaim ClaimTypeReferenceId="accountType"/>To include the account type claim in the access token, locate the
RelyingPartyelement, add the accountType claim as a token claim by using the following code:<OutputClaim ClaimTypeReferenceId="accountType" />
Step 2 - Validate user input by using regular expressions
When it's not possible to know all possible user input values in advance, you allow the user to input the data themselves. In this case, you can use regular expressions (regex) or pattern to dictate how a user input need to be formatted. For instance, an email must have the at (@) symbol and a period (.) somewhere in its text.
When you declare a claim, custom policy allows you to define a regex, which the user input must match. You can optionally provide a message, which is shown to the user, if their input doesn't match the expression.
Locate the
ClaimsSchemaelement, and declare the email claim by using the following code:<ClaimType Id="email"> <DisplayName>Email Address</DisplayName> <DataType>string</DataType> <DefaultPartnerClaimTypes> <Protocol Name="OpenIdConnect" PartnerClaimType="email"/> </DefaultPartnerClaimTypes> <UserHelpText>Your email address. </UserHelpText> <UserInputType>TextBox</UserInputType> <Restriction> <Pattern RegularExpression="^[a-zA-Z0-9.!#$%&'^_`{}~-]+@[a-zA-Z0-9-]+(?:\.[a-zA-Z0-9-]+)*$" HelpText="Please enter a valid email address something like maurice@contoso.com"/> </Restriction> </ClaimType>Locate the technical profile with
Id="UserInformationCollector", add the email claim as display claim by using the following code:<DisplayClaim ClaimTypeReferenceId="email" Required="true"/>In the technical profile with
Id="UserInformationCollector", add the email claim as an output claim by using the following code:<OutputClaim ClaimTypeReferenceId="email"/>Locate the
RelyingPartyelement, add the email as a token claim by using the following code:<OutputClaim ClaimTypeReferenceId="email" />
Step 3 - Validate user input by using predicates
You've used regex to validate user inputs. However, regex have one weakness, that's, the error message displays until you correct input without showing you the specific requirement the input is missing.
Predicates validations allow you to address this problem by allowing you to define a set of rules (predicates) and independent error message for each rule. In custom policies, a predicate has an inbuilt method, which defines the checks that you want to make. For example, you can use IsLengthRange predicate method to check whether a user password is within the range of minimum and maximum parameters (values) specified.
While the Predicates define the validation to check against a claim type, the PredicateValidations groups a set of predicates to form a user input validation that can be applied to a claim type. For example, you create a predicate group of validation that validates different types of allowed characters for a password. Both Predicates and PredicateValidations elements are child elements of BuildingBlocks section of your policy file.
Locate the
ClaimsSchemaelement, and declare the password claim by using the following code:<ClaimType Id="password"> <DisplayName>Password</DisplayName> <DataType>string</DataType> <AdminHelpText>Enter password</AdminHelpText> <UserHelpText>Enter password</UserHelpText> <UserInputType>Password</UserInputType> </ClaimType>Add a
Predicateselement as a child ofBuildingBlockssection by using the following code. You add thePredicateselement below theClaimsSchemaelement:<Predicates> </Predicates>Inside the
Predicateselement, define predicates by using the following code:<Predicate Id="IsLengthBetween8And64" Method="IsLengthRange" HelpText="The password must be between 8 and 64 characters."> <Parameters> <Parameter Id="Minimum">8</Parameter> <Parameter Id="Maximum">64</Parameter> </Parameters> </Predicate> <Predicate Id="Lowercase" Method="IncludesCharacters" HelpText="a lowercase letter"> <Parameters> <Parameter Id="CharacterSet">a-z</Parameter> </Parameters> </Predicate> <Predicate Id="Uppercase" Method="IncludesCharacters" HelpText="an uppercase letter"> <Parameters> <Parameter Id="CharacterSet">A-Z</Parameter> </Parameters> </Predicate> <Predicate Id="Number" Method="IncludesCharacters" HelpText="a digit"> <Parameters> <Parameter Id="CharacterSet">0-9</Parameter> </Parameters> </Predicate> <Predicate Id="Symbol" Method="IncludesCharacters" HelpText="a symbol"> <Parameters> <Parameter Id="CharacterSet">@#$%^&*\-_+=[]{}|\\:',.?/`~"();!</Parameter> </Parameters> </Predicate> <Predicate Id="PIN" Method="MatchesRegex" HelpText="The password must be numbers only."> <Parameters> <Parameter Id="RegularExpression">^[0-9]+$</Parameter> </Parameters> </Predicate> <Predicate Id="AllowedCharacters" Method="MatchesRegex" HelpText="An invalid character was provided."> <Parameters> <Parameter Id="RegularExpression">(^([0-9A-Za-z\d@#$%^&*\-_+=[\]{}|\\:',?/`~"();! ]|(\.(?!@)))+$)|(^$)</Parameter> </Parameters> </Predicate> <Predicate Id="DisallowedWhitespace" Method="MatchesRegex" HelpText="The password must not begin or end with a whitespace character."> <Parameters> <Parameter Id="RegularExpression">(^\S.*\S$)|(^\S+$)|(^$)</Parameter> </Parameters> </Predicate>We've defined several rules, which when put together described an acceptable password. Next, you can group predicates, to form a set of password policies that you can use in your policy.
Add a
PredicateValidationselement as a child ofBuildingBlockssection by using the following code. You add thePredicateValidationselement as a child ofBuildingBlockssection, but below thePredicateselement:<PredicateValidations> </PredicateValidations>Inside the
PredicateValidationselement, define PredicateValidations by using the following code:<PredicateValidation Id="SimplePassword"> <PredicateGroups> <PredicateGroup Id="DisallowedWhitespaceGroup"> <PredicateReferences> <PredicateReference Id="DisallowedWhitespace"/> </PredicateReferences> </PredicateGroup> <PredicateGroup Id="AllowedCharactersGroup"> <PredicateReferences> <PredicateReference Id="AllowedCharacters"/> </PredicateReferences> </PredicateGroup> <PredicateGroup Id="LengthGroup"> <PredicateReferences> <PredicateReference Id="IsLengthBetween8And64"/> </PredicateReferences> </PredicateGroup> </PredicateGroups> </PredicateValidation> <PredicateValidation Id="StrongPassword"> <PredicateGroups> <PredicateGroup Id="DisallowedWhitespaceGroup"> <PredicateReferences> <PredicateReference Id="DisallowedWhitespace"/> </PredicateReferences> </PredicateGroup> <PredicateGroup Id="AllowedCharactersGroup"> <PredicateReferences> <PredicateReference Id="AllowedCharacters"/> </PredicateReferences> </PredicateGroup> <PredicateGroup Id="LengthGroup"> <PredicateReferences> <PredicateReference Id="IsLengthBetween8And64"/> </PredicateReferences> </PredicateGroup> <PredicateGroup Id="CharacterClasses"> <UserHelpText>The password must have at least 3 of the following:</UserHelpText> <PredicateReferences MatchAtLeast="3"> <PredicateReference Id="Lowercase"/> <PredicateReference Id="Uppercase"/> <PredicateReference Id="Number"/> <PredicateReference Id="Symbol"/> </PredicateReferences> </PredicateGroup> </PredicateGroups> </PredicateValidation> <PredicateValidation Id="CustomPassword"> <PredicateGroups> <PredicateGroup Id="DisallowedWhitespaceGroup"> <PredicateReferences> <PredicateReference Id="DisallowedWhitespace"/> </PredicateReferences> </PredicateGroup> <PredicateGroup Id="AllowedCharactersGroup"> <PredicateReferences> <PredicateReference Id="AllowedCharacters"/> </PredicateReferences> </PredicateGroup> </PredicateGroups> </PredicateValidation>We've three defined Predicate Validation, StrongPassword, CustomPassword and SimplePassword. Depending on the characteristics of the password you want your users to input, you can use any on the Predicate Validations. In this article, we'll use a strong password.
Locate the password Claim Type declaration and add the StrongPassword Predicate Validation just after the UserInputType element declaration it contains by using the following code:
<PredicateValidationReference Id="StrongPassword" />Locate the technical profile with
Id="UserInformationCollector", add the password claim as display claim by using the following code:<DisplayClaim ClaimTypeReferenceId="password" Required="true"/>In the technical profile with
Id="UserInformationCollector", add the password claim as an output claim by using the following code:<OutputClaim ClaimTypeReferenceId="password"/>
Note
For security reasons, we'll not add a users's password as a claim in the token generated by your policy. So, we don't add the password claim to the relying party element.
Step 4 - Validate password and confirm password
You can require your users to input their password twice as a means to confirm that the user remembers the password they input. In this case, you must check that the values of the two entries match. Custom policy provides an easy way to achieve this requirement. The claim types password and reenterPassword are considered special, so when they're used to collect user inputs, the UI validates that the user correctly re-entered their password.
Use the following steps to validate password re-enter in your custom policy:
In your
ClaimsSchemasection of yourContosoCustomPolicy.XMLfile, declare reenterPassword claim just after the password claim by using the following code:<ClaimType Id="reenterPassword"> <DisplayName>Confirm new password</DisplayName> <DataType>string</DataType> <AdminHelpText>Confirm new password</AdminHelpText> <UserHelpText>Reenter password</UserHelpText> <UserInputType>Password</UserInputType> </ClaimType>To collect password confirmation input from the user, locate the
UserInformationCollectorself-asserted technical profile, add reenterPassword claim as a display claim by using the following code:<DisplayClaim ClaimTypeReferenceId="reenterPassword" Required="true"/>In your
ContosoCustomPolicy.XMLfile, locate theUserInformationCollectorself-asserted technical profile, add reenterPassword claim as an output claim by using the following code:<OutputClaim ClaimTypeReferenceId="reenterPassword"/>
Step 5 - Upload custom policy file
At this point, you've built your policy to address the first three approaches to user input validation.
Follow the steps in Upload custom policy file. If you're uploading a file with same name as the one already in the portal, make sure you select Overwrite the custom policy if it already exists.
Step 6 - Test the custom policy
Under Custom policies, select B2C_1A_CONTOSOCUSTOMPOLICY.
For Select application on the overview page of the custom policy, select the web application such as webapp1 that you previously registered. Make sure that the Select reply URL value is set to
https://jwt.ms.Select Run now button.
Enter Given Name and Surname.
Select Account Type.
For Email Address, enter an email value that's not well formatted such as maurice@contoso.
For Password, enter password value that doesn't obey all the characteristics of a strong password as set.
Select Continue button. You'll see a screen similar to the one shown below:
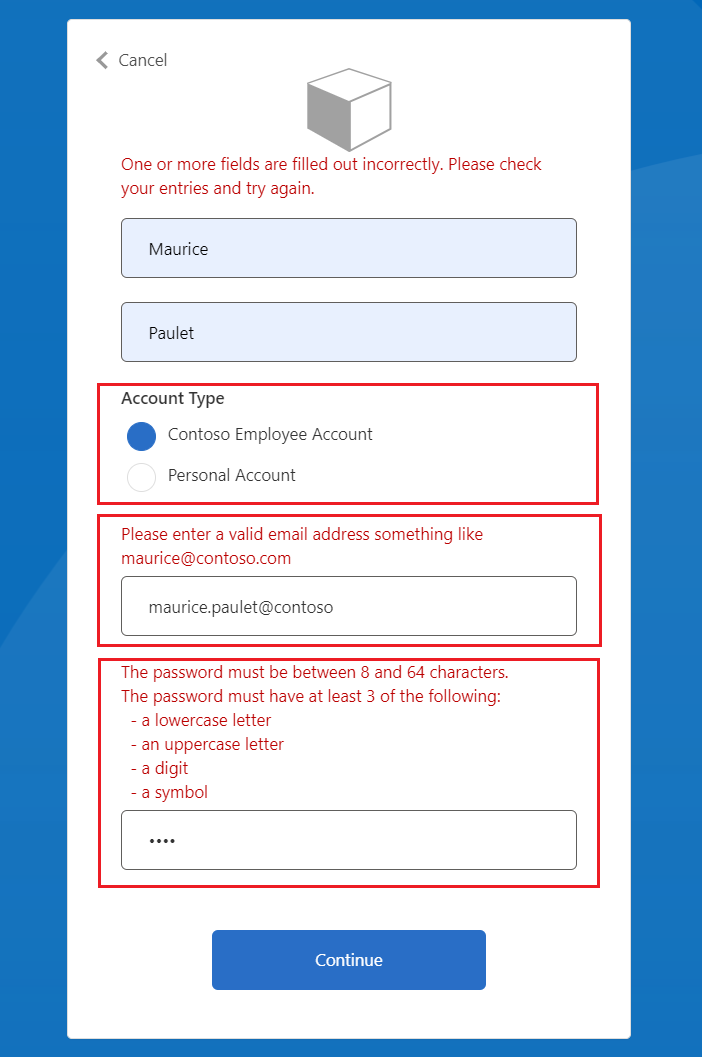
You must correct your inputs before you continue.
Enter correct values as suggested by the error messages, and then select Continue button again. After the policy finishes execution, you're redirected to
https://jwt.ms, and you see a decoded JWT. The token looks similar to the following JWT snippet:
    {
      "typ": "JWT",
      "alg": "RS256",
      "kid": "pxLOMWFg...."
    }.{
      ...
      "sub": "c7ae4515-f7a7....",
      ...
      "acr": "b2c_1a_contosocustompolicy",
      "accountType": "work",
      ...
      "email": "maurice@contoso.com",
      "name": "Maurice Paulet",
      "message": "Hello Maurice Paulet"
    }.[Signature]
Step 7 - Validate user input by using validation technical profiles
The validation techniques we've used in step 1, step 2 and step 3 aren't applicable for all scenarios. If your business rules are too complex to be defined at claim declaration level, you can configure a Validation Technical, and then call it from a Self-Asserted Technical Profile.
Note
Only self-asserted technical profiles can use validation technical profiles. Learn more about validation technical profile
Scenario overview
We require that, if the user's Account Type is Contoso Employee Account, we must ensure that their email domain is based on a set of predefined domains. These domains are contoso.com, fabrikam.com, and woodgrove.com. Otherwise, we show an error to the user until they use a valid Contoso Employee Account or switch to Personal Account.
Use the following steps to learn how to validate user input by using validation technical profiles. You use a claims transformation type validation technical profile, but you can also call a REST API service to validate data as you'll learn later in this series.
In your
ClaimsSchemasection of yourContosoCustomPolicy.XMLfile, declare domain and domainStatus claims by using the following code:<ClaimType Id="domain"> <DataType>string</DataType> </ClaimType> <ClaimType Id="domainStatus"> <DataType>string</DataType> </ClaimType>Locate the
ClaimsTransformationssection, and configure claims transformations by using the following code:<ClaimsTransformation Id="GetDomainFromEmail" TransformationMethod="ParseDomain"> <InputClaims> <InputClaim ClaimTypeReferenceId="email" TransformationClaimType="emailAddress"/> </InputClaims> <OutputClaims> <OutputClaim ClaimTypeReferenceId="domain" TransformationClaimType="domain"/> </OutputClaims> </ClaimsTransformation> <ClaimsTransformation Id="LookupDomain" TransformationMethod="LookupValue"> <InputClaims> <InputClaim ClaimTypeReferenceId="domain" TransformationClaimType="inputParameterId"/> </InputClaims> <InputParameters> <InputParameter Id="contoso.com" DataType="string" Value="valid"/> <InputParameter Id="fabrikam.com" DataType="string" Value="valid"/> <InputParameter Id="woodgrove.com" DataType="string" Value="valid"/> <InputParameter Id="errorOnFailedLookup" DataType="boolean" Value="true"/> </InputParameters> <OutputClaims> <OutputClaim ClaimTypeReferenceId="domainStatus" TransformationClaimType="outputClaim"/> </OutputClaims> </ClaimsTransformation>The GetDomainFromEmail claims transformation extracts a domain from email by using ParseDomain method and stores it in the domain claim. The LookupDomain Claims Transformation uses the extracted domain to check if it's valid by looking it up in the predefined domains, and assigning valid to domainStatus claim.
Use the following code to add a technical profile in the same claims provider as the technical profile with
Id=UserInformationCollector:<TechnicalProfile Id="CheckCompanyDomain"> <DisplayName>Check Company validity </DisplayName> <Protocol Name="Proprietary" Handler="Web.TPEngine.Providers.ClaimsTransformationProtocolProvider, Web.TPEngine, Version=1.0.0.0, Culture=neutral, PublicKeyToken=null"/> <InputClaimsTransformations> <InputClaimsTransformation ReferenceId="GetDomainFromEmail"/> </InputClaimsTransformations> <OutputClaims> <OutputClaim ClaimTypeReferenceId="domain"/> </OutputClaims> <OutputClaimsTransformations> <OutputClaimsTransformation ReferenceId="LookupDomain"/> </OutputClaimsTransformations> </TechnicalProfile>We've declared claims transformation technical profile, which executes the GetDomainFromEmail and LookupDomain claims transformations.
Locate the technical profile with
Id=UserInformationCollector, and aValidationTechnicalProfilejust after theOutputClaimselement by using the following code:<ValidationTechnicalProfiles> <ValidationTechnicalProfile ReferenceId="CheckCompanyDomain"> <Preconditions> <Precondition Type="ClaimEquals" ExecuteActionsIf="false"> <Value>accountType</Value> <Value>work</Value> <Action>SkipThisValidationTechnicalProfile</Action> </Precondition> </Preconditions> </ValidationTechnicalProfile> </ValidationTechnicalProfiles>We've added a Validation Technical Profile to the UserInformationCollector self-asserted technical profile. The technical profile is skipped only if the accountType value isn't equal to work. If the technical profile executes, and the email domain isn't valid, an error it thrown.
Locate the technical profile with
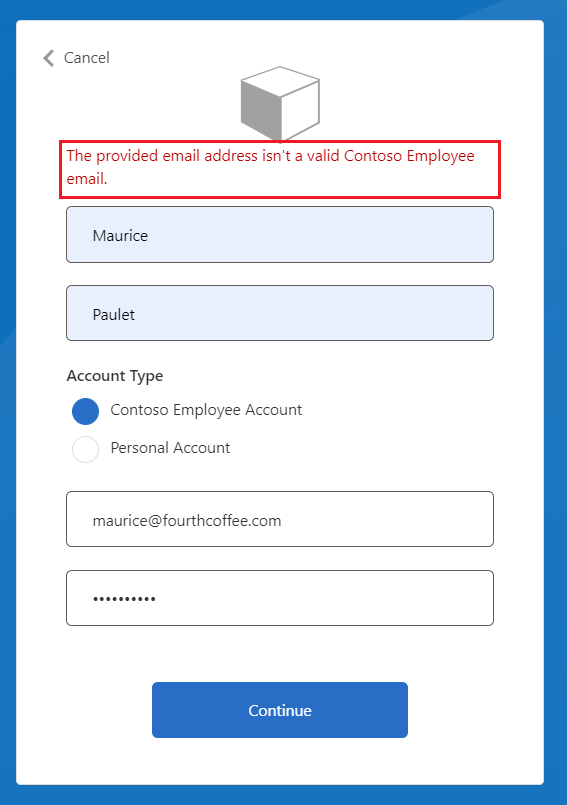
Id=UserInformationCollector, and add the following code inside themetadatatag.<Item Key="LookupNotFound">The provided email address isn't a valid Contoso Employee email.</Item>We've set up a custom error in case the user doesn't use a valid email.
Follow the instructions in Upload custom policy file to upload your policy file.
Follow the instructions in step 6 to test your custom policy:
- For Account Type, select Contoso Employee Account
- For Email Address, enter an invalid email address such as maurice@fourthcoffee.com.
- Enter the rest of the details as required and select Continue
Since maurice@fourthcoffee.com isn't a valid email, you'll see an error similar to the one shown in the screenshot below. You must use a valid email address to successfully run the custom policy and receive a JWT.
Related content
Learn about validation technical profile.
Learn how to Conditionally enable or disable Technical Profiles in Azure AD B2C custom policies.