Note
Access to this page requires authorization. You can try signing in or changing directories.
Access to this page requires authorization. You can try changing directories.
Important
Effective May 1, 2025, Azure AD B2C will no longer be available to purchase for new customers. Learn more in our FAQ.
Before you begin, use the Choose a policy type selector at the top of this page to choose the type of policy you’re setting up. Azure Active Directory B2C offers two methods to define how users interact with your applications: through predefined user flows or through fully configurable custom policies. The steps required in this article are different for each method.
Azure Active Directory B2C (Azure AD B2C) integrates directly with Microsoft Entra multifactor authentication so that you can add a second layer of security to sign-up and sign-in experiences in your applications. If you already created sign-up and sign-in user flows, you can still enable multifactor authentication.
Using this feature applications can handle multiple scenarios such as:
- Requiring multifactor authentication to access one application, but not requiring it to access another. For example, a customer can sign into an auto insurance application with a social or local account, but must verify the phone number before accessing the home insurance application registered in the same directory.
- Requiring multifactor authentication to access an application in general, but not requiring it to access the sensitive portions within it. For example, a customer can sign in to a banking application with a social or local account and check the account balance, but must verify the phone number before attempting a wire transfer.
Prerequisites
- Create a user flow so users can sign up and sign in to your application.
- Register a web application.
- Complete the steps in Get started with custom policies in Active Directory B2C. This tutorial guides you how to update custom policy files to use your Azure AD B2C tenant configuration.
- Register a web application.
Verification methods
With Conditional Access users may or may not be challenged for MFA based on configuration decisions that you can make as an administrator. The methods of the multifactor authentication are:
- Email - During sign-in, a verification email containing a one-time password (OTP) is sent to the user. The user provides the OTP code that was sent in the email to the application.
- SMS or phone call - During the first sign-up or sign-in, the user is asked to provide and verify a phone number. During subsequent sign-ins, the user is prompted to select either the Send Code or Call Me option. Depending on the user's choice, a text message is sent or a phone call is made to the verified phone number to identify the user. The user either provides the OTP code sent via text message or approves the phone call.
- Phone call only - Works in the same way as the SMS or phone call option, but only a phone call is made.
- SMS only - Works in the same way as the SMS or phone call option, but only a text message is sent.
- Authenticator app - TOTP - The user must install an authenticator app that supports time-based one-time password (TOTP) verification, such as the Microsoft Authenticator app, on a device that they own. During the first sign-up or sign-in, the user scans a QR code or enters a code manually using the authenticator app. During subsequent sign-ins, the user types the TOTP code that appears on the authenticator app. See how to set up the Microsoft Authenticator app.
Important
Authenticator app - TOTP provides stronger security than SMS/Phone and email is the least secure. SMS/Phone-based multifactor authentication incurs separate charges from the normal Azure AD B2C MAU's pricing model.
Set multifactor authentication
Sign in to the Azure portal.
If you have access to multiple tenants, select the Settings icon in the top menu to switch to your Azure AD B2C tenant from the Directories + subscriptions menu.
In the left menu, select Azure AD B2C. Or, select All services and search for and select Azure AD B2C.
Select User flows.
Select the user flow for which you want to enable MFA. For example, B2C_1_signinsignup.
Select Properties.
In the Multifactor authentication section, select the desired Type of method. Then under MFA enforcement select an option:
Off - MFA is never enforced during sign-in, and users are not prompted to enroll in MFA during sign-up or sign-in.
Always on - MFA is always required, regardless of your Conditional Access setup. During sign-up, users are prompted to enroll in MFA. During sign-in, if users aren't already enrolled in MFA, they're prompted to enroll.
Conditional - During sign-up and sign-in, users are prompted to enroll in MFA (both new users and existing users who aren't enrolled in MFA). During sign-in, MFA is enforced only when an active Conditional Access policy evaluation requires it:
- If the result is an MFA challenge with no risk, MFA is enforced. If the user isn't already enrolled in MFA, they're prompted to enroll.
- If the result is an MFA challenge due to risk and the user is not enrolled in MFA, sign-in is blocked.
Note
- With general availability of Conditional Access in Azure AD B2C, users are now prompted to enroll in an MFA method during sign-up. Any sign-up user flows you created prior to general availability won't automatically reflect this new behavior, but you can include the behavior by creating new user flows.
- If you select Conditional, you'll also need to add Conditional Access to user flows, and specify the apps you want the policy to apply to.
- Multifactor authentication is disabled by default for sign-up user flows. You can enable MFA in user flows with phone sign-up, but because a phone number is used as the primary identifier, email one-time passcode is the only option available for the second authentication factor.
Select Save. MFA is now enabled for this user flow.
You can use Run user flow to verify the experience. Confirm the following scenario:
A customer account is created in your tenant before the multifactor authentication step occurs. During the step, the customer is asked to provide a phone number and verify it. If verification is successful, the phone number is attached to the account for later use. Even if the customer cancels or drops out, the customer can be asked to verify a phone number again during the next sign-in with multifactor authentication enabled.
To enable multifactor authentication, get the custom policy starter pack from GitHub as follows:
- Download the .zip file or clone the repository from
https://github.com/Azure-Samples/active-directory-b2c-custom-policy-starterpack, and then update the XML files in the SocialAndLocalAccountsWithMFA starter pack with your Azure AD B2C tenant name. The SocialAndLocalAccountsWithMFA enables social and local sign in options, and multifactor authentication options, except for the Authenticator app - TOTP option. - To support the Authenticator app - TOTP MFA option, download the custom policy files from
https://github.com/azure-ad-b2c/samples/tree/master/policies/totp, and then update the XML files with your Azure AD B2C tenant name. Make sure to includeTrustFrameworkExtensions.xml,TrustFrameworkLocalization.xml, andTrustFrameworkBase.xmlXML files from the SocialAndLocalAccounts starter pack. - Update your [page layout] to version
2.1.14. For more information, see Select a page layout.
Enroll a user in TOTP with an authenticator app (for end users)
When an Azure AD B2C application uses the TOTP option for MFA, end users need to use an authenticator app to generate TOTP codes. Users can use the Microsoft Authenticator app or any other authenticator app that supports TOTP verification. If using the Microsoft Authenticator app an Azure AD B2C system admin needs to advise end users to set up the Microsoft Authenticator app using the following steps:
- Download and install the Microsoft Authenticator app on your Android or iOS mobile device.
- Open the Azure AD B2C application requiring you to use TOTP for MFA, for example Contoso webapp, and then sign in or sign up by entering the required information.
- If you're asked to enroll your account by scanning a QR code using an authenticator app, open the Microsoft Authenticator app in your phone, and in the upper right corner, select the 3-dotted menu icon (for Android) or + menu icon (for iOS).
- Select + Add account.
- Select Other account (Google, Facebook, etc.), and then scan the QR code shown in the Azure AD B2C application to enroll your account. If you're unable to scan the QR code, you can add the account manually:
- In the Microsoft Authenticator app on your phone, select OR ENTER CODE MANUALLY.
- In the Azure AD B2C application, select Still having trouble?. This displays Account Name and Secret.
- Enter the Account Name and Secret in your Microsoft Authenticator app, and then select FINISH.
- In the Azure AD B2C application, select Continue.
- In Enter your code, enter the code that appears in your Microsoft Authenticator app.
- Select Verify.
- During subsequent sign-in to the application, type the code that appears in the Microsoft Authenticator app.
Learn about OATH software tokens
Delete a user's TOTP authenticator enrollment (for system admins)
In Azure AD B2C, you can delete a user's TOTP authenticator app enrollment. The user will then be forced to re-enroll their account to use TOTP authentication again. To delete a user's TOTP enrollment, you can use either the Azure portal or the Microsoft Graph API.
Note
- Deleting a user's TOTP authenticator app enrollment from Azure AD B2C doesn't remove the user's account in the TOTP authenticator app on their device. The system admin needs to direct the user to manually delete their account from the TOTP authenticator app on their device before trying to enroll again.
- If the user accidentally deletes their account from the TOTP authenticator app, they need to notify a system admin or app owner who can delete the user's TOTP authenticator enrollment from Azure AD B2C so the user can re-enroll.
Delete TOTP authenticator app enrollment using the Azure portal
- Sign in to the Azure portal.
- If you have access to multiple tenants, select the Settings icon in the top menu to switch to your Azure AD B2C tenant from the Directories + subscriptions menu.
- In the left menu, select Users.
- Search for and select the user for which you want to delete TOTP authenticator app enrollment.
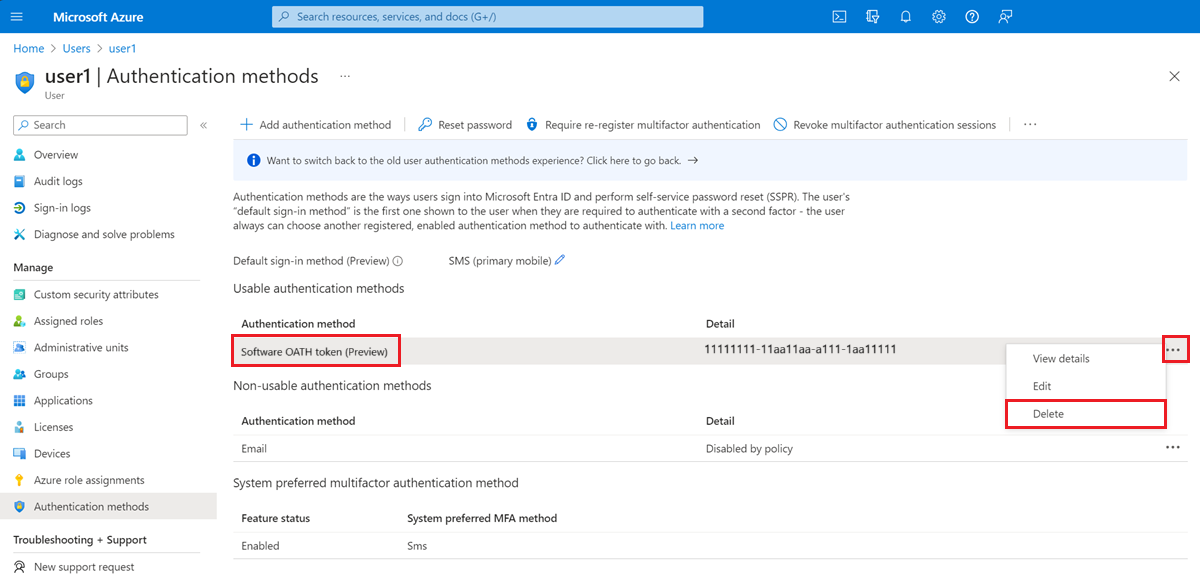
- In the left menu, select Authentication methods.
- Under Usable authentication methods, find Software OATH token, and then select the ellipsis menu next to it. If you don't see this interface, select the option to "Switch to the new user authentication methods experience! Click here to use it now" to switch to the new authentication methods experience.
- Select Delete, and then select Yes to confirm.
Delete TOTP authenticator app enrollment using the Microsoft Graph API
Learn how to delete a user's Software OATH token authentication method using the Microsoft Graph API.
SMS pricing tiers by country/region
The following table provides details about the different pricing tiers for SMS based authentication services across various countries or regions. For pricing details, see Azure AD B2C pricing.
SMS is an add-on feature and requires a linked subscription. If your subscription expires or is cancelled, end users will no longer be able to authenticate using SMS, which could block them from signing in depending on your MFA policy.
| Tier | Countries/Regions |
|---|---|
| Phone Authentication Low Cost | Australia, Brazil, Brunei, Canada, Chile, China, Colombia, Cyprus, North Macedonia, Poland, Portugal, South Korea, Thailand, Türkiye, United States |
| Phone Authentication Mid Low Cost | Greenland, Albania, American Samoa, Austria, Bahamas, Bahrain, Bosnia & Herzegovina, Botswana, Costa Rica, Czech Republic, Denmark, Estonia, Faroe Islands, Finland, France, Greece, Hong Kong SAR, Hungary, Iceland, Ireland, Italy, Japan, Latvia, Lithuania, Luxembourg, Macao SAR, Malta, Mexico, Micronesia, Moldova, Namibia, New Zealand, Nicaragua, Norway, Romania, São Tomé and Príncipe, Seychelles Republic, Singapore, Slovakia, Solomon Islands, Spain, Sweden, Switzerland, Taiwan, United Kingdom, United States Virgin Islands, Uruguay |
| Phone Authentication Mid High Cost | Andorra, Angola, Anguilla, Antarctica, Antigua and Barbuda, Argentina, Armenia, Aruba, Barbados, Belgium, Benin, Bolivia, Bonaire, Curaçao, Saba, Sint Eustatius and Sint Maarten, British Virgin Islands, Bulgaria, Burkina Faso, Cameroon, Cayman Islands, Central African Republic, Cook Islands, Côte d’Ivoire, Croatia, Diego Garcia, Djibouti, Dominican Republic, Dominican Republic, Dominican Republic, Ecuador, El Salvador, Eritrea, Falkland Islands, Fiji, French Guiana, French Polynesia, Gambia, Georgia, Germany, Gibraltar, Grenada, Guadeloupe, Guam, Guinea, Guyana, Honduras, India, Kenya, Kiribati, Laos, Liberia, Malaysia, Marshall Islands, Martinique, Mauritius, Monaco, Montenegro, Montserrat, Netherlands, New Caledonia, Niue, Oman, Palau, Panama, Paraguay, Peru, Puerto Rico, Puerto Rico, Réunion, Rwanda, Saint Helena, Ascension and Tristan de Cunha, Saint Kitts & Nevis, Saint Lucia, Saint Pierre & Miquelon, Saint Vincent and the Grenadines, Saipan, Samoa, San Marino, Saudi Arabia, Sint Maarten, Slovenia, South Africa, South Sudan, Suriname, Swaziland (New Name is Kingdom of Eswatini), Timor-Leste, Tokelau, Tonga, Turks & Caicos, Tuvalu, United Arab Emirates, Vanuatu, Venezuela, Vietnam, Wallis and Futuna |
| Phone Authentication High Cost | Liechtenstein, Bermuda, Cabo Verde, Cambodia, Democratic Republic of Congo, Dominica, Egypt, Equatorial Guinea, Ghana, Guatemala, Guinea-Bissau, Israel, Jamaica, Jamaica, Kosovo, Lesotho, Maldives, Mali, Mauritania, Morocco, Mozambique, Papua New Guinea, Philippines, Qatar, Sierra Leone, Trinidad & Tobago, Ukraine, Zimbabwe, Afghanistan, Algeria, Azerbaijan, Bangladesh, Belarus, Belize, Bhutan, Burundi, Chad, Comoros, Congo, Ethiopia, Gabonese Republic, Haiti, Indonesia, Iraq, Jordan, Kuwait, Kyrgyzstan, Lebanon, Libya, Madagascar, Malawi, Mongolia, Myanmar, Nauru, Nepal, Niger, Nigeria, Pakistan, Palestinian National Authority, Russia, Senegal, Serbia, Somalia, Sri Lanka, Sudan, Tajikistan, Tanzania, Togolese Republic, Tunisia, Turkmenistan, Uganda, Uzbekistan, Yemen, Zambia |
Next steps
- Learn about the TOTP display control and Microsoft Entra ID multifactor authentication technical profile