Note
Access to this page requires authorization. You can try signing in or changing directories.
Access to this page requires authorization. You can try changing directories.
Important
Effective May 1, 2025, Azure AD B2C will no longer be available to purchase for new customers. Learn more in our FAQ.
To authorize access to a web API, you can serve only requests that include a valid access token that Azure Active Directory B2C (Azure AD B2C) issues. This article shows you how to enable Azure AD B2C authorization to your web API. After you complete the steps in this article, only users who obtain a valid access token will be authorized to call your web API endpoints.
Prerequisites
Before you begin, read one of the following articles, which discuss how to configure authentication for apps that call web APIs. Then, follow the steps in this article to replace the sample web API with your own web API.
- Configure authentication in a sample ASP.NET Core application
- Configure authentication in a sample single-page application (SPA)
Overview
Token-based authentication ensures that requests to a web API include a valid access token.
The app completes the following steps:
It authenticates users with Azure AD B2C.
It acquires an access token with the required permissions (scopes) for the web API endpoint.
It passes the access token as a bearer token in the authentication header of the HTTP request by using this format:
Authorization: Bearer <access token>
The web API completes the following steps:
It reads the bearer token from the authorization header in the HTTP request.
It validates the token.
It validates the permissions (scopes) in the token.
It reads the claims that are encoded in the token (optional).
It responds to the HTTP request.
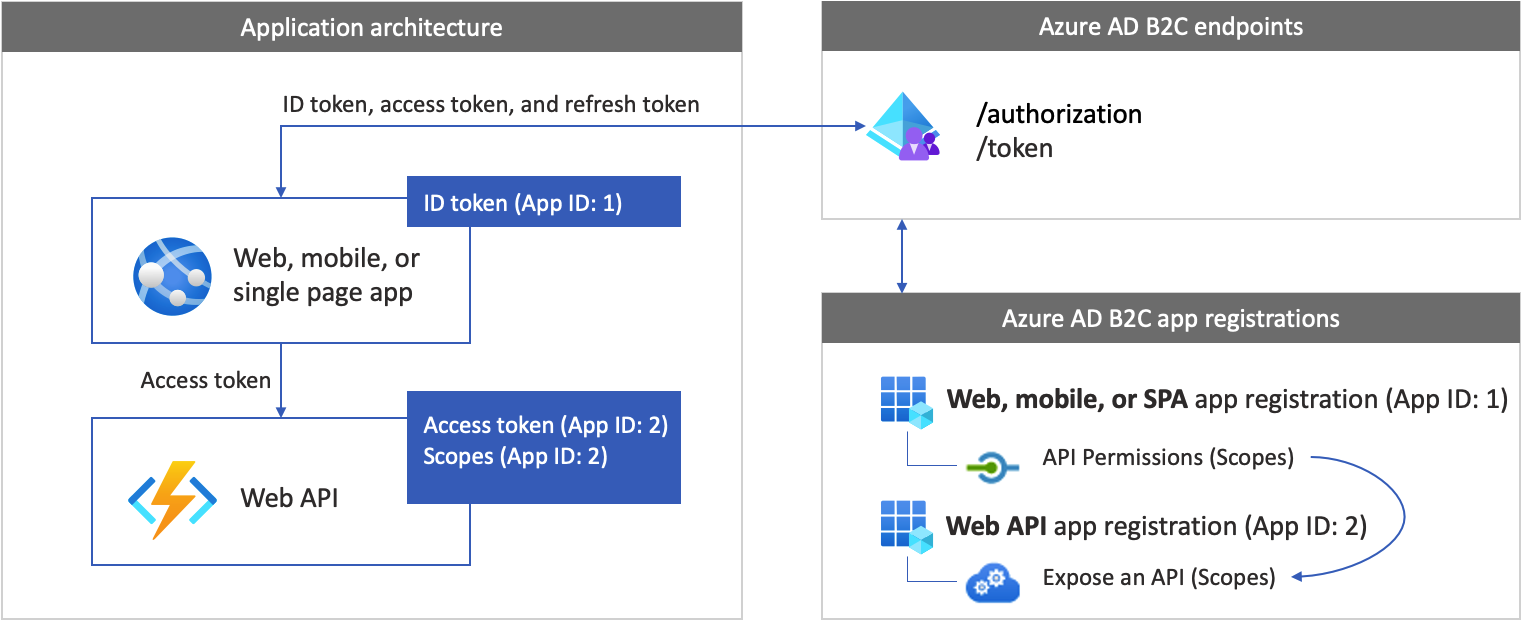
App registration overview
To enable your app to sign in with Azure AD B2C and call a web API, you need to register two applications in the Azure AD B2C directory.
The web, mobile, or SPA application registration enables your app to sign in with Azure AD B2C. The app registration process generates an Application ID, also known as the client ID, which uniquely identifies your application (for example, App ID: 1).
The web API registration enables your app to call a protected web API. The registration exposes the web API permissions (scopes). The app registration process generates an Application ID, which uniquely identifies your web API (for example, App ID: 2). Grant your app (App ID: 1) permissions to the web API scopes (App ID: 2).
The application registrations and the application architecture are described in the following diagram:
Prepare your development environment
In the next sections, you create a new web API project. Select your programming language, ASP.NET Core, or Node.js. Make sure you have a computer that's running either of the following software:
- Visual Studio Code
- C# for Visual Studio Code (latest version)
- .NET 5.0 SDK
Step 1: Create a protected web API
Create a new web API project. First, select the programming language you want to use, ASP.NET Core or Node.js.
Use the dotnet new command. The dotnet new command creates a new folder named TodoList with the web API project assets. Open the directory, and then open Visual Studio Code.
dotnet new webapi -o TodoList
cd TodoList
code .
When you're prompted to "add required assets to the project," select Yes.
Step 2: Install the dependencies
Add the authentication library to your web API project. The authentication library parses the HTTP authentication header, validates the token, and extracts claims. For more information, review the documentation for the library.
To add the authentication library, install the package by running the following command:
dotnet add package Microsoft.Identity.Web
Step 3: Initiate the authentication library
Add the necessary code to initiate the authentication library.
Open Startup.cs and then, at the beginning of the class, add the following using declarations:
using Microsoft.AspNetCore.Authentication.JwtBearer;
using Microsoft.Identity.Web;
Find the ConfigureServices(IServiceCollection services) function. Then, before the services.AddControllers(); line of code, add the following code snippet:
public void ConfigureServices(IServiceCollection services)
{
    // Adds Microsoft Identity platform (Azure AD B2C) support to protect this Api
    services.AddAuthentication(JwtBearerDefaults.AuthenticationScheme)
            .AddMicrosoftIdentityWebApi(options =>
    {
        Configuration.Bind("AzureAdB2C", options);

        options.TokenValidationParameters.NameClaimType = "name";
    },
    options => { Configuration.Bind("AzureAdB2C", options); });
    // End of the Microsoft Identity platform block

    services.AddControllers();
}
Find the Configure function. Then, immediately after the app.UseRouting(); line of code, add the following code snippet:
app.UseAuthentication();
After the change, your code should look like the following snippet:
public void Configure(IApplicationBuilder app, IWebHostEnvironment env)
{
    if (env.IsDevelopment())
    {
        app.UseDeveloperExceptionPage();
    }

    app.UseHttpsRedirection();

    app.UseRouting();

    // Add the following line
    app.UseAuthentication();
    // End of the block you add

    app.UseAuthorization();

    app.UseEndpoints(endpoints =>
    {
        endpoints.MapControllers();
    });
}
Step 4: Add the endpoints
Add two endpoints to your web API:
- Anonymous
/publicendpoint. This endpoint returns the current date and time. Use it to debug your web API with anonymous calls. - Protected
/helloendpoint. This endpoint returns the value of thenameclaim within the access token.
To add the anonymous endpoint:
Under the /Controllers folder, add a PublicController.cs file, and then add it to the following code snippet:
using System;
using Microsoft.AspNetCore.Mvc;
using Microsoft.Extensions.Logging;

namespace TodoList.Controllers
{
    [ApiController]
    [Route("[controller]")]
    public class PublicController : ControllerBase
    {
        private readonly ILogger<PublicController> _logger;

        public PublicController(ILogger<PublicController> logger)
        {
            _logger = logger;
        }

        [HttpGet]
        public ActionResult Get()
        {
            return Ok( new {date = DateTime.UtcNow.ToString()});
        }
    }
}
To add the protected endpoint:
Under the /Controllers folder, add a HelloController.cs file, and then add it to the following code:
using Microsoft.AspNetCore.Authorization;
using Microsoft.AspNetCore.Http;
using Microsoft.AspNetCore.Mvc;
using Microsoft.Extensions.Logging;
using Microsoft.Identity.Web.Resource;

namespace TodoList.Controllers
{
    [Authorize]
    [RequiredScope("tasks.read")]
    [ApiController]
    [Route("[controller]")]
    public class HelloController : ControllerBase
    {

        private readonly ILogger<HelloController> _logger;
        private readonly IHttpContextAccessor _contextAccessor;

        public HelloController(ILogger<HelloController> logger, IHttpContextAccessor contextAccessor)
        {
            _logger = logger;
            _contextAccessor = contextAccessor;
        }

        [HttpGet]
        public ActionResult Get()
        {
            return Ok( new { name = User.Identity.Name});
        }
    }
}
The HelloController controller is decorated with the AuthorizeAttribute, which limits access to authenticated users only.
The controller is also decorated with the [RequiredScope("tasks.read")]. The RequiredScopeAttribute verifies that the web API is called with the right scopes, tasks.read.
Step 5: Configure the web server
In a development environment, set the web API to listen on incoming HTTP or HTTPS requests port number. In this example, use HTTP port 6000 and HTTPS port 6001. The base URI of the web API will be http://localhost:6000 for HTTP and https://localhost:6001 for HTTPS.
Add the following JSON snippet to the appsettings.json file.
"Kestrel": {
    "EndPoints": {
      "Http": {
        "Url": "http://localhost:6000"
      },
      "Https": {
         "Url": "https://localhost:6001"
        }
    }
  }
Step 6: Configure the web API
Add configurations to a configuration file. The file contains information about your Azure AD B2C identity provider. The web API app uses this information to validate the access token that the web app passes as a bearer token.
Under the project root folder, open the appsettings.json file, and then add the following settings:
{
  "AzureAdB2C": {
    "Instance": "https://contoso.b2clogin.com",
    "Domain": "contoso.onmicrosoft.com",
    "ClientId": "<web-api-app-application-id>",
    "SignedOutCallbackPath": "/signout/<your-sign-up-in-policy>",
    "SignUpSignInPolicyId": "<your-sign-up-in-policy>"
  },
  // More settings here
}
In the appsettings.json file, update the following properties:
| Section | Key | Value |
|---|---|---|
| AzureAdB2C | Instance | The first part of your Azure AD B2C tenant name (for example, https://contoso.b2clogin.com). |
| AzureAdB2C | Domain | Your Azure AD B2C tenant full tenant name (for example, contoso.onmicrosoft.com). |
| AzureAdB2C | ClientId | The web API application ID. In the preceding diagram, it's the application with App ID: 2. To learn how to get your web API application registration ID, see Prerequisites. |
| AzureAdB2C | SignUpSignInPolicyId | The user flows, or custom policy. To learn how to get your user flow or policy, see Prerequisites. |
Step 7: Run and test the web API
Finally, run the web API with your Azure AD B2C environment settings.
In the command shell, start the web app by running the following command:
dotnet run
You should see the following output, which means that your app is up and running and ready to receive requests.
Now listening on: http://localhost:6000
To stop the program, in the command shell, select Ctrl+C. You can rerun the app by using the node app.js command.
Tip
Alternatively, to run the dotnet run command, you can use the Visual Studio Code debugger. Visual Studio Code's built-in debugger helps accelerate your edit, compile, and debug loop.
Open a browser and go to http://localhost:6000/public. In the browser window, you should see the following text displayed, along with the current date and time.
Step 8: Call the web API from your app
Try to call the protected web API endpoint without an access token. Open a browser and go to http://localhost:6000/hello. The API returns an unauthorized HTTP error message, confirming that web API is protected with a bearer token.
Continue to configure your app to call the web API. For guidance, see the Prerequisites section.
Watch this video to learn about some best practices when you integrate Azure AD B2C with an API.
Related content
Get the complete example in GitHub:
- Get the web API by using the Microsoft identity library.