Note
Access to this page requires authorization. You can try signing in or changing directories.
Access to this page requires authorization. You can try changing directories.
Important
Effective May 1, 2025, Azure AD B2C will no longer be available to purchase for new customers. Learn more in our FAQ.
Before you begin, use the Choose a policy type selector at the top of this page to choose the type of policy you’re setting up. Azure Active Directory B2C offers two methods to define how users interact with your applications: through predefined user flows or through fully configurable custom policies. The steps required in this article are different for each method.
With Azure Active Directory B2C (Azure AD B2C) HTML templates, you can craft your users' identity experiences. Your HTML templates can contain only certain HTML tags and attributes. Basic HTML tags, such as <b>, <i>, <u>, <h1>, and <hr> are allowed. More advanced tags such as <script>, and <iframe> are removed for security reasons but the <script> tag should be added in the <head> tag. From selfasserted page layout version 2.1.21 / unifiedssp version 2.1.10 / multifactor version 1.2.10 onwards B2C doesn't support adding scripts in <body> tag (as this can pose a risk for cross site scripting attack). Migrating existing scripts from <body> to <head> may at-times require rewriting existing scripts with mutation observers for proper working.
The <script> tag should be added in the <head> tag in two ways:
Adding the
deferattribute, which specifies that the script is downloaded in parallel to parsing the page, then the script is executed after the page has finished parsing:<script src="my-script.js" defer></script>Adding
asyncattribute that specifies that the script is downloaded in parallel to parsing the page, then the script is executed as soon as it is available (before parsing completes):<script src="my-script.js" async></script>
To enable JavaScript and advance HTML tags and attributes:
- Select a page layout
- Enable it on the user flow by using the Azure portal
- Use b2clogin.com in your requests
- Select a page layout
- Add an element to your custom policy
- Use b2clogin.com in your requests
Prerequisites
- Create a user flow so users can sign up and sign in to your application.
- Register a web application.
- Complete the steps in Get started with custom policies in Active Directory B2C. This tutorial guides you how to update custom policy files to use your Azure AD B2C tenant configuration.
- Register a web application.
Begin setting up a page layout version
If you intend to enable JavaScript client-side code, the elements you base your JavaScript on must be immutable. If they're not immutable, any changes could cause unexpected behavior on your user pages. To prevent these issues, enforce the use of a page layout and specify a page layout version to ensure the content definitions you’ve based your JavaScript on are immutable. Even if you don’t intend to enable JavaScript, you can specify a page layout version for your pages.
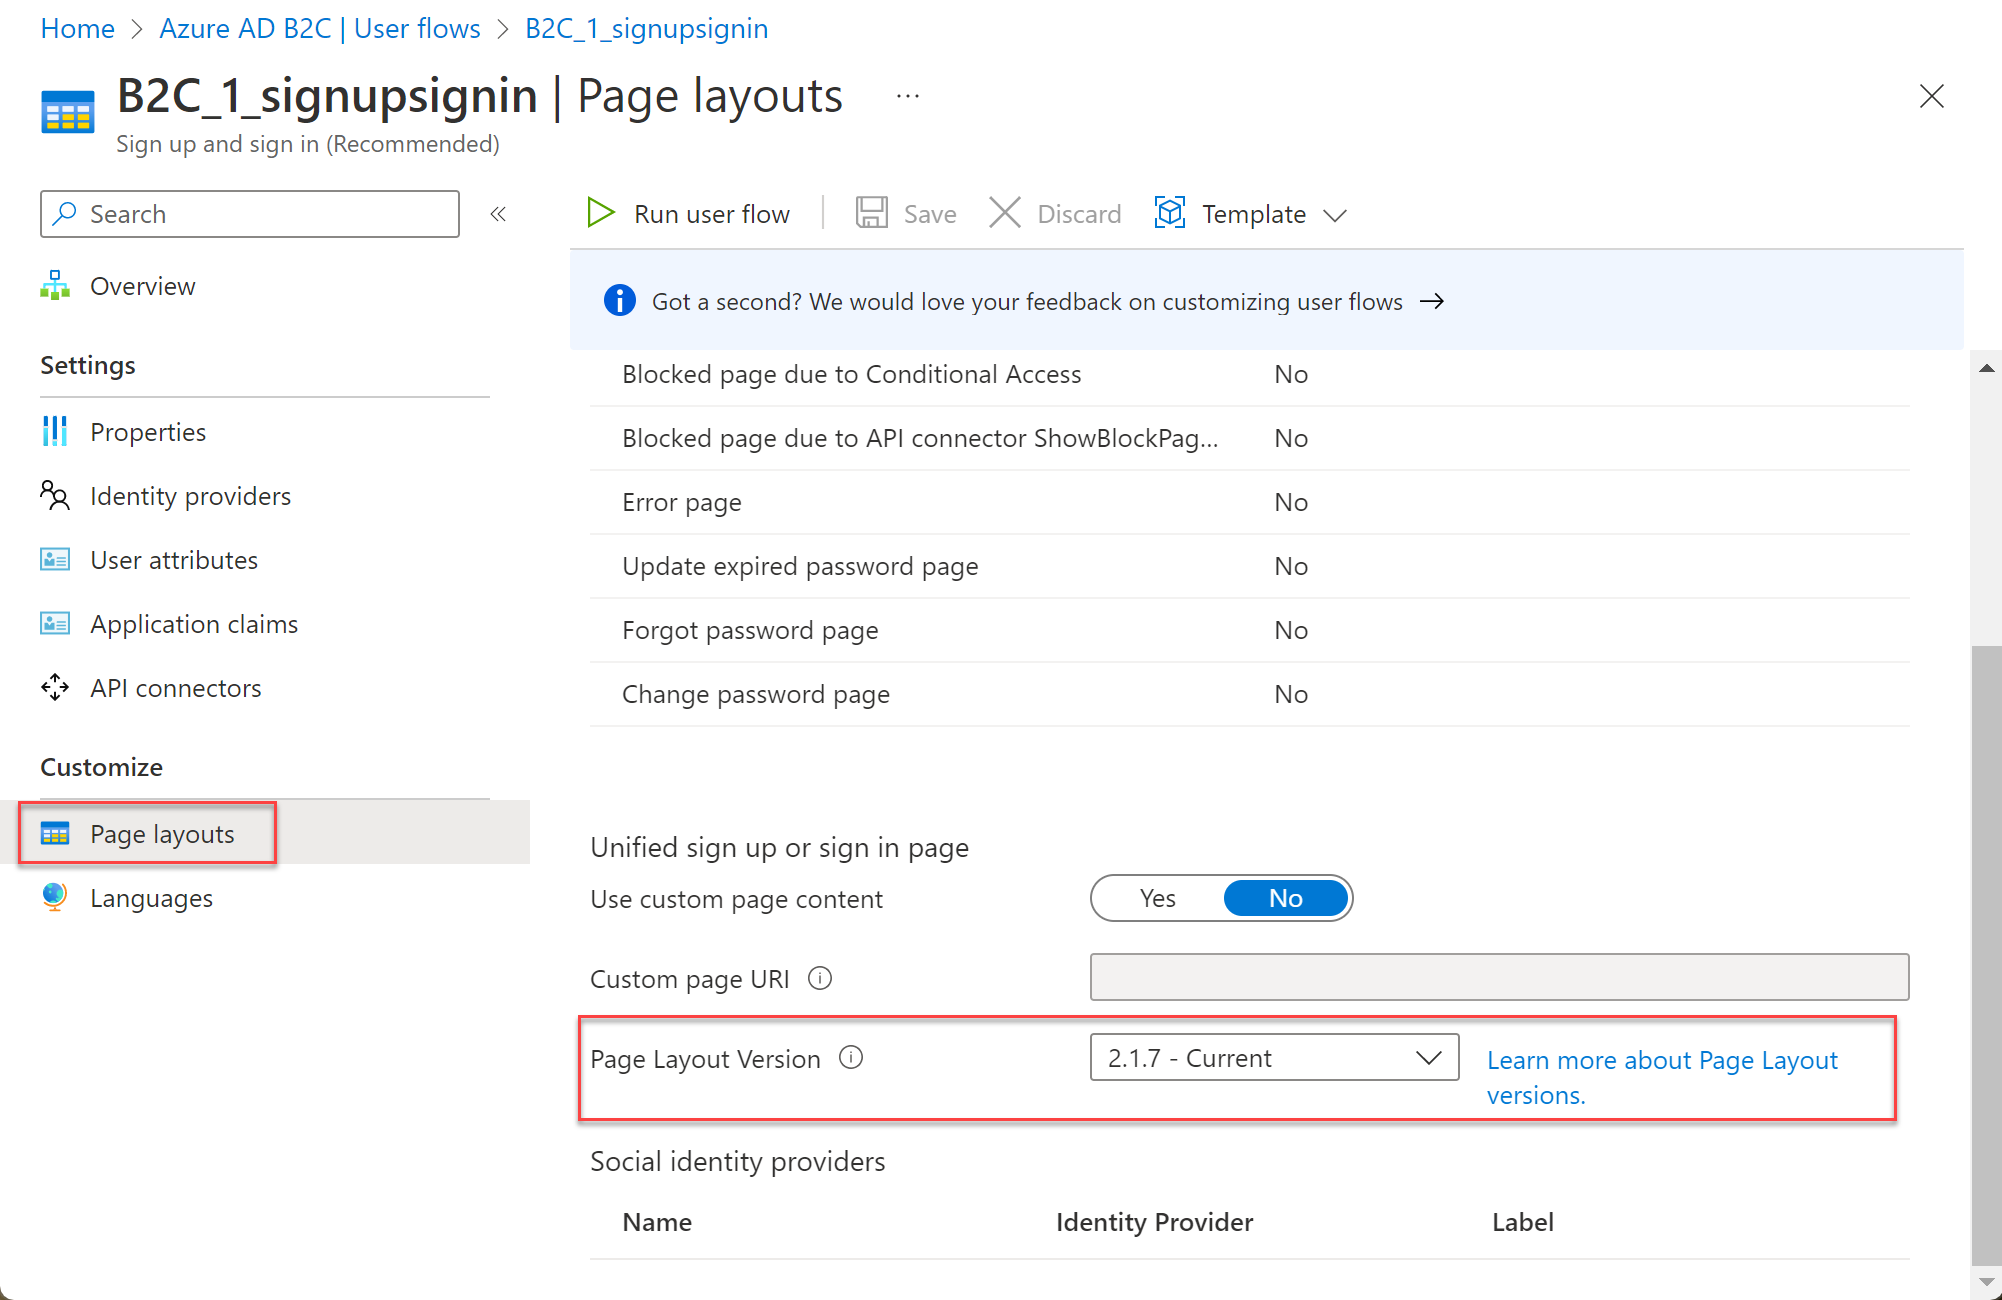
To specify a page layout version for your user flow pages:
- In your Azure AD B2C tenant, select User flows.
- Select your policy (for example, "B2C_1_SignupSignin") to open it.
- Select Page layouts. Choose a Layout name, and then choose the Page Layout Version.
For information about the different page layout versions, see the Page layout version change log.
To specify a page layout version for your custom policy pages:
- Select a page layout for the user interface elements of your application.
- Define a page layout version with page
contractversion for all of the content definitions in your custom policy. The format of the value must contain the wordcontract: urn:com:microsoft:aad:b2c:elements:contract:page-name:version.
The following example shows the content definition identifiers and the corresponding DataUri with page contract:
<ContentDefinitions>
  <ContentDefinition Id="api.error">
    <DataUri>urn:com:microsoft:aad:b2c:elements:contract:globalexception:1.2.0</DataUri>
  </ContentDefinition>
  <ContentDefinition Id="api.idpselections">
    <DataUri>urn:com:microsoft:aad:b2c:elements:contract:providerselection:1.2.0</DataUri>
  </ContentDefinition>
  <ContentDefinition Id="api.idpselections.signup">
    <DataUri>urn:com:microsoft:aad:b2c:elements:contract:providerselection:1.2.0</DataUri>
  </ContentDefinition>
  <ContentDefinition Id="api.signuporsignin">
    <DataUri>urn:com:microsoft:aad:b2c:elements:contract:unifiedssp:1.2.0</DataUri>
  </ContentDefinition>
  <ContentDefinition Id="api.selfasserted">
    <DataUri>urn:com:microsoft:aad:b2c:elements:contract:selfasserted:1.2.0</DataUri>
  </ContentDefinition>
  <ContentDefinition Id="api.selfasserted.profileupdate">
    <DataUri>urn:com:microsoft:aad:b2c:elements:contract:selfasserted:1.2.0</DataUri>
  </ContentDefinition>
  <ContentDefinition Id="api.localaccountsignup">
    <DataUri>urn:com:microsoft:aad:b2c:elements:contract:selfasserted:1.2.0</DataUri>
  </ContentDefinition>
  <ContentDefinition Id="api.localaccountpasswordreset">
    <DataUri>urn:com:microsoft:aad:b2c:elements:contract:selfasserted:1.2.0</DataUri>
  </ContentDefinition>
  <ContentDefinition Id="api.phonefactor">
    <DataUri>urn:com:microsoft:aad:b2c:elements:contract:multifactor:1.2.0</DataUri>
  </ContentDefinition>
</ContentDefinitions>
Enable JavaScript
In the user flow Properties, you can enable JavaScript. Enabling JavaScript also enforces the use of a page layout. You can then set the page layout version for the user flow as described in the next section.

You enable script execution by adding the ScriptExecution element to the RelyingParty element.
Open your custom policy file. For example, SignUpOrSignin.xml.
Add the ScriptExecution element to the RelyingParty element:
<RelyingParty>
  <DefaultUserJourney ReferenceId="SignUpOrSignIn" />
  <UserJourneyBehaviors>
    <ScriptExecution>Allow</ScriptExecution>
  </UserJourneyBehaviors>
  ...
</RelyingParty>
Save and upload the file.
Guidelines for using JavaScript
Follow these guidelines when you customize the interface of your application using JavaScript:
- Don't:
- bind a click event on
<a>HTML elements. - take a dependency on Azure AD B2C code or comments.
- change the order or hierarchy of Azure AD B2C HTML elements. Use an Azure AD B2C policy to control the order of the UI elements.
- bind a click event on
- You can call any RESTful service with these considerations:
- You may need to set your RESTful service CORS to allow client-side HTTP calls.
- Make sure your RESTful service is secure and uses only the HTTPS protocol.
- Don't use JavaScript directly to call Azure AD B2C endpoints.
- You can embed your JavaScript or you can link to external JavaScript files. When using an external JavaScript file, make sure to use the absolute URL and not a relative URL.
- JavaScript frameworks:
- Azure AD B2C uses a specific version of jQuery. Don’t include another version of jQuery. Using more than one version on the same page causes issues.
- Using RequireJS isn't supported.
- Most JavaScript frameworks are not supported by Azure AD B2C.
- Azure AD B2C settings can be read by calling
window.SETTINGS,window.CONTENTobjects, such as the current UI language. Don’t change the value of these objects. - To customize the Azure AD B2C error message, use localization in a policy.
- If anything can be achieved by using a policy, generally it's the recommended way.
- We recommend that you use our existing UI controls, such as buttons, rather than hiding them and implementing click bindings on your own UI controls. This approach ensures that your user experience continues to function properly even when we release new page contract upgrades.
JavaScript samples
Show or hide a password
A common way to help your customers with their sign-up success is to allow them to see what they’ve entered as their password. This option helps users sign up by enabling them to easily see and make corrections to their password if needed. Any field of type password has a checkbox with a Show password label. This enables the user to see the password in plain text. Include this code snippet into your sign-up or sign-in template for a self-asserted page:
function makePwdToggler(pwd){
  // Create show-password checkbox
  var checkbox = document.createElement('input');
  checkbox.setAttribute('type', 'checkbox');
  var id = pwd.id + 'toggler';
  checkbox.setAttribute('id', id);

  var label = document.createElement('label');
  label.setAttribute('for', id);
  label.appendChild(document.createTextNode('show password'));

  var div = document.createElement('div');
  div.appendChild(checkbox);
  div.appendChild(label);

  // Add show-password checkbox under password input
  pwd.insertAdjacentElement('afterend', div);

  // Add toggle password callback
  function toggle(){
    if(pwd.type === 'password'){
      pwd.type = 'text';
    } else {
      pwd.type = 'password';
    }
  }
  checkbox.onclick = toggle;
  // For non-mouse usage
  checkbox.onkeydown = toggle;
}

function setupPwdTogglers(){
  var pwdInputs = document.querySelectorAll('input[type=password]');
  for (var i = 0; i < pwdInputs.length; i++) {
    makePwdToggler(pwdInputs[i]);
  }
}

setupPwdTogglers();
Add terms of use
Include the following code into your page where you want to include a Terms of Use checkbox. This checkbox is typically needed in your local account sign-up and social account sign-up pages.
function addTermsOfUseLink() {
    // find the terms of use label element
    var termsOfUseLabel = document.querySelector('#api label[for="termsOfUse"]');
    if (!termsOfUseLabel) {
        return;
    }

    // get the label text
    var termsLabelText = termsOfUseLabel.innerHTML;

    // create a new <a> element with the same inner text
    var termsOfUseUrl = 'https://learn.microsoft.com/legal/termsofuse';
    var termsOfUseLink = document.createElement('a');
    termsOfUseLink.setAttribute('href', termsOfUseUrl);
    termsOfUseLink.setAttribute('target', '_blank');
    termsOfUseLink.appendChild(document.createTextNode(termsLabelText));

    // replace the label text with the new element
    termsOfUseLabel.replaceChild(termsOfUseLink, termsOfUseLabel.firstChild);
}
In the code, replace termsOfUseUrl with the link to your terms of use agreement. For your directory, create a new user attribute called termsOfUse and then include termsOfUse as a user attribute.
Alternatively, you can add a link at the bottom of self-asserted pages, without using of JavaScript. Use the following localization:
<LocalizedResources Id="api.localaccountsignup.en">
  <LocalizedStrings>
    <!-- The following elements will display a link at the bottom of the page. -->
    <LocalizedString ElementType="UxElement" StringId="disclaimer_link_1_text">Terms of use</LocalizedString>
    <LocalizedString ElementType="UxElement" StringId="disclaimer_link_1_url">termsOfUseUrl</LocalizedString>
    </LocalizedStrings>
</LocalizedResources>
Replace termsOfUseUrl with the link to your organization's privacy policy and terms of use.
Next steps
Find more information about how to Customize the user interface of your application in Azure Active Directory B2C.