Note
Access to this page requires authorization. You can try signing in or changing directories.
Access to this page requires authorization. You can try changing directories.
Important
Effective May 1, 2025, Azure AD B2C will no longer be available to purchase for new customers. Learn more in our FAQ.
In this tutorial, learn to configure Azure Active Directory B2C (Azure AD B2C) with HYPR. When Azure AD B2C is the identity provider (IdP), you can integrate HYPR with customer applications for passwordless authentication. HYPR replaces passwords with public key encryptions that help prevent fraud, phishing, and credential reuse.
Prerequisites
To get started, you'll need:
An Azure subscription
- If you don't have one, you can get an Azure free account
- An Azure AD B2C tenant linked to your Azure subscription
- A HYPR cloud tenant
- Request a HYPR custom demo
- A user mobile device registered using the HYPR REST APIs, or the HYPR Device Manager in your HYPR tenant
- For example, see HYPR SDK for Java Web
Scenario description
The HYPR integration has the following components:
- Azure AD B2C – The authorization server to verify user credentials, or the identity provider (IdP)
- Web and mobile applications - For mobile or web applications protected by HYPR and Azure AD B2C
- HYPR has mobile SDK and a mobile app for iOS and Android
- HYPR mobile app - Use it for this tutorial, if you're not using the mobile SDKs in your mobile applications
- HYPR REST APIs - User device registration and authentication
- Go to apidocs.hypr.com for HYPR Passwordless APIs
The following architecture diagram shows the implementation.
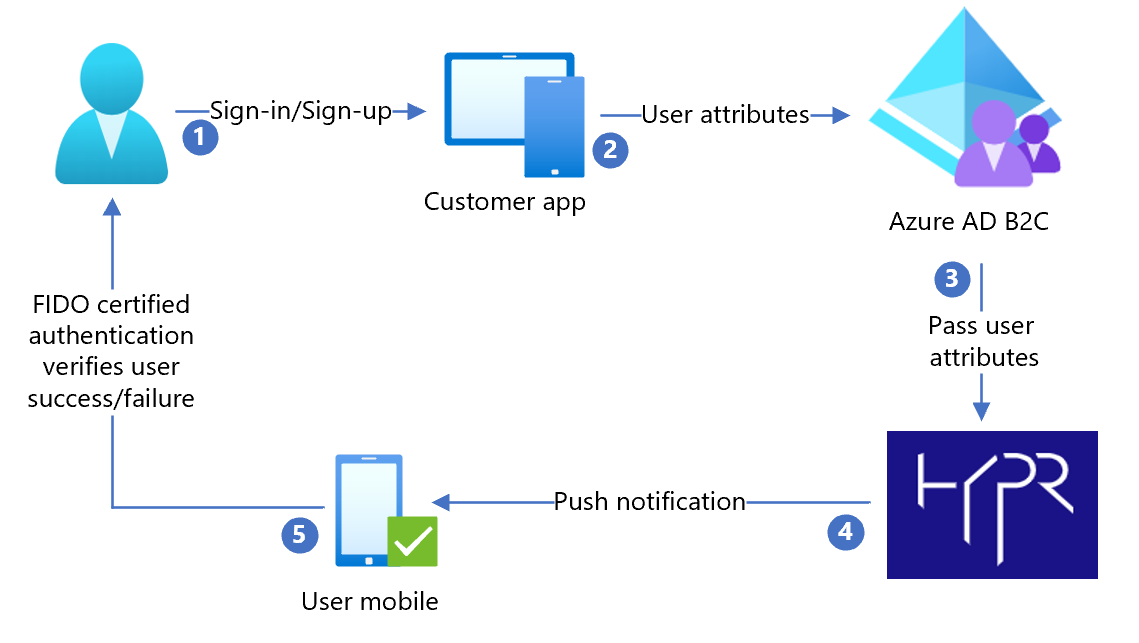
- User arrives at a sign-in page and selects sign-in or sign-up. User enters username.
- The application sends the user attributes to Azure AD B2C for identify verification.
- Azure AD B2C sends user attributes to HYPR to authenticate the user through the HYPR mobile app.
- HYPR sends a push notification to the registered user mobile device for a Fast Identity Online (FIDO) certified authentication. It can be a user fingerprint, biometric, or decentralized PIN.
- After user acknowledges the push notification, user is granted or denied access to the customer application.
Configure the Azure AD B2C policy
Follow the instructions in Custom policy starter pack to download Active-directory-b2c-custom-policy-starterpack/LocalAccounts/
Configure the policy for the Azure AD B2C tenant.
Note
Update policies to relate to your tenant.
Test the user flow
- Open the Azure AD B2C tenant.
- Under Policies, select Identity Experience Framework.
- Select the SignUpSignIn you created.
- Select Run user flow.
- For Application, select the registered app (sample is JWT).
- For Reply URL, select the redirect URL.
- Select Run user flow.
- Complete the sign-up flow to create an account.
- After the user attribute is created, HYPR is called.
Tip
If the flow is incomplete, confirm the user is saved in the directory.