Note
Access to this page requires authorization. You can try signing in or changing directories.
Access to this page requires authorization. You can try changing directories.
Important
Effective May 1, 2025, Azure AD B2C will no longer be available to purchase for new customers. Learn more in our FAQ.
Before you begin
Azure Active Directory B2C (Azure AD B2C) has two methods to define users interaction with applications: predefined user flows or configurable custom policies. See, User flows and custom policies overview
Integrate Azure AD B2C with IDEMIA Mobile ID
IDEMIA provides biometric authentication services like face ID and fingerprinting, which reduces fraud and credential reuse. With Mobile ID, citizens benefit from a trusted, government-issued digital ID, as a complement to their physical ID. Mobile ID verifies identity by using a self-selected PIN, touch ID, or face ID. Citizens control their identities by sharing information needed for a transaction. Many state departments of motor vehicles (DMVs) use Mobile ID.
To learn more, go to idemia.com: IDEMIA
Scenario description
Mobile ID integration includes the following components:
- Azure AD B2C – authorization server that verifies user credentials
- It's also known as the identity provider (IdP)
- IDEMIA Mobile ID - OpenID Connect (OIDC) provider configured as an Azure AD B2C external provider
- IDEMIA Mobile ID application - a digital version of a driver’s license, or state-issued ID, in an app on your phone
- See, IDEMIA Mobile ID
Mobile ID is a digitized identification document, a portable mobile identity token that DMVs use to verify individual identities. The signed digitized ID is stored on user mobile phones as an identity on the edge. The signed credentials ease access to identity services such as proof of age, financial know your customer, account access, etc.
The following diagram illustrates the sign-up and sign-in user flows with Mobile ID.
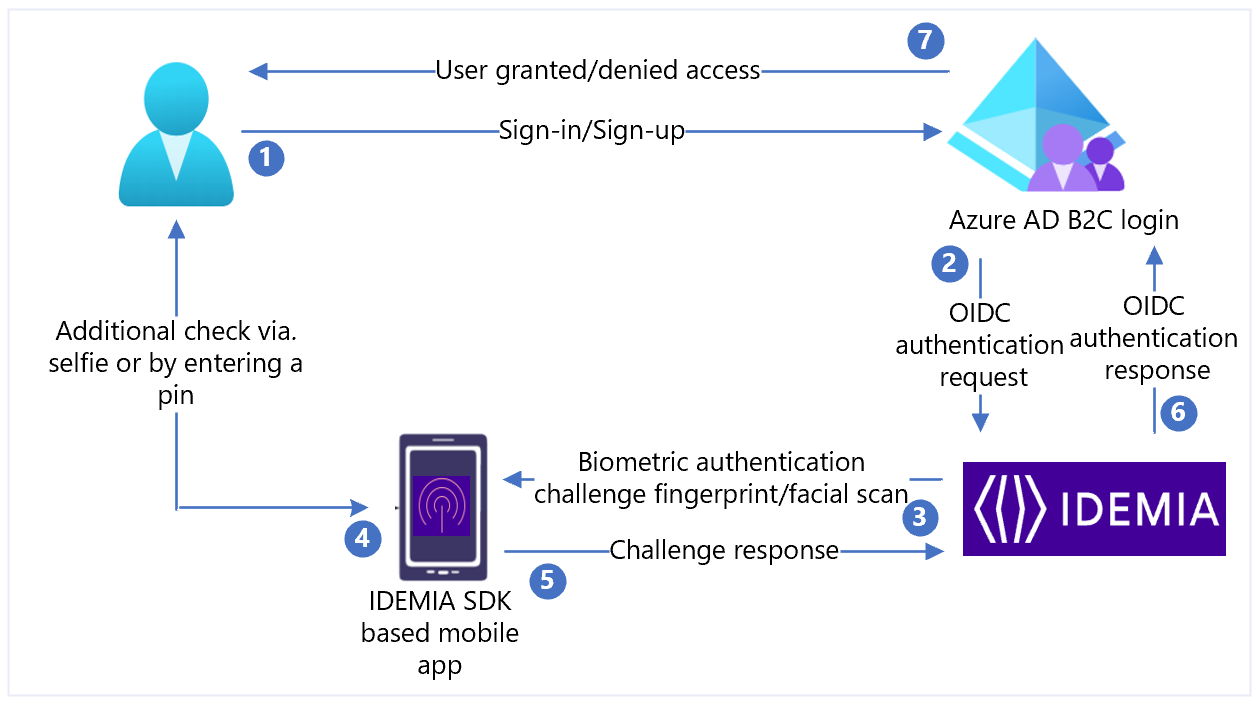
- User visits the Azure AD B2C sign-in page (the replying party), with their device and Mobile ID, to conduct a transaction.
- Azure AD B2C performs an ID check. It redirects the user to the IDEMIA router with an OIDC authorization code flow.
- The router sends a biometric challenge to the user’s mobile app with authentication and authorization request details.
- Depending on security, the user might be prompted provide more details: input a PIN, take a live selfie, or both.
- The authentication response provides proof of possession, presence, and consent. The response returns to the router.
- The router verifies user information and replies to Azure AD B2C with the result.
- The user is granted or denied access.
Enable Mobile ID
To get started, go to the idemia.com Get in touch page to request a demo. In the request form text field, indicate your interest in Azure AD B2C integration.
Integrate Mobile ID with Azure AD B2C
Use the following sections to prepare for and perform integration processes.
Prerequisites
To get started, you need:
Access to users with an IDEMIA, US state issued Mobile ID credential (mID)
- Or during the test phase, the mID demo application from IDEMIA
An Azure subscription
- If you don't have one, get an Azure free account
An Azure AD B2C tenant linked to the Azure subscription
Your business web application registered in an Azure AD B2C tenant
- For testing, configure https://jwt.ms, a Microsoft web application with decoded token contents
Note
The token contents don't leave your browser.
Submit a relying party application for mID
During Mobile ID integration, the following information is provided.
| Property | Description |
|---|---|
| Application Name | Azure AD B2C, or another application name |
| Client_ID | The unique identifier from the identity provider (IdP) |
| Client Secret | Password the relying party application uses to authenticate with the IDEMIA IdP |
| Metadata endpoint | A URL pointing to a token issuer configuration document, also known as an OpenID well-known configuration endpoint |
| Redirect URIs | https://your-B2C-tenant-name.b2clogin.com/your-B2C-tenant-name.onmicrosoft.com/oauth2/authrespFor example, https://fabrikam.b2clogin.com/fabrikam.onmicrosoft.com/oauth2/authrespIf you use a custom domain, enter https://your-domain-name/your-tenant-name.onmicrosoft.com/oauth2/authresp. |
| Post sign out redirect URIs | https://your-B2C-tenant-name.b2clogin.com/your-B2C-tenant-name.onmicrosoft.com/{policy}/oauth2/v2.0/logoutSend a sign out request. |
Note
You need the Client ID and Client Secret later to configure the IdP in Azure AD B2C.
Create a policy key
Store the noted IDEMIA Client Secret in your Azure AD B2C tenant. For the following instructions, use the directory with your Azure AD B2C tenant.
- Sign in to the Azure portal.
- In the portal toolbar, select Directories + subscriptions.
- On the Portal settings, Directories + subscriptions page, in the Directory name list find your Azure AD B2C directory
- Select Switch.
- In the top-left corner of Azure portal, select All services.
- Search for and select Azure AD B2C.
- On the Overview page, select Identity Experience Framework.
- Select Policy Keys.
- Select Add.
- For Options, choose Manual.
- Enter a Name for the policy key. For example,
IdemiaAppSecret. The prefixB2C_1A_is added to the key name. - In Secret, enter the Client Secret you noted.
- For Key usage, select Signature.
- Select Create.
Configure Mobile ID as an External IdP
To enable users to sign in with Mobile ID, define IDEMIA as a claims provider. This action ensures Azure AD B2C communicates through an endpoint, which provides claims Azure AD B2C uses to verify user authentication with biometry.
To define IDEMIA as a claims provider, add it to the ClaimsProvider element in the policy extension file.
     <TechnicalProfile Id="Idemia-Oauth2">
          <DisplayName>IDEMIA</DisplayName>
          <Description>Login with your IDEMIA identity</Description>
          <Protocol Name="OAuth2" />
          <Metadata>
            <Item Key="METADATA">https://idp.XXXX.net/oxauth/.well-known/openid-configuration</Item>
            <!-- Update the Client ID below to the Application ID -->
            <Item Key="client_id">00001111-aaaa-2222-bbbb-3333cccc4444</Item>
            <Item Key="response_types">code</Item>
            <Item Key="scope">openid id_basic mt_scope</Item>
            <Item Key="response_mode">form_post</Item>
            <Item Key="HttpBinding">POST</Item>
            <Item Key="UsePolicyInRedirectUri">false</Item>
            <Item Key="token_endpoint_auth_method">client_secret_basic</Item>
            <Item Key="ClaimsEndpoint">https://idp.XXXX.net/oxauth/restv1/userinfo</Item>
            <Item Key="ValidTokenIssuerPrefixes">https://login.microsoftonline.com/</Item>
          </Metadata>
          <CryptographicKeys>
            <Key Id="client_secret" StorageReferenceId="B2C_1A_IdemiaAppSecret" />
</CryptographicKeys>
          <InputClaims>
            <InputClaim ClaimTypeReferenceId="acr" PartnerClaimType="acr_values" DefaultValue="loa-2" />
          </InputClaims>
          <OutputClaims>
            <OutputClaim ClaimTypeReferenceId="issuerUserId" PartnerClaimType="sub" />
            <OutputClaim ClaimTypeReferenceId="tenantId" PartnerClaimType="tid" />
            <OutputClaim ClaimTypeReferenceId="givenName" PartnerClaimType="firstName1" />
            <OutputClaim ClaimTypeReferenceId="surName" PartnerClaimType="lastName1" />
            <OutputClaim ClaimTypeReferenceId="authenticationSource" DefaultValue="socialIdpAuthentication" AlwaysUseDefaultValue="true" />
            <OutputClaim ClaimTypeReferenceId="identityProvider" DefaultValue="idemia" />
            <OutputClaim ClaimTypeReferenceId="documentId" />
            <OutputClaim ClaimTypeReferenceId="address1" />
          </OutputClaims>
          <OutputClaimsTransformations>
            <OutputClaimsTransformation ReferenceId="CreateRandomUPNUserName" />
            <OutputClaimsTransformation ReferenceId="CreateUserPrincipalName" />
            <OutputClaimsTransformation ReferenceId="CreateAlternativeSecurityId" />
            <OutputClaimsTransformation ReferenceId="CreateSubjectClaimFromAlternativeSecurityId" />
          </OutputClaimsTransformations>
          <UseTechnicalProfileForSessionManagement ReferenceId="SM-SocialLogin" />
        </TechnicalProfile>
Set client_id to the application ID from the application registration.
| Property | Description |
|---|---|
| Scope | For OpenID Connect (OIDC), the minimum requirement is set scope parameter to openid. Append more scopes as a space-delimited list. |
| redirect_uri | This location is where the user agent sends the authorization code to Azure AD B2C. |
| response_type | For the authorization code flow, select code |
| acr_values | This parameter controls the authentication methods the user must perform during authentication. |
Select one of the following values:
| Parameter value | Effect on user authentication process |
|---|---|
loa-2 |
Crypto-based Microsoft Entra multifactor authentication only |
loa-3 |
Crypto-based MFA, plus another factor |
loa-4 |
Crypto-based MFA, plus the user performs PIN and biometric authentication |
The /userinfo endpoint provides the claims for the scope(s) requested in the authorization request. For the <mt_scope>, there are claims like First Name, Last Name, and Driver's License Number, among other items. The claims set for a scope are published in the scope_to_claims_mapping section of the discovery API. Azure AD B2C requests claims from the claims endpoint and returns them in the OutputClaims element. You might need to map the claim name in your policy to the name in the IdP. Define the claim type in the ClaimSchema element:
<ClaimType Id="documentId">
     <DisplayName>documentId</DisplayName>
     <DataType>string</DataType>
</ClaimType>
<ClaimType Id="address1">
     <DisplayName>address</DisplayName>
     <DataType>string</DataType>
</ClaimType>
Add a user journey
For these instructions, the IdP is set up, but it's not in any sign-in page. If you don't have a custom user journey, copy a template user journey.
- From the starter pack, open the
TrustFrameworkBase.xmlfile. - Locate and copy the contents of the
UserJourneyselement, which includesID=SignUpOrSignIn. - Open the
TrustFrameworkExtensions.xml. - Locate the UserJourneys element. If there's no element, add one.
- Paste the contents of the UserJourney element as a child of the UserJourneys element.
- Rename the user journey ID. For example,
ID=CustomSignUpSignIn.
Add the IdP to a user journey
If there's a user journey, add the new IdP to it. First add a sign-in button, then link it to an action, which is the technical profile you created.
- In the user journey, locate the orchestration step element with Type=
CombinedSignInAndSignUp, or Type=ClaimsProviderSelection. It's usually the first orchestration step. The ClaimsProviderSelections element has an IdP list users sign in with. The order of the elements controls is the order of the sign-in buttons the user sees. - Add a ClaimsProviderSelection XML element.
- Set the TargetClaimsExchangeId value to a friendly name.
- Add a ClaimsExchange element.
- Set the Id to the value of the target claims exchange ID.
- Update the TechnicalProfileReferenceId value to the technical profile ID you created.
The following XML demonstrates the first two orchestration steps of a user journey with the IdP:
<OrchestrationStep Order="1" Type="CombinedSignInAndSignUp" ContentDefinitionReferenceId="api.signuporsignin">
  <ClaimsProviderSelections>
    ...
    <ClaimsProviderSelection TargetClaimsExchangeId="IdemiaExchange" />
  </ClaimsProviderSelections>
  ...
</OrchestrationStep>

<OrchestrationStep Order="2" Type="ClaimsExchange">
  ...
  <ClaimsExchanges>
    <ClaimsExchange Id="IdemiaExchange" TechnicalProfileReferenceId="Idemia-Oauth2" />
  </ClaimsExchanges>
</OrchestrationStep>
Configure the relying party policy
The relying party policy, for example SignUpSignIn.xml, specifies the user journey the Azure AD B2C executes.
- Find the DefaultUserJourney element in relying party.
- Update the ReferenceId to match the user journey ID, in which you added the IdP.
In the following example, for the CustomSignUpOrSignIn user journey, the ReferenceId is set to CustomSignUpOrSignIn.
<RelyingParty>
  <DefaultUserJourney ReferenceId="CustomSignUpSignIn" />
  ...
</RelyingParty>
Upload the custom policy
For the following instructions, use the directory with your Azure AD B2C tenant.
Sign in to the Azure portal.
In the portal toolbar, select the Directories + subscriptions.
On the Portal settings, Directories + subscriptions page, in the Directory name list, find your Azure AD B2C directory.
Select Switch.
In the Azure portal, search for and select Azure AD B2C.
Under Policies, select Identity Experience Framework.
Select Upload Custom Policy.
Upload the two policy files you changed, in the following order:
- The extension policy, for example
TrustFrameworkExtensions.xml - The relying party policy, such as
SignUpSignIn.xml
- The extension policy, for example
Test your custom policy
- Select your relying party policy, for example
B2C_1A_signup_signin. - For Application, select a web application you registered.
https://jwt.msappears for Reply URL.- Select Run now.
- From the sign-up or sign-in page, select IDEMIA.
- The browser is redirected to
https://jwt.ms. See the token contents returned by Azure AD B2C.
Learn more: Tutorial: Register a web application in Azure AD B2C