Note
Access to this page requires authorization. You can try signing in or changing directories.
Access to this page requires authorization. You can try changing directories.
Important
Effective May 1, 2025, Azure AD B2C will no longer be available to purchase for new customers. Learn more in our FAQ.
The itsme digital ID app allows you to sign in securely without card-readers, passwords, two-factor authentication, or multiple PIN codes. The itsme app provides strong customer authentication with a verified identity. In this article, learn how to integrate Azure AD B2C authentication with itsme OpenID Connect (OIDC) using a client secret user flow policy.
Prerequisites
To get started, you'll need:
- An Azure subscription. If you don't have a subscription, you can get a free account.
- An Azure AD B2C tenant that is linked to your Azure subscription.
- Your Client ID, also known as Partner code, provided by itsme.
- Your Service code provided by itsme.
- Your client secret for your itsme account.
Scenario description
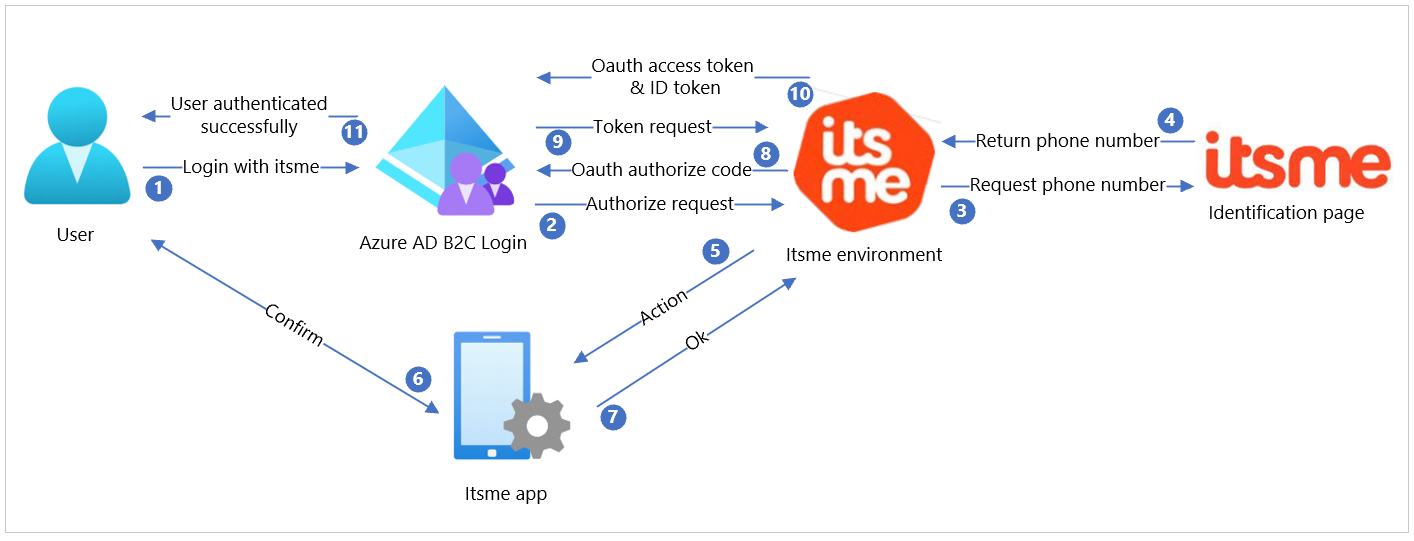
| Step | Description |
|---|---|
| 1 | On your website or application, include the Log in with itsme button by adapting in the Azure AD B2C user flow. The interaction flow starts when the user clicks on this button. |
| 2 | Azure AD B2C starts the OpenID connect flow by sending an Authorize request to the itsme client secret API. A well-known/OpenID-configuration endpoint is available containing information about the endpoints. |
| 3 | The itsme environment redirects the user to the itsme identify yourself page, allowing the user to fill in their phone number. |
| 4 | The itsme environment receives the phone number from the user and validates the correctness. |
| 5 | If the phone number belongs to an active itsme user, an Action is created for the itsme app. |
| 6 | The user opens the itsme app, checks the request, and confirms the action. |
| 7 | The app informs the itsme environment the action has been confirmed. |
| 8 | The itsme environment returns the OAuth authorize code to Azure AD B2C. |
| 9 | Using the authorize code, the Azure AD B2C does a token request. |
| 10 | The itsme environment checks the token request, and if still valid, returns the OAuth access token and the ID token containing the requested user information. |
| 11 | Finally, the user is redirected to the redirect URL as an authenticated user. |
Onboard with itsme
To create an account with itsme, visit itsme at the Azure Marketplace.
Activate your itsme account by sending an email to onboarding@itsme.be. You'll receive a Partner code and Service code that will be needed for your B2C setup.
After activation of your itsme partner account, you'll receive an email with a one-time link to the client secret.
Follow the instructions at itsme to complete the configuration.
Integrate with Azure AD B2C
Set up a new Identity Provider in Azure AD B2C
Note
If you don't have one already, create an Azure AD B2C tenant that is linked to your Azure subscription.
If you have access to multiple tenants, select the Settings icon in the top menu to switch to your Azure AD B2C tenant from the Directories + subscriptions menu.
Under Azure services, select Azure AD B2C (or select More services and use the All services search box to search for Azure AD B2C).
Select Identity providers, and then select New OpenID Connect provider.
Fill in the form with the following information:
Property Value Name itsme Metadata URL https://oidc.<environment>.itsme.services/clientsecret-oidc/csapi/v0.1/.well-known/openid-configuration
where<environment>is eithere2e(test environment) orprd(production)ClientID Your Client ID, also known as Partner code Client Secret Your client_secret Scope openid service:YOURSERVICECODE profile email [phone] [address] Response Type code Response Mode query Domain Hint You can leave this empty UserID sub Display Name name Given name given_name Surname family_name Email email Select Save.
Configure a User Flow
In your Azure AD B2C tenant, under Policies, select User flows.
Select New user flow.
Select Sign up and sign in, select a version, and then select Create.
Enter a Name.
In the Identity providers section, select itsme.
Select Create.
Open the newly created user flow by selecting the user flow name.
Select Properties and adjust the following values:
- Change Access & ID token lifetimes (minutes) to 5.
- Change Refresh token sliding window lifetime to No expiry.
Register an application
In your B2C tenant, under Manage, select App registrations > New registration.
Provide a Name for the application and enter your Redirect URI. For testing purposes, enter
https://jwt.ms.Make sure multi-factor authentication is Disabled.
Select Register.
To use this app registration to test the user flow, you need to enable implicit grant flow:
Select the app registration you created.
Under Manage, select Authentication.
Under Implicit grant and hybrid flows, select both the Access tokens (used for implicit flows) and ID tokens (used for implicit and hybrid flows) check boxes.
Select Save.
Note
If you enable implicit grant to test a user flow, make sure you disable the implicit grant flow settings before you deploy your app to production.
Test the user flow
In your B2C tenant, under Policies select User flows.
Select your previously created user flow.
Select Run user flow.
a. For Application, select the app that you registered.
b. For Reply URL, select the redirect URL that you added to your app. For testing purposes, select
https://jwt.ms.The itsme Identify yourself page appears.
Enter your mobile phone number and select send.
Confirm the action in the itsme app.
Next steps
For additional information, review the following articles: