Create a Microsoft Entra Domain Services forest trust to an on-premises domain using Azure PowerShell
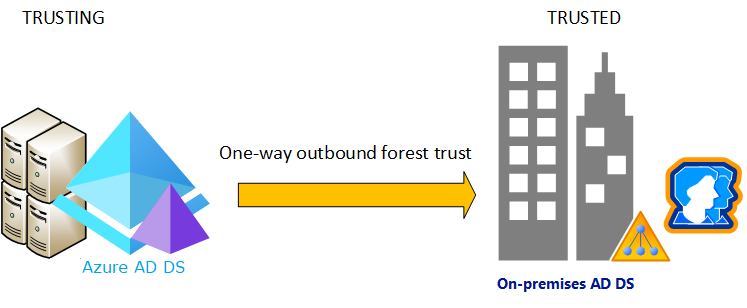
In environments where you can't synchronize password hashes, or you have users that exclusively sign in using smart cards so they don't know their password, you can create a one-way outbound trust from Microsoft Entra Domain Services to one or more on-premises AD DS environments. This trust relationship lets users, applications, and computers authenticate against an on-premises domain from the Domain Services managed domain. In this case, on-premises password hashes are never synchronized.
In this article, you learn how to:
- Create a Domain Services forest using Azure PowerShell
- Create a one-way outbound forest trust in the managed domain using Azure PowerShell
- Configure DNS in an on-premises AD DS environment to support managed domain connectivity
- Create a one-way inbound forest trust in an on-premises AD DS environment
- Test and validate the trust relationship for authentication and resource access
If you don't have an Azure subscription, create an account before you begin.
Important
Managed domain forests don't currently support Azure HDInsight or Azure Files. The default managed domain forests do support both of these additional services.
Prerequisites
To complete this article, you need the following resources and privileges:
An active Azure subscription.
- If you don't have an Azure subscription, create an account.
A Microsoft Entra tenant associated with your subscription, either synchronized with an on-premises directory or a cloud-only directory.
Install and configure Azure PowerShell.
- If needed, follow the instructions to install the Azure PowerShell module and connect to your Azure subscription.
- Make sure that you sign in to your Azure subscription using the Connect-AzAccount cmdlet.
Install and configure MS Graph PowerShell.
- If needed, follow the instructions to install the MS Graph PowerShell module and connect to Microsoft Entra ID.
- Make sure that you sign in to your Microsoft Entra tenant using the Connect-MgGraph cmdlet.
You need Application Administrator and Groups Administrator Microsoft Entra roles in your tenant to enable Domain Services.
You need Domain Services Contributor Azure role to create the required Domain Services resources.
Sign in to the Microsoft Entra admin center
In this article, you create and configure the outbound forest trust from a managed domain using the Microsoft Entra admin center. To get started, first sign in to the Microsoft Entra admin center.
Deployment process
It's a multi-part process to create a managed domain forest and the trust relationship to an on-premises AD DS. The following high-level steps build your trusted, hybrid environment:
- Create a managed domain service principal.
- Create a managed domain forest.
- Create hybrid network connectivity using site-to-site VPN or Express Route.
- Create the managed domain side of the trust relationship.
- Create the on-premises AD DS side of the trust relationship.
Before you start, make sure you understand the network considerations, forest naming, and DNS requirements. You can't change the managed domain forest name once it's deployed.
Create the Microsoft Entra service principal
Domain Services requires a service principal synchronize data from Microsoft Entra ID. This principal must be created in your Microsoft Entra tenant before you created the managed domain forest.
Create a Microsoft Entra service principal for Domain Services to communicate and authenticate itself. A specific application ID is used named Domain Controller Services with an ID of 6ba9a5d4-8456-4118-b521-9c5ca10cdf84. Don't change this application ID.
Create a Microsoft Entra service principal using the New-MgServicePrincipal cmdlet:
New-MgServicePrincipal
Create a managed domain
To create a managed domain, you use the New-AaddsResourceForest script. This script is part of a wider set of commands that support managed domains, including create the one-way bound forest in a following section. These scripts are available from the PowerShell Gallery and are digitally signed by the Microsoft Entra engineering team.
First, create a resource group using the New-AzResourceGroup cmdlet. In the following example, the resource group is named myResourceGroup and is created in the westus region. Use your own name and desired region:
New-AzResourceGroup `
  -Name "myResourceGroup" `
  -Location "WestUS"
Install the
New-AaddsResourceForestscript from the PowerShell Gallery using the Install-Script cmdlet:Install-Script -Name New-AaddsResourceForestReview the following parameters needed for the
New-AaddsResourceForestscript. Make sure you also have the prerequisite Azure PowerShell and Microsoft Graph PowerShell modules. Make sure you have planned the virtual network requirements to provide application and on-premises connectivity.Name Script parameter Description Subscription -azureSubscriptionId Subscription ID used for Domain Services billing. You can get the list of subscriptions using the Get-AzureRMSubscription cmdlet. Resource Group -aaddsResourceGroupName Name of the resource group for the managed domain and associated resources. Location -aaddsLocation The Azure region to host your managed domain. For available regions, see supported regions for Domain Services. Domain Services administrator -aaddsAdminUser The user principal name of the first managed domain administrator. This account must be an existing cloud user account in your Microsoft Entra ID. The user, and the user running the script, are added to the AAD DC Administrators group. Domain Services domain name -aaddsDomainName The FQDN of the managed domain, based on the previous guidance on how to choose a forest name. The
New-AaddsResourceForestscript can create the Azure virtual network and Domain Services subnet if these resources don't already exist. The script can optionally create the workload subnets, when specified:Name Script parameter Description Virtual network name -aaddsVnetName Name of the virtual network for the managed domain. Address space -aaddsVnetCIDRAddressSpace Virtual network's address range in CIDR notation (if creating the virtual network). Domain Services subnet name -aaddsSubnetName Name of the subnet of the aaddsVnetName virtual network hosting the managed domain. Don't deploy your own VMs and workloads into this subnet. Domain Services address range -aaddsSubnetCIDRAddressRange Subnet address range in CIDR notation for the Domain Services instance, such as 192.168.1.0/24. Address range must be contained by the address range of the virtual network, and different from other subnets. Workload subnet name (optional) -workloadSubnetName Optional name of a subnet in the aaddsVnetName virtual network to create for your own application workloads. VMs and applications and also be connected to a peered Azure virtual network instead. Workload address range (optional) -workloadSubnetCIDRAddressRange Optional subnet address range in CIDR notation for application workload, such as 192.168.2.0/24. Address range must be contained by the address range of the virtual network, and different from other subnets. Now create a managed domain forest using the
New-AaddsResourceForestscript. The following example creates a forest named addscontoso.com and creates a workload subnet. Provide your own parameter names and IP address ranges or existing virtual networks.New-AzureAaddsForest ` -azureSubscriptionId <subscriptionId> ` -aaddsResourceGroupName "myResourceGroup" ` -aaddsLocation "WestUS" ` -aaddsAdminUser "contosoadmin@contoso.com" ` -aaddsDomainName "aaddscontoso.com" ` -aaddsVnetName "myVnet" ` -aaddsVnetCIDRAddressSpace "192.168.0.0/16" ` -aaddsSubnetName "AzureADDS" ` -aaddsSubnetCIDRAddressRange "192.168.1.0/24" ` -workloadSubnetName "myWorkloads" ` -workloadSubnetCIDRAddressRange "192.168.2.0/24"It takes quite some time to create the managed domain forest and supporting resources. Allow the script to complete. Continue on to the next section to configure your on-premises network connectivity while the Microsoft Entra forest provisions in the background.
Configure and validate network settings
As the managed domain continues to deploy, configure and validate the hybrid network connectivity to the on-premises datacenter. You also need a management VM to use with the managed domain for regular maintenance. Some of the hybrid connectivity may already exist in your environment, or you may need to work with others in your team to configure the connections.
Before you start, make sure you understand the network considerations and recommendations.
Create the hybrid connectivity to your on-premises network to Azure using an Azure VPN or Azure ExpressRoute connection. The hybrid network configuration is beyond the scope of this documentation, and may already exist in your environment. For details on specific scenarios, see the following articles:
Important
If you create the connection directly to your managed domain's virtual network, use a separate gateway subnet. Don't create the gateway in the managed domain's subnet.
To administer a managed domain, you create a management VM, join it to the managed domain, and install the required AD DS management tools.
While the managed domain is being deployed, create a Windows Server VM then install the core AD DS management tools to install the needed management tools. Wait to join the management VM to the managed domain until one of the following steps after the domain is successfully deployed.
Validate network connectivity between your on-premises network and the Azure virtual network.
- Confirm that your on-premises domain controller can connect to the managed VM using
pingor remote desktop, for example. - Verify that your management VM can connect to your on-premises domain controllers, again using a utility such as
ping.
- Confirm that your on-premises domain controller can connect to the managed VM using
In the Microsoft Entra admin center, search for and select Microsoft Entra Domain Services. Choose your managed domain, such as aaddscontoso.com and wait for the status to report as Running.
When running, update DNS settings for the Azure virtual network and then enable user accounts for Domain Services to finalize the configurations for your managed domain.
Make a note of the DNS addresses shown on the overview page. You need these addresses when you configure the on-premises Active Directory side of the trust relationship in a following section.
Restart the management VM for it to receive the new DNS settings, then join the VM to the managed domain.
After the management VM is joined to the managed domain, connect again using remote desktop.
From a command prompt, use
nslookupand the managed domain name to validate name resolution for the forest.nslookup aaddscontoso.comThe command should return two IP addresses for the forest.
Create the forest trust
The forest trust has two parts - the one-way outbound forest trust in the managed domain, and the one-way inbound forest trust in the on-premises AD DS forest. You manually create both sides of this trust relationship. When both sides are created, users and resources can successfully authenticate using the forest trust. A managed domain supports up to five one-way outbound forest trusts to on-premises forests.
Create the managed domain side of the trust relationship
Use the Add-AaddsResourceForestTrust script to create the managed domain side of the trust relationship. First, install the Add-AaddsResourceForestTrust script from the PowerShell Gallery using the Install-Script cmdlet:
Install-Script -Name Add-AaddsResourceForestTrust
Now provide the script the following information:
| Name | Script parameter | Description |
|---|---|---|
| Domain Services domain name | -ManagedDomainFqdn | FQDN of the managed domain, such as aaddscontoso.com |
| On-premises AD DS domain name | -TrustFqdn | The FQDN of the trusted forest, such as onprem.contoso.com |
| Trust friendly name | -TrustFriendlyName | Friendly name of the trust relationship. |
| On-premises AD DS DNS IP addresses | -TrustDnsIPs | A comma-delimited list of DNS server IPv4 addresses for the trusted domain listed. |
| Trust password | -TrustPassword | A complex password for the trust relationship. This password is also entered when creating the one-way inbound trust in the on-premises AD DS. |
| Credentials | -Credentials | The credentials used to authenticate to Azure. The user must be in the AAD DC Administrators group. If not provided, the script prompts for authentication. |
The following example creates a trust relationship named myAzureADDSTrust to onprem.contoso.com. Use your own parameter names and passwords:.
Add-AaddsResourceForestTrust `
    -ManagedDomainFqdn "aaddscontoso.com" `
    -TrustFqdn "onprem.contoso.com" `
    -TrustFriendlyName "myAzureADDSTrust" `
    -TrustDnsIPs "10.0.1.10,10.0.1.11" `
    -TrustPassword <complexPassword>
Important
Remember your trust password. You must use the same password when your create the on-premises side of the trust.
Configure DNS in the on-premises domain
To correctly resolve the managed domain from the on-premises environment, you may need to add forwarders to the existing DNS servers. If you haven't configure the on-premises environment to communicate with the managed domain, complete the following steps from a management workstation for the on-premises AD DS domain:
- Select Start | Administrative Tools | DNS
- Right-select DNS server, such as myAD01, select Properties
- Choose Forwarders, then Edit to add additional forwarders.
- Add the IP addresses of the managed domain, such as 10.0.1.4 and 10.0.1.5.
- From a local command prompt, validate name resolution using nslookup of the managed domain name. For example,
Nslookup aaddscontoso.comshould return the two IP addresses for the managed domain.
Create inbound forest trust in the on-premises domain
The on-premises AD DS domain needs an incoming forest trust for the managed domain. This trust must be manually created in the on-premises AD DS domain, it can't be created from the Microsoft Entra admin center.
To configure inbound trust on the on-premises AD DS domain, complete the following steps from a management workstation for the on-premises AD DS domain:
- Select Start | Administrative Tools | Active Directory Domains and Trusts
- Right-select domain, such as onprem.contoso.com, select Properties
- Choose Trusts tab, then New Trust
- Enter the name of the managed domain, such as aaddscontoso.com, then select Next
- Select the option to create a Forest trust, then to create a One way: incoming trust.
- Choose to create the trust for This domain only. In the next step, you create the trust in the Microsoft Entra admin center for the managed domain.
- Choose to use Forest-wide authentication, then enter and confirm a trust password. This same password is also entered in the Microsoft Entra admin center in the next section.
- Step through the next few windows with default options, then choose the option for No, do not confirm the outgoing trust. You can't validate the trust relation because your delegated admin account to the managed domain doesn't have the required permissions. This behavior is by design.
- Select Finish
Validate resource authentication
The following common scenarios let you validate that forest trust correctly authenticates users and access to resources:
- On-premises user authentication from the Domain Services forest
- Access resources in the Domain Services forest as an on-premises user
On-premises user authentication from the Domain Services forest
You should have Windows Server virtual machine joined to the managed domain resource domain. Use this virtual machine to test your on-premises user can authenticate on a virtual machine.
Connect to the Windows Server VM joined to the managed domain using Remote Desktop and your managed domain administrator credentials. If you get a Network Level Authentication (NLA) error, check the user account you used is not a domain user account.
Tip
To securely connect to your VMs joined to Microsoft Entra Domain Services, you can use the Azure Bastion Host Service in supported Azure regions.
Open a command prompt and use the
whoamicommand to show the distinguished name of the currently authenticated user:whoami /fqdnUse the
runascommand to authenticate as a user from the on-premises domain. In the following command, replaceuserUpn@trusteddomain.comwith the UPN of a user from the trusted on-premises domain. The command prompts you for the user's password:Runas /u:userUpn@trusteddomain.com cmd.exeIf the authentication is a successful, a new command prompt opens. The title of the new command prompt includes
running as userUpn@trusteddomain.com.Use
whoami /fqdnin the new command prompt to view the distinguished name of the authenticated user from the on-premises Active Directory.
Access resources in Domain Services as an on-premises user
Using the Windows Server VM joined to the managed domain, you can test the scenario where users can access resources hosted in the forest when they authenticate from computers in the on-premises domain with users from the on-premises domain. The following examples show you how to create and test various common scenarios.
Enable file and printer sharing
Connect to the Windows Server VM joined to the managed domain using Remote Desktop and your managed domain administrator credentials. If you get a Network Level Authentication (NLA) error, check the user account you used is not a domain user account.
Tip
To securely connect to your VMs joined to Microsoft Entra Domain Services, you can use the Azure Bastion Host Service in supported Azure regions.
Open Windows Settings, then search for and select Network and Sharing Center.
Choose the option for Change advanced sharing settings.
Under the Domain Profile, select Turn on file and printer sharing and then Save changes.
Close Network and Sharing Center.
Create a security group and add members
Open Active Directory Users and Computers.
Right-select the domain name, choose New, and then select Organizational Unit.
In the name box, type LocalObjects, then select OK.
Select and right-click LocalObjects in the navigation pane. Select New and then Group.
Type FileServerAccess in the Group name box. For the Group Scope, select Domain local, then choose OK.
In the content pane, double-click FileServerAccess. Select Members, choose to Add, then select Locations.
Select your on-premises Active Directory from the Location view, then choose OK.
Type Domain Users in the Enter the object names to select box. Select Check Names, provide credentials for the on-premises Active Directory, then select OK.
Note
You must provide credentials because the trust relationship is only one way. This means users from the managed domain can't access resources or search for users or groups in the trusted (on-premises) domain.
The Domain Users group from your on-premises Active Directory should be a member of the FileServerAccess group. Select OK to save the group and close the window.
Create a file share for cross-forest access
- On the Windows Server VM joined to the managed domain, create a folder and provide name such as CrossForestShare.
- Right-select the folder and choose Properties.
- Select the Security tab, then choose Edit.
- In the Permissions for CrossForestShare dialog box, select Add.
- Type FileServerAccess in Enter the object names to select, then select OK.
- Select FileServerAccess from the Groups or user names list. In the Permissions for FileServerAccess list, choose Allow for the Modify and Write permissions, then select OK.
- Select the Sharing tab, then choose Advanced Sharing…
- Choose Share this folder, then enter a memorable name for the file share in Share name such as CrossForestShare.
- Select Permissions. In the Permissions for Everyone list, choose Allow for the Change permission.
- Select OK two times and then Close.
Validate cross-forest authentication to a resource
Sign in a Windows computer joined to your on-premises Active Directory using a user account from your on-premises Active Directory.
Using Windows Explorer, connect to the share you created using the fully qualified host name and the share such as
\\fs1.aaddscontoso.com\CrossforestShare.To validate the write permission, right-select in the folder, choose New, then select Text Document. Use the default name New Text Document.
If the write permissions are set correctly, a new text document is created. The following steps will then open, edit, and delete the file as appropriate.
To validate the read permission, open New Text Document.
To validate the modify permission, add text to the file and close Notepad. When prompted to save changes, choose Save.
To validate the delete permission, right-select New Text Document and choose Delete. Choose Yes to confirm file deletion.
Update or remove outbound forest trust
If you need to update an existing one-way outbound forest from the managed domain, you can use the Get-AaddsResourceForestTrusts and Set-AaddsResourceForestTrust scripts. These scripts help in scenarios where you want to update the forest trust friendly name or trust password. To remove a one-way outbound trust from the managed domain, you can use the Remove-AaddsResourceForestTrust script. You must manually remove the one-way inbound forest trust in the associated on-premises AD DS forest.
Update a forest trust
In normal operation, the managed domain and on-premises forest negotiate a regular password update process between themselves. This is part of the normal AD DS trust relationship security process. You don't need to manually rotate the trust password unless the trust relationship has experienced an issue and you want to manually reset to a known password. For more information, see trusted domain object password changes.
The following example steps show you how to update an existing trust relationship if you need to manually reset the outbound trust password:
Install the
Get-AaddsResourceForestTrustsandSet-AaddsResourceForestTrustscripts from the PowerShell Gallery using the Install-Script cmdlet:Install-Script -Name Get-AaddsResourceForestTrusts,Set-AaddsResourceForestTrustBefore you can update an existing trust, first get the trust resource using the
Get-AaddsResourceForestTrustsscript. In the following example, the existing trust is assigned to an object named existingTrust. Specify your own managed domain forest name and on-premises forest name to update:$existingTrust = Get-AaddsResourceForestTrust ` -ManagedDomainFqdn "aaddscontoso.com" ` -TrustFqdn "onprem.contoso.com" ` -TrustFriendlyName "myAzureADDSTrust"To update the existing trust password, use the
Set-AaddsResourceForestTrustscript. Specify the existing trust object from the previous step, then a new trust relationship password. No password complexity is enforced by PowerShell, so make sure you to generate and use a secure password for your environment.Set-AaddsResourceForestTrust ` -Trust $existingTrust ` -TrustPassword <newComplexPassword>
Delete a forest trust
If you no longer need the one-way outbound forest trust from the managed domain to an on-premises AD DS forest, you can remove it. Make sure that no applications or services need to authenticate against the on-premises AD DS forest before you remove the trust. You must manually remove the one-way inbound trust in the on-premises AD DS forest, too.
Install the
Remove-AaddsResourceForestTrustscript from the PowerShell Gallery using the Install-Script cmdlet:Install-Script -Name Remove-AaddsResourceForestTrustNow remove the forest trust using the
Remove-AaddsResourceForestTrustscript. In the following example, the trust named myAzureADDSTrust between the managed domain forest named aaddscontoso.com and on-premises forest onprem.contoso.com is removed. Specify your own managed domain forest name and on-premises forest name to remove:Remove-AaddsResourceForestTrust ` -ManagedDomainFqdn "aaddscontoso.com" ` -TrustFqdn "onprem.contoso.com" ` -TrustFriendlyName "myAzureADDSTrust"
To remove the one-way inbound trust from the on-premises AD DS forest, connect to a management computer with access to the on-premises AD DS forest and complete the following steps:
- Select Start | Administrative Tools | Active Directory Domains and Trusts.
- Right-select domain, such as onprem.contoso.com, select Properties.
- Choose Trusts tab, then select the existing incoming trust from your managed domain forest.
- Select Remove, then confirm that you wish to remove the incoming trust.
Next steps
In this article, you learned how to:
- Create a managed domain using Azure PowerShell
- Create a one-way outbound forest trust in the managed domain using Azure PowerShell
- Configure DNS in an on-premises AD DS environment to support the managed domain connectivity
- Create a one-way inbound forest trust in an on-premises AD DS environment
- Test and validate the trust relationship for authentication and resource access
For more conceptual information about forest types in Domain Services, see How do forest trusts work in Domain Services?
Connect-MgGraph: /powershell/microsoftgraph/authentication-commands
New-MgServicePrincipal: /powershell/module/microsoft.graph.applications/new-mgserviceprincipal