Note
Access to this page requires authorization. You can try signing in or changing directories.
Access to this page requires authorization. You can try changing directories.
This tutorial describes how to use the Microsoft Entra SCIM Validator to validate that your provisioning server is compatible with the Azure SCIM client. The tutorial is intended for developers who want to build a SCIM compatible server to manage their identities with the Microsoft Entra provisioning service.
In this tutorial, you learn how to:
- Select a testing method
- Configure the testing method
- Validate your SCIM endpoint
Prerequisites
- A Microsoft Entra account with an active subscription. Create an account for free.
- A SCIM endpoint that conforms to the SCIM 2.0 standard and meets the provision service requirements. To learn more, see Tutorial: Develop and plan provisioning for a SCIM endpoint in Microsoft Entra ID.
Select a testing method
The first step is to select a testing method to validate your SCIM endpoint.
Open your web browser and navigate to the SCIM Validator: https://scimvalidator.microsoft.com/.
Select one of the three test options. You can use default attributes, automatically discover the schema, or upload a schema.
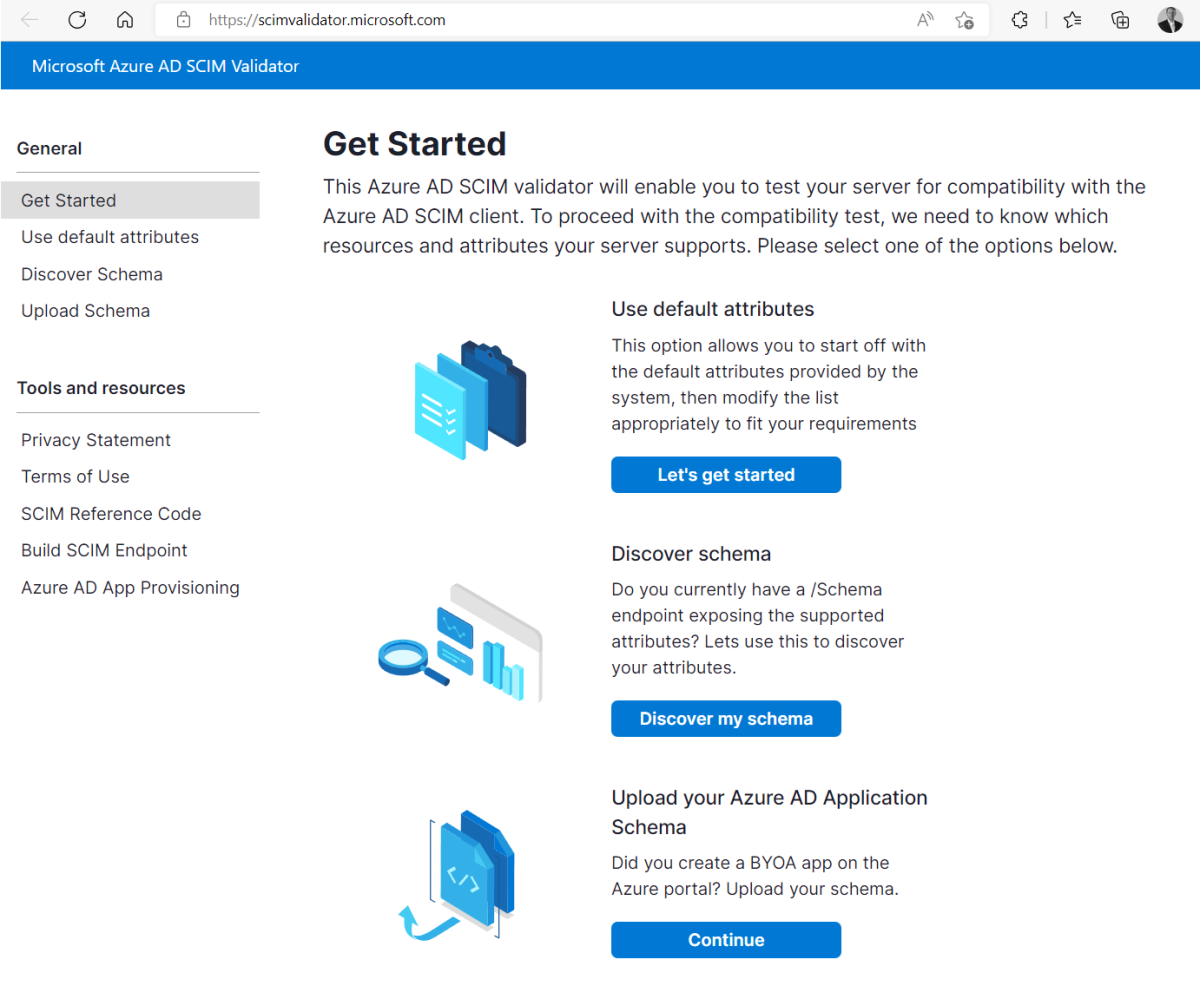

Use default attributes - The system provides the default attributes, and you modify them to meet your need.
Discover schema - If your end point supports /Schemas, this option lets the tool discover the supported attributes. We recommend this option as it reduces the overhead of updating your app as you build it out.
Upload Microsoft Entra Schema - Upload the schema you've downloaded from your sample app on Microsoft Entra ID.
Configure the testing method
Now that you've selected a testing method, the next step is to configure it.

- If you're using the default attributes option, then fill in all of the indicated fields.
- If you're using the discover schema option, then enter the SCIM endpoint URL and token.
- If you're uploading a schema, then select your .json file to upload. The option accepts a .json file exported from your sample app on the Microsoft Entra admin center. To learn how to export a schema, see How-to: Export provisioning configuration and roll back to a known good state.
Note
To test group attributes, make sure to select Enable Group Tests.
- Edit the list attributes as desired for both the user and group types using the ‘Add Attribute’ option at the end of the attribute list and minus (-) sign on the right side of the page.
- Select the joining property from both the user and group attributes list.
Note
The joining property, also known as matching attribute, is an attribute that user and group resources can be uniquely queried on at the source and matched in the target system.
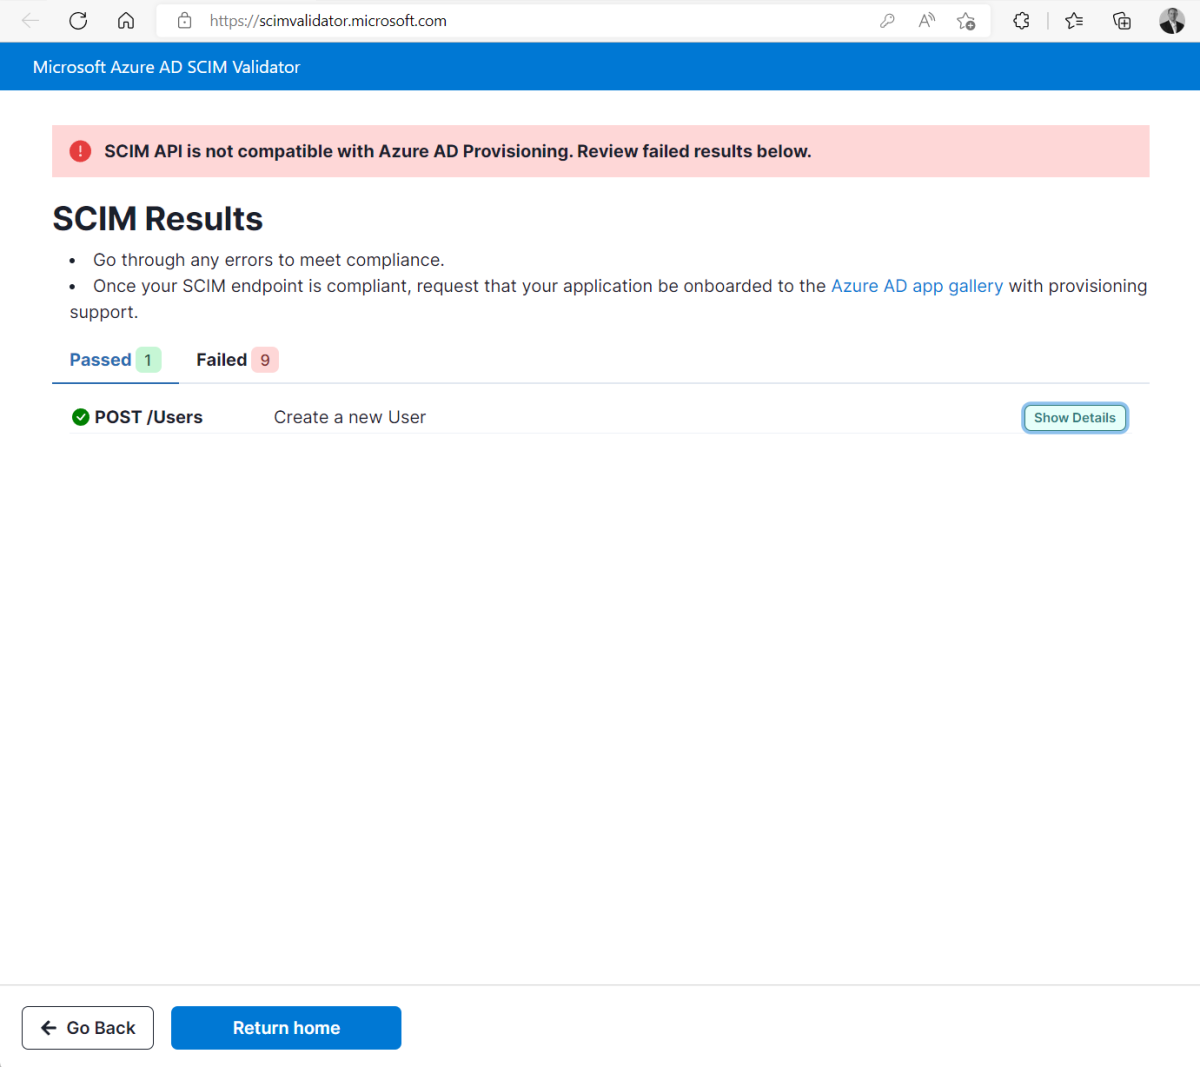
Validate your SCIM endpoint
Finally, you need to test and validate your endpoint.
Select Test Schema to begin the test.
Review the results with a summary of passed and failed tests.
Select the show details tab and review and fix issues.
Continue to test your schema until all tests pass.

Note validations performed by SCIM Validator
Create New User
- POST /Users – Creates a new user with a complete JSON payload.
- Endpoint returns HTTP 201
- POST response contains created user ID
- GET /Users?filter={joiningProperty} eq "value" – Verifies creation by filtering on the joining property.
- GET returns created user
- Returned values from GET match the passed values from the POST request (varies based on endpoint)
- DELETE /Users - Cleans Up Test User. -Only called if hard delete is supported
Create Duplicate User
- POST /Users – Attempts to create a user using an identical payload (with the same unique/joining attribute) to an existing user.
- Return HTTP 201 on first create request
- Return HTTP 409 on second create request
Add Attributes
- POST /Users - Creates the user resource
- HTTP 2xx success
- PATCH /Users/{id} – Uses a JSON Patch document (with the add operation) to insert additional non-required attributes.
- GET /Users?filter={joiningProperty} eq "value" – Retrieves the user to verify the added attributes.
- User is returned
- Inserted attributes are now present on the user
Replace User Attributes
- POST /Users - Creates the user resource
- HTTP 2xx success
- PATCH /Users/{id} – Sends a JSON Patch document (using the replace operation) to update one or more attributes.
- GET /Users?filter={joiningProperty} eq "value" – Verifies that the updated attributes are correctly applied.
- User is returned
- Updated attributes are present on the user
Update Joining Property
- POST /Users - Creates the user resource
- HTTP 2xx success
- PATCH /Users/{id} – Updates the joining property (e.g., userName) via a JSON Patch document.
- GET /Users?filter={joiningProperty} eq "newValue" – Confirms the joining property has been updated.
- Joining property is updated on user
Update Active Attribute to False
- POST /Users/ - Creates a resource based on the schema
- HTTP 2xx success
- Disabled user should be returned on GET request
- PATCH /Users/{id} – Issues a JSON Patch document that sets the "active" attribute to false.
- HTTP 2xx success
- GET /Users?filter={joiningProperty} eq "value" – Retrieves the user to confirm the active attribute is now false.
- Returned user record should have ACTIVE=FALSE"
Create New Group
- POST /Groups – Creates a new group with a complete JSON payload.
- Endpoint returns HTTP 201
- POST response contains created group ID
- GET /Group?filter={joiningProperty} eq "value" – Verifies creation by filtering on the joining property.
- GET returns created group
- Returned values from GET match the passed values from the POST request (varies based on endpoint)
- DELETE /Groups - Cleans Up Test User.
- Only called if hard delete is supported
Create Duplicate Group
- POST /Groups – Attempts to create a group using an identical payload (with the same unique/joining attribute) to an existing group.
- Return HTTP 201 on first create request
- Return HTTP 409 on second create request
Update Group Attributes
- POST /Groups - Creates a new group resource to update attributes on
- POST Returns HTTP 2xx
- PATCH /Groups/{id} – Sends a JSON Patch document using the replace operation to update one or more attributes of an existing group (excluding members).
- PATCH returns success (HTTP 2xx)
- GET /Groups?filter={joiningProperty} eq "value" – Confirms that the group’s attributes have been updated correctly.
- GET returns patched group
- Attributes on returned group match changed attributes on PATCH request
Create a New Group Resource
- POST /Groups - Creates a new group resource to add member to
- POST Returns HTTP 2xx
- POST /Users – Creates a new user resource to be used as a group member.
- POST Returns HTTP 2xx
- PATCH /Groups/{id} – Adds the newly created user’s identifier to the group using a JSON Patch document.
- PATCH Returns success
Using Expressions on SCIM Validator
The SCIM Validator supports using expressions to generate desired values for attributes.
How to use expressions
- Go to the Attributes page.
- Enter your desired expression in the value column of the attribute you want to customize.
- Run your test
Note
These expressions work for both User and Group attributes.
Available Expressions
The table below lists the available expressions
| Expression | Meaning | Example | Result |
|---|---|---|---|
| generateRandomString {Count of String Characters} | Generate a random string with the specified count of alphabet characters | {%generateRandomString 6%}@contoso.com | CXJHYP@contoso.com |
| generateRandomNumber {Count of Numbers} | Generate a random number with the specified count of digits | {%generateRandomNumber 4%} | 8821 |
| generateAlphaNumeric {Count of Characters} | Generate a random string with a mixture of alphabets and numbers, with the specified count of characters | {%generateAlphaNumeric 7%} | 59Q2M9W |
| generateAlphaNumericWithSpecialCharacters {Count of Characters} | Generate a random string with a mix of alphabets, numbers, and a special character, based on the specified count of characters | {%generateAlphaNumericWithSpecialCharacters 8%}TEST | D385N05’TEST |
You can add values before or after the expressions to achieve the desired outcome for example, when you add {% generateRandomString 6 %}@contoso.com into a value field of the userName attribute, it will generate a new userName value with every test while retaining the contoso.com domain.
Clean up resources
If you created any Azure resources in your testing that are no longer needed, don't forget to delete them.
Known Issues with Microsoft Entra SCIM Validator
- Soft deletes (disables) aren’t yet supported.
- The time zone format is randomly generated and fails for systems that try to validate it.
- The patch user remove attributes may attempt to remove mandatory/required attributes for certain systems. Such failures should be ignored.