Syncing extension attributes for Microsoft Entra Application Provisioning
Microsoft Entra ID must contain all the data (attributes) required to create a user profile when provisioning user accounts from Microsoft Entra ID to a SaaS app or on-premises application. When customizing attribute mappings for user provisioning, you might find that the attribute you want to map doesn't appear in the Source attribute list in Microsoft Entra ID. This article shows you how to add the missing attribute.
Determine where the extensions need to be added
Adding missing attributes needed for an application will start in either on-premises Active Directory or in Microsoft Entra ID, depending on where the user accounts reside and how they are brought into Microsoft Entra ID.
First, identify which users in your Microsoft Entra tenant need access to the application and therefore are going to be in scope of being provisioned into the application.
Next, determine what is the source of the attribute and the topology for how those users are brought into Microsoft Entra ID.
| Source of attribute | Topology | Steps required |
|---|---|---|
| HR system | Workers from HR system are provisioned as users into Microsoft Entra ID. | Create an extension attribute in Microsoft Entra ID. Update the HR inbound mapping to populate the extension attribute on Microsoft Entra ID users from the HR system. |
| HR system | Workers from HR system are provisioned as users into Windows Server AD. Microsoft Entra Connect cloud sync synchronizes them into Microsoft Entra ID. |
Extend the AD schema, if necessary. Create an extension attribute in Microsoft Entra ID using cloud sync. Update the HR inbound mapping to populate the extension attribute on the AD user from the HR system. |
| HR system | Workers from HR system are provisioned as users into Windows Server AD. Microsoft Entra Connect synchronizes them into Microsoft Entra ID. |
Extend the AD schema, if necessary. Create an extension attribute in Microsoft Entra ID using Microsoft Entra Connect. Update the HR inbound mapping to populate the extension attribute on the AD user from the HR system. |
If your organization's users are already in on-premises Active Directory, or are you creating them in Active Directory, you must sync the users from Active Directory to Microsoft Entra ID. You can sync users and attributes using Microsoft Entra Connect or Microsoft Entra Connect cloud sync.
- Check with the on-premises Active Directory domain admins whether the required attributes are part of the AD DS schema
Userobject class, and if they aren't, extend the Active Directory Domain Services schema in the domains where those users have accounts. - Configure Microsoft Entra Connect or Microsoft Entra Connect cloud sync to synchronize the users with their extension attribute from Active Directory to Microsoft Entra ID. Both of these solutions automatically synchronize certain attributes to Microsoft Entra ID, but not all attributes. Furthermore, some attributes (such as
sAMAccountName) that are synchronized by default might not be exposed using the Graph API. In these cases, you can use the Microsoft Entra Connect directory extension feature to synchronize the attribute to Microsoft Entra ID or use Microsoft Entra Connect cloud sync. That way, the attribute is visible to the Graph API and the Microsoft Entra provisioning service. - If the users in on-premises Active Directory don't already have the required attributes, you'll need to update the users in Active Directory. This update can be done either by reading the properties from Workday, from SAP SuccessFactors, or if you're using a different HR system, using the inbound HR API.
- Wait for Microsoft Entra Connect or Microsoft Entra Connect cloud sync to synchronize those updates you made in the Active Directory schema and the Active Directory users into Microsoft Entra ID.
Alternatively, if none of the users that need access to the application originate in on-premises Active Directory, then you'll need to create schema extensions using PowerShell or Microsoft Graph in Microsoft Entra ID, before configuring provisioning to your application.
The following sections outline how to create extension attributes for a tenant with cloud only users, and for a tenant with Active Directory users.
Create an extension attribute in a tenant with cloud only users
You can use Microsoft Graph and PowerShell to extend the user schema for users in Microsoft Entra ID. This is necessary if you have users who need that attribute, and none of them originate in or are synchronized from on-premises Active Directory. (If you do have Active Directory, then continue reading below in the section on how to use the Microsoft Entra Connect directory extension feature to synchronize the attribute to Microsoft Entra ID.)
Once schema extensions are created, these extension attributes are automatically discovered when you next visit the provisioning page in the Microsoft Entra admin center, in most cases.
When you have more than 1,000 service principals, you may find extensions missing in the source attribute list. If an attribute you've created doesn't automatically appear, then verify the attribute was created and add it manually to your schema. To verify it was created, use Microsoft Graph and Graph Explorer. To add it manually to your schema, see Editing the list of supported attributes.
Create an extension attribute for cloud only users using Microsoft Graph
You can extend the schema of Microsoft Entra users using Microsoft Graph.
First, list the apps in your tenant to get the ID of the app you're working on. To learn more, see List extensionProperties.
GET https://graph.microsoft.com/v1.0/applications
Next, create the extension attribute. Replace the ID property below with the ID retrieved in the previous step. You need to use the "ID" attribute and not the "appId". To learn more, see [Create extensionProperty]/graph/api/application-post-extensionproperty).
POST https://graph.microsoft.com/v1.0/applications/{id}/extensionProperties
Content-type: application/json

{
    "name": "extensionName",
    "dataType": "string",
    "targetObjects": [
      "User"
    ]
}
The previous request created an extension attribute with the format extension_appID_extensionName. You can now update a user with this extension attribute. To learn more, see Update user.
PATCH https://graph.microsoft.com/v1.0/users/{id}
Content-type: application/json

{
  "extension_inputAppId_extensionName": "extensionValue"
}
Finally, verify the attribute for the user. To learn more, see Get a user. Graph v1.0 doesn't by default return any of a user's directory extension attributes, unless the attributes are specified in the request as one of the properties to return.
GET https://graph.microsoft.com/v1.0/users/{id}?$select=displayName,extension_inputAppId_extensionName
Create an extension attribute for cloud only users using PowerShell
You can create a custom extension using PowerShell.
Note
Azure AD and MSOnline PowerShell modules are deprecated as of March 30, 2024. To learn more, read the deprecation update. After this date, support for these modules are limited to migration assistance to Microsoft Graph PowerShell SDK and security fixes. The deprecated modules will continue to function through March, 30 2025.
We recommend migrating to Microsoft Graph PowerShell to interact with Microsoft Entra ID (formerly Azure AD). For common migration questions, refer to the Migration FAQ. Note: Versions 1.0.x of MSOnline may experience disruption after June 30, 2024.
#Connect to your Azure AD tenant
Connect-AzureAD

#Create an application (you can instead use an existing application if you would like)
$App = New-AzureADApplication -DisplayName “test app name” -IdentifierUris https://testapp

#Create a service principal
New-AzureADServicePrincipal -AppId $App.AppId

#Create an extension property
New-AzureADApplicationExtensionProperty -ObjectId $App.ObjectId -Name “TestAttributeName” -DataType “String” -TargetObjects “User”
Optionally, you can test that you can set the extension property on a cloud only user.
#List users in your tenant to determine the objectid for your user
Get-AzureADUser

#Set a value for the extension property on the user. Replace the objectid with the ID of the user and the extension name with the value from the previous step
Set-AzureADUserExtension -objectid 0ccf8df6-62f1-4175-9e55-73da9e742690 -ExtensionName “extension_6552753978624005a48638a778921fan3_TestAttributeName”

#Verify that the attribute was added correctly.
Get-AzureADUser -ObjectId 0ccf8df6-62f1-4175-9e55-73da9e742690 | Select -ExpandProperty ExtensionProperty
Create an extension attribute using cloud sync
If you have users in Active Directory and are using Microsoft Entra Connect cloud sync, cloud sync automatically discovers your extensions in on-premises Active Directory when you go to add a new mapping. If you are using Microsoft Entra Connect sync, then continue reading at the next section create an extension attribute using Microsoft Entra Connect.
Use the steps below to autodiscover these attributes and set up a corresponding mapping to Microsoft Entra ID.
- Sign in to the Microsoft Entra admin center as at least a Hybrid Identity Administrator.
- Browse to Identity > Hybrid management > Microsoft Entra Connect > Cloud sync.
- Select the configuration you wish to add the extension attribute and mapping.
- Under Manage attributes select click to edit mappings.
- Select Add attribute mapping. The attributes are automatically be discovered.
- The new attributes are available in the drop-down under source attribute.
- Fill in the type of mapping you want and select Apply.
For more information, see Custom attribute mapping in Microsoft Entra Connect cloud sync.
Create an extension attribute using Microsoft Entra Connect
If users who access the applications originate in on-premises Active Directory, then you must sync the attributes with the users from Active Directory to Microsoft Entra ID. If you use Microsoft Entra Connect, you'll need to perform the following tasks before configuring provisioning to your application.
Check with the on-premises Active Directory domain admins whether the required attributes are part of the AD DS schema
Userobject class, and if they aren't, extend the Active Directory Domain Services schema in the domains where those users have accounts.Open the Microsoft Entra Connect wizard, choose Tasks, and then choose Customize synchronization options.
Sign in as a Global Administrator.
On the Optional Features page, select Directory extension attribute sync.
Select the attribute(s) you want to extend to Microsoft Entra ID.
Note
The search under Available Attributes is case sensitive.
Finish the Microsoft Entra Connect wizard and allow a full synchronization cycle to run. When the cycle is complete, the schema is extended and the new values are synchronized between your on-premises AD and Microsoft Entra ID.
Note
The ability to provision reference attributes from on-premises AD, such as managedby or DN/DistinguishedName, is not supported today. You can request this feature on User Voice.
Populate and use the new attribute
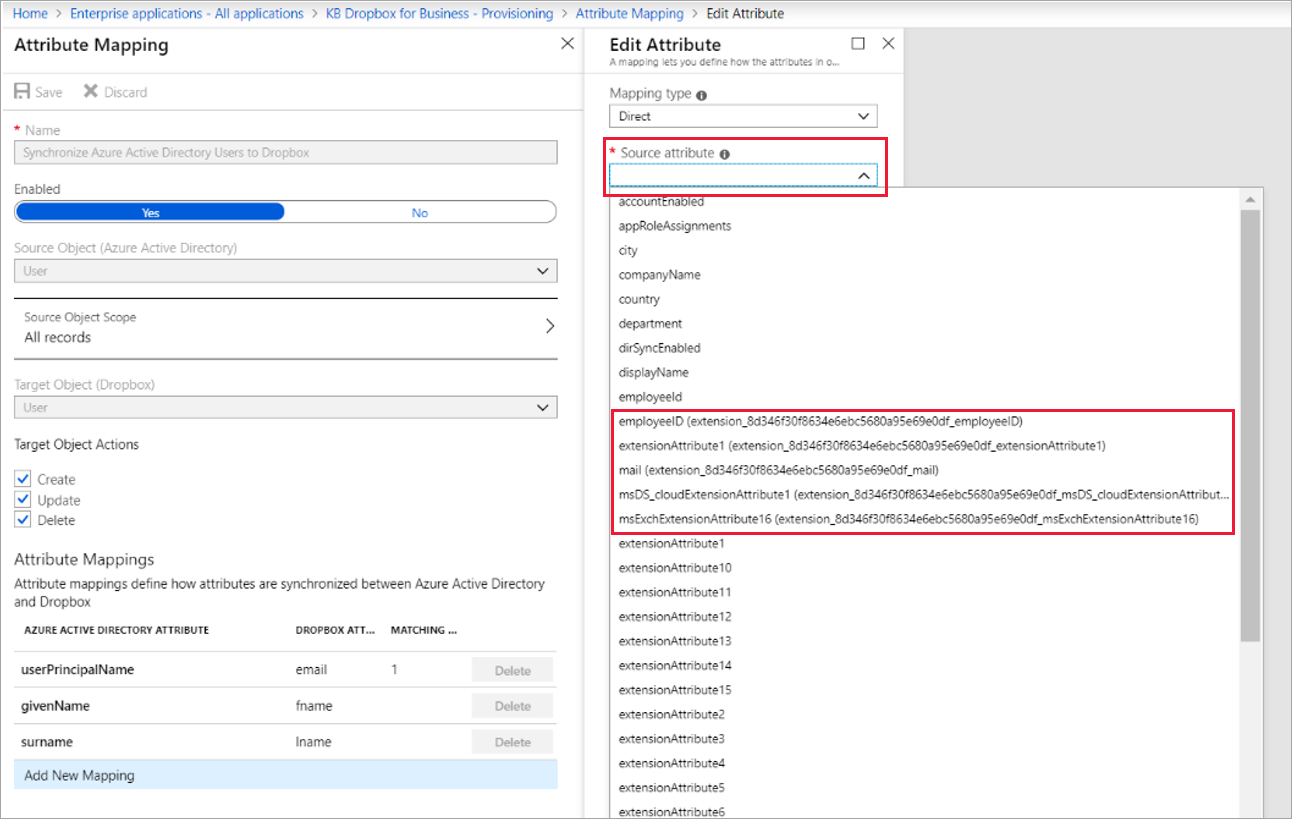
In the Microsoft Entra admin center, while you’re editing user attribute mappings for single-sign on or provisioning from Microsoft Entra ID to an application, the Source attribute list will now contain the added attribute in the format <attributename> (extension_<appID>_<attributename>), where appID is the identifier of a placeholder application in your tenant. Select the attribute and map it to the target application for provisioning.
Then, you'll need to populate those users assigned to the application with the required attribute, before enabling provisioning to the application. If the attribute does not originate in Active Directory, then there are five ways to populate the users in bulk:
- If the properties originate in an HR system, and you are provisioning the workers from that HR system as users in Active Directory, then configure a mapping from Workday, SAP SuccessFactors, or if you're using a different HR system, using the inbound HR API to the Active Directory attribute. Then, wait for Microsoft Entra Connect or Microsoft Entra Connect cloud sync to synchronize those updates you made in the Active Directory schema and the Active Directory users into Microsoft Entra ID.
- If the properties originate in an HR system, and you are not using Active Directory, you can configure a mapping from Workday, SAP SuccessFactors, or others via the inbound API to the Microsoft Entra user attribute.
- If the properties originate in another on-premises system, you can configure the MIM Connector for Microsoft Graph to create or update Microsoft Entra users.
- If the properties originate from the users themselves, then you can ask the users to supply the values of the attribute when they request access to the application, by including the attribute requirements in entitlement management catalog.
- For all other situations, a custom application can update the users via the Microsoft Graph API.
Next steps
Feedback
Coming soon: Throughout 2024 we will be phasing out GitHub Issues as the feedback mechanism for content and replacing it with a new feedback system. For more information see: https://aka.ms/ContentUserFeedback.
Submit and view feedback for