Note
Access to this page requires authorization. You can try signing in or changing directories.
Access to this page requires authorization. You can try changing directories.
User objects in Microsoft Entra ID have an attribute named certificateUserIds.
- The certificateUserIds attribute is multivalued and can hold up to 10 values.
- Each value can be no more than 1024 characters.
- Each value must be unique. Once a value is present on one user account, it can't be written to any other user account in the same Microsoft Entra tenant.
- The value doesn't need to be in email ID format. The certificateUserIds attribute can store nonroutable user principal names (UPNs) like bob@woodgrove or bob@local.
Note
Although each value must be unique in Microsoft Entra ID, you can map a single certificate to multiple accounts by implementing multiple username bindings. For more information, see Multiple username bindings.
Supported patterns for certificate user IDs
The values stored in certificateUserIds should be in the format described in the following table. The X509:<Mapping> prefixes are case-sensitive.
| Certificate mapping Field | Examples of values in certificateUserIds |
|---|---|
| PrincipalName | X509:<PN>bob@woodgrove.com |
| PrincipalName | X509:<PN>bob@woodgrove |
| RFC822Name | X509:<RFC822>user@woodgrove.com |
| IssuerAndSubject | X509:<I>DC=com,DC=contoso,CN=CONTOSO-DC-CA<S>DC=com,DC=contoso,OU=UserAccounts,CN=mfatest |
| Subject | X509:<S>DC=com,DC=contoso,OU=UserAccounts,CN=mfatest |
| SKI | X509:<SKI>aB1cD2eF3gH4iJ5kL6mN7oP8qR |
| SHA1PublicKey | X509:<SHA1-PUKEY>cD2eF3gH4iJ5kL6mN7oP8qR9sT |
| IssuerAndSerialNumber | X509:<I>DC=com,DC=contoso,CN=CONTOSO-DC-CA<SR>eF3gH4iJ5kL6mN7oP8qR9sT0uV To get the correct value for serial number, run this command and store the value shown in certificateUserIds: Syntax: Certutil –dump –v [~certificate path~] >> [~dumpFile path~] Example: certutil -dump -v firstusercert.cer >> firstCertDump.txt |
Roles to update certificateUserIds
Cloud-only users must have at least Privileged Authentication Administrator role to update certificateUserIds. Cloud-only users can use either the Microsoft Entra admin center or Microsoft Graph to update certificateUserIds.
Synchronized users must have at least Hybrid Identity Administrator role to update certificateUserIds. Only Microsoft Entra Connect can be used to update certificateUserIds by synchronizing the value from on-premises.
Note
Active Directory administrators can make changes that impact the certificateUserIds value in Microsoft Entra ID for any synchronized account. Administrators can include accounts with delegated administrative privilege over synchronized user accounts, or administrative rights over the Microsoft Entra Connect servers.
How to find the correct CertificateUserIds values for a user from the end user certificate using PowerShell module
Certificate UserIds follow a certain pattern for its values as per the UserName binding configurations on the tenant. The following PowerShell command helps an admin to retrieve the exact values for Certificate UserIds attribute for a user from an end user certificate. Admin can also get the current values in Certificate UserIds attribute for a user for a given username binding and set the value of the Certificate UserIds attribute.
More information at Microsoft Entra PowerShell Installation and Microsoft Graph PowerShell.
Start PowerShell.
Install and import the Microsoft Graph PowerShell SDK.
Install-Module Microsoft.Graph -Scope CurrentUser
Import-Module Microsoft.Graph.Authentication
Set-ExecutionPolicy -ExecutionPolicy RemoteSigned -Scope CurrentUser
Install Microsoft Entra PowerShell module (Minimum required version is 1.0.6)
Install-Module -Name Microsoft.Entra
More information on CertificateBasedAuthentication module here
Get-EntraUserCBAAuthorizationInfo
Get-EntraUserCBAAuthorizationInfo helps retrieve authorization information for a Microsoft Entra ID user, including certificate-based authentication identifiers.
Syntax:
Get-EntraUserCBAAuthorizationInfo
[-UserId] <String>
[-Raw]
[<CommonParameters>]
Example 1: Get authorization information for a user by User Principal Name
Connect-Entra -Scopes 'User.Read.All'
Get-EntraUserCBAAuthorizationInfo -UserId ‘user@contoso.com'
Response:
| Attribute | Value |
|---|---|
| Id | aaaaaaaa-0000-1111-2222-bbbbbbbbbbbb |
| DisplayName | Contoso User |
| UserPrincipalName | user@contoso.com |
| UserType | Member |
| AuthorizationInfo | @{CertificateUserIds=System.Object[]; RawAuthorizationInfo=System.Collections.Hashtable} |
This command retrieves the authorization information for the user with the specified User Principal Name.
Example 2: Retrieve authorization information for a user
Connect-Entra -Scopes 'User.Read.All'
$userInfo = Get-EntraUserCBAAuthorizationInfo -UserId 'user@contoso.com'
$userInfo.AuthorizationInfo.CertificateUserIds | Format-Table Type, TypeName, Value
Response:
| Type | TypeName | Value |
|---|---|---|
| PN | PrincipalName | user@contoso.com |
| S | Subject | CN=user@contoso.com |
| SKI | SubjectKeyIdentifier | 1111112222333344445555 |
This example retrieves the authorization information.
Example 3: Extract specific certificate user IDs
Connect-Entra -Scopes 'User.Read.All'
$userInfo = Get-EntraUserCBAAuthorizationInfo -UserId user@contoso.com'
$userInfo.AuthorizationInfo.CertificateUserIds | Where-Object Type -eq "PN" | Select-Object -ExpandProperty Value
Response: user@contoso.com
This example retrieves the authorization information and then filters to display only the Principal Name certificate values.
Get-EntraUserCertificateUserIdsFromCertificate
Returns an object with the certificate values needed to configure CertificateUserIDs for Certificate-Based Authentication in Microsoft Entra ID.
Syntax:
Get-EntraUserCertificateUserIdsFromCertificate
[-Path] <string>
[[-Certificate] <System.Security.Cryptography.X509Certificates.X509Certificate2> [-CertificateMapping] <string>]
[<CommonParameters>]
If the values from the certificate are too long, you can send the output to a file and copy from there.
Connect-Entra -Scopes 'User.Read.All'
Get-EntraUserCertificateUserIdsFromCertificate -Path C:\Downloads\test.pem | Format-List | Out-File -FilePath ".\certificateUserIds.txt"
Example 1: Retrieve certificate object from a certificate path
Get-EntraUserCertificateUserIdsFromCertificate -Path 'C:\path\to\certificate.cer'
Response:
| Name | Value |
|---|---|
| Subject | X509:<S>DC=com,DC=contoso,OU=UserAccounts,CN=user |
| IssuerAndSerialNumber | X509:<I>DC=com,DC=contoso,CN=CONTOSO-DC-CA<SR>eF3gH4iJ5kL6mN7oP8qR9sV0uD |
| RFC822Name | X509:<RFC822>user@contoso.com |
| SHA1PublicKey | X509:<SHA1-PUKEY>cA2eB3gH4iJ5kL6mN7oP8qR9sT |
| IssuerAndSubject | X509:<I>DC=com,DC=contoso,CN=CONTOSO-DC-CA<S>DC=com,DC=contoso,OU=UserAccounts,CN=user |
| SKI | X509:<SKI>aB1cD2eF3gH4iJ5kL6mN7oP8qR |
| PrincipalName | X509:<PN>user@contoso.com |
This example shows how to get all possible certificate mappings as an object.
Example 2: Retrieve certificate object from a certificate path and certificate mapping
Get-EntraUserCertificateUserIdsFromCertificate -Path 'C:\path\to\certificate.cer' -CertificateMapping 'Subject'
Response:
X509:<S>DC=com,DC=contoso,OU=UserAccounts,CN=user
This command returns the PrincipalName property.
Example 3: Retrieve certificate object from a certificate
$text = "-----BEGIN CERTIFICATE-----
MIIDiz...=
-----END CERTIFICATE-----"
$bytes = [System.Text.Encoding]::UTF8.GetBytes($text)
$certificate = [System.Security.Cryptography.X509Certificates.X509Certificate2]::new($bytes)
Get-EntraUserCertificateUserIdsFromCertificate -Certificate $certificate -CertificateMapping 'Subject'
Response:
X509:<S>DC=com,DC=contoso,OU=UserAccounts,CN=user
This command returns the PrincipalName property.
Set-EntraUserCBACertificateUserId
Sets certificate-based authentication user IDs for a user in Microsoft Entra ID using a certificate file or object.
Syntax
Set-EntraUserCBACertificateUserId
-UserId <string>
[-CertPath <string>]
[-Cert <System.Security.Cryptography.X509Certificates.X509Certificate2>]
-CertificateMapping <string[]>
[<CommonParameters>]
Example 1: Update user's certificate authorization information using certificate path
Connect-Entra -Scopes 'Directory.ReadWrite.All', 'User.ReadWrite.All'
Set-EntraUserCBACertificateUserId -UserId ‘user@contoso.com' -CertPath 'C:\path\to\certificate.cer' -CertificateMapping @('Subject', 'PrincipalName')
This example sets the certificate user IDs for the specified user using a certificate file, mapping both the Subject and PrincipalName fields. You can use Get-EntraUserCBAAuthorizationInfo command to view updated details.
Example 2: Update user's certificate authorization information using a certificate
Connect-Entra -Scopes 'Directory.ReadWrite.All', 'User.ReadWrite.All'
$text = '-----BEGIN CERTIFICATE-----
MIIDiz...=
-----END CERTIFICATE-----'
$bytes = [System.Text.Encoding]::UTF8.GetBytes($text)
$certificate = [System.Security.Cryptography.X509Certificates.X509Certificate2]::new($bytes)
Set-EntraUserCBACertificateUserId -UserId user@contoso.com' -Cert $certificate -CertificateMapping @('RFC822Name', 'SKI')
This example sets the certificate user IDs for the specified user using a certificate object, mapping the RFC822Name and SKI fields. You can use Get-EntraUserCBAAuthorizationInfo command to view updated details.
Update certificateUserIds using Microsoft Entra admin center
Use the following steps to update certificateUserIds for users:
Sign in to the Microsoft Entra admin center as at least a Privileged Authentication Administrator for cloud-only users or as at least a Hybrid Identity Administrator for synchronized users.
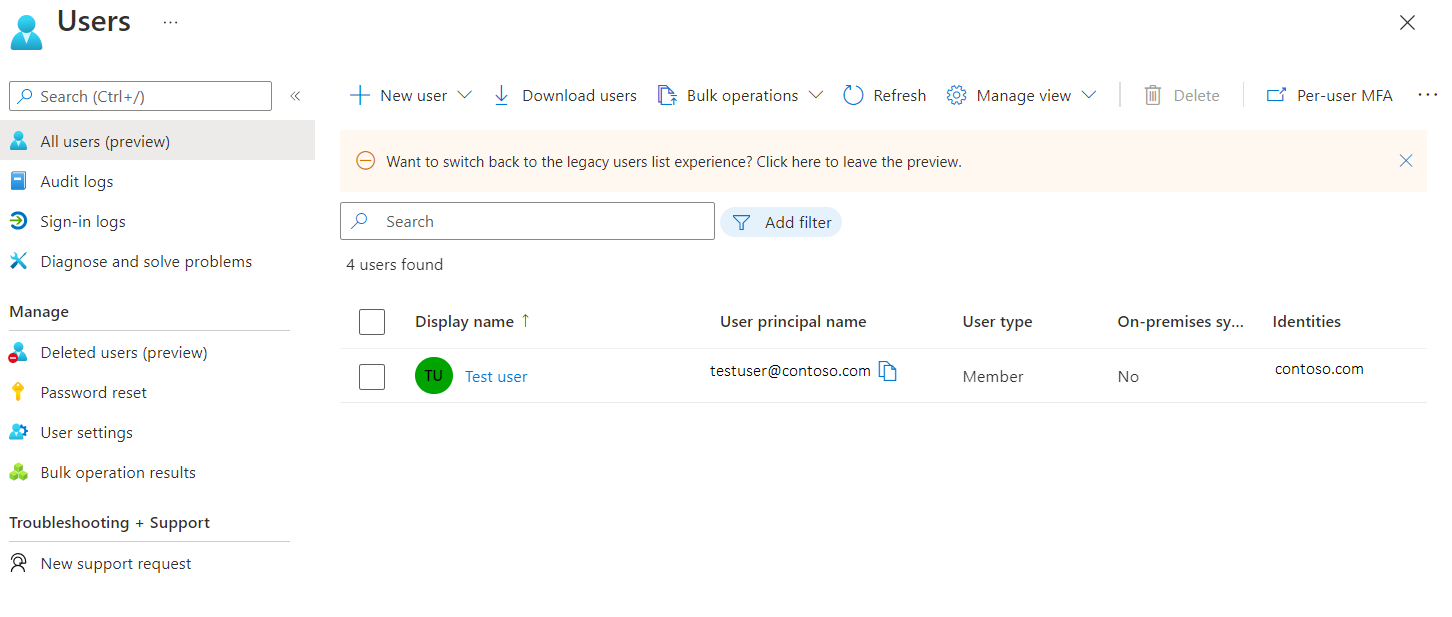
Search for and select All users.
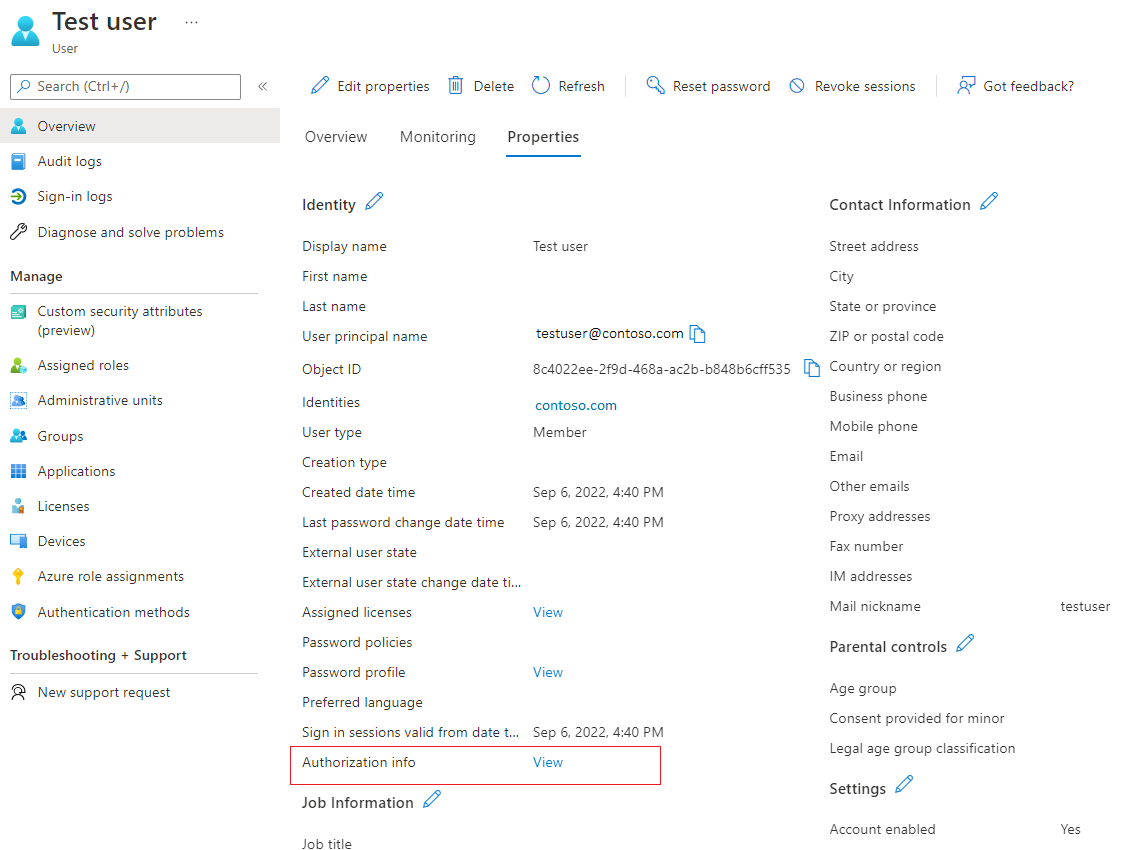
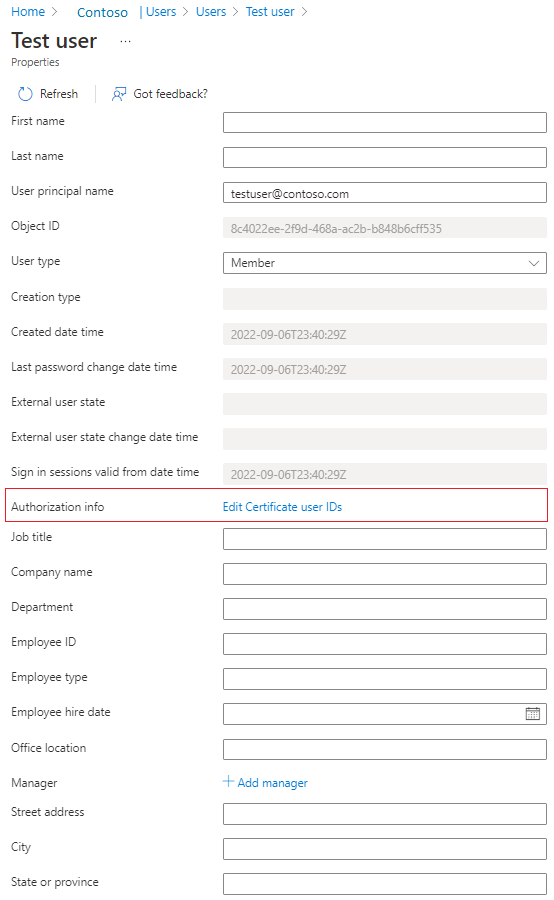
Select a user, and select Edit Properties.
Next to Authorization info, select View.
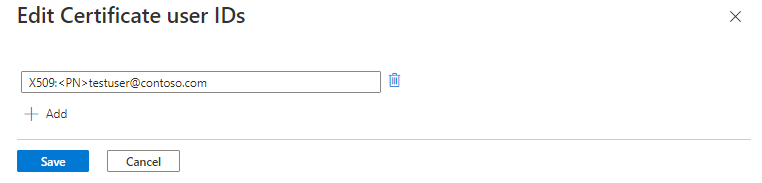
Select Edit certificate user IDs.
Select Add.
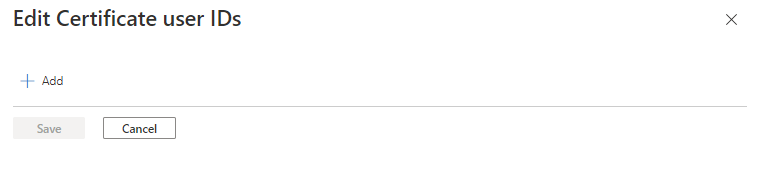
Enter the value and select Save. You can add up to four values, each of 120 characters.
Update certificateUserIds using Microsoft Graph queries
The following examples show how to use Microsoft Graph to look up certificateUserIds and update them.
Look up certificateUserIds
Authorized callers can run Microsoft Graph queries to find all the users with a given certificateUserId value. On the Microsoft Graph user object, the collection of certificateUserIds is stored in the authorizationInfo property.
To retrieve certificateUserIds of all user objects:
GET https://graph.microsoft.com/v1.0/users?$select=authorizationinfo
ConsistencyLevel: eventual
To retrieve certificateUserIds for a given user by user's ObjectId:
GET https://graph.microsoft.com/v1.0/users/{user-object-id}?$select=authorizationinfo
ConsistencyLevel: eventual
To retrieve the user object with a specific value in certificateUserIds:
GET https://graph.microsoft.com/v1.0/users?$select=authorizationinfo&$filter=authorizationInfo/certificateUserIds/any(x:x eq 'X509:<PN>user@contoso.com')&$count=true
ConsistencyLevel: eventual
You can also use the not and startsWith operators to match the filter condition. To filter against the certificateUserIds object, the request must include the $count=true query string, and the ConsistencyLevel header must be set to eventual.
Update certificateUserIds
Run a PATCH request to update the certificateUserIds for a given user.
Request body
PATCH https://graph.microsoft.com/v1.0/users/{user-object-id}
Content-Type: application/json
{
    "authorizationInfo": {
        "certificateUserIds": [
            "X509:<PN>123456789098765@mil"
        ]
    }
}
Update certificateUserIds using Microsoft Graph PowerShell commands
For this configuration, you can use Microsoft Graph PowerShell.
Start PowerShell with administrator privileges.
Install and import the Microsoft Graph PowerShell SDK.
    Install-Module Microsoft.Graph -Scope CurrentUser
    Import-Module Microsoft.Graph.Authentication
    Set-ExecutionPolicy -ExecutionPolicy RemoteSigned -Scope CurrentUser
Connect to the tenant and accept all.
Connect-MGGraph -Scopes "Directory.ReadWrite.All", "User.ReadWrite.All" -TenantId <tenantId>List certificateUserIds attribute of a given user.
  $results = Invoke-MGGraphRequest -Method get -Uri 'https://graph.microsoft.com/v1.0/users/<userId>?$select=authorizationinfo' -OutputType PSObject -Headers @{'ConsistencyLevel' = 'eventual' }
  #list certificateUserIds
  $results.authorizationInfo
Create a variable with certificateUserIds values.
  #Create a new variable to prepare the change. Ensure that you list any existing values you want to keep as this operation will overwrite the existing value
  $params = @{
        authorizationInfo = @{
              certificateUserIds = @(
              "X509:<SKI>gH4iJ5kL6mN7oP8qR9sT0uV1wX",
              "X509:<PN>user@contoso.com"
              )
        }
  }
Update the certificateUserIds attribute.
$results = Invoke-MGGraphRequest -Method patch -Uri 'https://graph.microsoft.com/v1.0/users/<UserId>/?$select=authorizationinfo' -OutputType PSObject -Headers @{'ConsistencyLevel' = 'eventual' } -Body $params
Update certificateUserIds using user object
Get the user object.
  $userObjectId = "aaaaaaaa-0000-1111-2222-bbbbbbbbbbbb"
  $user = Get-MgUser -UserId $userObjectId -Property AuthorizationInfo
Update the certificateUserIds attribute of the user object.
   $user.AuthorizationInfo.certificateUserIds = @("X509:<SKI>iJ5kL6mN7oP8qR9sT0uV1wX2yZ", "X509:<PN>user1@contoso.com")
   Update-MgUser -UserId $userObjectId -AuthorizationInfo $user.AuthorizationInfo
Update certificateUserIds using Microsoft Entra Connect
Microsoft Entra Connect supports synchronizing values to certificateUserIds from an on-premises Active Directory environment. On-premises Active Directory supports certificate-based authentication and multiple username bindings. Make sure you use the latest version of Microsoft Entra Connect.
To use these mapping methods, you need to populate the altSecurityIdentities attribute of user objects in the on-premises Active Directory. In addition, after you apply certificate-based authentication changes on Windows domain controllers as described in KB5014754, you may have implemented some of the nonreusable mapping methods (Type=strong) mapping methods to meet the on-premises Active Directory strong certificate binding enforcement requirements.
To prevent synchronization errors, make sure the values being synchronized follow one of the supported formats for the certificateUserIds.
Before you begin, make sure all user accounts that are synchronized from on-premises Active Directory have:
10 or fewer values in their altSecurityIdentities attributes
No value with more than 1,024 characters
No duplicate values
Carefully consider if a duplicate value is meant to map a single certificate to multiple on-premises Active Directory accounts. For more information, see Multiple username bindings.
Note
In specific scenarios, a subset of users might have a valid business justification to map a single certificate to more than one on-premises Active Directory account. Review these scenarios and where needed, implement separate mapping methods to map to more than one account in both the on-premises Active Directory and Microsoft Entra ID.
Considerations for ongoing synchronization of certificateUserIds
- Ensure that the provisioning process for populating the values in on-premises Active Directory implements proper hygiene. Only values associated with current valid certificates are populated.
- Values are removed when the corresponding certificate is expired or revoked.
- Values larger than 1024 characters aren't populated.
- Duplicate values aren't provisioned.
- Use Microsoft Entra Connect Health to monitor synchronization.
Follow these steps to configure Microsoft Entra Connect to synchronize userPrincipalName to certificateUserIds:
On the Microsoft Entra Connect server, find and start the Synchronization Rules Editor.
Select Direction, and select Outbound.
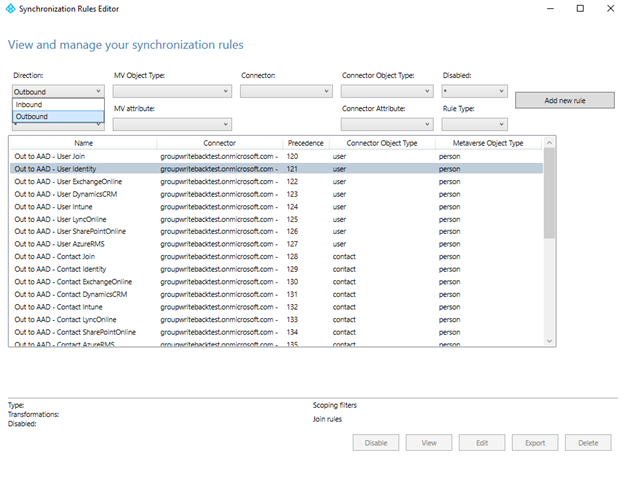
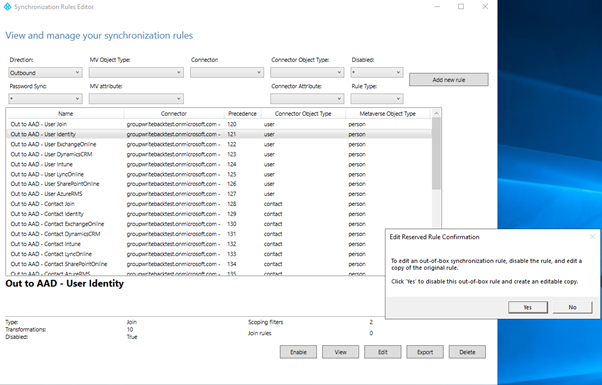
Find the rule Out to Microsoft Entra ID – User Identity, select Edit, and select Yes to confirm.
Enter a high number in the Precedence field, and then select Next.
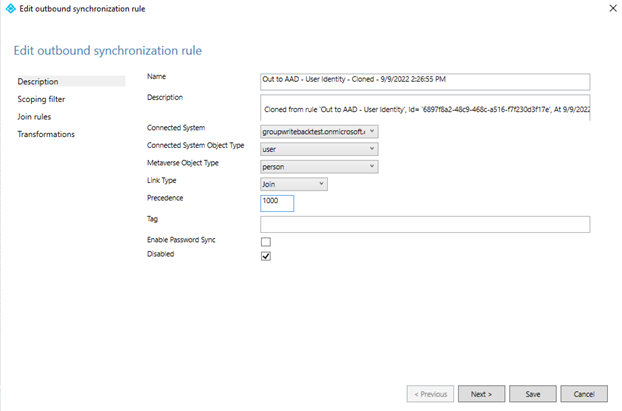
Select Transformations > Add transformation. You may need to scroll down the list of transformations before you can create a new one.
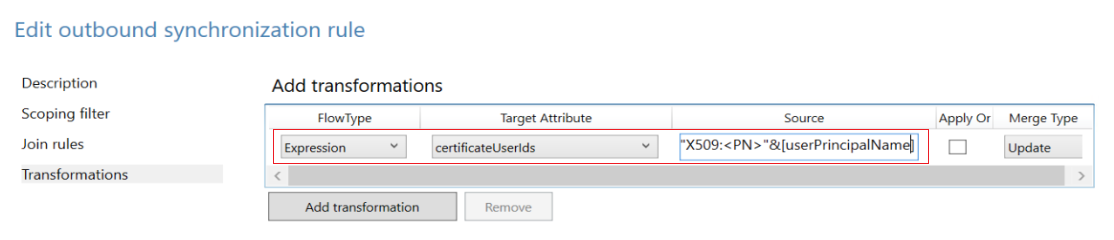
Synchronize X509:<PN>PrincipalNameValue
To synchronize X509:<PN>PrincipalNameValue, create an outbound synchronization rule, and choose Expression in the flow type. Choose the target attribute as certificateUserIds, and in the source field, add the following expression. If your source attribute isn't userPrincipalName, you can change the expression accordingly.
"X509:<PN>"&[userPrincipalName]
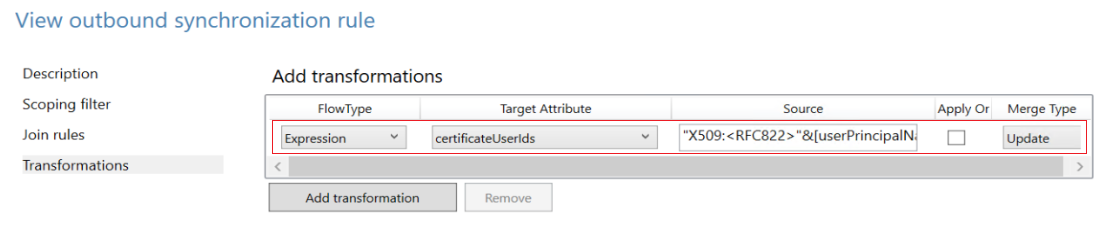
Synchronize X509:<RFC822>RFC822Name
To synchronize X509:<RFC822>RFC822Name, create an outbound synchronization rule and choose Expression in the flow type. Choose the target attribute as certificateUserIds, and in the source field, add the following expression. If your source attribute isn't userPrincipalName, you can change the expression accordingly.
"X509:<RFC822>"&[userPrincipalName]
Select Target Attribute, select certificateUserIds, select Source, select userPrincipalName, and then select Save.
Select OK to confirm.
Important
The preceding examples use userPrincipalName attribute as a source attribute in the transform rule. You can use any available attribute with the appropriate value. For example, some organizations use the mail attribute. For more complex transform rules, see Microsoft Entra Connect Sync: Understanding Declarative Provisioning Expressions
For more information about declarative provisioning expressions, see Microsoft Entra Connect: Declarative Provisioning Expressions.
Synchronize altSecurityIdentities attribute from Active Directory to Microsoft Entra certificateUserIds
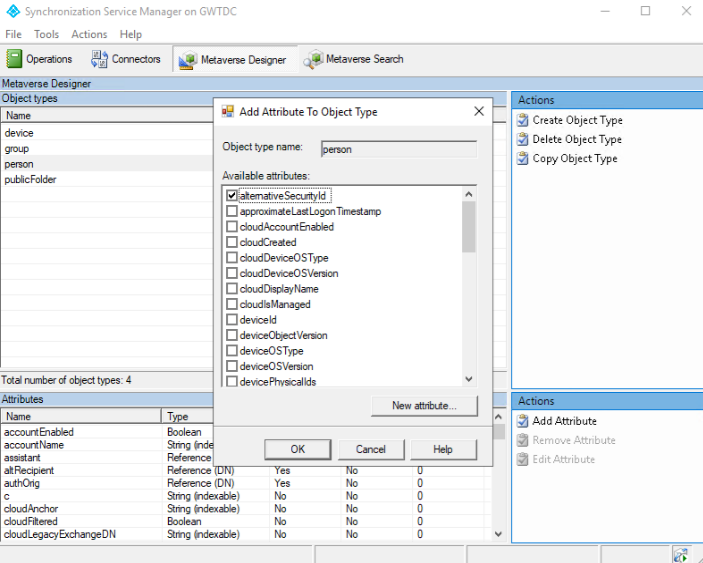
The altSecurityIdentities attribute isn't part of the default attributes set. An administrator needs to add a new attribute to the person object in the Metaverse, and then create the appropriate synchronization rules to relay this data to certificateUserIds in Microsoft Entra ID.
Open Metaverse Designer and select the person object. To create the alternativeSecurityId attribute, select New attribute. Select String (non-indexable) to create an attribute size up to 1024 characters, which is the maximum supported length for certificateUserIds. If you select String (indexable), the maximum size of an attribute value is 448 characters. Make sure you select Multi-valued.

Open Metaverse Designer, and select alternativeSecurityId to add it to the person object.
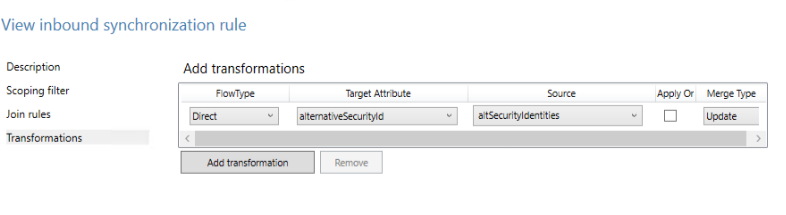
Create an inbound synchronization rule to transform from altSecurityIdentities to alternativeSecurityId attribute.
In the inbound rule, use the following options.
Option Value Name Descriptive name of the rule, such as: In from Active Directory - altSecurityIdentities Connected System Your on-premises Active Directory domain Connected System Object Type user Metaverse Object Type person Precedence Choose a number under 100 that isn't currently used Then select Transformations and create a direct mapping to the target attribute alternativeSecurityId from the source attribute altSecurityIdentities, as shown in the following screenshot.
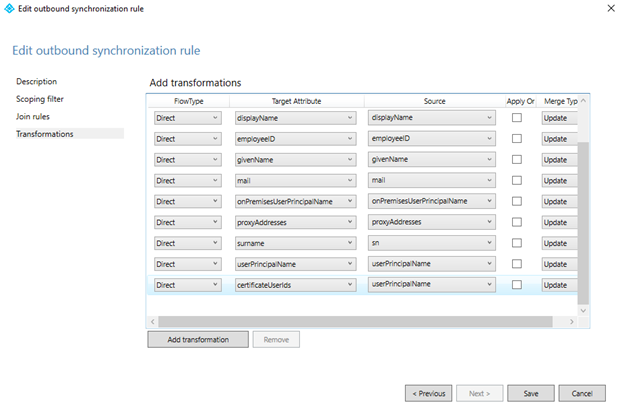
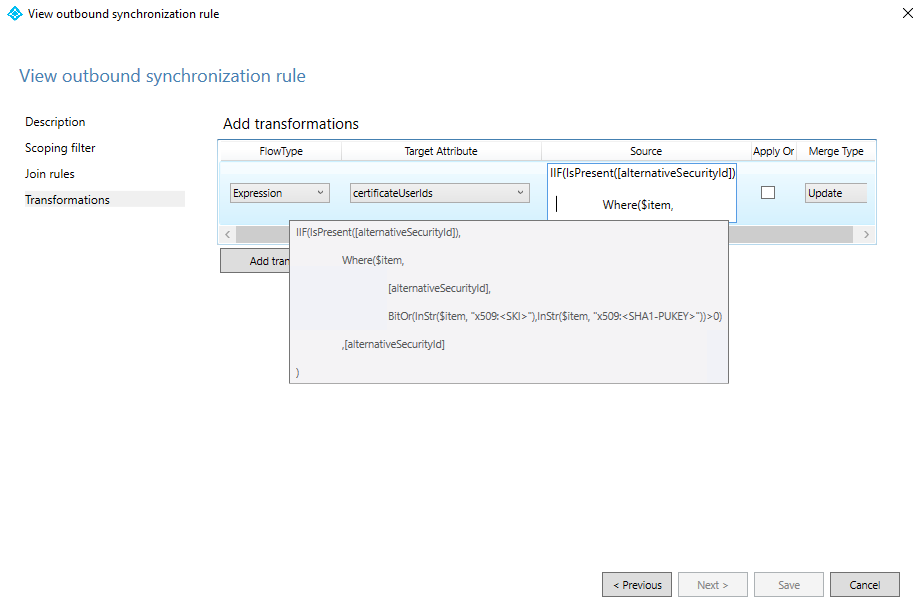
Create an outbound synchronization rule to transform from the alternativeSecurityId attribute to the certificateUserIds attribute in Microsoft Entra ID.
Option Value Name Descriptive name of the rule, such as: Out to Microsoft Entra ID - certificateUserIds Connected System Your Microsoft Entra domain Connected System Object Type user Metaverse Object Type person Precedence Choose a high number not currently used above all default rules, such as 150 Then select Transformations and create a direct mapping to the target attribute certificateUserIds from the source attribute alternativeSecurityId, as shown in the following screenshot.
Run the synchronization to populate data to the certificateUserIds attribute.
To verify success, view the Authorization info of a user in Microsoft Entra ID.

To map a subset of values from the altSecurityIdentities attribute, replace the Transformation in step 4 with an Expression. To use an Expression, proceed to the Transformations tab and change your FlowType option to Expression, the target attribute to certificateUserIds, and then input the expression into the Source field. The following example filters only values that align to the SKI and SHA1PublicKey Certificate mapping fields:

Expression code:
IIF(IsPresent([alternativeSecurityId]),
                Where($item,[alternativeSecurityId],BitOr(InStr($item, "X509:<SKI>"),InStr($item, "X509:<SHA1-PUKEY>"))>0),[alternativeSecurityId]
)
Administrators can filter values from altSecurityIdentities that align with the supported patterns. Ensure that the CBA configuration is updated to support the username bindings that are synchronized to certificateUserIds and enable authentication using these values.
Next steps
- Overview of Microsoft Entra CBA
- Technical deep dive for Microsoft Entra CBA
- How to configure Microsoft Entra CBA
- Microsoft Entra CBA Certificate Revocation List
- Microsoft Entra CBA on iOS devices
- Microsoft Entra CBA on Android devices
- Windows smart card logon using Microsoft Entra CBA
- How to migrate federated users
- FAQ