Note
Access to this page requires authorization. You can try signing in or changing directories.
Access to this page requires authorization. You can try changing directories.
Microsoft Entra terms of use policies provide a simple method to present information to end users before granting access to resources. This guide shows you how to set up Microsoft Entra terms of use with Conditional Access policies to require acceptance of your terms of use policy before accessing applications and data. These terms of use statements can be generalized or specific to groups or users and provided in multiple languages. Administrators can determine who has or hasn't accepted terms of use with the provided logs or APIs.
Note
This article provides steps about how to delete personal data from the device or service and can be used to support your obligations under the GDPR. For general information about GDPR, see the GDPR section of the Microsoft Trust Center and the GDPR section of the Service Trust portal.
Prerequisites
To use and configure Microsoft Entra terms of use policies, you must have:
- Microsoft Entra ID P1 licenses.
- Administrators who need to read terms of use configuration and Conditional Access policies need at least the Security Reader role assigned.
- Administrators who need to Create or modify terms of use and Conditional Access policies need at least the Conditional Access Administrator role assigned.
- A terms of use document in PDF format. The PDF file can be any content you decide to display. To support users on mobile devices, the recommended font size in the PDF is 24 point.
Service limits
You can add no more than 40 terms per tenant.
Add terms of use
Once you complete your terms of use policy document, use the following procedure to add it.
Sign in to the Microsoft Entra admin center as at least a Conditional Access Administrator.
Browse to Entra ID > Conditional Access > Terms of use.
Select, New terms.

In the Name box, enter a name for the terms of use policy.
For Terms of use document, browse to your finalized terms of use policy PDF and select it.
Select the language for your terms of use policy document. The language option allows you to upload multiple terms of use documents, each with a different language. The version of the terms of use policy that an end user sees is based on their browser preferences.
In the Display name box, enter a title that users see when they sign in.
To require end users to view the terms of use policy before accepting them, set Require users to expand the terms of use to On.
To require end users to accept your terms of use policy on every device they're accessing from, set Require users to consent on every device to On. Users might be required to install other applications if this option is enabled. For more information, see Per-device terms of use.
If you want to expire terms of use policy consents on a schedule, set Expire consents to On. When set to On, two more schedule settings are displayed.
Use the Expire starting on and Frequency settings to specify the schedule for terms of use policy expirations. The following table shows the result for a couple of example settings:
Expire starting on Frequency Result Today's date Monthly Starting today, users must accept the terms of use policy and then reaccept every month. Date in the future Monthly Starting today, users must accept the terms of use policy. When the future date occurs, consents expire, and then users must reaccept every month. For example, if you set the expire starting on date to Jan 1 and frequency to Monthly, this example is how expirations might occur for two users:
User First accept date First expire date Second expire date Third expire date Alice Jan 1 Feb 1 Mar 1 Apr 1 Bob Jan 15 Feb 1 Mar 1 Apr 1 Use the Duration before re-acceptance required (days) setting to specify the number of days before the user must reaccept the terms of use policy. This option allows users to follow their own schedule. For example, if you set the duration to 30 days, this example is how expirations might occur for two users:
User First accept date First expire date Second expire date Third expire date Alice Jan 1 Jan 31 Mar 2 Apr 1 Bob Jan 15 Feb 14 Mar 16 Apr 15 It's possible to use the Expire consents and Duration before re-acceptance required (days) settings together, but typically you use one or the other.
Important
Users whose consent expires, regardless of the setting used, Expire consents or Duration before re-acceptance required (days) are prompted to reaccept the terms only if their session expired.
Under Conditional Access, use the Enforce with Conditional Access policy template list to select the template to enforce the terms of use policy.
Template Description Custom policy Select the users, groups, and apps that the terms of use policy is applied to. Create Conditional Access policy later This terms of use policy appears in the grant control list when creating a Conditional Access policy. Important
Conditional Access policy controls (including terms of use policies) don't support enforcement on service accounts. We recommend excluding all service accounts from the Conditional Access policy.
Custom Conditional Access policies enable granular terms of use policies, down to a specific cloud application or group of users. For more information, see Quickstart: Require terms of use to be accepted before accessing cloud apps.
Select Create.
If you selected a custom Conditional Access template, then a new screen appears that allows you to create the custom Conditional Access policy. You should now see your new terms of use policies.
Per-device terms of use
The Require users to consent on every device setting enables you to require end users to accept your terms of use policy on every device they're accessing from. The end user's device must be registered in Microsoft Entra ID. When the device is registered, the device ID is used to enforce the terms of use policy on each device. Their experience is dependent on permissions to join devices and the platform or software used. For more information, see device identity in Microsoft Entra ID.
Per-device terms of use have the following constraints:
- The Microsoft Intune Enrollment app
Application ID: d4ebce55-015a-49b5-a083-c84d1797ae8cisn't supported. Ensure that it's excluded from any Conditional Access policy requiring Terms of Use. - Microsoft Entra B2B users aren't supported.
Policy changes
Conditional Access policies take effect immediately. When this enforcement happens, the administrator might see errors in the Microsoft Entra admin center. The administrator must sign out and sign in to satisfy the new policy.
Important
Users in scope need to sign out and sign in in order to satisfy a new policy if:
- a Conditional Access policy is enabled on a terms of use policy
- or a second terms of use policy is created
Edit terms of use details
You can edit some details of terms of use policies, but you can't modify an existing document. The following procedure describes how to edit the details.
Sign in to the Microsoft Entra admin center as at least a Conditional Access Administrator.
Browse to Entra ID > Conditional Access > Terms of use.
Select the terms of use policy you want to edit.
Select Edit terms.
In the Edit terms of use pane, you can change the following options:
- Name – the internal name of the terms of use that isn't shared with end users.
- Display name – the name that end users can see when viewing the terms of use.
- Require users to expand the terms of use – Setting this option to On forces the end user to expand the terms of use policy document before accepting it.
- You can update an existing terms of use document.
- You can add a language to an existing terms of use.
Once you're done, select Save to save your changes.
If there are other settings you would like to change, you must create a new terms of use policy.
Update the version or PDF of an existing terms of use
Sign in to the Microsoft Entra admin center as at least a Conditional Access Administrator.
Browse to Entra ID > Conditional Access > Terms of use.
Select the terms of use policy you want to edit.
Select Edit terms.
For the language that you would like to update a new version, select Update under the action column
In the pane on the right, upload the pdf for the new version
There's also a toggle option here Require reaccept if you want to require your users to accept this new version the next time they sign in.
- If you require your users to reaccept, next time they try to access the resource defined in your Conditional Access policy they'll be prompted to accept this new version.
- If you don’t require your users to reaccept, their previous consent stays current and only new users who haven't consented before or whose consent expires see the new version. Until the session expires, Require reaccept doesn't require users to accept the new terms of use. If you want to ensure reaccept, delete and recreate or create a new terms of use for this case.
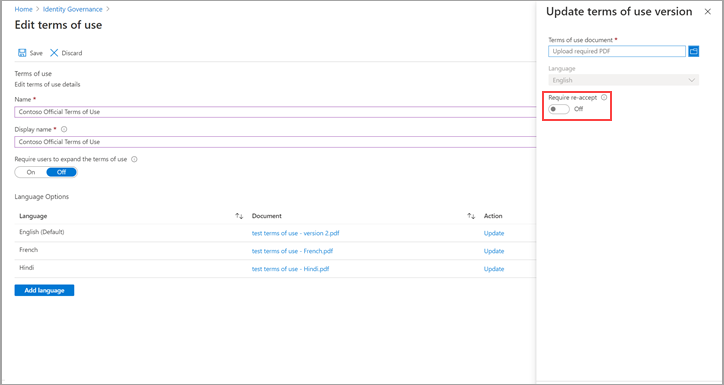
Once you upload your new pdf and decide on reaccept, select Add at the bottom of the pane.
You see the most recent version under the Document column.
Add a language
The following procedure describes how to add a language to your terms of use.
Sign in to the Microsoft Entra admin center as at least a Conditional Access Administrator.
Browse to Entra ID > Conditional Access > Terms of use.
Select the terms of use policy you want to edit.
Select Edit Terms.
Select Add language at the bottom of the page.
In the Add terms of use language pane, upload your localized PDF, and select the language.
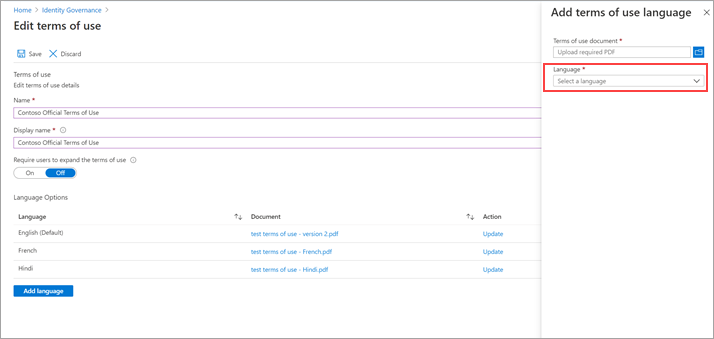
Select Add language.
Select Save
Select Add to add the language.
View previous versions of a terms of use
- Sign in to the Microsoft Entra admin center as at least a Security Reader.
- Browse to Entra ID > Conditional Access > Terms of use.
- Select the terms of use policy for which you want to view a version history.
- Select Languages and version history.
- Select See previous versions.
- You can select the name of the document to download that version.
View report of who has accepted and declined
The Terms of use blade shows a count of the users who accepted and declined. These counts and who accepted/declined are stored for the life of the terms of use policy.
Sign in to the Microsoft Entra admin center as at least a Security Reader.
Browse to Entra ID > Conditional Access > Terms of use.
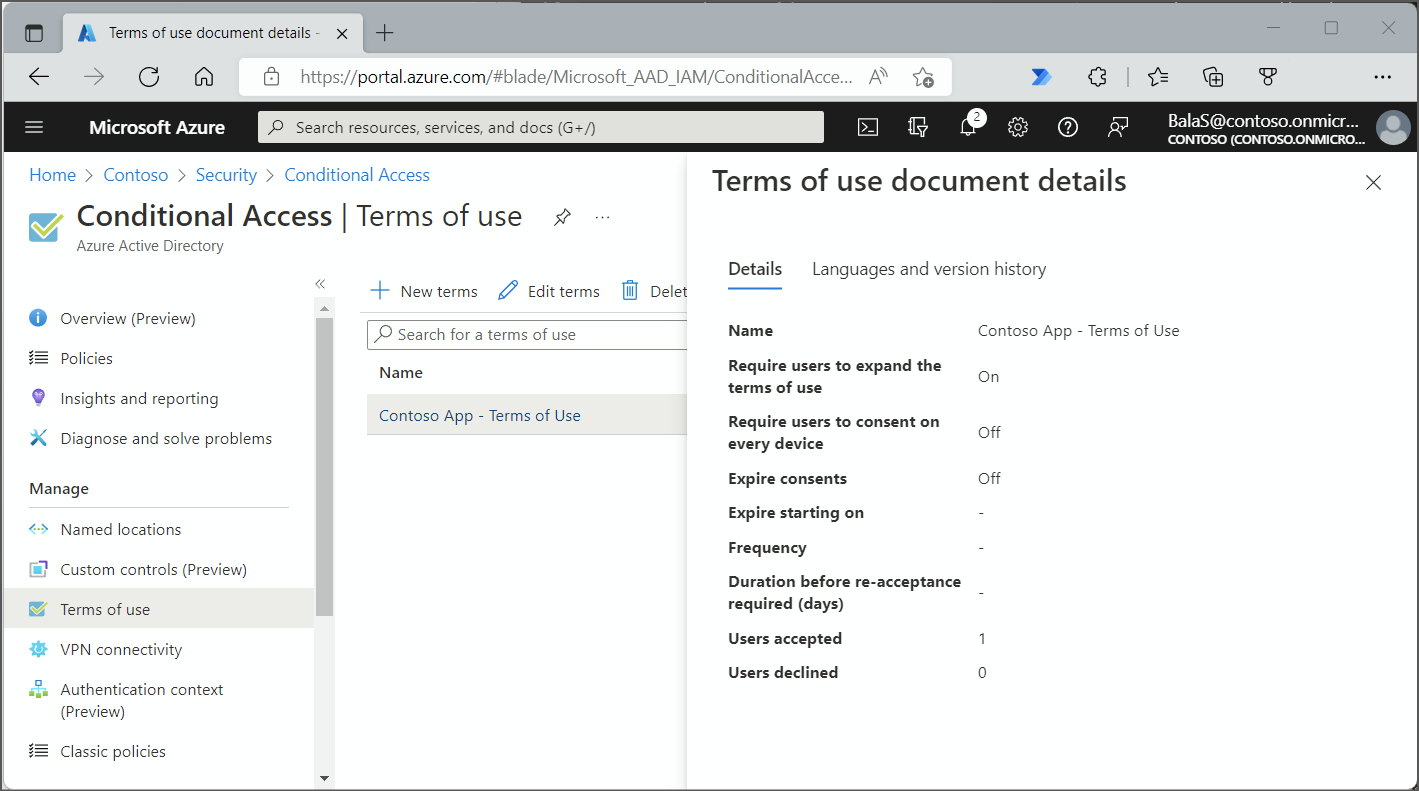
For a terms of use policy, select the numbers under Accepted or Declined to view the current state for users.
- By default, the next page will show you the current state of each user's acceptance to the terms of use.
- If you would like to see the previous consent events, you can select All from the Current State drop-down. Now you can see each user's events in details about each version and what happened.
- Alternatively, you can select a specific version from the Version drop-down to see who accepted that specific version.
To view the history for an individual user, select the ellipsis (...) and then View History. In the view history pane, you see a history of all the accepts, declines, and expirations.
User acceptance record deletion
User acceptance records are deleted when:
- An admin explicitly deletes the terms of use.
- When this change happens, all the acceptance records associated with that specific terms of use are also deleted.
- The tenant loses its Microsoft Entra ID P1 or P2 licenses.
- The tenant is deleted.
View Microsoft Entra audit logs
If you want to view more activity, Microsoft Entra terms of use policies include audit logs. Each user consent triggers an event in the audit logs that is stored for 30 days. You can view these logs in the portal or download as a .csv file.
To get started with Microsoft Entra audit logs, use the following procedure:
Sign in to the Microsoft Entra admin center as at least a Reports Reader.
Browse to Entra ID > Conditional Access > Terms of use.
Select a terms of use policy.
Select View audit logs.
On the Microsoft Entra audit logs screen, you can filter the information using the provided lists to target specific audit log information.
You can also select Download to download the information in a .csv file for use locally.
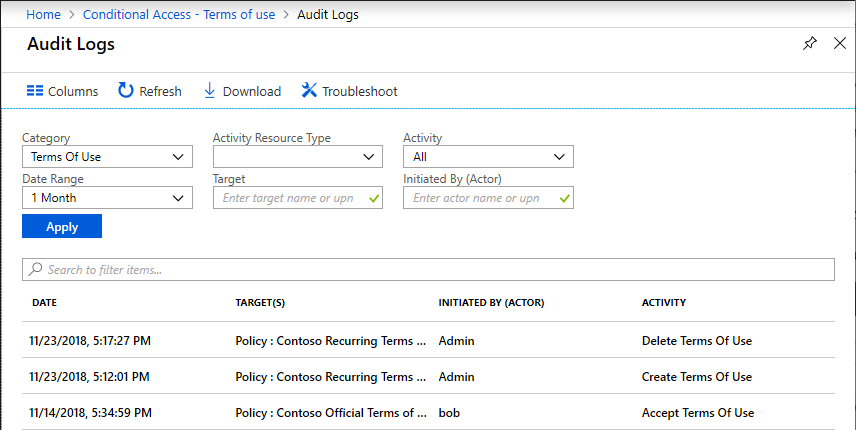
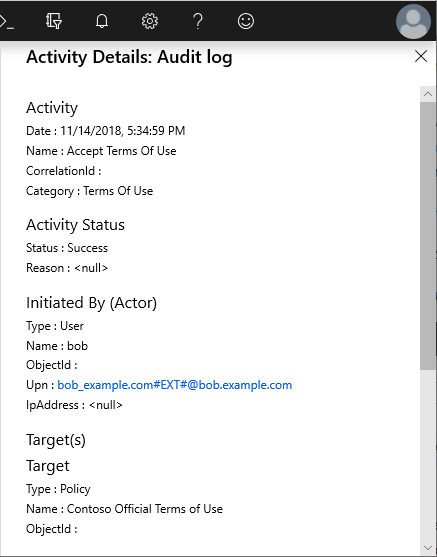
If you select a log, a pane appears with more activity details.
What terms of use looks like for users
Once a terms of use policy is created and enforced, users, who are in scope, see the following screen during sign-in.

Users can view the terms of use policy and, if necessary, use buttons to zoom in and out. Users are only required to accept the terms of use policy once, and they won't see the terms of use policy again on later sign-ins.
How users can review their terms of use
Users can review and see the terms of use policies that they've accepted by using the following procedure.
- Sign in to https://myaccount.microsoft.com/.
- Select Settings & Privacy.
- Select Privacy.
- Under Organization's notice, select View next to the terms of use statement you want to review.
Delete terms of use
You can delete old terms of use policies using the following procedure.
- Sign in to the Microsoft Entra admin center as at least a Conditional Access Administrator.
- Browse to Entra ID > Conditional Access > Terms of use.
- Select the terms of use policy you want to remove.
- Select Delete terms.
- In the message that appears asking if you want to continue, select Yes.
- You should no longer see your terms of use policy.
Platform and browser support
Microsoft Entra terms of use is designed to function optimally on the following platforms and browsers.
Supported desktop and mobile operating systems (latest stable versions):
- Windows
- macOS
- Linux
- Android
- iOS
Supported modern web browsers (latest stable versions):
- Microsoft Edge
- Mozilla Firefox
- Google Chrome
- Safari
Functionality on other configurations
Users on operating systems or browsers not listed above, or those using older versions of supported operating systems or browsers, may still be able to accept terms of use during the sign-in process. Some features, visual rendering, or performance might be degraded on unsupported configurations. We don't actively test or provide support for operating systems and browsers not explicitly listed as supported. This includes, but isn't limited to, browsers based on legacy engines such as EdgeHTML and Trident/MSHTML.
Desktop and mobile applications with web views
Applications that utilize web views based on the latest stable versions of modern HTML5 compliant browser engines (such as Blink, Gecko, or WebKit) should generally allow users to accept terms of use during sign-in. Nevertheless, some features, visual rendering, or performance degradation may occur. We don't actively test or offer support for all specific web view implementations.
Experiencing Issues?
If you encounter issues accepting terms of use on a specific operating system, browser, browser engine, or web view implementation within an application, open a support case. We evaluate supportability on a case-by-case basis.
B2B guests
Using Conditional Access and terms of use policies, you can enforce a policy directly towards B2B guest users. During the invitation redemption flow, the user is presented with the terms of use policy.
Terms of use policies are only displayed when the user has a guest account in Microsoft Entra ID. SharePoint Online currently has an external sharing recipient experience to share a document or a folder that doesn't require the user to have a guest account. In this case, a terms of use policy isn't displayed.
Azure Information Protection
You can configure a Conditional Access policy for the Azure Information Protection app and require a terms of use policy when a user accesses a protected document. This configuration triggers a terms of use policy before a user accessing a protected document for the first time.
Microsoft Intune Enrollment
You can configure a Conditional Access policy for the Microsoft Intune Enrollment app and require a terms of use policy before enrollment of a device in Intune. For more information, see the Read Choosing the right Terms solution for your organization blog post.
Note
The Intune Enrollment app isn't supported for Per-device terms of use.
For iOS/iPadOS Automated device enrollment, adding a custom URL to the Microsoft Entra Terms of Use policy doesn't allow for users to open the policy from the URL in Setup Assistant to read it. The policy can be read by the user after Setup Assistant is completed from the Company Portal website, or in the Company Portal app.
Frequently asked questions
Q: Why do I see two sign-ins for my users? One interrupt and one success.
A: Administrators might see two sign-ins when users haven't yet accepted a terms of use policy, this scenario is by design. These entries share a correlation ID.

One sign-in is interrupted since the user can't provide proof of acceptance of the terms of use policy in their token. The additional details field in the sign-in log includes the following message:
The user is required to satisfy additional requirements before finishing authentication, and was redirected to another page (such as terms of use or a third party MFA provider). This code alone does not indicate a failure on your users part to sign in. The sign in logs may indicate that this challenge was successfully passed or failed.
If the user accepts the terms of use policy, the other sign-in is successful.
Q: I cannot sign in using PowerShell when terms of use is enabled.
A: Terms of use can only be accepted when authenticating interactively.
Q: How do I see when/if a user has accepted a terms of use?
A: On the Terms of use blade, select the number under Accepted. You can also view or search the accepted activity in the Microsoft Entra audit logs. For more information, see View report of who accepted and declined and View Microsoft Entra audit logs.
Q: How long is information stored?
A: The user counts in the terms of use report and who accepted/declined are stored for the life of the terms of use. The Microsoft Entra audit logs are stored for 30 days.
Q: Why do I see a different number of consents in the terms of use details overview versus the Microsoft Entra audit logs?
A: The terms of use details overview data is stored for the lifetime of the terms of use policy. The Microsoft Entra audit logs are stored for 30 days.
Q: Why do I see a different number of consents in the terms of use details overview versus the exported CSV report?
A: The terms of use details overview reflect aggregated acceptances of the current version of the policy (updated once every day). If expiration is enabled or a terms of use agreement is updated (with reacceptance required), the count on the details overview is reset since the acceptances are expired, this page shows the count of the current version. All acceptance history is still captured in the CSV report.
Q: If hyperlinks are in the terms of use policy PDF document, will end users be able to click them?
A: Yes, end users are able to select hyperlinks to other pages but links to sections within the document aren't supported. Also, hyperlinks in terms of use policy PDFs don't work when accessed from the Microsoft Entra My Apps/MyAccount portal.
Q: Can a terms of use policy support multiple languages?
A: Yes. An administrator can upload multiple PDF documents and tag those documents with a corresponding language. When end users sign in, we look at their browser language preference and display the matching document. If there's no match, we display the default document, which is the first document that is uploaded. Windows desktop applications using Web Account Manager, such as Microsoft Teams, will use the operating system language for the terms, not application-specific language settings.
Q: When is the terms of use policy triggered?
A: A terms of use policy triggers during the sign-in experience.
Q: What applications can I target a terms of use policy to?
A: You can create a Conditional Access policy on the enterprise applications using modern authentication. For more information, see enterprise applications.
Q: Can I add multiple terms of use policies to a given user or app?
A: Yes, by creating multiple Conditional Access policies targeting those groups or applications. If a user falls in scope of multiple terms of use policies, they must accept one policy at a time.
Q: What happens if a user declines the terms of use policy?
A: The user is blocked from getting access to the application. The user would have to sign in again and accept the terms to get access.
Q: Is it possible to unaccept a terms of use policy that was previously accepted?
A: You can review previously accepted terms of use policies, but currently there isn't a way to unaccept.
Q: What happens if I'm also using Intune terms and conditions?
A: If you configure both Microsoft Entra terms of use and Intune terms and conditions, the user is required to accept both. For more information, see the Choosing the right Terms solution for your organization blog post.
Q: What endpoints does the terms of use service use for authentication?
A: Terms of use utilize the following endpoints for authentication: https://tokenprovider.termsofuse.identitygovernance.azure.com, https://myaccount.microsoft.com, and https://account.activedirectory.windowsazure.com. If your organization has an allowlist of URLs for enrollment, you need to add these endpoints to your allowlist, along with the Microsoft Entra endpoints for sign-in.