Note
Access to this page requires authorization. You can try signing in or changing directories.
Access to this page requires authorization. You can try changing directories.
The Microsoft identity platform supports single sign-on (SSO) with most preintegrated applications in the application gallery and custom applications. When a user authenticates to an application through the Microsoft identity platform using the SAML 2.0 protocol, a token is sent to the application. The application validates and uses the token to sign the user in instead of prompting for a username and password.
These SAML tokens contain pieces of information about the user known as claims. A claim is information that an identity provider states about a user inside the token they issue for that user. In a SAML token, claims data is typically contained in the SAML Attribute Statement. The user's unique ID is typically represented in the SAML subject, which is also referred to as the name identifier (nameID).
By default, the Microsoft identity platform issues a SAML token to an application that contains a claim with a value of the user's username (also known as the user principal name), which can uniquely identify the user. The SAML token also contains other claims that include the user's email address, first name, and last name.
View or edit claims
To view or edit the claims issued in the SAML token to the application:
- Sign in to the Microsoft Entra admin center as at least a Cloud Application Administrator.
- Browse to Entra ID > Enterprise apps > All applications.
- Select the application, select Single sign-on in the left-hand menu, and then select Edit in the Attributes & Claims section.
You might need to edit the claims issued in the SAML token for the following reasons:
- The application requires the
NameIdentifierornameIDclaim to be something other than the username (or user principal name). - The application has been written to require a different set of claim URIs or claim values.
Edit nameID
To edit the name identifier value claim:
- Open the Name identifier value page.
- Select the attribute or transformation that you want to apply to the attribute. Optionally, you can specify the format that you want the
nameIDclaim to have.
NameID format
If the SAML request contains the element NameIDPolicy with a specific format, then the Microsoft identity platform honors the format in the request.
If the SAML request doesn't contain an element for NameIDPolicy, then the Microsoft identity platform issues the nameID with the format you specify. If no format is specified, the Microsoft identity platform uses the default source format associated with the claim source selected. When the configured source attribute is null, the Microsoft identify platform will use the userprincipalName. If a transformation results in a null or illegal value, Microsoft Entra ID sends a persistent pairwise identifier in the nameID.
From the Choose name identifier format dropdown, select one of the options in the following table.
nameID format |
Description |
|---|---|
| Default | Microsoft identity platform uses the default source format. |
| Persistent | Microsoft identity platform uses Persistent as the nameID format. |
| Email address | Microsoft identity platform uses EmailAddress as the nameID format. |
| Unspecified | Microsoft identity platform uses Unspecified as the nameID format. |
| Windows domain qualified name | Microsoft identity platform uses the WindowsDomainQualifiedName format. |
Transient nameID is also supported, but isn't available in the dropdown and can't be configured on Azure's side. To learn more about the NameIDPolicy attribute, see Single sign-On SAML protocol.
Attributes
Select the desired source for the NameIdentifier (or nameID) claim. You can select from the options in the following table.
| Name | Description |
|---|---|
Email |
The email address of the user. |
userprincipalName |
The user principal name (UPN) of the user. |
onpremisessamaccountname |
The SAM account name that has been synced from on-premises Microsoft Entra ID. |
objectid |
The object ID of the user in Microsoft Entra ID. |
employeeid |
The employee ID of the user. |
Directory extensions |
The directory extensions synced from on-premises Active Directory using Microsoft Entra Connect Sync. |
Extension Attributes 1-15 |
The on-premises extension attributes used to extend the Microsoft Entra schema. |
pairwiseid |
The persistent form of user identifier. |
For more information about identifier values, see the table that lists the valid ID values per source later in this page.
Any constant (static) value can be assigned to any claim. Use the following steps to assign a constant value:
- On the Attributes & Claims blade, select the required claim that you want to modify.
- Enter the constant value without quotes in the Source attribute as per your organization and select Save. The constant value is displayed.
Directory Schema extensions
You can also configure directory schema extension attributes as non-conditional/conditional attributes. Use the following steps to configure the single or multi-valued directory schema extension attribute as a claim:
- On the Attributes & Claims blade, select Add new claim or edit an existing claim.
- Select source application from application picker where extension property is defined.
- Select Add to add the selection to the claims.
- Click Save to commit the changes.
Special claims transformations
You can use the following special claims transformations functions.
| Function | Description |
|---|---|
| ExtractMailPrefix() | Removes the domain suffix from either the email address or the user principal name. This function extracts only the first part of the user name being passed through (for example, "joe_smith" instead of joe_smith@contoso.com). |
| ToLower() | Converts the characters of the selected attribute into lowercase characters. |
| ToUpper() | Converts the characters of the selected attribute into uppercase characters. |
Add application-specific claims
To add application-specific claims:
- On the Attributes & Claims blade, select Add new claim to open the Manage user claims page.
- Enter the name of the claims. The value doesn't strictly need to follow a URI pattern, per the SAML spec. If you need a URI pattern, you can put that in the Namespace field.
- Select the Source where the claim is going to retrieve its value. You can select a user attribute from the source attribute dropdown or apply a transformation to the user attribute before emitting it as a claim.
Add a group claim
Group claims are used to make authorization decisions to access a resource by an app or a service provider. To add group claims;
- Navigate to App registrations and select the app you wish to add a group claim to.
- Select Add groups claim.
- Select the group types to include in your token. You can add security groups, directory groups, or groups assigned to a particular application.
- Choose the values you wish to include in your groups claim, then select Add.
Claim transformations
To apply a transformation to a user attribute:
- In Manage claim, select Transformation as the claim source to open the Manage transformation page.
- Select the function from the transformation dropdown. Depending on the function selected, provide parameters and a constant value to evaluate in the transformation.
- Select the source of the attribute by clicking on the appropriate radio button.
- Select the attribute name from the dropdown.
- Treat source as multivalued is a checkbox indicating whether the transform should be applied to all values or just the first. By default, transformations are only applied to the first element in a multi-value claim, by checking this box it ensures it's applied to all. This checkbox is only be enabled for multi-valued attributes, for example
user.proxyaddresses. - To apply multiple transformations, select Add transformation. You can apply a maximum of two transformations to a claim. For example, you could first extract the email prefix of the
user.mail. Then, make the string upper case.
You can use the following functions to transform claims.
| Function | Description |
|---|---|
| ExtractMailPrefix() | Removes the domain suffix from either the email address or the user principal name. This function extracts only the first part of the user name being passed through. For example, joe_smith instead of joe_smith@contoso.com. |
| Join() | Creates a new value by joining two attributes. Optionally, you can use a separator between the two attributes. For the nameID claim transformation, the Join() function has specific behavior when the transformation input has a domain part. It removes the domain part from input before joining it with the separator and the selected parameter. For example, if the input of the transformation is joe_smith@contoso.com and the separator is @ and the parameter is fabrikam.com, this input combination results in joe_smith@fabrikam.com. |
| ToLowercase() | Converts the characters of the selected attribute into lowercase characters. |
| ToUppercase() | Converts the characters of the selected attribute into uppercase characters. |
| Contains() | Outputs an attribute or constant if the input matches the specified value. Otherwise, you can specify another output if there's no match. For example, if you want to emit a claim where the value is the user's email address if it contains the domain @contoso.com, otherwise you want to output the user principal name. To perform this function, configure the following values: Parameter 1(input): user.email, Value: "@contoso.com", Parameter 2 (output): user.email, and Parameter 3 (output if there's no match): user.userprincipalname. |
| EndWith() | Outputs an attribute or constant if the input ends with the specified value. Otherwise, you can specify another output if there's no match. For example, if you want to emit a claim where the value is the user's employee ID if the employee ID ends with 000, otherwise you want to output an extension attribute. To perform this function, configure the following values: Parameter 1(input): user.employeeid, Value: "000", Parameter 2 (output): user.employeeid, and Parameter 3 (output if there's no match): user.extensionattribute1. |
| StartWith() | Outputs an attribute or constant if the input starts with the specified value. Otherwise, you can specify another output if there's no match. For example, if you want to emit a claim where the value is the user's employee ID if the country/region starts with US, otherwise you want to output an extension attribute. To perform this function, configure the following values: Parameter 1(input): user.country, Value: "US", Parameter 2 (output): user.employeeid, and Parameter 3 (output if there's no match): user.extensionattribute1 |
| Extract() - After matching | Returns the substring after it matches the specified value. For example, if the input's value is Finance_BSimon, the matching value is Finance_, then the claim's output is BSimon. |
| Extract() - Before matching | Returns the substring until it matches the specified value. For example, if the input's value is BSimon_US, the matching value is _US, then the claim's output is BSimon. |
| Extract() - Between matching | Returns the substring until it matches the specified value. For example, if the input's value is Finance_BSimon_US, the first matching value is Finance_, the second matching value is _US, then the claim's output is BSimon. |
| ExtractAlpha() - Prefix | Returns the prefix alphabetical part of the string. For example, if the input's value is BSimon_123, then it returns BSimon. |
| ExtractAlpha() - Suffix | Returns the suffix alphabetical part of the string. For example, if the input's value is 123_Simon, then it returns Simon. |
| ExtractNumeric() - Prefix | Returns the prefix numerical part of the string. For example, if the input's value is 123_BSimon, then it returns 123. |
| ExtractNumeric() - Suffix | Returns the suffix numerical part of the string. For example, if the input's value is BSimon_123, then it returns 123. |
| IfEmpty() | Outputs an attribute or constant if the input is null or empty. For example, if you want to output an attribute stored in an extension attribute if the employee ID for a user is empty. To perform this function, configure the following values: Parameter 1(input): user.employeeid, Parameter 2 (output): user.extensionattribute1, and Parameter 3 (output if there's no match): user.employeeid. |
| IfNotEmpty() | Outputs an attribute or constant if the input isn't null or empty. For example, if you want to output an attribute stored in an extension attribute if the employee ID for a user isn't empty. To perform this function, configure the following values: Parameter 1(input): user.employeeid and Parameter 2 (output): user.extensionattribute1. |
| Substring() - Fixed Length | Extracts parts of a string claim type, beginning at the character at the specified position, and returns the specified number of characters. The sourceClaim is the claim source of the transform that should be executed. The StartIndex is the zero-based starting character position of a substring in this instance. The Length is the length in characters of the substring. For example, sourceClaim - PleaseExtractThisNow, StartIndex - 6, and Length - 11 produces an output of ExtractThis. |
| Substring() - EndOfString | Extracts parts of a string claim type, beginning at the character at the specified position, and returns the rest of the claim from the specified start index. The sourceClaim is the claim source of the transform that should be executed. The StartIndex is the zero-based starting character position of a substring in this instance. For example, sourceClaim - PleaseExtractThisNow and StartIndex - 6 produces an output of ExtractThisNow. |
| RegexReplace() | For more information about regex-based claims transformation, see the next section. |
Regex-based claims transformation
You can use regular expressions to transform claims. A maximum of 20 total regex replacements can be made when using regex-based claims transformations.
The following image shows an example of the first level of transformation:
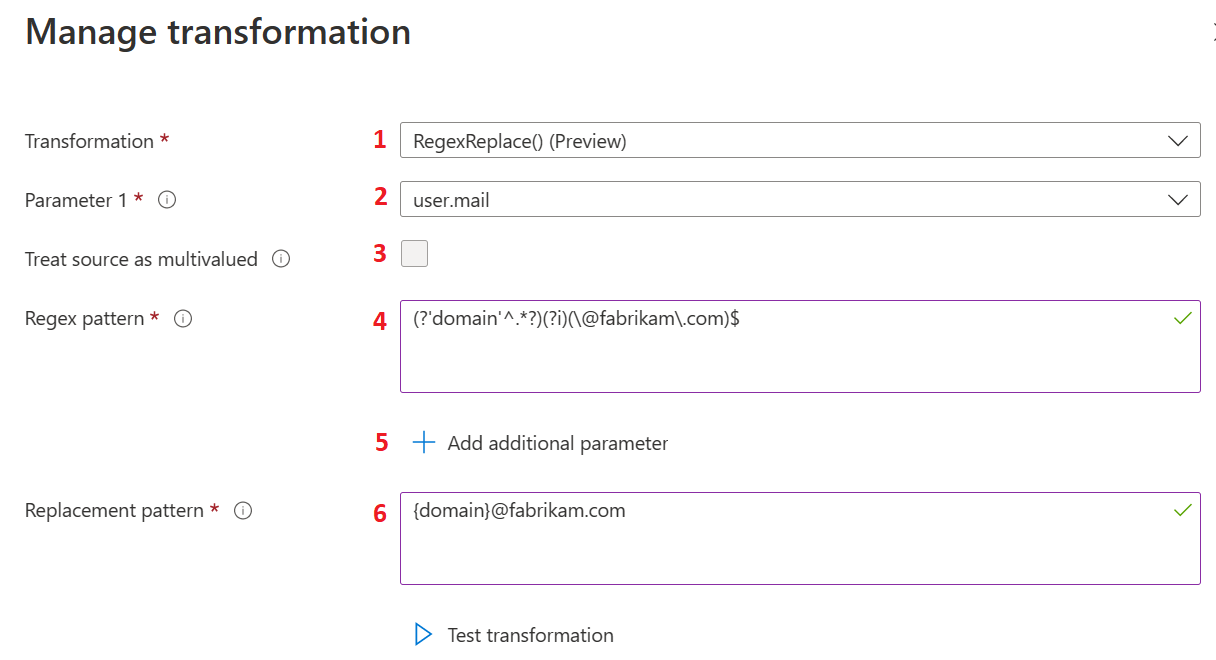
The actions listed in the following table provide information about the first level of transformations and correspond to the labels in the previous image. Select Edit to open the claims transformation blade.
| Action | Field | Description |
|---|---|---|
1 |
Transformation |
Select the RegexReplace() option from the Transformation options to use the regex-based claims transformation method for claims transformation. |
2 |
Parameter 1 |
The input for the regular expression transformation. For example, user.mail that has a user email address such as admin@fabrikam.com. |
3 |
Treat source as multivalued |
Some input user attributes can be multi-value user attributes. If the selected user attribute supports multiple values and the user wants to use multiple values for the transformation, they need to select Treat source as multivalued. If selected, all values are used for the regex match, otherwise only the first value is used. |
4 |
Regex pattern |
A regular expression that is evaluated against the value of user attribute selected as Parameter 1. For example, a regular expression to extract the user alias from the user's email address would be represented as (?'domain'^.*?)(?i)(\@fabrikam\.com)$. |
5 |
Add additional parameter |
More than one user attribute can be used for the transformation. The values of the attributes would then be merged with regex transformation output. Up to five more parameters are supported. |
6 |
Replacement pattern |
The replacement pattern is the text template, which contains placeholders for regex outcome. All group names must be wrapped inside the curly braces such as {group-name}. Let's say the administration wants to use user alias with some other domain name, for example xyz.com and merge country name with it. In this case, the replacement pattern would be {country}.{domain}@xyz.com, where {country} is the value of input parameter and {domain} is the group output from the regular expression evaluation. In such a case, the expected outcome is US.swmal@xyz.com. |
The following image shows an example of the second level of transformation:
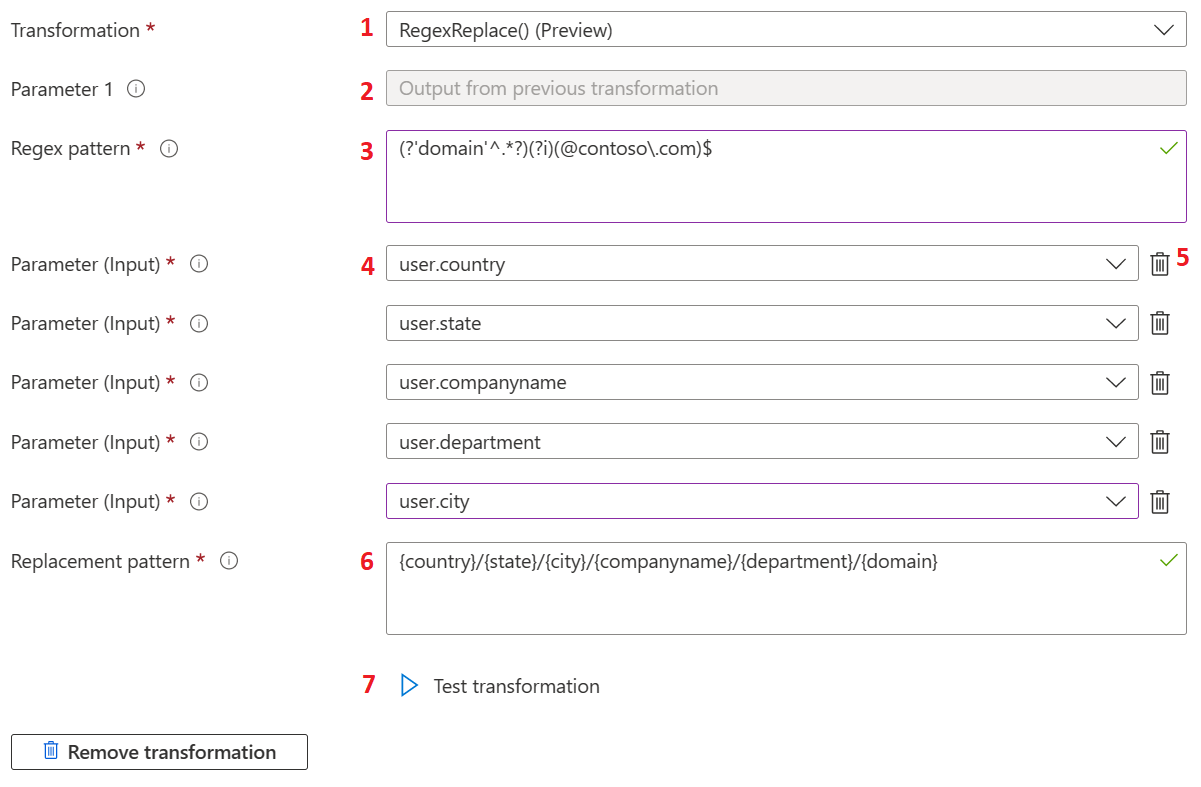
The following table provides information about the second level of transformations. The actions listed in the table correspond to the labels in the previous image.
| Action | Field | Description |
|---|---|---|
1 |
Transformation |
Regex-based claims transformations aren't limited to the first transformation and can be used as the second level transformation as well. Any other transformation method can be used as the first transformation. |
2 |
Parameter 1 |
If RegexReplace() is selected as a second level transformation, output of first level transformation is used as an input for the second level transformation. To apply the transformation, the second level regex expression should match the output of the first transformation. |
3 |
Regex pattern |
Regex pattern is the regular expression for the second level transformation. |
4 |
Parameter input |
User attribute inputs for the second level transformations. |
5 |
Parameter input |
Administrators can delete the selected input parameter if they don't need it anymore. |
6 |
Replacement pattern |
The replacement pattern is the text template, which contains placeholders for regex outcome group name, input parameter group name, and static text value. All group names must be wrapped inside the curly braces such as {group-name}. Let's say the administration wants to use user alias with some other domain name, for example xyz.com and merge country name with it. In this case, the replacement pattern would be {country}.{domain}@xyz.com, where {country} is the value of input parameter and {domain} is the group output from the regular expression evaluation. In such a case, the expected outcome is US.swmal@xyz.com. |
7 |
Test transformation |
The RegexReplace() transformation is evaluated only if the value of the selected user attribute for Parameter 1 matches with the regular expression provided in the Regex pattern textbox. If they don't match, the default claim value is added to the token. To validate regular expression against the input parameter value, a test experience is available within the transform blade. This test experience operates on dummy values only. When more input parameters are used, the name of the parameter is added to the test result instead of the actual value. To access the test section, select Test transformation. |
The following image shows an example of testing the transformations:
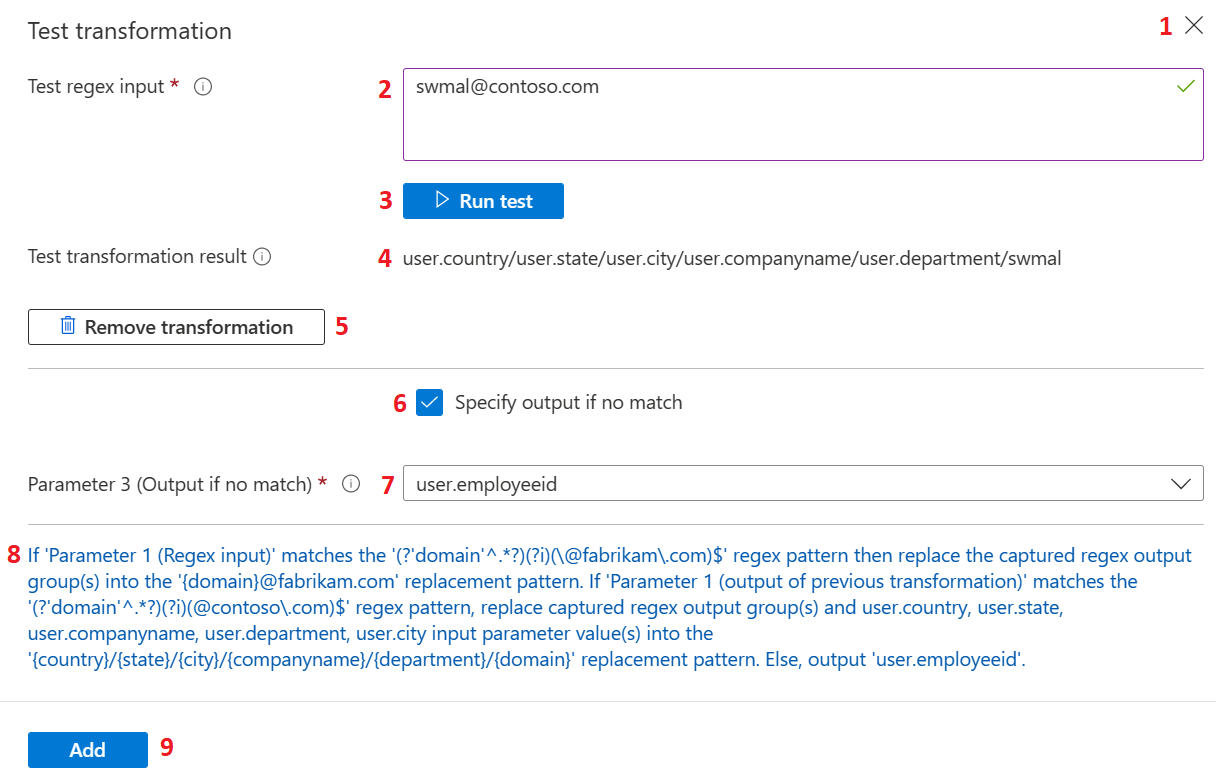
The following table provides information about testing the transformations. The actions listed in the table correspond to the labels in the previous image.
| Action | Field | Description |
|---|---|---|
1 |
Test transformation |
Select the close or (X) button to hide the test section and re-render the Test transformation button again on the blade. |
2 |
Test regex input |
Accepts input that is used for the regular expression test evaluation. In case regex-based claims transformation is configured as a second level transformation, provide a value that is the expected output of the first transformation. |
3 |
Run test |
After the test regex input is provided and the Regex pattern, Replacement pattern and Input parameters are configured, the expression can be evaluated by selecting Run test. |
4 |
Test transformation result |
If evaluation succeeds, an output of test transformation is rendered against the Test transformation result label. |
5 |
Remove transformation |
The second level transformation can be removed by selecting Remove transformation. |
6 |
Specify output if no match |
When a regex input value is configured against the Parameter 1 that doesn't match the Regular expression, the transformation is skipped. In such cases, the alternate user attribute can be configured, which is added to the token for the claim by checking Specify output if no match. |
7 |
Parameter 3 |
If an alternate user attribute needs to be returned when there's no match and Specify output if no match is checked, an alternate user attribute can be selected using the dropdown. This dropdown is available against Parameter 3 (output if no match). |
8 |
Summary |
At the bottom of the blade, a full summary of the format is displayed that explains the meaning of the transformation in simple text. |
9 |
Add |
After the configuration settings for the transformation are verified, it can be saved to a claims policy by selecting Add. Select Save on the Manage Claim blade to save the changes. |
RegexReplace() transformation is also available for the group claims transformations.
RegexReplace() transformation validations
When the following conditions occur after Add or Run test is selected, a message is displayed that provides more information about the issue:
- Input parameters with duplicate user attributes aren't allowed.
- Unused input parameters found. Defined input parameters should have respective usage into the Replacement pattern text.
- The provided test regex input doesn't match with the provided regular expression.
- The source for the groups into the replacement pattern isn't found.
Add the UPN claim to SAML tokens
The http://schemas.xmlsoap.org/ws/2005/05/identity/claims/upn claim is part of the SAML restricted claim set. If you have custom signing key configured, you can add it in the Attributes & Claims section.
In case there is no custom signing key configured, please refer to SAML Restricted claim set. You can add it as an optional claim through App registrations in the Azure portal.
Open the application in App registrations, select Token configuration, and then select Add optional claim. Select the SAML token type, choose upn from the list, and then click Add to add the claim to the token.
Customization done in the Attributes & Claims section can overwrite the optional claims in the App Registration.
Emit claims based on conditions
You can specify the source of a claim based on user type and the group to which the user belongs.
The user type can be:
- Any - All users are allowed to access the application.
- Members: Native member of the tenant
- All guests: User is brought over from an external organization with or without Microsoft Entra ID.
- Microsoft Entra guests: Guest user belongs to another organization using Microsoft Entra ID.
- External guests: Guest user belongs to an external organization that doesn't have Microsoft Entra ID.
One scenario where the user type is helpful is when the source of a claim is different for a guest and an employee accessing an application. You can specify that if the user is an employee, the NameID is sourced from user.email. If the user is a guest, then the NameID is sourced from user.extensionattribute1.
To add a claim condition:
- In Manage claim, expand the Claim conditions.
- Select the user type.
- Select the group(s) to which the user should belong. You can select up to 50 unique groups across all claims for a given application.
- Select the Source where the claim is going to retrieve its value. You can either select a user attribute from the dropdown for the source attribute or apply a transformation to the user attribute. You can also select a directory schema extension before emitting it as a claim.
The order in which you add the conditions are important. Microsoft Entra first evaluates all conditions with source Attribute and then evaluates all conditions with source Transformation to decide which value to emit in the claim. Conditions with the same source are evaluated from top to bottom. The last value, which matches the expression is emitted in the claim. Transformations such as IsNotEmpty and Contains act like restrictions.
For example, Britta Simon is a guest user in the Contoso tenant. Britta belongs to another organization that also uses Microsoft Entra ID. Given the following configuration for the Fabrikam application, when Britta tries to sign in to Fabrikam, the Microsoft identity platform evaluates the conditions.
First, the Microsoft identity platform verifies whether Britta's user type is All guests. Because the type is All guests, the Microsoft identity platform assigns the source for the claim to user.extensionattribute1. Second, the Microsoft identity platform verifies whether Britta's user type is Microsoft Entra guests. Because the type is All guests, the Microsoft identity platform assigns the source for the claim to user.mail. Finally, the claim is emitted with a value of user.mail for Britta.
As another example, consider when Britta Simon tries to sign in and the following configuration is used. All conditions are first evaluated with the source of Attribute. Because Britta's user type is Microsoft Entra guests, user.mail is assigned as the source for the claim. Next, the transformations are evaluated. Because Britta is a guest, user.extensionattribute1 is now the new source for the claim. Because Britta is in Microsoft Entra guests, user.othermail is now the source for this claim. Finally, the claim is emitted with a value of user.othermail for Britta.
As a final example, consider what happens if Britta has no user.othermail configured or it's empty. In both cases the condition entry is ignored, and the claim falls back to user.extensionattribute1 instead.
Advanced SAML claims options
Advanced claims options can be configured for SAML2.0 applications to expose the same claim to OIDC tokens and vice versa for applications that intend to use the same claim for both SAML2.0 and OIDC response tokens.
Advanced claim options can be configured by checking the box under Advanced SAML Claims Options in the Manage claims blade.
The following table lists other advanced options that can be configured for an application.
| Option | Description |
|---|---|
| Append application ID to issuer | Automatically adds the application ID to the issuer claim. This option ensures a unique claim value for each instance when there are multiple instances of the same application. This setting is ignored if a custom signing key isn't configured for the application. |
| Override audience claim | Allows for the overriding of the audience claim sent to the application. The value provided must be a valid absolute URI. This setting is ignored if a custom signing key isn't configured for the application. |
| Include attribute name format | If selected, Microsoft Entra ID adds an attribute called NameFormat that describes the format of the name to restricted, core, and optional claims for the application. For more information, see, Claims mapping policy type |