Note
Access to this page requires authorization. You can try signing in or changing directories.
Access to this page requires authorization. You can try changing directories.
Role-based access control (RBAC) is a popular mechanism to enforce authorization in applications. RBAC allows administrators to grant permissions to roles rather than to specific users or groups. The administrator can then assign roles to different users and groups to control who has access to what content and functionality.
By using RBAC with application role and role claims, developers can securely enforce authorization in their apps with less effort.
Another approach is to use Microsoft Entra groups and group claims as shown in the active-directory-aspnetcore-webapp-openidconnect-v2 code sample on GitHub. Microsoft Entra groups and application roles aren't mutually exclusive; they can be used together to provide even finer-grained access control.
Declare roles for an application
You define app roles by using the Microsoft Entra admin center during the app registration process. App roles are defined on an application registration representing a service, app, or API. When a user signs in to the application, Microsoft Entra ID emits a roles claim for each role that the user or service principal was granted, which can be used to implement claim-based authorization. App roles can be assigned to a user or a group of users. App roles can also be assigned to the service principal for another application, or to the service principal for a managed identity.
Currently, if you add a service principal to a group, and then assign an app role to that group, Microsoft Entra ID doesn't add the roles claim to tokens it issues.
App roles are declared using App roles UI in the Microsoft Entra admin center:
The number of roles you add counts toward application manifest limits enforced by Microsoft Entra ID. For information about these limits, see the Manifest limits section of Microsoft Entra app manifest reference.
App roles UI
To create an app role by using the Microsoft Entra admin center's user interface:
Sign in to the Microsoft Entra admin center as at least a Cloud Application Administrator.
If you have access to multiple tenants, use the Settings icon
 in the top menu to switch to the tenant containing the app registration from the Directories + subscriptions menu.
Browse to Entra ID > App registrations and then select the application you want to define app roles in.
Under manage select App roles, and then select Create app role.
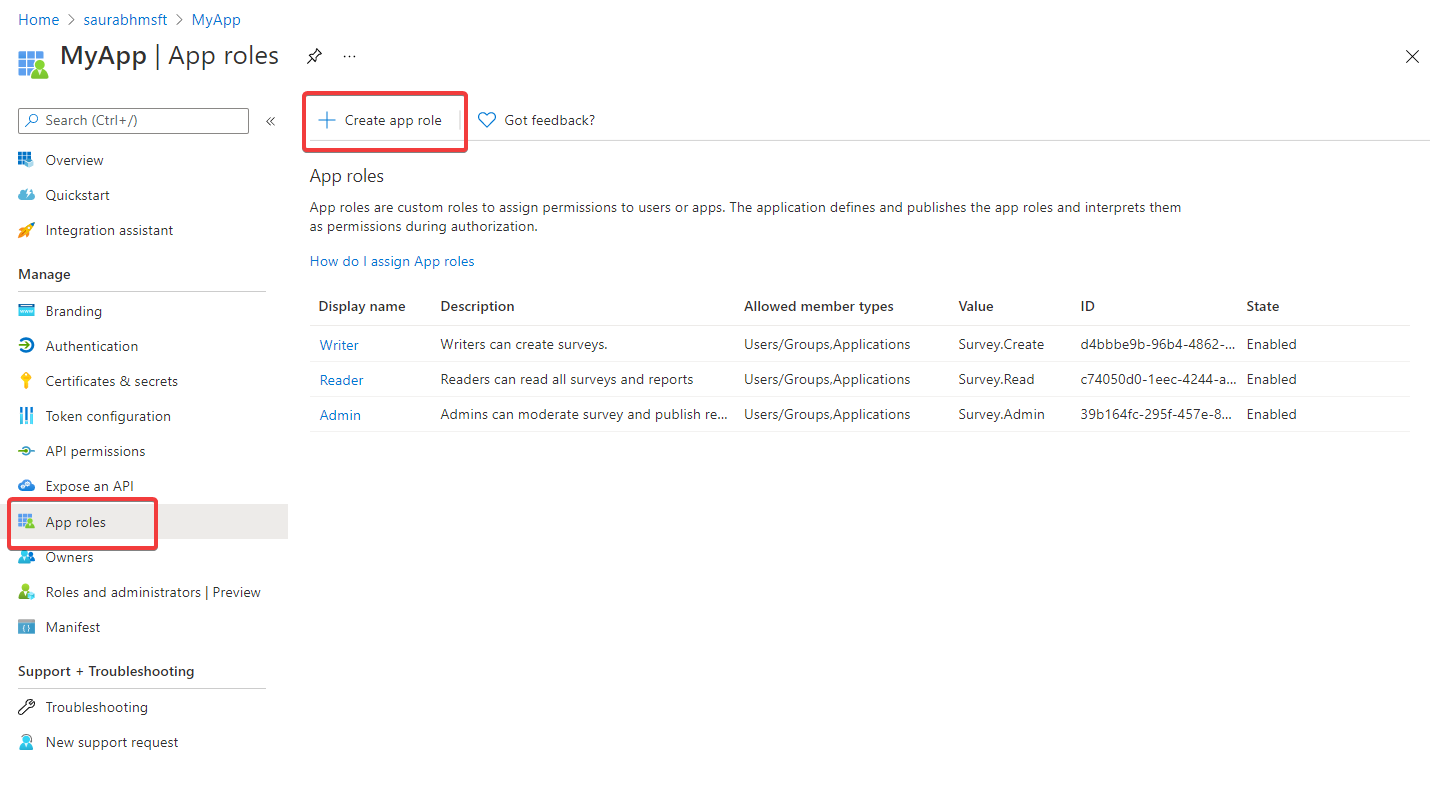
In the Create app role pane, enter the settings for the role. The table following the image describes each setting and their parameters.
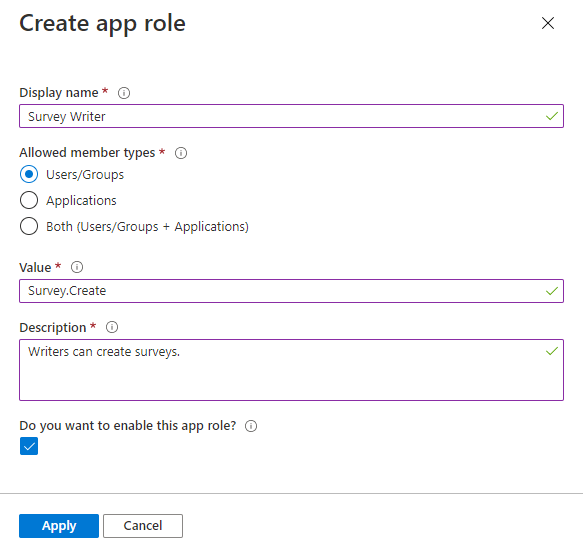
Field Description Example Display name Display name for the app role that appears in the admin consent and app assignment experiences. This value may contain spaces. Survey WriterAllowed member types Specifies whether this app role can be assigned to users, applications, or both.
When available toapplications, app roles appear as application permissions in an app registration's Manage section > API permissions > Add a permission > My APIs > Choose an API > Application permissions.Users/GroupsValue Specifies the value of the roles claim that the application should expect in the token. The value should exactly match the string referenced in the application's code. The value can't contain spaces. Survey.CreateDescription A more detailed description of the app role displayed during admin app assignment and consent experiences. Writers can create surveys.Do you want to enable this app role? Specifies whether the app role is enabled. To delete an app role, deselect this checkbox and apply the change before attempting the delete operation. This setting controls the app role's usage and availability while being able to temporarily or permanently disabling it without removing it entirely. Checked Select Apply to save your changes.
When the app role is set to Enabled, any users, applications, or groups who are assigned have the app role included in their tokens. These can be access tokens when your app is the API being called by an app or ID tokens when your app is signing in a user.
When the app role is set to Disabled, it becomes inactive and no longer assignable. However, the current app role assignments to users, groups and applications will remain, and the app role will continue to pass in the token(s). Remove the app role from the user, group or application to ensure the app role is also removed from the token(s).
Assign application owner
Before you can assign app roles to applications, you need to assign yourself as the application owner.
- In your app registration, under Manage, select Owners, and Add owners.
- In the new window, find and select the owner(s) that you want to assign to the application. Selected owners appear in the right panel. Once done, confirm with Select and the app owner(s) appear in the owner's list.
Note
Ensure that both the API application and the application you want to add permissions to both have an owner, otherwise the API will not be listed when requesting API permissions.
Assign app roles to applications
After adding app roles in your application, you can assign an app role to a client app by using the Microsoft Entra admin center or programmatically by using Microsoft Graph. Assigning an app role to an application shouldn't be confused with assigning roles to users.
When you assign app roles to an application, you create application permissions. Application permissions are typically used by daemon apps or back-end services that need to authenticate and make authorized API call as themselves, without the interaction of a user.
To assign app roles to an application by using the Microsoft Entra admin center:
- Sign in to the Microsoft Entra admin center as at least a Cloud Application Administrator.
- Browse to Entra ID > App registrations and then select All applications.
- Select All applications to view a list of all your applications. If your application doesn't appear in the list, use the filters at the top of the All applications list to restrict the list, or scroll down the list to locate your application.
- Select the application to which you want to assign an app role.
- Select API permissions > Add a permission.
- Select the My APIs tab, and then select the app for which you defined app roles.
- Under Permission, select the roles you want to assign.
- Select the Add permissions button complete addition of the roles.
The newly added roles should appear in your app registration's API permissions pane.
Grant admin consent
Because these are application permissions, not delegated permissions, an admin must grant consent to use the app roles assigned to the application.
- In the app registration's API permissions pane, select Grant admin consent for <tenant name>.
- Select Yes when prompted to grant consent for the requested permissions.
The Status column should reflect that consent has been Granted for <tenant name>.
Usage scenario of app roles
If you're implementing app role business logic that signs in the users in your application scenario, first define the app roles in App registrations. Then, an admin assigns them to users and groups in the Enterprise applications pane. Depending on the scenario, these assigned app roles are included in different tokens that are issued for your application. For example, for an app that signs in users, the roles claims are included in the ID token. When your application calls an API, the roles claims are included in the access token.
If you're implementing app role business logic in an app-calling-API scenario, you have two app registrations. One app registration is for the app, and a second app registration is for the API. In this case, define the app roles and assign them to the user or group in the app registration of the API. When the user authenticates with the app and requests an access token to call the API, a roles claim is included in the token. Your next step is to add code to your web API to check for those roles when the API is called.
To learn how to add authorization to your web API, see Protected web API: Verify scopes and app roles.
App roles vs. groups
Though you can use app roles or groups for authorization, key differences between them can influence which you decide to use for your scenario.
| App roles | Groups |
|---|---|
| They're specific to an application and are defined in the app registration. They move with the application. | They aren't specific to an app, but to a Microsoft Entra tenant. |
| App roles are removed when their app registration is removed. | Groups remain intact even if the app is removed. |
Provided in the roles claim. |
Provided in groups claim. |
Developers can use app roles to control whether a user can sign in to an app or an app can obtain an access token for a web API. To extend this security control to groups, developers and admins can also assign security groups to app roles.
Developers prefer to use app roles when they want to describe and control the parameters of authorization in their app themselves. For example, an app using groups for authorization will break in the next tenant as both the group ID and name could be different. An app using app roles remains safe. In fact, SaaS apps often assign groups to app roles for the same reasons, as it allows the SaaS app to be provisioned in multiple tenants.
Assign users and groups to Microsoft Entra roles
Once you add app roles in your application, you can assign users and groups to Microsoft Entra roles. Assignment of users and groups to roles can be done through the portal's UI, or programmatically using Microsoft Graph. When the users assigned to the various roles sign in to the application, their tokens have the assigned roles in the roles claim.
To assign users and groups to roles by using the Microsoft Entra admin center:
- Sign in to the Microsoft Entra admin center as at least a Cloud Application Administrator.
- If you have access to multiple tenants, use the Settings icon
in the top menu to switch to the tenant containing the app registration from the Directories + subscriptions menu.
- Browse to Entra ID > Enterprise apps.
- Select All applications to view a list of all your applications. If your application doesn't appear in the list, use the filters at the top of the All applications list to restrict the list, or scroll down the list to locate your application.
- Select the application in which you want to assign users or security group to roles.
- Under Manage, select Users and groups.
- Select Add user to open the Add Assignment pane.
- Select the Users and groups selector from the Add Assignment pane. A list of users and security groups is displayed. You can search for a certain user or group and select multiple users and groups that appear in the list. Select the Select button to proceed.
- Select Select a role in the Add assignment pane. All the roles that you defined for the application are displayed.
- Choose a role and select the Select button.
- Select the Assign button to finish the assignment of users and groups to the app.
Confirm that the users and groups you added appear in the Users and groups list.
Next steps
Learn more about app roles with the following resources.
- Code samples on GitHub
- Reference documentation
- Video: Implement authorization in your applications with Microsoft identity platform (1:01:15)