Access Microsoft Graph from a secured app as the app
Learn how to access Microsoft Graph from a web app running on Azure App Service.

You want to call Microsoft Graph for the web app. A safe way to give your web app access to data is to use a system-assigned managed identity. A managed identity from Microsoft Entra ID allows App Service to access resources through role-based access control (RBAC), without requiring app credentials. After assigning a managed identity to your web app, Azure takes care of the creation and distribution of a certificate. You don't have to worry about managing secrets or app credentials.
In this tutorial, you learn how to:
- Create a system-assigned managed identity on a web app.
- Add Microsoft Graph API permissions to a managed identity.
- Call Microsoft Graph from a web app by using managed identities.
If you don't have an Azure subscription, create an Azure free account before you begin.
Prerequisites
- A web application running on Azure App Service that has the App Service authentication/authorization module enabled.
Enable managed identity on app
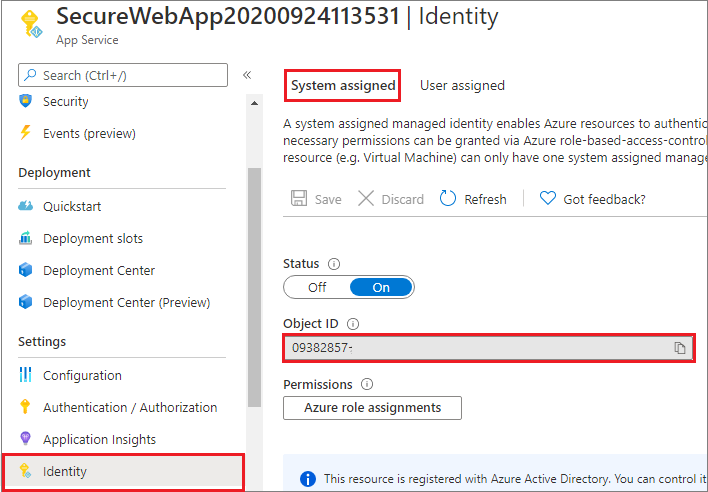
If you create and publish your web app through Visual Studio, the managed identity was enabled on your app for you. In your app service, select Identity in the left pane and then select System assigned. Verify that Status is set to On. If not, select Save and then select Yes to enable the system-assigned managed identity. When the managed identity is enabled, the status is set to On and the object ID is available.
Take note of the Object ID value, which you'll need in the next step.
Grant access to Microsoft Graph
When accessing the Microsoft Graph, the managed identity needs to have proper permissions for the operation it wants to perform. Currently, there's no option to assign such permissions through the Microsoft Entra admin center. The following script will add the requested Microsoft Graph API permissions to the managed identity service principal object.
# Install the module.
# Install-Module Microsoft.Graph -Scope CurrentUser

# The tenant ID
$TenantId = "00001111-aaaa-2222-bbbb-3333cccc4444"

# The name of your web app, which has a managed identity.
$webAppName = "SecureWebApp-20201106120003"
$resourceGroupName = "SecureWebApp-20201106120003ResourceGroup"

# The name of the app role that the managed identity should be assigned to.
$appRoleName = "User.Read.All"

# Get the web app's managed identity's object ID.
Connect-AzAccount -Tenant $TenantId
$managedIdentityObjectId = (Get-AzWebApp -ResourceGroupName $resourceGroupName -Name $webAppName).identity.principalid

Connect-MgGraph -TenantId $TenantId -Scopes 'Application.Read.All','AppRoleAssignment.ReadWrite.All'

# Get Microsoft Graph app's service principal and app role.
$serverApplicationName = "Microsoft Graph"
$serverServicePrincipal = (Get-MgServicePrincipal -Filter "DisplayName eq '$serverApplicationName'")
$serverServicePrincipalObjectId = $serverServicePrincipal.Id

$appRoleId = ($serverServicePrincipal.AppRoles | Where-Object {$_.Value -eq $appRoleName }).Id

# Assign the managed identity access to the app role.
New-MgServicePrincipalAppRoleAssignment `
    -ServicePrincipalId $managedIdentityObjectId `
    -PrincipalId $managedIdentityObjectId `
    -ResourceId $serverServicePrincipalObjectId `
    -AppRoleId $appRoleId
After executing the script, you can verify in the Microsoft Entra admin center that the requested API permissions are assigned to the managed identity.
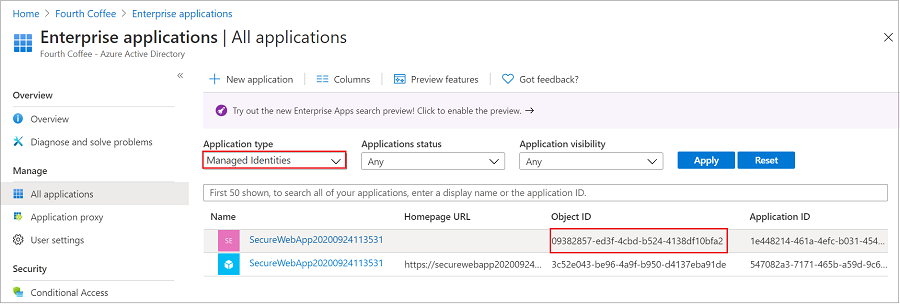
Go to Applications, and then select Enterprise applications. This pane displays all the service principals in your tenant. Add a filter for "Application type == Managed Identities" and select the service principal for the managed identity.
If you're following this tutorial, there are two service principals with the same display name (SecureWebApp2020094113531, for example). The service principal that has a Homepage URL represents the web app in your tenant. The service principal that appears in Managed Identities should not have a Homepage URL listed and the Object ID should match the object ID value of the managed identity in the previous step.
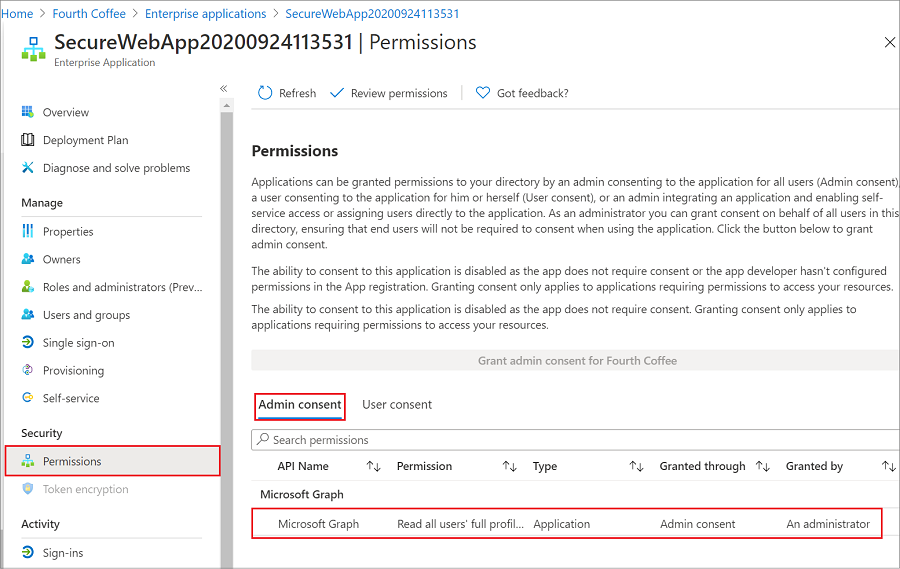
Select the service principal for the managed identity.
In Overview, select Permissions, and you'll see the added permissions for Microsoft Graph.
Call Microsoft Graph
The ChainedTokenCredential, ManagedIdentityCredential, and EnvironmentCredential classes are used to get a token credential for your code to authorize requests to Microsoft Graph. Create an instance of the ChainedTokenCredential class, which uses the managed identity in the App Service environment or the development environment variables to fetch tokens and attach them to the service client. The following code example gets the authenticated token credential and uses it to create a service client object, which gets the users in the group.
To see this code as part of a sample application, see the sample on GitHub.
Install the Microsoft.Identity.Web.GraphServiceClient client library package
Install the Microsoft.Graph and Microsoft.Identity.Web.GraphServiceClient NuGet packages in your project by using the .NET command-line interface (CLI) or the Package Manager Console in Visual Studio.
.NET CLI
Open a command line, and switch to the directory that contains your project file.
Run the install commands.
dotnet add package Microsoft.Identity.Web.GraphServiceClient
dotnet add package Microsoft.Graph
Package Manager Console
Open the project/solution in Visual Studio, and open the console by using the Tools > NuGet Package Manager > Package Manager Console command.
Run the install commands.
Install-Package Microsoft.Identity.Web.GraphServiceClient
Install-Package Microsoft.Graph
Example
using System;
using System.Collections.Generic;
using System.Threading.Tasks;
using Microsoft.AspNetCore.Mvc.RazorPages;
using Microsoft.Extensions.Logging;
using Microsoft.Graph;
using Azure.Identity;

...

public IList<MSGraphUser> Users { get; set; }

public async Task OnGetAsync()
{
    // Create the Graph service client with a ChainedTokenCredential which gets an access
    // token using the available Managed Identity or environment variables if running
    // in development.
    var credential = new ChainedTokenCredential(
        new ManagedIdentityCredential(),
        new EnvironmentCredential());

    string[] scopes = new[] { "https://graph.microsoft.com/.default" };

    var graphServiceClient = new GraphServiceClient(
        credential, scopes);

    List<MSGraphUser> msGraphUsers = new List<MSGraphUser>();
    try
    {
        //var users = await graphServiceClient.Users.Request().GetAsync();
        var users = await graphServiceClient.Users.GetAsync();
        foreach (var u in users.Value)
        {
            MSGraphUser user = new MSGraphUser();
            user.userPrincipalName = u.UserPrincipalName;
            user.displayName = u.DisplayName;
            user.mail = u.Mail;
            user.jobTitle = u.JobTitle;

            msGraphUsers.Add(user);
        }
    }
    catch (Exception ex)
    {
        string msg = ex.Message;
    }

    Users = msGraphUsers;
}
Clean up resources
If you're finished with this tutorial and no longer need the web app or associated resources, clean up the resources you created.