Note
Access to this page requires authorization. You can try signing in or changing directories.
Access to this page requires authorization. You can try changing directories.
Applies to:  Workforce tenants External tenants (learn more)
In this tutorial, you build a native Windows Desktop .NET (XAML) app that signs in users and gets an access token to call the Microsoft Graph API.
When you've completed the guide, your application will able to call a protected API that uses personal accounts (including outlook.com, live.com, and others). The application will also use work and school accounts from any company or organization that uses Microsoft Entra ID.
In this tutorial, you:
- Create a Windows Presentation Foundation (WPF) project in Visual Studio
- Install the Microsoft Authentication Library (MSAL) for .NET
- Register the application
- Add code to support user sign-in and sign-out
- Add code to call Microsoft Graph API
- Test the app
Prerequisites
- A workforce tenant. You can use your Default Directory or set up a new tenant.
- Register a new app in the Microsoft Entra admin center, configured for Accounts in any organizational directory and personal Microsoft accounts. Refer to Register an application for more details. Record the following values from the application Overview page for later use:
- Application (client) ID
- Directory (tenant) ID
- Add the following redirect URIs using the Mobile and desktop applications platform configuration. Refer to How to add a redirect URI in your application for more details.
- Redirect URI:
https://login.microsoftonline.com/common/oauth2/nativeclient
- Redirect URI:
- .NET Framework 4.8
- Visual Studio 2019
How the sample app generated by this guide works

The sample application that you create with this guide enables a Windows Desktop application that queries the Microsoft Graph API or a web API that accepts tokens from a Microsoft identity platform endpoint. For this scenario, you add a token to HTTP requests via the Authorization header. The Microsoft Authentication Library (MSAL) handles token acquisition and renewal.
Handling token acquisition for accessing protected web APIs
After the user is authenticated, the sample application receives a token you can use to query Microsoft Graph API or a web API that's secured by the Microsoft identity platform.
APIs such as Microsoft Graph require a token to allow access to specific resources. For example, a token is required to read a user's profile, access a user's calendar, or send email. Your application can request an access token by using MSAL to access these resources by specifying API scopes. This access token is then added to the HTTP Authorization header for every call that's made against the protected resource.
MSAL manages caching and refreshing access tokens for you, so that your application doesn't need to.
NuGet packages
This guide uses the following NuGet packages:
| Library | Description |
|---|---|
| Microsoft.Identity.Client | Microsoft Authentication Library (MSAL.NET) |
Set up your project
In this section, you create a new project to demonstrate how to integrate a Windows Desktop .NET application (XAML) with Sign-In with Microsoft so that the application can query web APIs that require a token.
The application that you create displays a button that will call the Microsoft Graph API, an area to display the results, and a sign-out button.
Note
Prefer to download this sample's Visual Studio project instead? Download a project, and register your application to configure the code sample before you execute it.
Create the application using the following steps:
- Open Visual Studio
- On the start window, select Create a new project.
- In the All language dropdown, select C#.
- Search for and choose the WPF App (.NET Framework) template, and then select Next.
- In the Project name box, enter a name like Win-App-calling-MsGraph.
- Choose a Location for the project or accept the default option.
- In the Framework, select .NET Framework 4.8.
- Select Create.
Add MSAL to your project
In Visual Studio, select Tools > NuGet Package Manager> Package Manager Console.
In the Package Manager Console window, paste the following Azure PowerShell command:
Install-Package Microsoft.Identity.Client -Pre
Add the code to initialize MSAL
In this step, you create a class to handle interaction with MSAL, such as handling of tokens.
Open the App.xaml.cs file, and then add the reference for MSAL to the class:
using Microsoft.Identity.Client;Update the app class to the following:
public partial class App : Application
{
    static App()
    {
        _clientApp = PublicClientApplicationBuilder.Create(ClientId)
            .WithAuthority(AzureCloudInstance.AzurePublic, Tenant)
            .WithDefaultRedirectUri()
            .Build();
    }

    // Below are the clientId (Application Id) of your app registration and the tenant information.
    // You have to replace:
    // - the content of ClientID with the Application Id for your app registration
    // - the content of Tenant by the information about the accounts allowed to sign-in in your application:
    //   - For Work or School account in your org, use your tenant ID, or domain
    //   - for any Work or School accounts, use `organizations`
    //   - for any Work or School accounts, or Microsoft personal account, use `common`
    //   - for Microsoft Personal account, use consumers
    private static string ClientId = "Enter_the_Application_Id_here";

    private static string Tenant = "common";

    private static IPublicClientApplication _clientApp ;

    public static IPublicClientApplication PublicClientApp { get { return _clientApp; } }
}
Create the application UI
This section shows how an application can query a protected back-end server such as Microsoft Graph.
A MainWindow.xaml file is automatically be created as a part of your project template. Open this file, and then replace your application's <Grid> node with the following code:
<Grid>
    <StackPanel Background="Azure">
        <StackPanel Orientation="Horizontal" HorizontalAlignment="Right">
            <Button x:Name="CallGraphButton" Content="Call Microsoft Graph API" HorizontalAlignment="Right" Padding="5" Click="CallGraphButton_Click" Margin="5" FontFamily="Segoe Ui"/>
            <Button x:Name="SignOutButton" Content="Sign-Out" HorizontalAlignment="Right" Padding="5" Click="SignOutButton_Click" Margin="5" Visibility="Collapsed" FontFamily="Segoe Ui"/>
        </StackPanel>
        <Label Content="API Call Results" Margin="0,0,0,-5" FontFamily="Segoe Ui" />
        <TextBox x:Name="ResultText" TextWrapping="Wrap" MinHeight="120" Margin="5" FontFamily="Segoe Ui"/>
        <Label Content="Token Info" Margin="0,0,0,-5" FontFamily="Segoe Ui" />
        <TextBox x:Name="TokenInfoText" TextWrapping="Wrap" MinHeight="70" Margin="5" FontFamily="Segoe Ui"/>
    </StackPanel>
</Grid>
Use MSAL to get a token for the Microsoft Graph API
In this section, you use MSAL to get a token for the Microsoft Graph API.
In the MainWindow.xaml.cs file, add the reference for MSAL to the class:
using Microsoft.Identity.Client;Replace the
MainWindowclass code with the following code:public partial class MainWindow : Window { //Set the API Endpoint to Graph 'me' endpoint string graphAPIEndpoint = "https://graph.microsoft.com/v1.0/me"; //Set the scope for API call to user.read string[] scopes = new string[] { "user.read" }; public MainWindow() { InitializeComponent(); } /// <summary> /// Call AcquireToken - to acquire a token requiring user to sign-in /// </summary> private async void CallGraphButton_Click(object sender, RoutedEventArgs e) { AuthenticationResult authResult = null; var app = App.PublicClientApp; ResultText.Text = string.Empty; TokenInfoText.Text = string.Empty; var accounts = await app.GetAccountsAsync(); var firstAccount = accounts.FirstOrDefault(); try { authResult = await app.AcquireTokenSilent(scopes, firstAccount) .ExecuteAsync(); } catch (MsalUiRequiredException ex) { // A MsalUiRequiredException happened on AcquireTokenSilent. // This indicates you need to call AcquireTokenInteractive to acquire a token System.Diagnostics.Debug.WriteLine($"MsalUiRequiredException: {ex.Message}"); try { authResult = await app.AcquireTokenInteractive(scopes) .WithAccount(accounts.FirstOrDefault()) .WithPrompt(Prompt.SelectAccount) .ExecuteAsync(); } catch (MsalException msalex) { ResultText.Text = $"Error Acquiring Token:{System.Environment.NewLine}{msalex}"; } } catch (Exception ex) { ResultText.Text = $"Error Acquiring Token Silently:{System.Environment.NewLine}{ex}"; return; } if (authResult != null) { ResultText.Text = await GetHttpContentWithToken(graphAPIEndpoint, authResult.AccessToken); DisplayBasicTokenInfo(authResult); this.SignOutButton.Visibility = Visibility.Visible; } } }
More information
Get a user token interactively
Calling the AcquireTokenInteractive method results in a window that prompts users to sign in. Applications usually require users to sign in interactively the first time they need to access a protected resource. They might also need to sign in when a silent operation to acquire a token fails (for example, when a user's password is expired).
Get a user token silently
The AcquireTokenSilent method handles token acquisitions and renewals without any user interaction. After AcquireTokenInteractive is executed for the first time, AcquireTokenSilent is the usual method to use to obtain tokens that access protected resources for subsequent calls, because calls to request or renew tokens are made silently.
Eventually, the AcquireTokenSilent method may fail. Reasons for failure might be that the user has either signed out or changed their password on another device. When MSAL detects that the issue can be resolved by requiring an interactive action, it fires an MsalUiRequiredException exception. Your application can handle this exception in two ways:
It can make a call against
AcquireTokenInteractiveimmediately. This call results in prompting the user to sign in. This pattern is used in online applications where there's no available offline content for the user. The sample generated by this setup follows this pattern, which can be seen in action the first time you execute the sample.Because no user has used the application,
PublicClientApp.Users.FirstOrDefault()contains a null value, and anMsalUiRequiredExceptionexception is thrown.The code in the sample then handles the exception by calling
AcquireTokenInteractive, which results in prompting the user to sign in.It can instead present a visual indication to users that an interactive sign-in is required, so that they can select the right time to sign in. Or the application can retry
AcquireTokenSilentlater. This pattern is frequently used when users can use other application functionality without disruption. For example, when offline content is available in the application. In this case, users can decide when they want to sign in to either access the protected resource or refresh the outdated information. Alternatively, the application can decide to retryAcquireTokenSilentwhen the network is restored after having been temporarily unavailable.
Call the Microsoft Graph API by using the token you just obtained
Add the following new method to your MainWindow.xaml.cs. The method is used to make a GET request against Graph API by using an Authorize header:
/// <summary>
/// Perform an HTTP GET request to a URL using an HTTP Authorization header
/// </summary>
/// <param name="url">The URL</param>
/// <param name="token">The token</param>
/// <returns>String containing the results of the GET operation</returns>
public async Task<string> GetHttpContentWithToken(string url, string token)
{
    var httpClient = new System.Net.Http.HttpClient();
    System.Net.Http.HttpResponseMessage response;
    try
    {
        var request = new System.Net.Http.HttpRequestMessage(System.Net.Http.HttpMethod.Get, url);
        //Add the token in Authorization header
        request.Headers.Authorization = new System.Net.Http.Headers.AuthenticationHeaderValue("Bearer", token);
        response = await httpClient.SendAsync(request);
        var content = await response.Content.ReadAsStringAsync();
        return content;
    }
    catch (Exception ex)
    {
        return ex.ToString();
    }
}
More information about making a REST call against a protected API
In this sample application, you use the GetHttpContentWithToken method to make an HTTP GET request against a protected resource that requires a token and then return the content to the caller. This method adds the acquired token in the HTTP Authorization header. For this sample, the resource is the Microsoft Graph API me endpoint, which displays the user's profile information.
Add a method to sign out a user
To sign out a user, add the following method to your MainWindow.xaml.cs file:
/// <summary>
/// Sign out the current user
/// </summary>
private async void SignOutButton_Click(object sender, RoutedEventArgs e)
{
    var accounts = await App.PublicClientApp.GetAccountsAsync();

    if (accounts.Any())
    {
        try
        {
            await App.PublicClientApp.RemoveAsync(accounts.FirstOrDefault());
            this.ResultText.Text = "User has signed-out";
            this.CallGraphButton.Visibility = Visibility.Visible;
            this.SignOutButton.Visibility = Visibility.Collapsed;
        }
        catch (MsalException ex)
        {
            ResultText.Text = $"Error signing-out user: {ex.Message}";
        }
    }
}
More information about user sign-out
The SignOutButton_Click method removes users from the MSAL user cache, which effectively tells MSAL to forget the current user so that a future request to acquire a token succeeds only if it's made to be interactive.
Although the application in this sample supports single users, MSAL supports scenarios where multiple accounts can be signed in at the same time. An example is an email application where a user has multiple accounts.
Display basic token information
To display basic information about the token, add the following method to your MainWindow.xaml.cs file:
/// <summary>
/// Display basic information contained in the token
/// </summary>
private void DisplayBasicTokenInfo(AuthenticationResult authResult)
{
    TokenInfoText.Text = "";
    if (authResult != null)
    {
        TokenInfoText.Text += $"Username: {authResult.Account.Username}" + Environment.NewLine;
        TokenInfoText.Text += $"Token Expires: {authResult.ExpiresOn.ToLocalTime()}" + Environment.NewLine;
    }
}
More information
In addition to the access token that's used to call the Microsoft Graph API, after the user signs in, MSAL also obtains an ID token. This token contains a small subset of information that's pertinent to users. The DisplayBasicTokenInfo method displays the basic information that's contained in the token. For example, it displays the user's display name and ID, as well as the token expiration date and the string representing the access token itself. You can select the Call Microsoft Graph API button multiple times and see that the same token was reused for subsequent requests. You can also see the expiration date being extended when MSAL decides it's time to renew the token.
Test your code
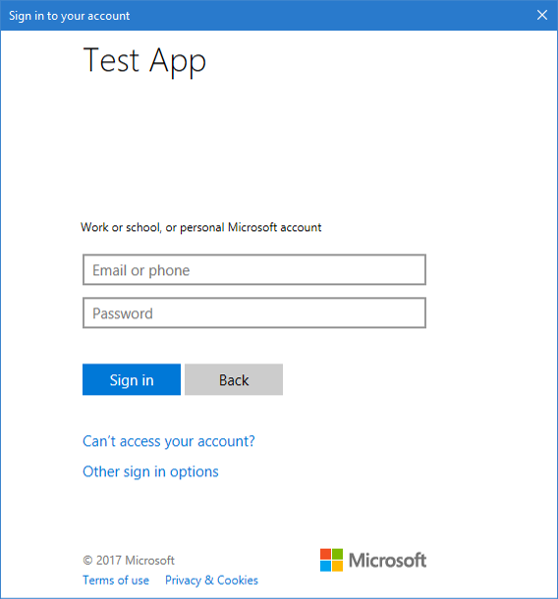
To run your project, in Visual Studio, select F5. Your application MainWindow is displayed.
The first time that you run the application and select the Call Microsoft Graph API button, you're prompted to sign in. Use a Microsoft Entra account (work or school account) or a Microsoft account (live.com, outlook.com) to test it.
Provide consent for application access
The first time that you sign in to your application, you're also prompted to provide consent to allow the application to access your profile and sign you in, as shown here:

View application results
After you sign in, you should see the user profile information that's returned by the call to the Microsoft Graph API. The results are displayed in the API Call Results box. Basic information about the token that was acquired via the call to AcquireTokenInteractive or AcquireTokenSilent should be visible in the Token Info box. The results contain the following properties:
| Property | Format | Description |
|---|---|---|
| Username | user@domain.com | The username that is used to identify the user. |
| Token Expires | DateTime | The time at which the token expires. MSAL extends the expiration date by renewing the token as necessary. |
More information about scopes and delegated permissions
The Microsoft Graph API requires the user.read scope to read a user's profile. This scope is automatically added by default in every application that's registered in the Application Registration Portal. Other APIs for Microsoft Graph, and custom APIs for your back-end server, might require more scopes. The Microsoft Graph API requires the Calendars.Read scope to list the user's calendars.
To access the user's calendars in the context of an application, add the Calendars.Read delegated permission to the application registration information. Then, add the Calendars.Read scope to the acquireTokenSilent call.
Note
The user might be prompted for additional consents as you increase the number of scopes.
Help and support
If you need help, want to report an issue, or want to learn about your support options, see Help and support for developers.
Next step
Learn more about building desktop apps that call protected web APIs in our multi-part scenario series: