Customize the language of the authentication experience
You can create a personalized sign-in experience for users who sign in using a specific browser language by customizing the branding elements for that browser language. This customization overrides any configurations made to the default branding. If you don't make any changes to the elements, the default elements are displayed.
Prerequisites
- If you haven't already created your own Microsoft Entra external tenant, create one now.
- Register an application.
- Create a user flow.
- Review the file size requirements for each image you want to add. You may need to use a photo editor to create the right-sized images. The preferred image type for all images is PNG, but JPG is accepted.
Tip

To try out this feature, go to the Woodgrove Groceries demo and start the “Language customization” use case.
Add browser language under Company branding
Sign in to the Microsoft Entra admin center as at least a Organizational Branding Administrator.
If you have access to multiple tenants, use the Settings icon
 in the top menu to switch to the external tenant you created earlier from the Directories + subscriptions menu.
Browse to Company branding > Browser language customizations > Add browser language.
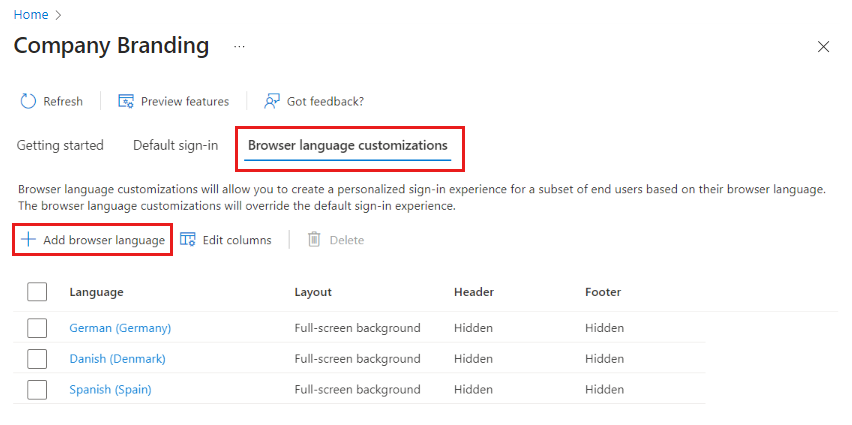
On the Basics tab, under Language specific UI Customization, select the browser language you want to customize from the menu.
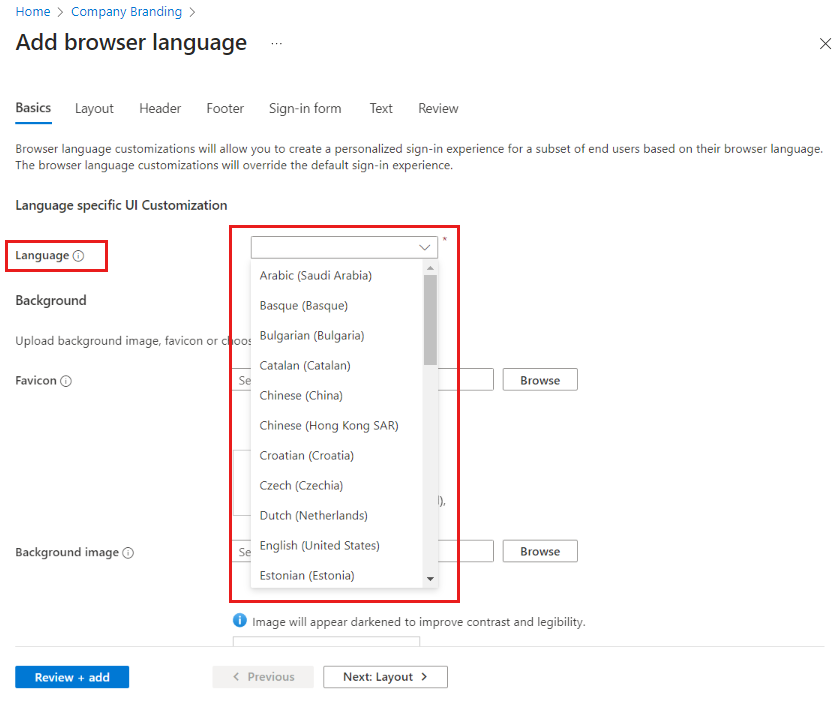


The following languages are supported in the external tenant:
- Arabic (Saudi Arabia)
- Basque (Basque)
- Bulgarian (Bulgaria)
- Catalan (Catalan)
- Chinese (China)
- Chinese (Hong Kong SAR)
- Croatian (Croatia)
- Czech (Czechia)
- Danish (Denmark)
- Dutch (Netherlands)
- English (United States)
- Estonian (Estonia)
- Finnish (Finland)
- French (France)
- Galician (Galician)
- German (Germany)
- Greek (Greece)
- Hebrew (Israel)
- Hungarian (Hungary)
- Italian (Italy)
- Japanese (Japan)
- Kazakh (Kazakhstan)
- Korean (Korea)
- Latvian (Latvia)
- Lithuanian (Lithuania)
- Norwegian Bokmål (Norway)
- Polish (Poland)
- Portuguese (Brazil)
- Portuguese (Portugal)
- Romanian (Romania)
- Russian (Russia)
- Serbian (Latin, Serbia)
- Slovak (Slovakia)
- Slovenian (Sierra Leone)
- Spanish (Spain)
- Swedish (Sweden)
- Thai (Thailand)
- Turkish (Türkiye)
- Ukrainian (Ukraine)
- Customize the elements on the Basics, Layout, Header, Footer, Sign-in form, and Text tabs. For detailed instructions, see Customize the branding and end-user experience.
- When you’re finished, select the Review tab and go over all of your language customizations. Then select Add if you would like to save your changes or Previous if you would like to continue editing.
Add language customization to a user flow
Language customization in the external tenant allows your user flow to accommodate different languages to suit your customer's needs. You can use languages to modify the strings displayed to your customers as part of the attribute collection process during sign-up.
Sign in to the Microsoft Entra admin center as at least a Organizational Branding Administrator.
If you have access to multiple tenants, use the Settings icon
in the top menu to switch to the external tenant you created earlier from the Directories + subscriptions menu.Browse to Identity > External Identities > User flows.
Select the user flow that you want to enable for translations.
Select Languages.
On the Languages page for the user flow, select the language that you want to customize.
Expand Sign up and sign in (Preview).
Select Download defaults (or Download overrides if you have previously edited this language).


The downloaded file is in JSON format and includes both built-in and custom attributes, as well as other page-level and error strings:
{
	"AttributeCollection_Description": "Wir benötigen nur ein paar weitere Informationen, um Ihr Konto einzurichten.",
	"AttributeCollection_Title": "Details hinzufügen",
	"Attribute_City": "Ort",
	"Attribute_Country": "Land/Region",
	"Attribute_DisplayName": "Anzeigename",
	"Attribute_Email": "E-Mail-Adresse",
	"Attribute_Generic_ConfirmationLabel": "{0} erneut eingeben",
	"Attribute_GivenName": "Vorname",
	"Attribute_JobTitle": "Position",
	"Attribute_Password": "Kennwort",
	"Attribute_Password_MismatchErrorString": "Kennwörter stimmen nicht überein.",
	"Attribute_PostalCode": "Postleitzahl",
	"Attribute_State": "Bundesland/Kanton",
	"Attribute_StreetAddress": "Straße",
	"Attribute_Surname": "Nachname",
	"SignIn_Description": "Melden Sie sich an, um auf {0} zuzugreifen.",
	"SignIn_Title": "Anmelden",
	"SignUp_Description": "Registrieren Sie sich, um auf {0} zuzugreifen.",
	"SignUp_Title": "Konto erstellen",
	"SisuOtc_Title": "Code eingeben",
	"Attribute_extension_a235ca9a0a7c4d33bd69e07bed81c8b1_Shoesize": "Shoe size"
}
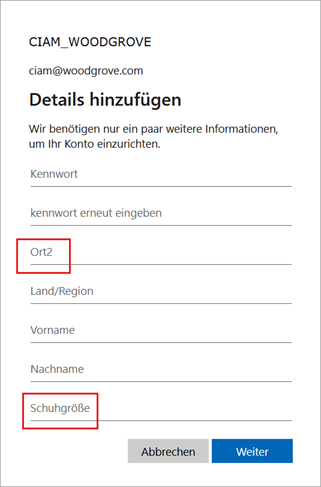
You can modify any or all of these attributes in the downloaded file. For example, you can modify the built-in attribute, City and the custom attribute, Shoesize:
{
	"AttributeCollection_Description": "Wir benötigen nur ein paar weitere Informationen, um Ihr Konto einzurichten.",
	"AttributeCollection_Title": "Details hinzufügen",
	"Attribute_City": "Ort2",
	"Attribute_Country": "Land/Region",
	"Attribute_DisplayName": "Anzeigename",
	"Attribute_Email": "E-Mail-Adresse",
	"Attribute_Generic_ConfirmationLabel": "{0} erneut eingeben",
	"Attribute_GivenName": "Vorname",
	"Attribute_JobTitle": "Position",
	"Attribute_Password": "Kennwort",
	"Attribute_Password_MismatchErrorString": "Kennwörter stimmen nicht überein.",
	"Attribute_PostalCode": "Postleitzahl",
	"Attribute_State": "Bundesland/Kanton",
	"Attribute_StreetAddress": "Straße",
	"Attribute_Surname": "Nachname",
	"SignIn_Description": "Melden Sie sich an, um auf {0} zuzugreifen.",
	"SignIn_Title": "Anmelden",
	"SignUp_Description": "Registrieren Sie sich, um auf {0} zuzugreifen.",
	"SignUp_Title": "Konto erstellen",
	"SisuOtc_Title": "Code eingeben",
	"Attribute_extension_a235ca9a0a7c4d33bd69e07bed81c8b1_Shoesize": "Schuhgröße"
}
- After making the necessary changes, you can upload the new overrides file. The changes are saved to your user flow automatically. The override appears under the Configured tab.
- To double-check your changes, select the language under the Configured tab and expand the Sign up and sign in (Preview) option. You can view your customized language file by selecting Download overrides. To remove your customized override file, select Remove overrides.

- Go to the sign-in page of your external tenant. Make sure you have the right locale and market in your URLs, for example: ui_locales=de-DE and mkt=de-DE. The updated attributes on the sign-up page appear as follows:
Important
In the external tenant, we have two options to add custom text to the sign-up and sign-in experience. The function is available under each user flow during language customization and under Company Branding. Although we have to ways to customize strings (via Company branding and via User flows), both ways modify the same JSON file. The most recent change made either via User flows or via Company branding will always override the previous one.
Right-to-left language support
Languages that are read right-to-left, such as Arabic and Hebrew, are displayed in the opposite direction compared to languages that are read left-to-right. The external tenant supports right-to-left functionality and features for languages that work in a right-to-left environment for entering, and displaying data. Right-to-left readers can interact in a natural reading manner.

Remove the browser language customization
When no longer needed, you can remove the language customization from your external tenant in the admin center or with the Microsoft Graph API.
Remove the language customization in the admin center
Sign in to the Microsoft Entra admin center.
Browse to Company branding > Browser language customizations
Select the language you want to delete and then select Delete and OK.


Remove the language customization with the Microsoft Graph API
Sign in to the MS Graph explorer with your external tenant account:
https://developer.microsoft.com/en-us/graph/graph-explorer?tenant=<your-tenant-name.onmicrosoft.com>.Query the default branding object using the Microsoft Graph API:
https://graph.microsoft.com/v1.0/organization/<your-tenant-ID>/branding/localizations. To confirm that you're signed in to your external tenant, verify the tenant name on the right side of the screen.Remove the localized branding object.

Wait a few minutes for the changes to take effect.

Next steps
Feedback
Coming soon: Throughout 2024 we will be phasing out GitHub Issues as the feedback mechanism for content and replacing it with a new feedback system. For more information see: https://aka.ms/ContentUserFeedback.
Submit and view feedback for