Note
Access to this page requires authorization. You can try signing in or changing directories.
Access to this page requires authorization. You can try changing directories.
The user profile is the digital representation of a user's identity that should, where possible, reflect how the user wants to be represented. The user profile appears in several places across the Microsoft suite, including Outlook, Teams, Windows, and others. Identity information that appears across these tools is sourced from the user profile.
A user's profile information and settings can be managed on an individual basis and for all users in your directory. When you look at these settings together, you can see how permissions, restrictions, and other connections work together.
This article covers how to add user profile information, such as a profile picture and job title. You can also choose to allow users to connect their LinkedIn accounts or restrict access to the Microsoft Entra administration portal. Some settings might be managed in more than one area, such as the uploading Organizational data in Microsoft 365.
Prerequisites
The required role of least privilege varies based on the type of user you're adding and if you need to assign Microsoft Entra roles at the same time. Whenever possible you should use the least privileged role.
| Task | Role |
|---|---|
| Create a new user | User Administrator |
| Invite an external guest | Guest Inviter |
| Assign Microsoft Entra roles | Privileged Role Administrator |
Add or change profile information
When new users are created, only a few details are added to their user profile. If your organization needs more details, they can be added after the user is created.
Sign in to the Microsoft Entra admin center as at least a User Administrator.
Browse to Entra ID > Users.

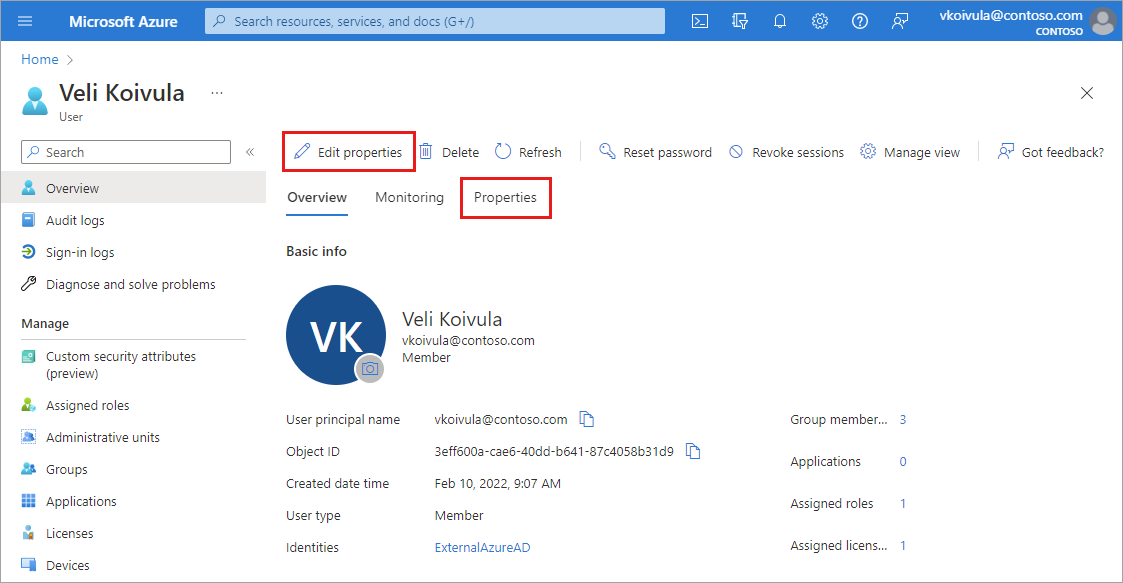
Select a user.
There are two ways to edit user profile details. Either select Edit properties from the top of the page or select Properties.
After making any changes, select the Save button.
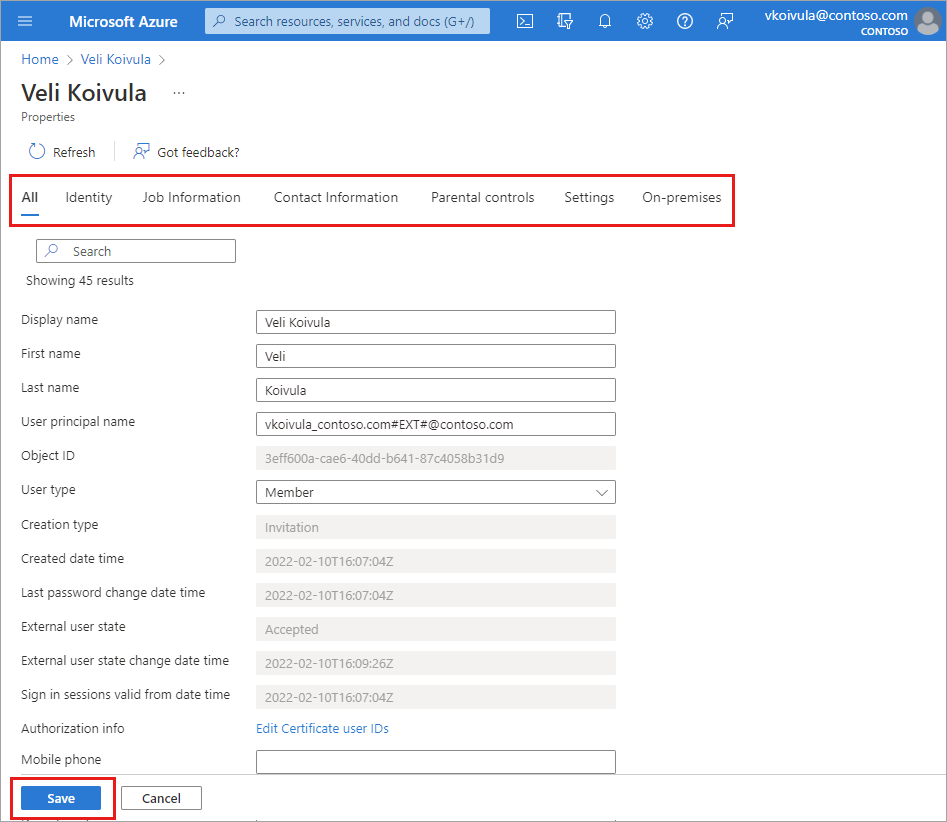
If you selected the Edit properties option:
- The full list of properties appears in edit mode on the All category.
- To edit properties based on the category, select a category from the top of the page.
- Select the Save button at the bottom of the page to save any changes.
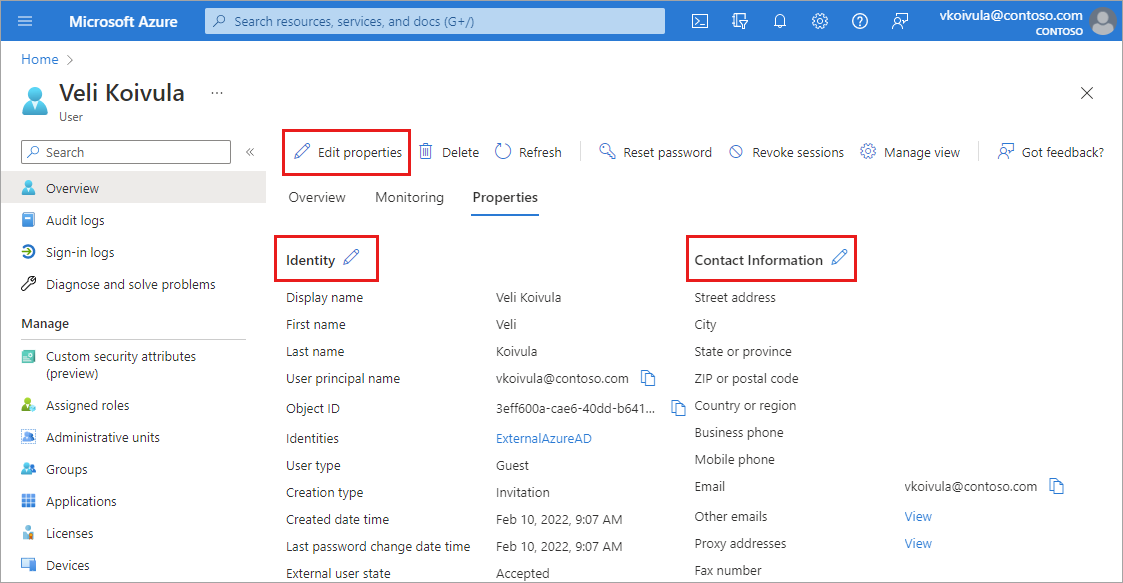
If you selected the Properties tab option:
- The full list of properties appears for you to review.
- To edit a property, select the pencil icon next to the category heading.
- Select the Save button at the bottom of the page to save any changes.
Profile categories
There are six categories of profile details you might be able to edit.
Identity: Add or update identity values for the user. These values include display name, first and last name, and user principal name. Review the user name guidance before adding or editing user names.
Job information: Add any job-related information, such as the user's job title, department, or manager.
Contact info: Add any relevant contact information for the user.
Parental controls: For organizations like K-12 school districts, the user's age group might need to be provided. Minors are 12 and under, Not adult are 13-18 years old, and Adults are 18 and over. The combination of age group and consent provided by parent options determine the Legal age group classification. The Legal age group classification might limit the user's access and authority.
Settings: Decide whether the user can sign in to the Microsoft Entra tenant. You can also specify the user's global location.
On-premises: Accounts synced from Windows Server Active Directory include other values not applicable to Microsoft Entra accounts.
Note
For users whose source of authority is Windows Server Active Directory, you must use Windows Server Active Directory to update their identity, contact info, or job info. After making updates, you must wait for the next synchronization cycle to complete before the changes take effect. However, you can update their attributes directly in the Microsoft Entra admin center if you are updating Microsoft Entra ID attributes, such as Usage Location. Some attributes that are synchronized from on-premises, such as User Principal Name, On Premises Immutable ID, and Account Enabled, can be updated in Microsoft Entra ID for users managed from on-premises, but we don't recommend managing these attributes in Entra ID other than for emergency purposes.
Guidance on user name properties
Microsoft Entra ID provides several fields for specifying full and partial names, departments, and titles. In general, we recommend treating every name-related field in Microsoft Entra ID as user-visible data that Microsoft and non-Microsoft apps might use in different contexts. Name fields in Microsoft Entra ID should represent the user's preferred name that can be reflected through all Microsoft products.
Applications in Microsoft 365 display a user's name as defined by either:
- First and last name stored in Microsoft Entra ID, or
- Display name stored in Microsoft Entra ID
Use the following tips when adding and editing the name properties of a user:
- Ensure the first and last name are names the user would expect to see on their user profile, such as the profile card in Microsoft 365 applications or in meeting transcriptions.
- The name a user expects to see might not correspond to their legal name used on formal identity documents.
- Use the display name field to accommodate your organization's approach or policy for displaying names.
- Don't use the display name field as an alternative name for the user, which can lead to an inconsistent representation of the user across those products where first and last name are used and those products where display name is used.
Note
Data from your organization's HR system can be synced to Microsoft Entra ID using HR driven provisioning. Consider the user name guidance before syncing the legal name of a user. For more information, see What is HR driven provisioning.
User name examples
Review the following examples to understand how the name properties are used in different contexts. For these examples, we're using the name Christopher Green, who goes by Chris Green.
If your organization supports nicknames, enter this information in the First name and the Display name fields.
- First name: Chris
- Last name: Green
- Display name: Chris Green
If your organization lists last name first, use the Display name to show the name in the preferred order.
- First name: Chris
- Last name: Green
- Display name: Green, Chris
If you have two users with the same first and last name, use a middle initial to differentiate them.
- First name: Chris B.
- Last name: Green
- Identity: Chris B. Green
If a user goes by a name other than the legal name that appears on their formal identification documents, store their legal name in your organization's human capital management (HCM) system and enter their preferred name in Microsoft Entra ID.
- Wang Zhihao goes by John Wang
- Legal name appears in HCM
- First name in Microsoft Entra ID: John
- Last name in Microsoft Entra ID: Wang
Add or edit the profile picture
On the user's overview page, select the camera icon in the lower-right corner of the user's thumbnail. If no image has been added, the user's initials appear here. This picture appears in Microsoft Entra ID and on the user's personal pages, such as the myapps.microsoft.com page.
All your changes are saved for the user.
Note
If you're having issues updating a user's profile picture, please ensure that your Office 365 Exchange Online Enterprise App is Enabled for users to sign in.
Manage settings for all users
In the User settings area, you can adjust several settings that affect all users. Some settings are managed in a separate area linked from this page. These settings require the Global Administrator role.
Sign in to the Microsoft Entra admin center as a Global Administrator.
Browse to Entra ID > Users > User settings.
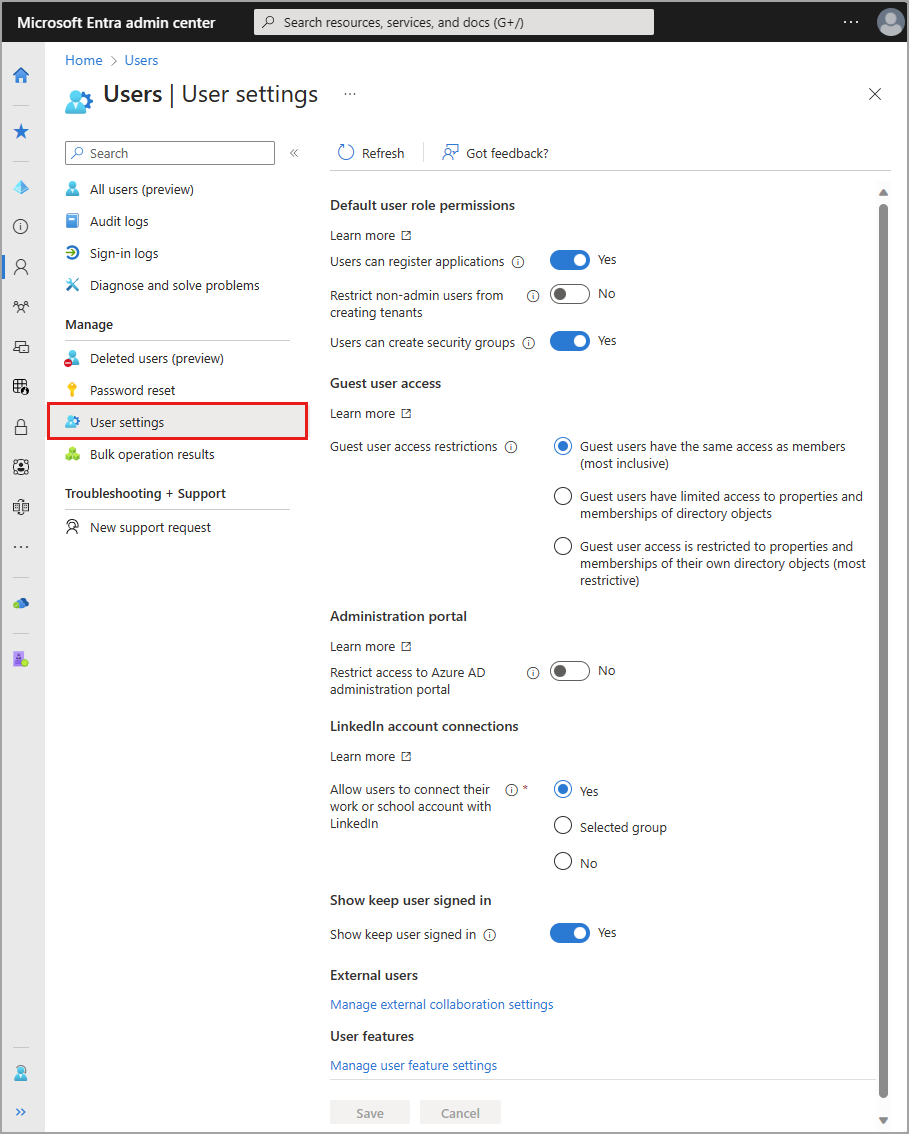
The following settings can be managed from User settings.
- Allow users to register their own applications
- Prevent non-admins from creating their own tenants
- For more information, see default user permissions
- Allow users to create security groups
- Guest user access restrictions
- Guest users have the same access as members (most inclusive)
- Guest users have limited access to properties and memberships of directory objects
- Guest user access is restricted to properties and memberships of their own directory objects (most restrictive)
- Restrict access to the Microsoft Entra administration portal
- Allow users to connect their work or school account with LinkedIn
- Enable the "Stay signed in?" prompt
- Manage external collaboration settings
- Guest user access
- Guest invite setting
- External user leave settings
- Collaboration restrictions
- Manage user feature settings
- Users can use preview features for My Apps
- Administrators can access My Staff

Edit multiple users at once
This new Microsoft Entra admin center update allows editing certain user attributes in bulk. On the All Users page, you can select up to 60 users at a time and update their attributes at once. For information about how to add users in bulk, see Bulk create users in Microsoft Entra ID.
Sign in to the Microsoft Entra admin center as a User Administrator.
Browse to Entra ID > Users.
Select the users you want to edit (note: you can edit up to 60 users at a time)
Select Edit from the top of the page.

There are two ways to update the users. Either select “Edit” from the top of the page or right click on the selected users.

Select one of the available user management actions in the drop down to perform on your selected users.
If you select the Edit properties action, the following properties will be available to edit:
- City
- Company name
- Country or region
- Department
- Employee hire date
- Employee type
- Job title
- Office location
- State or province
- Street address
- Usage location
- Zip or postal code
Note
You must visit specific user profiles to edit other properties.
