Next steps and how to manage Microsoft Entra Connect
Use the operational procedures in this article to customize Microsoft Entra Connect to meet your organization's needs and requirements.
Add additional sync admins
By default, only the user who did the installation and local admins are able to manage the installed sync engine. For additional people to be able to access and manage the sync engine, locate the group named ADSyncAdmins on the local server and add them to this group.
Assign licenses to Microsoft Entra ID P1 or P2 and Enterprise Mobility Suite users
Now that your users have been synchronized to the cloud, you need to assign them a license so they can get going with cloud apps such as Microsoft 365.
To assign a Microsoft Entra ID P1 or P2 or Enterprise Mobility Suite License
Tip
Steps in this article might vary slightly based on the portal you start from.
- Sign in to the Microsoft Entra admin center as at least a Hybrid Identity Administrator.
- On the left, select Active Directory.
- On the Active Directory page, double-click the directory that has the users you want to set up.
- At the top of the directory page, select Licenses.
- On the Licenses page, select Active Directory Premium or Enterprise Mobility Suite, and then click Assign.
- In the dialog box, select the users you want to assign licenses to, and then click the check mark icon to save the changes.
Verify the scheduled synchronization task
Use the Microsoft Entra admin center to check the status of a synchronization.
To verify the scheduled synchronization task
- Sign in to the Microsoft Entra admin center as at least a Hybrid Identity Administrator.
- Browse to Identity > Hybrid management > Microsoft Entra Connect > Connect sync.
- At the top of the page, note the last synchronization.

Start a scheduled synchronization task
If you need to run a synchronization task, you can do this by:
- Double-click on the Microsoft Entra Connect desktop shortcut to start the wizard.
- Click Configure.
- On the tasks screen, select the Customize synchronization options and click Next
- Enter your Microsoft Entra credentials
- Click Next. Click Next. Click Next.
- On the Ready to Configure screen, ensure that the Start the synchronization process when configuration completes box is selected.
- Click Configure.
For more information on the Microsoft Entra Connect Sync Scheduler, see Microsoft Entra Connect Scheduler.
Additional tasks available in Microsoft Entra Connect
After your initial installation of Microsoft Entra Connect, you can always start the wizard again from the Microsoft Entra Connect start page or desktop shortcut. You will notice that going through the wizard again provides some new options in the form of additional tasks.
The following table provides a summary of these tasks and a brief description of each task.
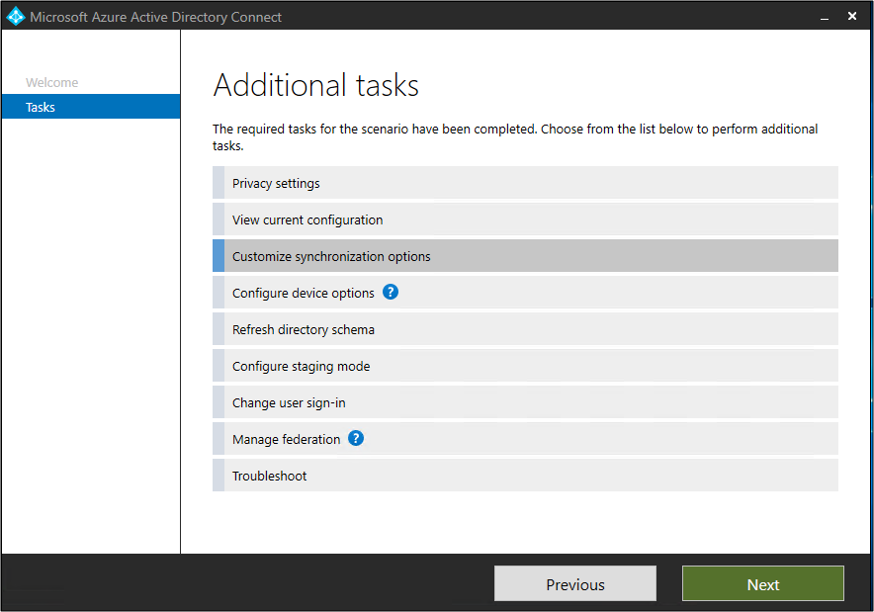
| Additional task | Description |
|---|---|
| Privacy Settings | View what telemetry data is being shared with Microsoft. |
| View current configuration | View your current Microsoft Entra Connect solution. This includes general settings, synchronized directories, and sync settings. |
| Customize synchronization options | Change the current configuration like adding additional Active Directory forests to the configuration, or enabling sync options such as user, group, device, or password write-back. |
| Configure device options | Device options available for synchronization |
| Refresh directory schema | Allows you to add new on-premises directory objects for synchronization |
| Configure Staging Mode | Stage information that is not immediately synchronized and is not exported to Microsoft Entra ID or on-premises Active Directory. With this feature, you can preview the synchronizations before they occur. |
| Change user sign-in | Change the authentication method users are using to sign-in |
| Manage federation | Manage your AD FS infrastructure, renew certificates, and add AD FS servers |
| Troubleshoot | Help with troubleshooting Microsoft Entra Connect issues |
Next steps
Learn more about integrating your on-premises identities with Microsoft Entra ID.
Feedback
Coming soon: Throughout 2024 we will be phasing out GitHub Issues as the feedback mechanism for content and replacing it with a new feedback system. For more information see: https://aka.ms/ContentUserFeedback.
Submit and view feedback for