Quickstart: Microsoft Entra seamless single sign-on
Microsoft Entra seamless single sign-on (Seamless SSO) automatically signs in users when they're using their corporate desktops that are connected to your corporate network. Seamless SSO provides your users with easy access to your cloud-based applications without using any other on-premises components.
To deploy Seamless SSO for Microsoft Entra ID by using Microsoft Entra Connect, complete the steps that are described in the following sections.
Check the prerequisites
Ensure that the following prerequisites are in place:
Set up your Microsoft Entra Connect server: If you use pass-through authentication as your sign-in method, no other prerequisite check is required. If you use password hash synchronization as your sign-in method and there's a firewall between Microsoft Entra Connect and Microsoft Entra ID, ensure that:
You use Microsoft Entra Connect version 1.1.644.0 or later.
If your firewall or proxy allows, add the connections to your allowlist for
*.msappproxy.netURLs over port 443. If you require a specific URL instead of a wildcard for proxy configuration, you can configuretenantid.registration.msappproxy.net, wheretenantidis the GUID of the tenant for which you're configuring the feature. If URL-based proxy exceptions aren't possible in your organization, you can instead allow access to the Azure datacenter IP ranges, which are updated weekly. This prerequisite is applicable only when you enable the Seamless SSO feature. It isn't required for direct user sign-ins.Note
- Microsoft Entra Connect versions 1.1.557.0, 1.1.558.0, 1.1.561.0, and 1.1.614.0 have a problem related to password hash sync. If you don't intend to use password hash sync in conjunction with pass-through authentication, review the Microsoft Entra Connect release notes to learn more.
Use a supported Microsoft Entra Connect topology: Ensure that you're using one of the Microsoft Entra Connect supported topologies.
Note
Seamless SSO supports multiple on-premises Windows Server Active Directory (Windows Server AD) forests, whether or not there are Windows Server AD trusts between them.
Set up domain administrator credentials: You must have domain administrator credentials for each Windows Server AD forest that:
- You sync to Microsoft Entra ID through Microsoft Entra Connect.
- Contains users you want to enable Seamless SSO for.
Enable modern authentication: To use this feature, you must enable modern authentication on your tenant.
Use the latest versions of Microsoft 365 clients: To get a silent sign-on experience with Microsoft 365 clients (for example, with Outlook, Word, or Excel), your users must use versions 16.0.8730.xxxx or later.
Note
If you have an outgoing HTTP proxy, make sure that the URL autologon.microsoftazuread-sso.com is on your allowlist. You should specify this URL explicitly because the wildcard might not be accepted.
Enable the feature
Tip
Steps in this article might vary slightly based on the portal you start from.
Enable Seamless SSO through Microsoft Entra Connect.
Note
If Microsoft Entra Connect doesn't meet your requirements, you can enable Seamless SSO by using PowerShell. Use this option if you have more than one domain per Windows Server AD forest, and you want to target the domain to enable Seamless SSO for.
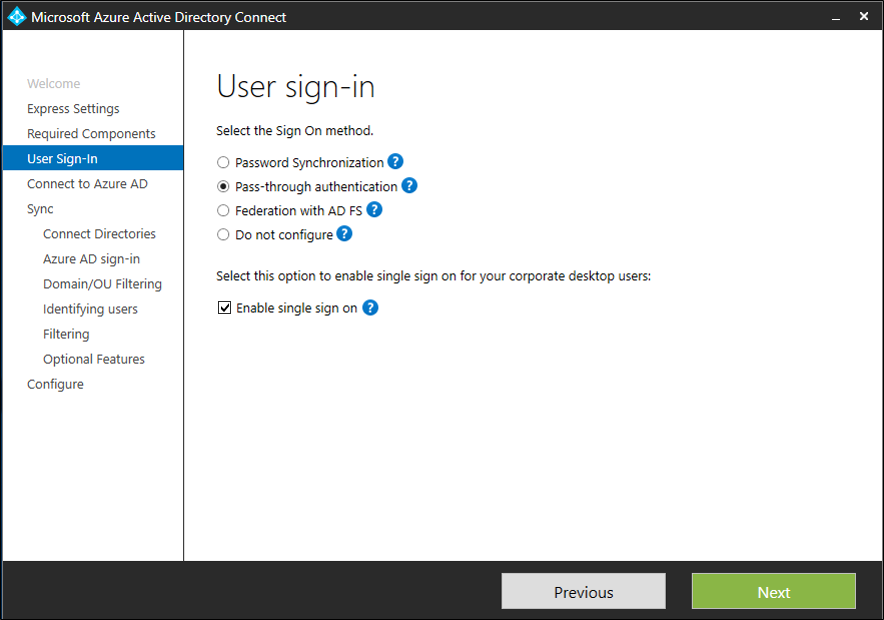
If you're doing a fresh installation of Microsoft Entra Connect, choose the custom installation path. On the User sign-in page, select the Enable single sign on option.
Note
The option is available to select only if the sign-on method that's selected is Password Hash Synchronization or Pass-through Authentication.
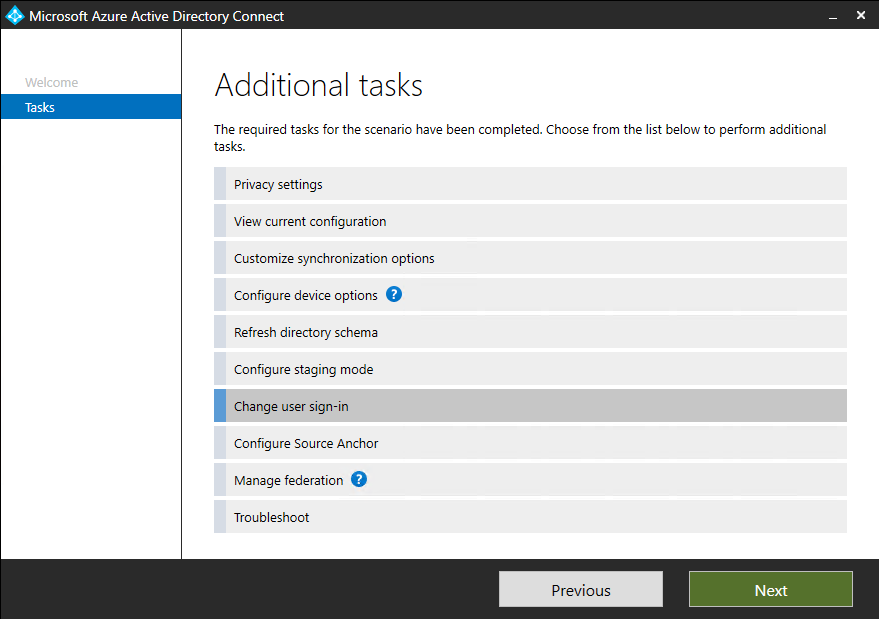
If you already have an installation of Microsoft Entra Connect, in Additional tasks, select Change user sign-in, and then select Next. If you're using Microsoft Entra Connect versions 1.1.880.0 or later, the Enable single sign on option is selected by default. If you're using an earlier version of Microsoft Entra Connect, select the Enable single sign on option.
Continue through the wizard to the Enable single sign on page. Provide Domain Administrator credentials for each Windows Server AD forest that:
- You sync to Microsoft Entra ID through Microsoft Entra Connect.
- Contains users you want to enable Seamless SSO for.
When you complete the wizard, Seamless SSO is enabled on your tenant.
Note
The Domain Administrator credentials are not stored in Microsoft Entra Connect or in Microsoft Entra ID. They're used only to enable the feature.
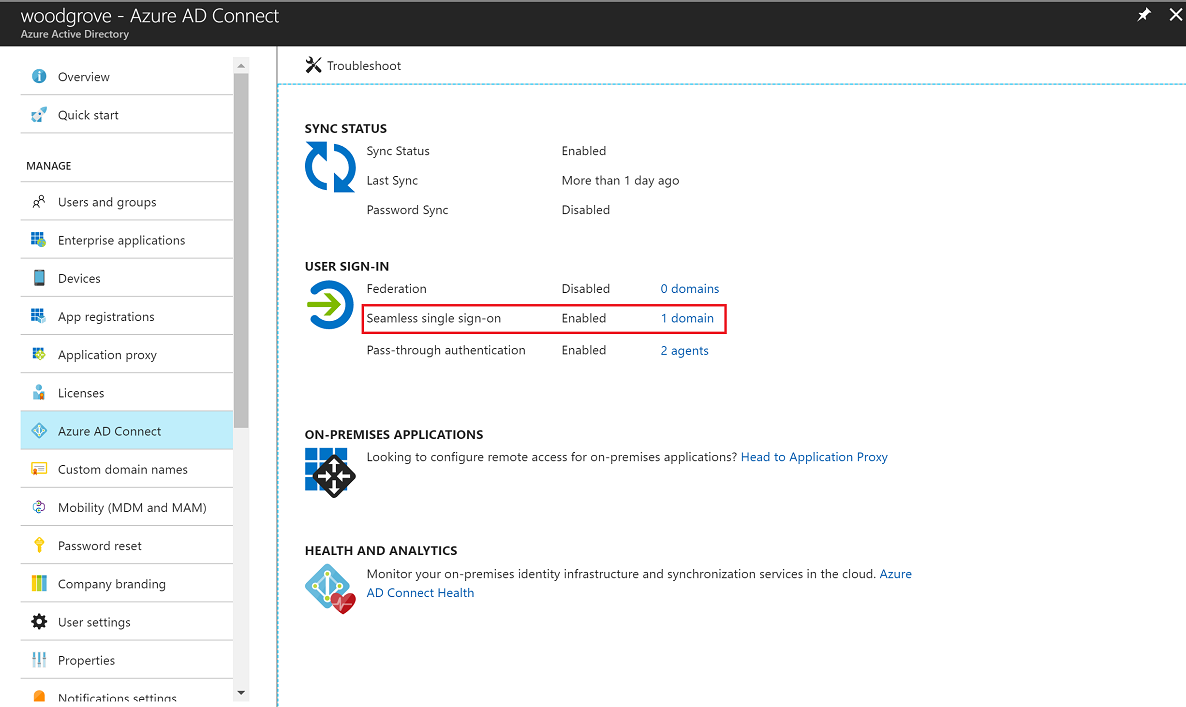
To verify that you have enabled Seamless SSO correctly:
- Sign in to the Microsoft Entra admin center as at least a Hybrid Identity Administrator.
- Browse to Identity > Hybrid management > Microsoft Entra Connect > Connect sync.
- Verify that Seamless single sign-on is set to Enabled.
Important
Seamless SSO creates a computer account named AZUREADSSOACC in each Windows Server AD forest in your on-premises Windows Server AD directory. The AZUREADSSOACC computer account must be strongly protected for security reasons. Only Domain Administrator accounts should be allowed to manage the computer account. Ensure that Kerberos delegation on the computer account is disabled, and that no other account in Windows Server AD has delegation permissions on the AZUREADSSOACC computer account. Store the computer accounts in an organization unit so that they're safe from accidental deletions and only Domain Administrators can access them.
Note
If you're using Pass-the-Hash and Credential Theft Mitigation architectures in your on-premises environment, make appropriate changes to ensure that the AZUREADSSOACC computer account doesn't end up in the Quarantine container.
Roll out the feature
You can gradually roll out Seamless SSO to your users by using the instructions provided in the next sections. You start by adding the following Microsoft Entra URL to all or selected user intranet zone settings through Group Policy in Windows Server AD:
https://autologon.microsoftazuread-sso.com
You also must enable an intranet zone policy setting called Allow updates to status bar via script through Group Policy.
Note
The following instructions work only for Internet Explorer, Microsoft Edge, and Google Chrome on Windows (if Google Chrome shares a set of trusted site URLs with Internet Explorer). Learn how to set up Mozilla Firefox and Google Chrome on macOS.
Why you need to modify user intranet zone settings
By default, a browser automatically calculates the correct zone, either internet or intranet, from a specific URL. For example, http://contoso/ maps to the intranet zone, and http://intranet.contoso.com/ maps to the internet zone (because the URL contains a period). Browsers don't send Kerberos tickets to a cloud endpoint, like to the Microsoft Entra URL, unless you explicitly add the URL to the browser's intranet zone.
There are two ways you can modify user intranet zone settings:
| Option | Admin consideration | User experience |
|---|---|---|
| Group policy | Admin locks down editing of intranet zone settings | Users can't modify their own settings |
| Group policy preference | Admin allows editing of intranet zone settings | Users can modify their own settings |
Group policy detailed steps
Open the Group Policy Management Editor tool.
Edit the group policy that's applied to some or all your users. This example uses Default Domain Policy.
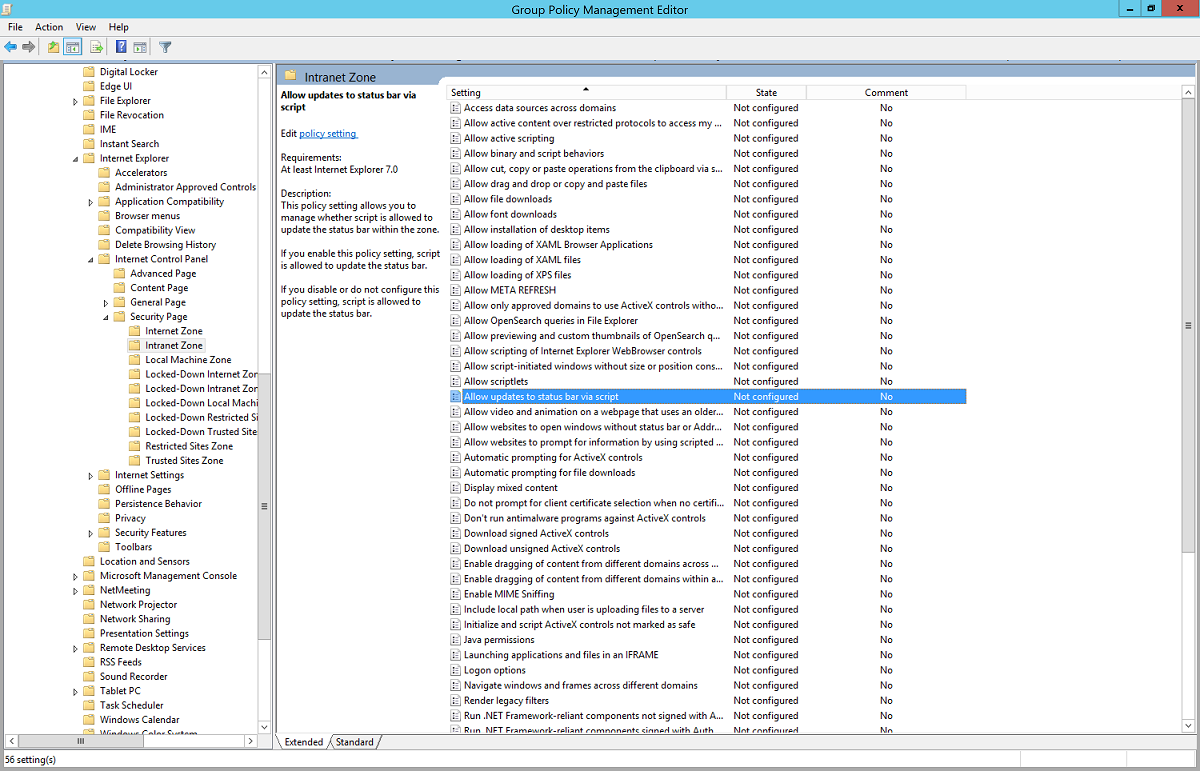
Go to User Configuration > Policies > Administrative Templates > Windows Components > Internet Explorer > Internet Control Panel > Security Page. Select Site to Zone Assignment List.
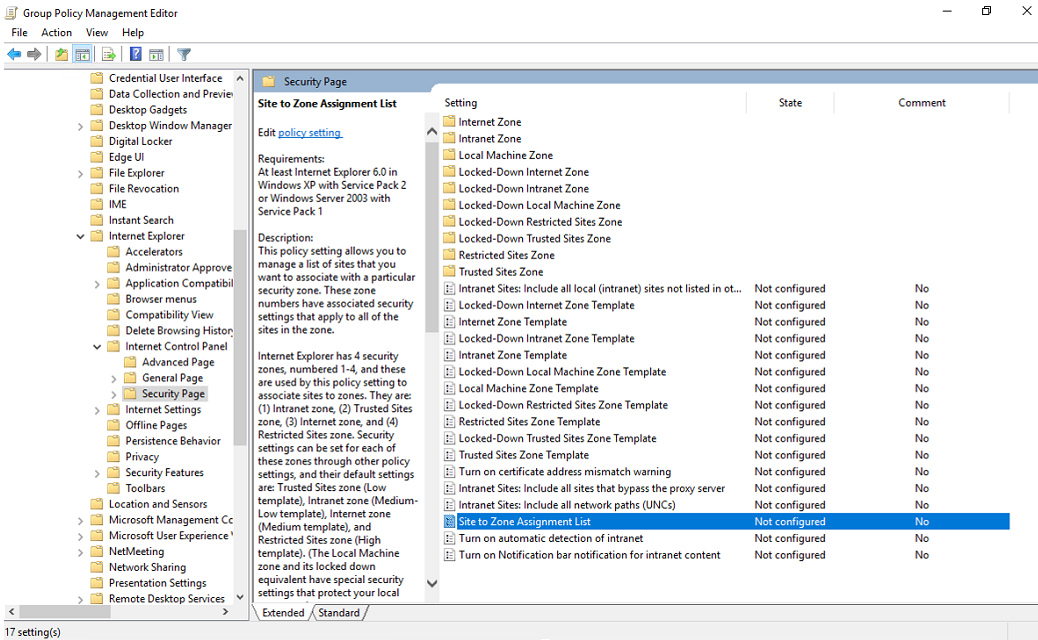
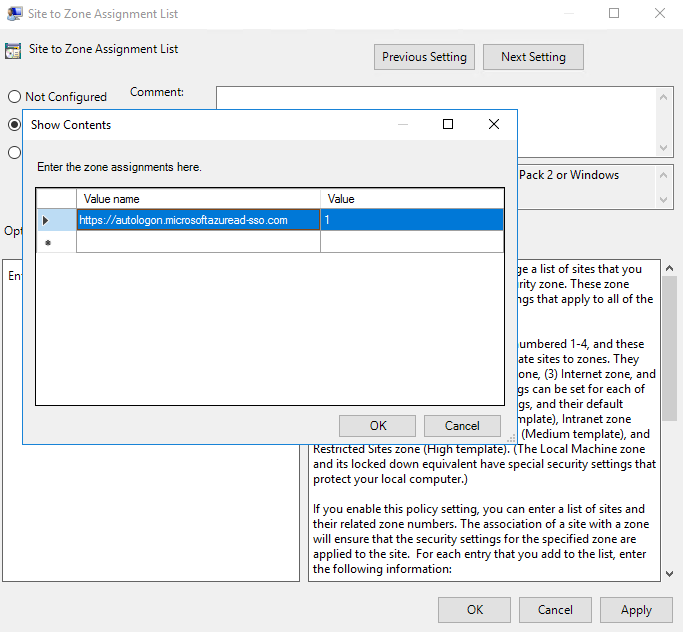
Enable the policy, and then enter the following values in the dialog:
Value name: The Microsoft Entra URL where the Kerberos tickets are forwarded.
Value (Data): 1 indicates the intranet zone.
The result looks like this example:
Value name:
https://autologon.microsoftazuread-sso.comValue (Data): 1
Note
If you want to prevent some users from using Seamless SSO (for instance, if these users sign in on shared kiosks), set the preceding values to 4. This action adds the Microsoft Entra URL to the restricted zone and Seamless SSO fails for the users all the time.
Select OK, and then select OK again.
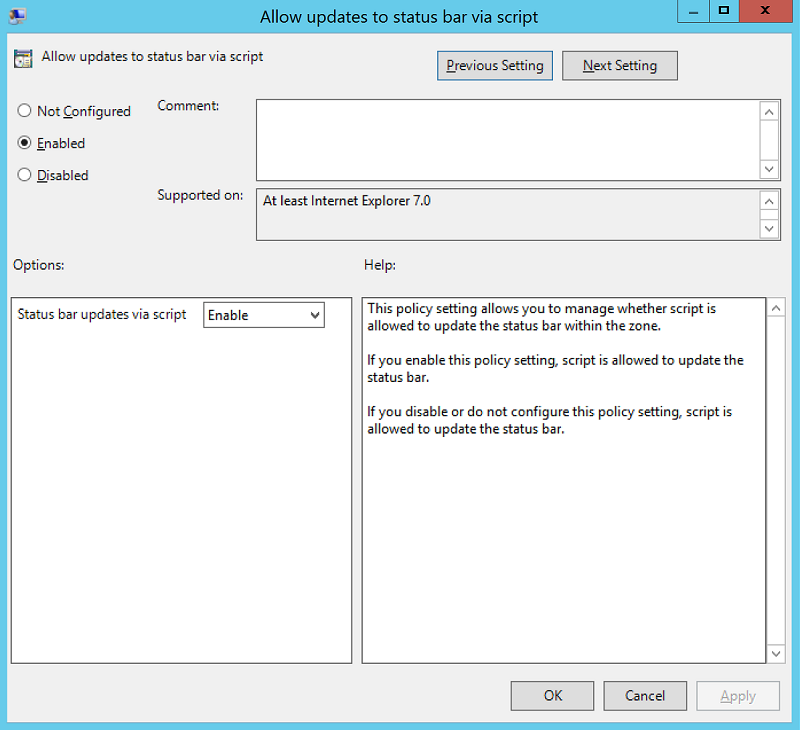
Go to User Configuration > Policies > Administrative Templates > Windows Components > Internet Explorer > Internet Control Panel > Security Page > Intranet Zone. Select Allow updates to status bar via script.
Enable the policy setting, and then select OK.

Group policy preference detailed steps
Open the Group Policy Management Editor tool.
Edit the group policy that's applied to some or all your users. This example uses Default Domain Policy.
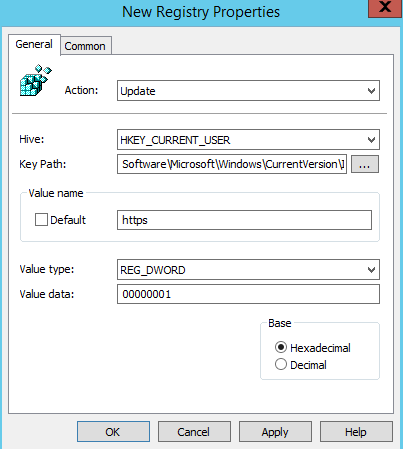
Go to User Configuration > Preferences > Windows Settings > Registry > New > Registry item.
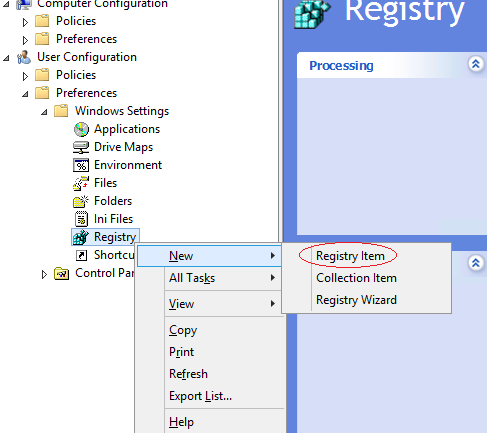
Enter or select the following values as demonstrated, and then select OK.
Key Path: Software\Microsoft\Windows\CurrentVersion\Internet Settings\ZoneMap\Domains\microsoftazuread-sso.com\autologon
Value name: https
Value type: REG_DWORD
Value data: 00000001

Browser considerations
The next sections have information about Seamless SSO that's specific to different types of browsers.
Mozilla Firefox (all platforms)
If you're using the Authentication policy settings in your environment, ensure that you add the Microsoft Entra URL (https://autologon.microsoftazuread-sso.com) to the SPNEGO section. You can also set the PrivateBrowsing option to true to allow Seamless SSO in private browsing mode.
Safari (macOS)
Ensure that the machine running the macOS is joined to Windows Server AD.
Instructions for joining your macOS device to Windows Server AD are outside the scope of this article.
Microsoft Edge based on Chromium (all platforms)
If you've overridden the AuthNegotiateDelegateAllowlist or AuthServerAllowlist policy settings in your environment, ensure that you also add the Microsoft Entra URL (https://autologon.microsoftazuread-sso.com) to these policy settings.
Microsoft Edge based on Chromium (macOS and other non-Windows platforms)
For Microsoft Edge based on Chromium on macOS and other non-Windows platforms, see the Microsoft Edge based on Chromium Policy List for information on how to add the Microsoft Entra URL for integrated authentication to your allowlist.
Google Chrome (all platforms)
If you've overridden the AuthNegotiateDelegateAllowlist or AuthServerAllowlist policy settings in your environment, ensure that you also add the Microsoft Entra URL (https://autologon.microsoftazuread-sso.com) to these policy settings.
macOS
The use of third-party Active Directory Group Policy extensions to roll out the Microsoft Entra URL to Firefox and Google Chrome for macOS users is outside the scope of this article.
Known browser limitations
Seamless SSO doesn't work on Internet Explorer if the browser is running in Enhanced Protected mode. Seamless SSO supports the next version of Microsoft Edge based on Chromium, and it works in InPrivate and Guest mode by design. Microsoft Edge (legacy) is no longer supported.
You might need to configure AmbientAuthenticationInPrivateModesEnabled for InPrivate or guest users based on the corresponding documentation:
Test Seamless SSO
To test the feature for a specific user, ensure that all the following conditions are in place:
- The user signs in on a corporate device.
- The device is joined to your Windows Server AD domain. The device doesn't need to be Microsoft Entra joined.
- The device has a direct connection to your domain controller, either on the corporate wired or wireless network or via a remote access connection, such as a VPN connection.
- You've rolled out the feature to this user through Group Policy.
To test a scenario in which the user enters a username, but not a password:
- Sign in to https://myapps.microsoft.com. Be sure to either clear the browser cache or use a new private browser session with any of the supported browsers in private mode.
To test a scenario in which the user doesn't have to enter a username or password, use one of these steps:
- Sign in to
https://myapps.microsoft.com/contoso.onmicrosoft.com. Be sure to either clear the browser cache or use a new private browser session with any of the supported browsers in private mode. Replacecontosowith your tenant name. - Sign in to
https://myapps.microsoft.com/contoso.comin a new private browser session. Replacecontoso.comwith a verified domain (not a federated domain) on your tenant.
Roll over keys
In Enable the feature, Microsoft Entra Connect creates computer accounts (representing Microsoft Entra ID) in all the Windows Server AD forests on which you enabled Seamless SSO. To learn more, see Microsoft Entra seamless single sign-on: Technical deep dive.
Important
The Kerberos decryption key on a computer account, if leaked, can be used to generate Kerberos tickets for any user in its Windows Server AD forest. Malicious actors can then impersonate Microsoft Entra sign-ins for compromised users. We highly recommend that you periodically roll over these Kerberos decryption keys, or at least once every 30 days.
For instructions on how to roll over keys, see Microsoft Entra seamless single sign-on: Frequently asked questions.
Important
You don't need to do this step immediately after you have enabled the feature. Roll over the Kerberos decryption keys at least once every 30 days.
Next steps
- Technical deep dive: Understand how the Seamless single sign-on feature works.
- Frequently asked questions: Get answers to frequently asked questions about Seamless single sign-on.
- Troubleshoot: Learn how to resolve common problems with the Seamless single sign-on feature.
- UserVoice: Use the Microsoft Entra Forum to file new feature requests.
Feedback
Coming soon: Throughout 2024 we will be phasing out GitHub Issues as the feedback mechanism for content and replacing it with a new feedback system. For more information see: https://aka.ms/ContentUserFeedback.
Submit and view feedback for