Note
Access to this page requires authorization. You can try signing in or changing directories.
Access to this page requires authorization. You can try changing directories.
Managed identities for Azure resources provide Azure services with an automatically managed identity in Microsoft Entra ID. You can use this identity to authenticate to any service that supports Microsoft Entra authentication, without having credentials in your code.
For information about Azure Policy definition and details, see Use Azure Policy to assign managed identities (preview).
In this article, you learn how to enable and disable system and user-assigned managed identities for an Azure Virtual Machine (VM), using the Azure portal.
Prerequisites
- If you're unfamiliar with managed identities for Azure resources, check out the overview section.
- If you don't already have an Azure account, sign up for a free account before continuing.
System-assigned managed identity
In this section, you learn how to enable and disable the system-assigned managed identity for VM using the Azure portal.
Enable system-assigned managed identity during creation of a VM
To enable system-assigned managed identity on a VM during its creation, your account needs the Virtual Machine Contributor role assignment. No other Microsoft Entra directory role assignments are required.
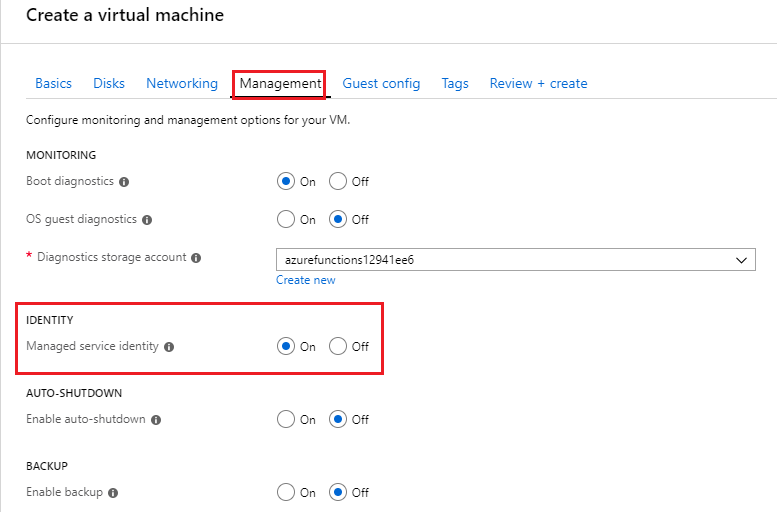
When creating a Windows virtual machine or Linux virtual machine, select the Management tab.
In the Identity section, select the Enable system assigned managed identity check-box.
Enable system-assigned managed identity on an existing VM
To enable system-assigned managed identity on a VM that was originally provisioned without it, your account needs the Virtual Machine Contributor role assignment. No other Microsoft Entra directory role assignments are required.
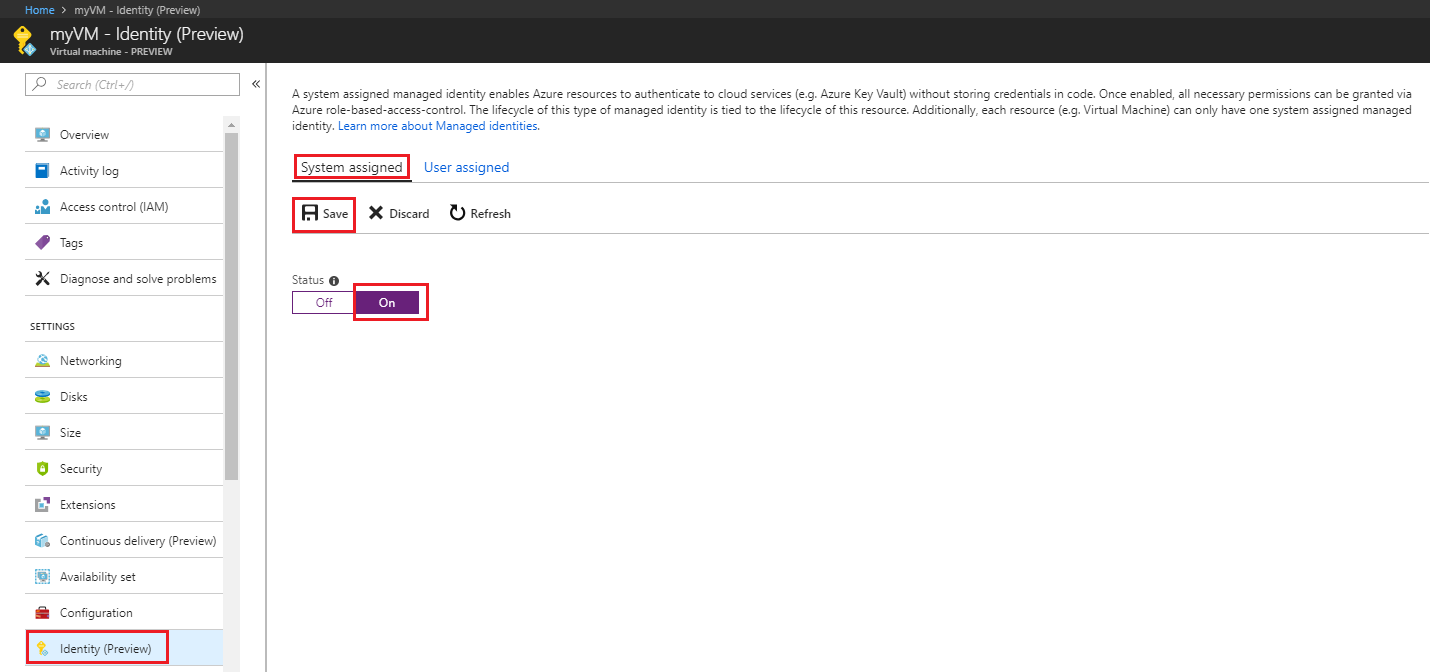
Sign in to the Azure portal using an account associated with the Azure subscription that contains the VM.
Navigate to the desired Virtual Machine and in the Security section select Identity.
Under System assigned, Status, select On and then click Save:
Remove system-assigned managed identity from a VM
To remove system-assigned managed identity from a VM, your account needs the Virtual Machine Contributor role assignment. No other Microsoft Entra directory role assignments are required.
If you have a Virtual Machine that no longer needs system-assigned managed identity:
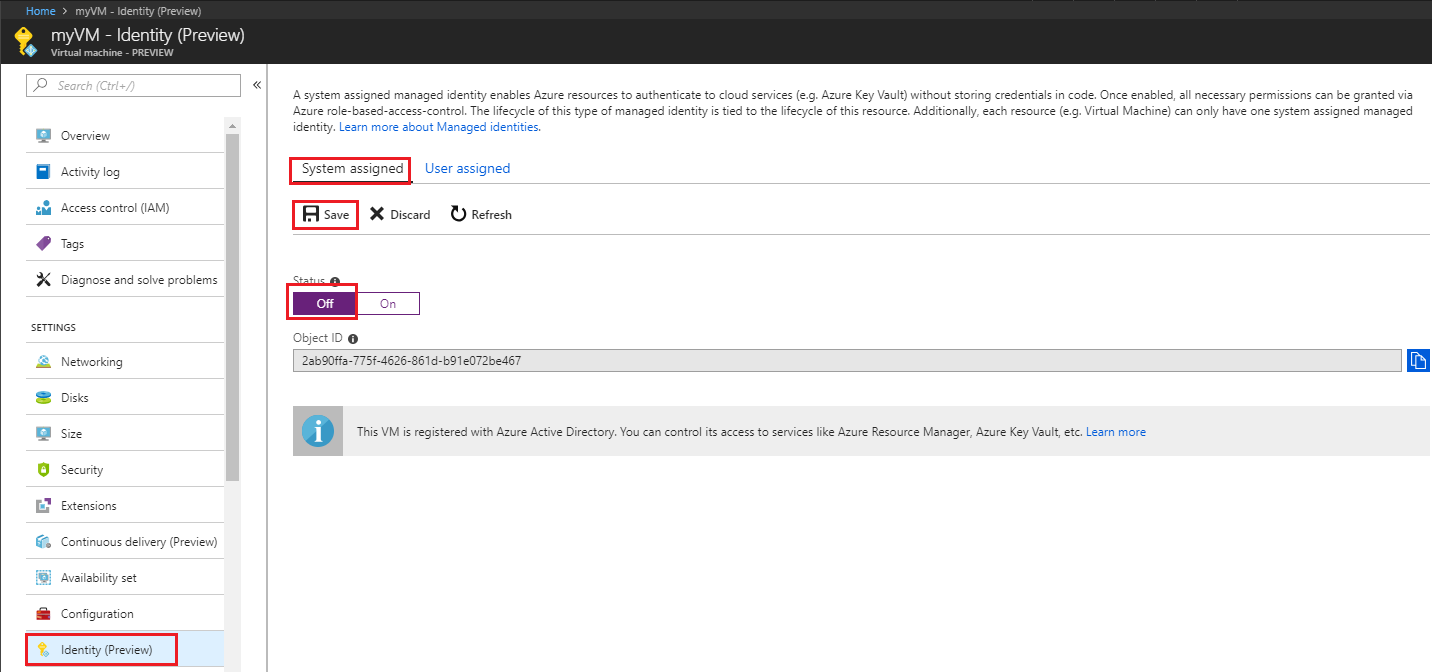
Sign in to the Azure portal using an account associated with the Azure subscription that contains the VM.
Navigate to the desired Virtual Machine and in the Security section select Identity.
Under System assigned, Status, select Off and then click Save:
User-assigned managed identity
In this section, you learn how to add and remove a user-assigned managed identity from a VM using the Azure portal.
Assign a user-assigned identity during the creation of a VM
To assign a user-assigned identity to a VM, your account needs the Virtual Machine Contributor and Managed Identity Operator role assignments. No other Microsoft Entra directory role assignments are required.
Currently, the Azure portal does not support assigning a user-assigned managed identity during the creation of a VM. First create a Windows virtual machine or Linux virtual machine, then assign a user-assigned managed identity to the VM.
Assign a user-assigned managed identity to an existing VM
To assign a user-assigned identity to a VM, your account needs the Virtual Machine Contributor and Managed Identity Operator role assignments. No other Microsoft Entra directory role assignments are required.
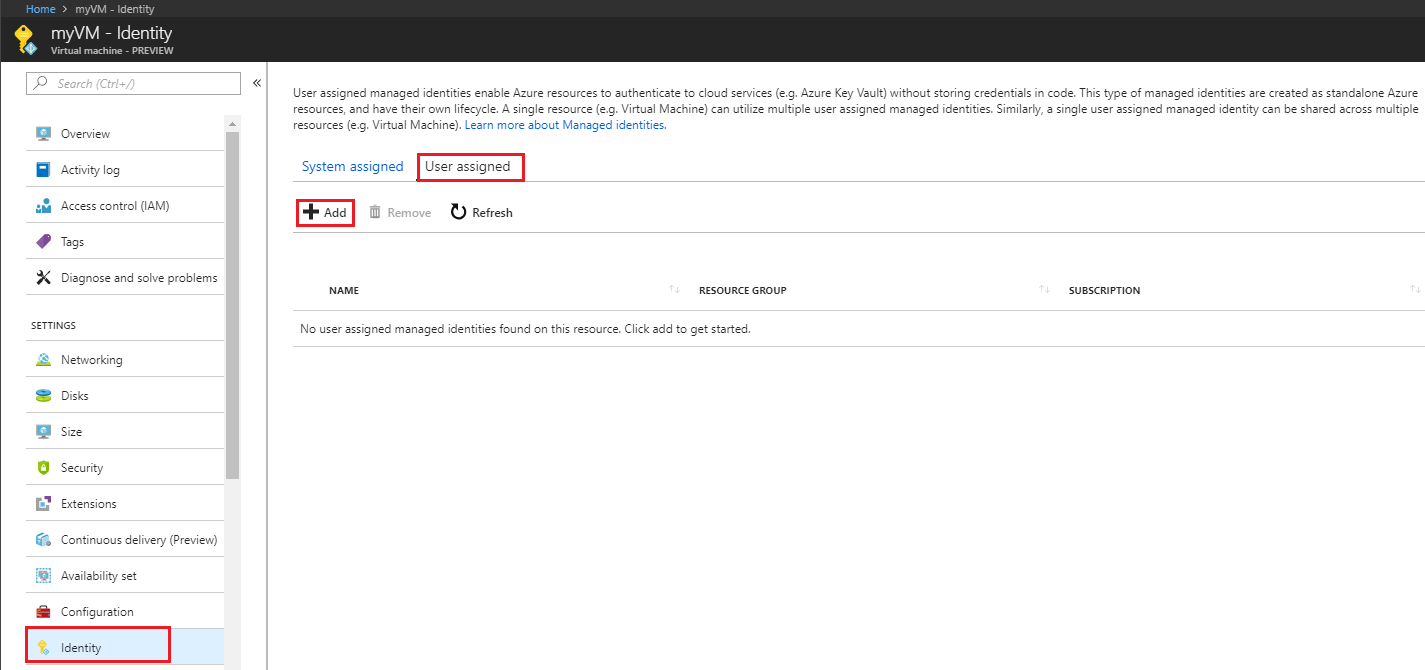
Sign in to the Azure portal using an account associated with the Azure subscription that contains the VM.
Navigate to the desired VM and click Security > Identity, User assigned and then +Add. Click the user-assigned identity you want to add to the VM and then click Add.
Select the previously created user assigned managed identity from the list.
Remove a user-assigned managed identity from a VM
To remove a user-assigned identity from a VM, your account needs the Virtual Machine Contributor role assignment. No other Microsoft Entra directory role assignments are required.
Sign in to the Azure portal using an account associated with the Azure subscription that contains the VM.
Navigate to the desired VM and select Security > Identity, User assigned, the name of the user-assigned managed identity you want to delete and then click Remove (click Yes in the confirmation pane).

Next steps
- Using the Azure portal, give an Azure VM's managed identity access to another Azure resource.
In this article, using the Azure CLI, you learn how to perform the following managed identities for Azure resources operations on an Azure VM:
- Enable and disable the system-assigned managed identity on an Azure VM
- Add and remove a user-assigned managed identity on an Azure VM
If you don't already have an Azure account, sign up for a free account before continuing.
Prerequisites
- If you're unfamiliar with managed identities for Azure resources, see What are managed identities for Azure resources?. To learn about system-assigned and user-assigned managed identity types, see Managed identity types.
Use the Bash environment in Azure Cloud Shell. For more information, see Get started with Azure Cloud Shell.

If you prefer to run CLI reference commands locally, install the Azure CLI. If you're running on Windows or macOS, consider running Azure CLI in a Docker container. For more information, see How to run the Azure CLI in a Docker container.
If you're using a local installation, sign in to the Azure CLI by using the az login command. To finish the authentication process, follow the steps displayed in your terminal. For other sign-in options, see Authenticate to Azure using Azure CLI.
When you're prompted, install the Azure CLI extension on first use. For more information about extensions, see Use and manage extensions with the Azure CLI.
Run az version to find the version and dependent libraries that are installed. To upgrade to the latest version, run az upgrade.
System-assigned managed identity
In this section, you learn how to enable and disable the system-assigned managed identity on an Azure VM using Azure CLI.
Enable system-assigned managed identity during creation of an Azure VM
To create an Azure VM with the system-assigned managed identity enabled, your account needs the Virtual Machine Contributor role assignment. No other Microsoft Entra directory role assignments are required.
Create a resource group for containment and deployment of your VM and its related resources, using az group create. You can skip this step if you already have resource group you would like to use instead:
az group create --name myResourceGroup --location westusCreate a VM using az vm create. The following example creates a VM named myVM with a system-assigned managed identity, as requested by the
--assign-identityparameter, with the specified--roleand--scope. The--admin-usernameand--admin-passwordparameters specify the administrative user name and password account for virtual machine sign-in. Update these values as appropriate for your environment:az vm create --resource-group myResourceGroup --name myVM --image win2016datacenter --generate-ssh-keys --assign-identity --role contributor --scope /Subscriptions/mySubscriptionId/resourceGroups/myResourceGroup --admin-username azureuser --admin-password myPassword12
Enable system-assigned managed identity on an existing Azure VM
To enable system-assigned managed identity on a VM, your account needs the Virtual Machine Contributor role assignment. No other Microsoft Entra directory role assignments are required.
If you're using the Azure CLI in a local console, first sign in to Azure using az login. Use an account that is associated with the Azure subscription that contains the VM.
az loginUse az vm identity assign with the
identity assigncommand enable the system-assigned identity to an existing VM:az vm identity assign -g myResourceGroup -n myVm
Disable system-assigned identity from an Azure VM
To disable system-assigned managed identity on a VM, your account needs the Virtual Machine Contributor role assignment. No other Microsoft Entra directory role assignments are required.
If you have a Virtual Machine that no longer needs the system-assigned identity, but still needs user-assigned identities, use the following command:
az vm update -n myVM -g myResourceGroup --set identity.type='UserAssigned'
If you have a virtual machine that no longer needs system-assigned identity and it has no user-assigned identities, use the following command:
Note
The value none is case sensitive. It must be lowercase.
az vm update -n myVM -g myResourceGroup --set identity.type="none"
User-assigned managed identity
In this section, you will learn how to add and remove a user-assigned managed identity from an Azure VM using Azure CLI. If you create your user-assigned managed identity in a different RG than your VM. You'll have to use the URL of your managed identity to assign it to your VM. For example:
--identities "/subscriptions/<SUBID>/resourcegroups/<RESROURCEGROUP>/providers/Microsoft.ManagedIdentity/userAssignedIdentities/<USER_ASSIGNED_ID_NAME>"
Assign a user-assigned managed identity during the creation of an Azure VM
To assign a user-assigned identity to a VM during its creation, your account needs the Virtual Machine Contributor and Managed Identity Operator role assignments. No other Microsoft Entra directory role assignments are required.
You can skip this step if you already have a resource group you would like to use. Create a resource group for containment and deployment of your user-assigned managed identity, using az group create. Be sure to replace the
<RESOURCE GROUP>and<LOCATION>parameter values with your own values. :az group create --name <RESOURCE GROUP> --location <LOCATION>Create a user-assigned managed identity using az identity create. The
-gparameter specifies the resource group where the user-assigned managed identity is created, and the-nparameter specifies its name.Important
When you create user-assigned managed identities, the name must start with a letter or number, and may include a combination of alphanumeric characters, hyphens (-) and underscores (_). For the assignment to a virtual machine or virtual machine scale set to work properly, the name is limited to 24 characters. For more information, see FAQs and known issues.
az identity create -g myResourceGroup -n myUserAssignedIdentityThe response contains details for the user-assigned managed identity created, similar to the following. The resource ID value assigned to the user-assigned managed identity is used in the following step.
{
    "clientId": "00001111-aaaa-2222-bbbb-3333cccc4444",
    "clientSecretUrl": "https://control-westcentralus.identity.azure.net/subscriptions/<SUBSCRIPTON ID>/resourcegroups/<RESOURCE GROUP>/providers/Microsoft.ManagedIdentity/userAssignedIdentities/<myUserAssignedIdentity>/credentials?tid=5678&oid=9012&aid=aaaaaaaa-0000-1111-2222-bbbbbbbbbbbb",
    "id": "/subscriptions/<SUBSCRIPTION ID>/resourcegroups/<RESOURCE GROUP>/providers/Microsoft.ManagedIdentity/userAssignedIdentities/<USER ASSIGNED IDENTITY NAME>",
    "location": "westcentralus",
    "name": "<USER ASSIGNED IDENTITY NAME>",
    "principalId": "aaaaaaaa-bbbb-cccc-1111-222222222222",
    "resourceGroup": "<RESOURCE GROUP>",
    "tags": {},
    "tenantId": "aaaabbbb-0000-cccc-1111-dddd2222eeee",
    "type": "Microsoft.ManagedIdentity/userAssignedIdentities"
}
Create a VM using az vm create. The following example creates a VM associated with the new user-assigned identity, as specified by the
--assign-identityparameter, with the specified--roleand--scope. Be sure to replace the<RESOURCE GROUP>,<VM NAME>,<USER NAME>,<PASSWORD>,<USER ASSIGNED IDENTITY NAME>,<ROLE>, and<SUBSCRIPTION>parameter values with your own values.az vm create --resource-group <RESOURCE GROUP> --name <VM NAME> --image <SKU linux image> --admin-username <USER NAME> --admin-password <PASSWORD> --assign-identity <USER ASSIGNED IDENTITY NAME> --role <ROLE> --scope <SUBSCRIPTION>
Assign a user-assigned managed identity to an existing Azure VM
To assign a user-assigned identity to a VM, your account needs the Virtual Machine Contributor and Managed Identity Operator role assignments. No other Microsoft Entra directory role assignments are required.
Create a user-assigned identity using az identity create. The
-gparameter specifies the resource group where the user-assigned identity is created, and the-nparameter specifies its name. Be sure to replace the<RESOURCE GROUP>and<USER ASSIGNED IDENTITY NAME>parameter values with your own values:Important
Creating user-assigned managed identities with special characters (that is, underscore) in the name is not currently supported. Please use alphanumeric characters. Check back for updates. For more information, see FAQs and known issues
az identity create -g <RESOURCE GROUP> -n <USER ASSIGNED IDENTITY NAME>The response contains details for the user-assigned managed identity created, similar to the following.
{
  "clientId": "00001111-aaaa-2222-bbbb-3333cccc4444",
  "clientSecretUrl": "https://control-westcentralus.identity.azure.net/subscriptions/<SUBSCRIPTON ID>/resourcegroups/<RESOURCE GROUP>/providers/Microsoft.ManagedIdentity/userAssignedIdentities/<USER ASSIGNED IDENTITY NAME>/credentials?tid=5678&oid=9012&aid=aaaaaaaa-0000-1111-2222-bbbbbbbbbbbb",
  "id": "/subscriptions/<SUBSCRIPTION ID>/resourcegroups/<RESOURCE GROUP>/providers/Microsoft.ManagedIdentity/userAssignedIdentities/<USER ASSIGNED IDENTITY NAME>",
  "location": "westcentralus",
  "name": "<USER ASSIGNED IDENTITY NAME>",
  "principalId": "aaaaaaaa-bbbb-cccc-1111-222222222222",
  "resourceGroup": "<RESOURCE GROUP>",
  "tags": {},
  "tenantId": "aaaabbbb-0000-cccc-1111-dddd2222eeee",
  "type": "Microsoft.ManagedIdentity/userAssignedIdentities"
}
Assign the user-assigned identity to your VM using az vm identity assign. Be sure to replace the
<RESOURCE GROUP>and<VM NAME>parameter values with your own values. The<USER ASSIGNED IDENTITY NAME>is the user-assigned managed identity's resourcenameproperty, as created in the previous step. If you created your user-assigned managed identity in a different RG than your VM. You'll have to use the URL of your managed identity.az vm identity assign -g <RESOURCE GROUP> -n <VM NAME> --identities <USER ASSIGNED IDENTITY>
Remove a user-assigned managed identity from an Azure VM
To remove a user-assigned identity to a VM, your account needs the Virtual Machine Contributor role assignment.
If this is the only user-assigned managed identity assigned to the virtual machine, UserAssigned will be removed from the identity type value. Be sure to replace the <RESOURCE GROUP> and <VM NAME> parameter values with your own values. The <USER ASSIGNED IDENTITY> will be the user-assigned identity's name property, which can be found in the identity section of the virtual machine using az vm identity show:
az vm identity remove -g <RESOURCE GROUP> -n <VM NAME> --identities <USER ASSIGNED IDENTITY>
If your VM does not have a system-assigned managed identity and you want to remove all user-assigned identities from it, use the following command:
Note
The value none is case sensitive. It must be lowercase.
az vm update -n myVM -g myResourceGroup --set identity.type="none" identity.userAssignedIdentities=null
If your VM has both system-assigned and user-assigned identities, you can remove all the user-assigned identities by switching to use only system-assigned. Use the following command:
az vm update -n myVM -g myResourceGroup --set identity.type='SystemAssigned' identity.userAssignedIdentities=null
Next steps
- Managed identities for Azure resources overview
- For the full Azure VM creation Quickstarts, see:
In this article, using PowerShell, you learn how to perform the following managed identities for Azure resources operations on an Azure VM.
Note
We recommend that you use the Azure Az PowerShell module to interact with Azure. See Install Azure PowerShell to get started. To learn how to migrate to the Az PowerShell module, see Migrate Azure PowerShell from AzureRM to Az.
Prerequisites
- If you're unfamiliar with managed identities for Azure resources, check out the overview section. Be sure to review the difference between a system-assigned and user-assigned managed identity.
- If you don't already have an Azure account, sign up for a free account before continuing.
- To run the example scripts, you have two options:
- Use the Azure Cloud Shell, which you can open using the Try It button on the top-right corner of code blocks.
- Run scripts locally by installing the latest version of Azure PowerShell, then sign in to Azure using
Connect-AzAccount.
System-assigned managed identity
In this section, we go over how to enable and disable the system-assigned managed identity using Azure PowerShell.
Enable system-assigned managed identity during creation of an Azure VM
To create an Azure VM with the system-assigned managed identity enabled, your account needs the Virtual Machine Contributor role assignment. No other Microsoft Entra directory role assignments are required.
Refer to one of the following Azure VM Quickstarts, completing only the necessary sections ("Sign in to Azure", "Create resource group", "Create networking group", "Create the VM").
When you get to the "Create the VM" section, make a slight modification to the New-AzVMConfig cmdlet syntax. Be sure to add a
-IdentityType SystemAssignedparameter to provision the VM with the system-assigned identity enabled, for example:$vmConfig = New-AzVMConfig -VMName myVM -IdentityType SystemAssigned ...
Enable system-assigned managed identity on an existing Azure VM
To enable system-assigned managed identity on a VM that was originally provisioned without it, your account needs the Virtual Machine Contributor role assignment. No other Microsoft Entra directory role assignments are required.
Retrieve the VM properties using the
Get-AzVMcmdlet. Then to enable a system-assigned managed identity, use the-IdentityTypeswitch on the Update-AzVM cmdlet:$vm = Get-AzVM -ResourceGroupName myResourceGroup -Name myVM Update-AzVM -ResourceGroupName myResourceGroup -VM $vm -IdentityType SystemAssigned
Add VM system assigned identity to a group
After you have enabled system assigned identity on a VM, you can add it to a group. The following procedure adds a VM's system assigned identity to a group.
Retrieve and note the
ObjectID(as specified in theIdfield of the returned values) of the VM's service principal:Get-AzADServicePrincipal -displayname "myVM"Retrieve and note the
ObjectID(as specified in theIdfield of the returned values) of the group:Get-AzADGroup -searchstring "myGroup"Add the VM's service principal to the group:
New-MgGroupMember -GroupId "<Id of group>" -DirectoryObjectId "<Id of VM service principal>"
Disable system-assigned managed identity from an Azure VM
To disable system-assigned managed identity on a VM, your account needs the Virtual Machine Contributor role assignment. No other Microsoft Entra directory role assignments are required.
If you have a Virtual Machine that no longer needs the system-assigned managed identity but still needs user-assigned managed identities, use the following cmdlet:
Retrieve the VM properties using the
Get-AzVMcmdlet and set the-IdentityTypeparameter toUserAssigned:$vm = Get-AzVM -ResourceGroupName myResourceGroup -Name myVM Update-AzVm -ResourceGroupName myResourceGroup -VM $vm -IdentityType "UserAssigned" -IdentityID "/subscriptions/<SUBSCRIPTION ID>/resourcegroups/<RESOURCE GROUP>/providers/Microsoft.ManagedIdentity/userAssignedIdentities/<USER ASSIGNED IDENTITY NAME>..."
If you have a virtual machine that no longer needs system-assigned managed identity and it has no user-assigned managed identities, use the following commands:
$vm = Get-AzVM -ResourceGroupName myResourceGroup -Name myVM
Update-AzVm -ResourceGroupName myResourceGroup -VM $vm -IdentityType None
User-assigned managed identity
In this section, you learn how to add and remove a user-assigned managed identity from a VM using Azure PowerShell.
Assign a user-assigned managed identity to a VM during creation
To assign a user-assigned identity to a VM, your account needs the Virtual Machine Contributor and Managed Identity Operator role assignments. No other Microsoft Entra directory role assignments are required.
Refer to one of the following Azure VM Quickstarts, completing only the necessary sections ("Sign in to Azure", "Create resource group", "Create networking group", "Create the VM").
When you get to the "Create the VM" section, make a slight modification to the
New-AzVMConfigcmdlet syntax. Add the-IdentityType UserAssignedand-IdentityIDparameters to provision the VM with a user-assigned identity. Replace<VM NAME>,<SUBSCRIPTION ID>,<RESOURCE GROUP>, and<USER ASSIGNED IDENTITY NAME>with your own values. For example:$vmConfig = New-AzVMConfig -VMName <VM NAME> -IdentityType UserAssigned -IdentityID "/subscriptions/<SUBSCRIPTION ID>/resourcegroups/<RESOURCE GROUP>/providers/Microsoft.ManagedIdentity/userAssignedIdentities/<USER ASSIGNED IDENTITY NAME>..."
Assign a user-assigned managed identity to an existing Azure VM
To assign a user-assigned identity to a VM, your account needs the Virtual Machine Contributor and Managed Identity Operator role assignments. No other Microsoft Entra directory role assignments are required.
Create a user-assigned managed identity using the New-AzUserAssignedIdentity cmdlet. Note the
Idin the output because you'll need this information in the next step.Important
Creating user-assigned managed identities only supports alphanumeric, underscore and hyphen (0-9 or a-z or A-Z, _ or -) characters. Additionally, name should be limited from 3 to 128 character length for the assignment to VM/VMSS to work properly. For more information, see FAQs and known issues
New-AzUserAssignedIdentity -ResourceGroupName <RESOURCEGROUP> -Name <USER ASSIGNED IDENTITY NAME>Retrieve the VM properties using the
Get-AzVMcmdlet. Then to assign a user-assigned managed identity to the Azure VM, use the-IdentityTypeand-IdentityIDswitch on the Update-AzVM cmdlet. The value for the-IdentityIdparameter is theIdyou noted in the previous step. Replace<VM NAME>,<SUBSCRIPTION ID>,<RESOURCE GROUP>, and<USER ASSIGNED IDENTITY NAME>with your own values.Warning
To retain any previously user-assigned managed identities assigned to the VM, query the
Identityproperty of the VM object (for example,$vm.Identity). If any user assigned managed identities are returned, include them in the following command along with the new user assigned managed identity you would like to assign to the VM.$vm = Get-AzVM -ResourceGroupName <RESOURCE GROUP> -Name <VM NAME> # Get the list of existing identity IDs and then append to it $identityIds = $vm.Identity.UserAssignedIdentities.Keys $uid = "/subscriptions/<SUBSCRIPTION ID>/resourcegroups/<RESOURCE GROUP>/providers/Microsoft.ManagedIdentity/userAssignedIdentities/<USER ASSIGNED IDENTITY NAME>" $identityIds = $identityIds + $uid # Update the VM with added identity IDs Update-AzVM -ResourceGroupName <RESOURCE GROUP> -VM $vm -IdentityType UserAssigned -IdentityID $uid
Remove a user-assigned managed identity from an Azure VM
To remove a user-assigned identity to a VM, your account needs the Virtual Machine Contributor role assignment.
If your VM has multiple user-assigned managed identities, you can remove all but the last one using the following commands. Be sure to replace the <RESOURCE GROUP> and <VM NAME> parameter values with your own values. The <USER ASSIGNED IDENTITY NAME> is the user-assigned managed identity's name property, which should remain on the VM. This information is discoverable using a query to search for the Identity property of the VM object. For example, $vm.Identity:
$vm = Get-AzVm -ResourceGroupName myResourceGroup -Name myVm
Update-AzVm -ResourceGroupName myResourceGroup -VirtualMachine $vm -IdentityType UserAssigned -IdentityID <USER ASSIGNED IDENTITY NAME>
If your VM doesn't have a system-assigned managed identity and you want to remove all user-assigned managed identities from it, use the following command:
$vm = Get-AzVm -ResourceGroupName myResourceGroup -Name myVm
Update-AzVm -ResourceGroupName myResourceGroup -VM $vm -IdentityType None
If your VM has both system-assigned and user-assigned managed identities, you can remove all the user-assigned managed identities by switching to use only system-assigned managed identities.
$vm = Get-AzVm -ResourceGroupName myResourceGroup -Name myVm
Update-AzVm -ResourceGroupName myResourceGroup -VirtualMachine $vm -IdentityType "SystemAssigned"
Next steps
For the full Azure VM creation Quickstarts, see:
In this article, using the Azure Resource Manager deployment template, you learn how to perform the following managed identities for Azure resources operations on an Azure VM:
Prerequisites
- If you're unfamiliar with using Azure Resource Manager deployment template, check out the overview section. Be sure to review the difference between a system-assigned and user-assigned managed identity.
- If you don't already have an Azure account, sign up for a free account before continuing.
Azure Resource Manager templates
As with the Azure portal and scripting, Azure Resource Manager templates allow you to deploy new or modified resources defined by an Azure resource group. Several options are available for template editing and deployment, both local and portal-based, including:
- Using a custom template from the Azure Marketplace, which allows you to create a template from scratch, or base it on an existing common or quickstart template.
- Deriving from an existing resource group, by exporting a template from either the original deployment, or from the current state of the deployment.
- Using a local JSON editor (such as VS Code), and then uploading and deploying by using PowerShell or CLI.
- Using the Visual Studio Azure Resource Group project to both create and deploy a template.
Regardless of the option you choose, template syntax is the same during initial deployment and redeployment. Enabling a system or user-assigned managed identity on a new or existing VM is done in the same manner. Also, by default, Azure Resource Manager does an incremental update to deployments.
System-assigned managed identity
In this section, you will enable and disable a system-assigned managed identity using an Azure Resource Manager template.
Enable system-assigned managed identity during creation of an Azure VM or on an existing VM
To enable system-assigned managed identity on a VM, your account needs the Virtual Machine Contributor role assignment. No other Microsoft Entra directory role assignments are required.
Whether you sign in to Azure locally or via the Azure portal, use an account that is associated with the Azure subscription that contains the VM.
To enable system-assigned managed identity, load the template into an editor, locate the
Microsoft.Compute/virtualMachinesresource of interest within theresourcessection and add the"identity"property at the same level as the"type": "Microsoft.Compute/virtualMachines"property. Use the following syntax:"identity": { "type": "SystemAssigned" },When you're done, the following sections should be added to the
resourcesection of your template and it should resemble the following:"resources": [ { //other resource provider properties... "apiVersion": "2018-06-01", "type": "Microsoft.Compute/virtualMachines", "name": "[variables('vmName')]", "location": "[resourceGroup().location]", "identity": { "type": "SystemAssigned", } } ]
Assign a role the VM's system-assigned managed identity
After you enable a system-assigned managed identity on your VM, you may want to grant it a role such as Reader access to the resource group in which it was created. You can find detailed information to help you with this step in the Assign Azure roles using Azure Resource Manager templates article.
Disable a system-assigned managed identity from an Azure VM
To remove system-assigned managed identity from a VM, your account needs the Virtual Machine Contributor role assignment. No other Microsoft Entra directory role assignments are required.
Whether you sign in to Azure locally or via the Azure portal, use an account that is associated with the Azure subscription that contains the VM.
Load the template into an editor and locate the
Microsoft.Compute/virtualMachinesresource of interest within theresourcessection. If you have a VM that only has system-assigned managed identity, you can disable it by changing the identity type toNone.Microsoft.Compute/virtualMachines API version 2018-06-01
If your VM has both system and user-assigned managed identities, remove
SystemAssignedfrom the identity type and keepUserAssignedalong with theuserAssignedIdentitiesdictionary values.Microsoft.Compute/virtualMachines API version 2018-06-01
If your
apiVersionis2017-12-01and your VM has both system and user-assigned managed identities, removeSystemAssignedfrom the identity type and keepUserAssignedalong with theidentityIdsarray of the user-assigned managed identities.
The following example shows you how to remove a system-assigned managed identity from a VM with no user-assigned managed identities:
{
    "apiVersion": "2018-06-01",
    "type": "Microsoft.Compute/virtualMachines",
    "name": "[parameters('vmName')]",
    "location": "[resourceGroup().location]",
    "identity": {
        "type": "None"
    }
}
User-assigned managed identity
In this section, you assign a user-assigned managed identity to an Azure VM using Azure Resource Manager template.
Note
To create a user-assigned managed identity using an Azure Resource Manager Template, see Create a user-assigned managed identity.
Assign a user-assigned managed identity to an Azure VM
To assign a user-assigned identity to a VM, your account needs the Managed Identity Operator role assignment. No other Microsoft Entra directory role assignments are required.
Under the
resourceselement, add the following entry to assign a user-assigned managed identity to your VM. Be sure to replace<USERASSIGNEDIDENTITY>with the name of the user-assigned managed identity you created.Microsoft.Compute/virtualMachines API version 2018-06-01
If your
apiVersionis2018-06-01, your user-assigned managed identities are stored in theuserAssignedIdentitiesdictionary format and the<USERASSIGNEDIDENTITYNAME>value must be stored in a variable defined in thevariablessection of your template.{ "apiVersion": "2018-06-01", "type": "Microsoft.Compute/virtualMachines", "name": "[variables('vmName')]", "location": "[resourceGroup().location]", "identity": { "type": "userAssigned", "userAssignedIdentities": { "[resourceID('Microsoft.ManagedIdentity/userAssignedIdentities/',variables('<USERASSIGNEDIDENTITYNAME>'))]": {} } } }Microsoft.Compute/virtualMachines API version 2017-12-01
If your
apiVersionis2017-12-01, your user-assigned managed identities are stored in theidentityIdsarray and the<USERASSIGNEDIDENTITYNAME>value must be stored in a variable defined in thevariablessection of your template.{ "apiVersion": "2017-12-01", "type": "Microsoft.Compute/virtualMachines", "name": "[variables('vmName')]", "location": "[resourceGroup().location]", "identity": { "type": "userAssigned", "identityIds": [ "[resourceID('Microsoft.ManagedIdentity/userAssignedIdentities/',variables('<USERASSIGNEDIDENTITYNAME>'))]" ] } }When you're done, the following sections should be added to the
resourcesection of your template and it should resemble the following:Microsoft.Compute/virtualMachines API version 2018-06-01
  "resources": [
     {
         //other resource provider properties...
         "apiVersion": "2018-06-01",
         "type": "Microsoft.Compute/virtualMachines",
         "name": "[variables('vmName')]",
         "location": "[resourceGroup().location]",
         "identity": {
             "type": "userAssigned",
             "userAssignedIdentities": {
                "[resourceID('Microsoft.ManagedIdentity/userAssignedIdentities/',variables('<USERASSIGNEDIDENTITYNAME>'))]": {}
             }
         }
     }
 ]
Microsoft.Compute/virtualMachines API version 2017-12-01
"resources": [
     {
         //other resource provider properties...
         "apiVersion": "2017-12-01",
         "type": "Microsoft.Compute/virtualMachines",
         "name": "[variables('vmName')]",
         "location": "[resourceGroup().location]",
         "identity": {
             "type": "userAssigned",
             "identityIds": [
                "[resourceID('Microsoft.ManagedIdentity/userAssignedIdentities/',variables('<USERASSIGNEDIDENTITYNAME>'))]"
             ]
         }
     }
]
Remove a user-assigned managed identity from an Azure VM
To remove a user-assigned identity from a VM, your account needs the Virtual Machine Contributor role assignment. No other Microsoft Entra directory role assignments are required.
Whether you sign in to Azure locally or via the Azure portal, use an account that is associated with the Azure subscription that contains the VM.
Load the template into an editor and locate the
Microsoft.Compute/virtualMachinesresource of interest within theresourcessection. If you have a VM that only has user-assigned managed identity, you can disable it by changing the identity type toNone.The following example shows you how to remove all user-assigned managed identities from a VM with no system-assigned managed identities:
 {
   "apiVersion": "2018-06-01",
   "type": "Microsoft.Compute/virtualMachines",
   "name": "[parameters('vmName')]",
   "location": "[resourceGroup().location]",
   "identity": {
       "type": "None"
       },
 }
Microsoft.Compute/virtualMachines API version 2018-06-01
To remove a single user-assigned managed identity from a VM, remove it from the
userAssignedIdentitiesdictionary.If you have a system-assigned managed identity, keep it in the
typevalue under theidentityvalue.Microsoft.Compute/virtualMachines API version 2017-12-01
To remove a single user-assigned managed identity from a VM, remove it from the
identityIdsarray.If you have a system-assigned managed identity, keep it in the
typevalue under theidentityvalue.
Next steps
In this article, using CURL to make calls to the Azure Resource Manager REST endpoint, you learn how to perform the following managed identities for Azure resources operations on an Azure VM:
- Enable and disable the system-assigned managed identity on an Azure VM
- Add and remove a user-assigned managed identity on an Azure VM
If you don't already have an Azure account, sign up for a free account before continuing.
Prerequisites
- If you're unfamiliar with managed identities for Azure resources, see What are managed identities for Azure resources?. To learn about system-assigned and user-assigned managed identity types, see Managed identity types.
Use the Bash environment in Azure Cloud Shell. For more information, see Get started with Azure Cloud Shell.
If you prefer to run CLI reference commands locally, install the Azure CLI. If you're running on Windows or macOS, consider running Azure CLI in a Docker container. For more information, see How to run the Azure CLI in a Docker container.
If you're using a local installation, sign in to the Azure CLI by using the az login command. To finish the authentication process, follow the steps displayed in your terminal. For other sign-in options, see Authenticate to Azure using Azure CLI.
When you're prompted, install the Azure CLI extension on first use. For more information about extensions, see Use and manage extensions with the Azure CLI.
Run az version to find the version and dependent libraries that are installed. To upgrade to the latest version, run az upgrade.
System-assigned managed identity
In this section, you learn how to enable and disable system-assigned managed identity on an Azure VM using CURL to make calls to the Azure Resource Manager REST endpoint.
Enable system-assigned managed identity during creation of an Azure VM
To create an Azure VM with the system-assigned managed identity enabled, your account needs the Virtual Machine Contributor role assignment. No other Microsoft Entra directory role assignments are required.
Create a resource group for containment and deployment of your VM and its related resources, using az group create. You can skip this step if you already have resource group you would like to use instead:
az group create --name myResourceGroup --location westusCreate a network interface for your VM:
az network nic create -g myResourceGroup --vnet-name myVnet --subnet mySubnet -n myNicRetrieve a Bearer access token, which you will use in the next step in the Authorization header to create your VM with a system-assigned managed identity.
az account get-access-tokenUsing Azure Cloud Shell, create a VM using CURL to call the Azure Resource Manager REST endpoint. The following example creates a VM named myVM with a system-assigned managed identity, as identified in the request body by the value
"identity":{"type":"SystemAssigned"}. Replace<ACCESS TOKEN>with the value you received in the previous step when you requested a Bearer access token and the<SUBSCRIPTION ID>value as appropriate for your environment.curl 'https://management.azure.com/subscriptions/<SUBSCRIPTION ID>/resourceGroups/myResourceGroup/providers/Microsoft.Compute/virtualMachines/myVM?api-version=2018-06-01' -X PUT -d '{"location":"westus","name":"myVM","identity":{"type":"SystemAssigned"},"properties":{"hardwareProfile":{"vmSize":"Standard_D2_v2"},"storageProfile":{"imageReference":{"sku":"2016-Datacenter","publisher":"MicrosoftWindowsServer","version":"latest","offer":"WindowsServer"},"osDisk":{"caching":"ReadWrite","managedDisk":{"storageAccountType":"StandardSSD_LRS"},"name":"myVM3osdisk","createOption":"FromImage"},"dataDisks":[{"diskSizeGB":1023,"createOption":"Empty","lun":0},{"diskSizeGB":1023,"createOption":"Empty","lun":1}]},"osProfile":{"adminUsername":"azureuser","computerName":"myVM","adminPassword":"<SECURE PASSWORD STRING>"},"networkProfile":{"networkInterfaces":[{"id":"/subscriptions/<SUBSCRIPTION ID>/resourceGroups/myResourceGroup/providers/Microsoft.Network/networkInterfaces/myNic","properties":{"primary":true}}]}}}' -H "Content-Type: application/json" -H "Authorization: Bearer <ACCESS TOKEN>"PUT https://management.azure.com/subscriptions/<SUBSCRIPTION ID>/resourceGroups/myResourceGroup/providers/Microsoft.Compute/virtualMachines/myVM?api-version=2018-06-01 HTTP/1.1Request headers
Request header Description Content-Type Required. Set to application/json.Authorization Required. Set to a valid Beareraccess token.Request body
  {
    "location":"westus",
    "name":"myVM",
    "identity":{
       "type":"SystemAssigned"
    },
    "properties":{
       "hardwareProfile":{
          "vmSize":"Standard_D2_v2"
       },
       "storageProfile":{
          "imageReference":{
             "sku":"2016-Datacenter",
             "publisher":"MicrosoftWindowsServer",
             "version":"latest",
             "offer":"WindowsServer"
          },
          "osDisk":{
             "caching":"ReadWrite",
             "managedDisk":{
                "storageAccountType":"StandardSSD_LRS"
             },
             "name":"myVM3osdisk",
             "createOption":"FromImage"
          },
          "dataDisks":[
             {
                "diskSizeGB":1023,
                "createOption":"Empty",
                "lun":0
             },
             {
                "diskSizeGB":1023,
                "createOption":"Empty",
                "lun":1
             }
          ]
       },
       "osProfile":{
          "adminUsername":"azureuser",
          "computerName":"myVM",
          "adminPassword":"myPassword12"
       },
       "networkProfile":{
          "networkInterfaces":[
             {
                "id":"/subscriptions/<SUBSCRIPTION ID>/resourceGroups/myResourceGroup/providers/Microsoft.Network/networkInterfaces/myNic",
                "properties":{
                   "primary":true
                }
             }
          ]
       }
    }
 }
Enable system-assigned identity on an existing Azure VM
To enable system-assigned managed identity on a VM that was originally provisioned without it, your account needs the Virtual Machine Contributor role assignment. No other Microsoft Entra directory role assignments are required.
Retrieve a Bearer access token, which you will use in the next step in the Authorization header to create your VM with a system-assigned managed identity.
az account get-access-tokenUse the following CURL command to call the Azure Resource Manager REST endpoint to enable system-assigned managed identity on your VM as identified in the request body by the value
{"identity":{"type":"SystemAssigned"}for a VM named myVM. Replace<ACCESS TOKEN>with the value you received in the previous step when you requested a Bearer access token and the<SUBSCRIPTION ID>value as appropriate for your environment.Important
To ensure you don't delete any existing user-assigned managed identities that are assigned to the VM, you need to list the user-assigned managed identities by using this CURL command:
curl 'https://management.azure.com/subscriptions/<SUBSCRIPTION ID>/resourceGroups/<RESOURCE GROUP>/providers/Microsoft.Compute/virtualMachines/<VM NAME>?api-version=2018-06-01' -H "Authorization: Bearer <ACCESS TOKEN>". If you have any user-assigned managed identities assigned to the VM as identified in theidentityvalue in the response, skip to step 3 that shows you how to retain user-assigned managed identities while enabling system-assigned managed identity on your VM.curl 'https://management.azure.com/subscriptions/<SUBSCRIPTION ID>/resourceGroups/myResourceGroup/providers/Microsoft.Compute/virtualMachines/myVM?api-version=2018-06-01' -X PATCH -d '{"identity":{"type":"SystemAssigned"}}' -H "Content-Type: application/json" -H "Authorization:Bearer <ACCESS TOKEN>"PATCH https://management.azure.com/subscriptions/<SUBSCRIPTION ID>/resourceGroups/myResourceGroup/providers/Microsoft.Compute/virtualMachines/myVM?api-version=2018-06-01 HTTP/1.1Request headers
Request header Description Content-Type Required. Set to application/json.Authorization Required. Set to a valid Beareraccess token.Request body
 {
    "identity":{
       "type":"SystemAssigned"
    }
 }
To enable system-assigned managed identity on a VM with existing user-assigned managed identities, you need to add
SystemAssignedto thetypevalue.For example, if your VM has the user-assigned managed identities
ID1andID2assigned to it, and you would like to add system-assigned managed identity to the VM, use the following CURL call. Replace<ACCESS TOKEN>and<SUBSCRIPTION ID>with values appropriate to your environment.API version
2018-06-01stores user-assigned managed identities in theuserAssignedIdentitiesvalue in a dictionary format as opposed to theidentityIdsvalue in an array format used in API version2017-12-01.API VERSION 2018-06-01
curl 'https://management.azure.com/subscriptions/<SUBSCRIPTION ID>/resourceGroups/myResourceGroup/providers/Microsoft.Compute/virtualMachines/myVM?api-version=2018-06-01' -X PATCH -d '{"identity":{"type":"SystemAssigned, UserAssigned", "userAssignedIdentities":{"/subscriptions/<<SUBSCRIPTION ID>>/resourcegroups/myResourceGroup/providers/Microsoft.ManagedIdentity/userAssignedIdentities/ID1":{},"/subscriptions/<SUBSCRIPTION ID>/resourcegroups/myResourceGroup/providers/Microsoft.ManagedIdentity/userAssignedIdentities/ID2":{}}}}' -H "Content-Type: application/json" -H "Authorization:Bearer <ACCESS TOKEN>"PATCH https://management.azure.com/subscriptions/<SUBSCRIPTION ID>/resourceGroups/myResourceGroup/providers/Microsoft.Compute/virtualMachines/myVM?api-version=2018-06-01 HTTP/1.1Request headers
Request header Description Content-Type Required. Set to application/json.Authorization Required. Set to a valid Beareraccess token.Request body
 {
    "identity":{
       "type":"SystemAssigned, UserAssigned",
       "userAssignedIdentities":{
          "/subscriptions/<<SUBSCRIPTION ID>>/resourcegroups/myResourceGroup/providers/Microsoft.ManagedIdentity/userAssignedIdentities/ID1":{

          },
          "/subscriptions/<SUBSCRIPTION ID>/resourcegroups/myResourceGroup/providers/Microsoft.ManagedIdentity/userAssignedIdentities/ID2":{

          }
       }
    }
 }
API VERSION 2017-12-01
curl 'https://management.azure.com/subscriptions/<SUBSCRIPTION ID>/resourceGroups/myResourceGroup/providers/Microsoft.Compute/virtualMachines/myVM?api-version=2017-12-01' -X PATCH -d '{"identity":{"type":"SystemAssigned, UserAssigned", "identityIds":["/subscriptions/<<SUBSCRIPTION ID>>/resourcegroups/myResourceGroup/providers/Microsoft.ManagedIdentity/userAssignedIdentities/ID1","/subscriptions/<SUBSCRIPTION ID>/resourcegroups/myResourceGroup/providers/Microsoft.ManagedIdentity/userAssignedIdentities/ID2"]}}' -H "Content-Type: application/json" -H "Authorization:Bearer <ACCESS TOKEN>"PATCH https://management.azure.com/subscriptions/<SUBSCRIPTION ID>/resourceGroups/myResourceGroup/providers/Microsoft.Compute/virtualMachines/myVM?api-version=2017-12-01 HTTP/1.1Request headers
Request header Description Content-Type Required. Set to application/json.Authorization Required. Set to a valid Beareraccess token.Request body
 {
    "identity":{
       "type":"SystemAssigned, UserAssigned",
       "identityIds":[
          "/subscriptions/<<SUBSCRIPTION ID>>/resourcegroups/myResourceGroup/providers/Microsoft.ManagedIdentity/userAssignedIdentities/ID1",
          "/subscriptions/<SUBSCRIPTION ID>/resourcegroups/myResourceGroup/providers/Microsoft.ManagedIdentity/userAssignedIdentities/ID2"
       ]
    }
 }
Disable system-assigned managed identity from an Azure VM
To disable system-assigned managed identity on a VM, your account needs the Virtual Machine Contributor role assignment. No other Microsoft Entra directory role assignments are required.
Retrieve a Bearer access token, which you will use in the next step in the Authorization header to create your VM with a system-assigned managed identity.
az account get-access-tokenUpdate the VM using CURL to call the Azure Resource Manager REST endpoint to disable system-assigned managed identity. The following example disables system-assigned managed identity as identified in the request body by the value
{"identity":{"type":"None"}}from a VM named myVM. Replace<ACCESS TOKEN>with the value you received in the previous step when you requested a Bearer access token and the<SUBSCRIPTION ID>value as appropriate for your environment.Important
To ensure you don't delete any existing user-assigned managed identities that are assigned to the VM, you need to list the user-assigned managed identities by using this CURL command:
curl 'https://management.azure.com/subscriptions/<SUBSCRIPTION ID>/resourceGroups/<RESOURCE GROUP>/providers/Microsoft.Compute/virtualMachines/<VM NAME>?api-version=2018-06-01' -H "Authorization: Bearer <ACCESS TOKEN>". If you have any user-assigned managed identities assigned to the VM as identified in theidentityvalue in the response, skip to step 3 that shows you how to retain user-assigned managed identities while disabling system-assigned managed identity on your VM.curl 'https://management.azure.com/subscriptions/<SUBSCRIPTION ID>/resourceGroups/myResourceGroup/providers/Microsoft.Compute/virtualMachines/myVM?api-version=2018-06-01' -X PATCH -d '{"identity":{"type":"None"}}' -H "Content-Type: application/json" -H "Authorization:Bearer <ACCESS TOKEN>"PATCH https://management.azure.com/subscriptions/<SUBSCRIPTION ID>/resourceGroups/myResourceGroup/providers/Microsoft.Compute/virtualMachines/myVM?api-version=2018-06-01 HTTP/1.1Request headers
Request header Description Content-Type Required. Set to application/json.Authorization Required. Set to a valid Beareraccess token.Request body
 {
    "identity":{
       "type":"None"
    }
 }
To remove system-assigned managed identity from a virtual machine that has user-assigned managed identities, remove
SystemAssignedfrom the{"identity":{"type:" "}}value while keeping theUserAssignedvalue and theuserAssignedIdentitiesdictionary values if you are using API version 2018-06-01. If you are using API version 2017-12-01 or earlier, keep theidentityIdsarray.
User-assigned managed identity
In this section, you learn how to add and remove user-assigned managed identity on an Azure VM using CURL to make calls to the Azure Resource Manager REST endpoint.
Assign a user-assigned managed identity during the creation of an Azure VM
To assign a user-assigned identity to a VM, your account needs the Virtual Machine Contributor and Managed Identity Operator role assignments. No other Microsoft Entra directory role assignments are required.
Retrieve a Bearer access token, which you will use in the next step in the Authorization header to create your VM with a system-assigned managed identity.
az account get-access-tokenCreate a network interface for your VM:
az network nic create -g myResourceGroup --vnet-name myVnet --subnet mySubnet -n myNicRetrieve a Bearer access token, which you will use in the next step in the Authorization header to create your VM with a system-assigned managed identity.
az account get-access-tokenCreate a user-assigned managed identity using the instructions found here: Create a user-assigned managed identity.
Create a VM using CURL to call the Azure Resource Manager REST endpoint. The following example creates a VM named myVM in the resource group myResourceGroup with a user-assigned managed identity
ID1, as identified in the request body by the value"identity":{"type":"UserAssigned"}. Replace<ACCESS TOKEN>with the value you received in the previous step when you requested a Bearer access token and the<SUBSCRIPTION ID>value as appropriate for your environment.API VERSION 2018-06-01
curl 'https://management.azure.com/subscriptions/<SUBSCRIPTION ID>/resourceGroups/myResourceGroup/providers/Microsoft.Compute/virtualMachines/myVM?api-version=2018-06-01' -X PUT -d '{"location":"westus","name":"myVM","identity":{"type":"UserAssigned","identityIds":["/subscriptions/<SUBSCRIPTION ID>/resourcegroups/myResourceGroup/providers/Microsoft.ManagedIdentity/userAssignedIdentities/ID1"]},"properties":{"hardwareProfile":{"vmSize":"Standard_D2_v2"},"storageProfile":{"imageReference":{"sku":"2016-Datacenter","publisher":"MicrosoftWindowsServer","version":"latest","offer":"WindowsServer"},"osDisk":{"caching":"ReadWrite","managedDisk":{"storageAccountType":"StandardSSD_LRS"},"name":"myVM3osdisk","createOption":"FromImage"},"dataDisks":[{"diskSizeGB":1023,"createOption":"Empty","lun":0},{"diskSizeGB":1023,"createOption":"Empty","lun":1}]},"osProfile":{"adminUsername":"azureuser","computerName":"myVM","adminPassword":"myPassword12"},"networkProfile":{"networkInterfaces":[{"id":"/subscriptions/<SUBSCRIPTION ID>/resourceGroups/myResourceGroup/providers/Microsoft.Network/networkInterfaces/myNic","properties":{"primary":true}}]}}}' -H "Content-Type: application/json" -H "Authorization: Bearer <ACCESS TOKEN>"PUT https://management.azure.com/subscriptions/<SUBSCRIPTION ID>/resourceGroups/myResourceGroup/providers/Microsoft.Compute/virtualMachines/myVM?api-version=2018-06-01 HTTP/1.1Request headers
Request header Description Content-Type Required. Set to application/json.Authorization Required. Set to a valid Beareraccess token.Request body
 {
    "location":"westus",
    "name":"myVM",
    "identity":{
       "type":"UserAssigned",
       "identityIds":[
          "/subscriptions/<SUBSCRIPTION ID>/resourcegroups/myResourceGroup/providers/Microsoft.ManagedIdentity/userAssignedIdentities/ID1"
       ]
    },
    "properties":{
       "hardwareProfile":{
          "vmSize":"Standard_D2_v2"
       },
       "storageProfile":{
          "imageReference":{
             "sku":"2016-Datacenter",
             "publisher":"MicrosoftWindowsServer",
             "version":"latest",
             "offer":"WindowsServer"
          },
          "osDisk":{
             "caching":"ReadWrite",
             "managedDisk":{
                "storageAccountType":"StandardSSD_LRS"
             },
             "name":"myVM3osdisk",
             "createOption":"FromImage"
          },
          "dataDisks":[
             {
                "diskSizeGB":1023,
                "createOption":"Empty",
                "lun":0
             },
             {
                "diskSizeGB":1023,
                "createOption":"Empty",
                "lun":1
             }
          ]
       },
       "osProfile":{
          "adminUsername":"azureuser",
          "computerName":"myVM",
          "adminPassword":"myPassword12"
       },
       "networkProfile":{
          "networkInterfaces":[
             {
                "id":"/subscriptions/<SUBSCRIPTION ID>/resourceGroups/myResourceGroup/providers/Microsoft.Network/networkInterfaces/myNic",
                "properties":{
                   "primary":true
                }
             }
          ]
       }
    }
 }
API VERSION 2017-12-01
curl 'https://management.azure.com/subscriptions/<SUBSCRIPTION ID>/resourceGroups/myResourceGroup/providers/Microsoft.Compute/virtualMachines/myVM?api-version=2017-12-01' -X PUT -d '{"location":"westus","name":"myVM","identity":{"type":"UserAssigned","identityIds":["/subscriptions/<SUBSCRIPTION ID>/resourcegroups/myResourceGroup/providers/Microsoft.ManagedIdentity/userAssignedIdentities/ID1"]},"properties":{"hardwareProfile":{"vmSize":"Standard_D2_v2"},"storageProfile":{"imageReference":{"sku":"2016-Datacenter","publisher":"MicrosoftWindowsServer","version":"latest","offer":"WindowsServer"},"osDisk":{"caching":"ReadWrite","managedDisk":{"storageAccountType":"StandardSSD_LRS"},"name":"myVM3osdisk","createOption":"FromImage"},"dataDisks":[{"diskSizeGB":1023,"createOption":"Empty","lun":0},{"diskSizeGB":1023,"createOption":"Empty","lun":1}]},"osProfile":{"adminUsername":"azureuser","computerName":"myVM","adminPassword":"myPassword12"},"networkProfile":{"networkInterfaces":[{"id":"/subscriptions/<SUBSCRIPTION ID>/resourceGroups/myResourceGroup/providers/Microsoft.Network/networkInterfaces/myNic","properties":{"primary":true}}]}}}' -H "Content-Type: application/json" -H "Authorization: Bearer <ACCESS TOKEN>"PUT https://management.azure.com/subscriptions/<SUBSCRIPTION ID>/resourceGroups/myResourceGroup/providers/Microsoft.Compute/virtualMachines/myVM?api-version=2017-12-01 HTTP/1.1Request headers
Request header Description Content-Type Required. Set to application/json.Authorization Required. Set to a valid Beareraccess token.Request body
 {
    "location":"westus",
    "name":"myVM",
    "identity":{
       "type":"UserAssigned",
       "identityIds":[
          "/subscriptions/<SUBSCRIPTION ID>/resourcegroups/myResourceGroup/providers/Microsoft.ManagedIdentity/userAssignedIdentities/ID1"
       ]
    },
    "properties":{
       "hardwareProfile":{
          "vmSize":"Standard_D2_v2"
       },
       "storageProfile":{
          "imageReference":{
             "sku":"2016-Datacenter",
             "publisher":"MicrosoftWindowsServer",
             "version":"latest",
             "offer":"WindowsServer"
          },
          "osDisk":{
             "caching":"ReadWrite",
             "managedDisk":{
                "storageAccountType":"StandardSSD_LRS"
             },
             "name":"myVM3osdisk",
             "createOption":"FromImage"
          },
          "dataDisks":[
             {
                "diskSizeGB":1023,
                "createOption":"Empty",
                "lun":0
             },
             {
                "diskSizeGB":1023,
                "createOption":"Empty",
                "lun":1
             }
          ]
       },
       "osProfile":{
          "adminUsername":"azureuser",
          "computerName":"myVM",
          "adminPassword":"myPassword12"
       },
       "networkProfile":{
          "networkInterfaces":[
             {
                "id":"/subscriptions/<SUBSCRIPTION ID>/resourceGroups/myResourceGroup/providers/Microsoft.Network/networkInterfaces/myNic",
                "properties":{
                   "primary":true
                }
             }
          ]
       }
    }
 }
Assign a user-assigned managed identity to an existing Azure VM
To assign a user-assigned identity to a VM, your account needs the Virtual Machine Contributor and Managed Identity Operator role assignments. No other Microsoft Entra directory role assignments are required.
Retrieve a Bearer access token, which you will use in the next step in the Authorization header to create your VM with a system-assigned managed identity.
az account get-access-tokenCreate a user-assigned managed identity using the instructions found here, Create a user-assigned managed identity.
To ensure you don't delete existing user or system-assigned managed identities that are assigned to the VM, you need to list the identity types assigned to the VM by using the following CURL command. If you have managed identities assigned to the virtual machine scale set, they are listed under in the
identityvalue.curl 'https://management.azure.com/subscriptions/<SUBSCRIPTION ID>/resourceGroups/<RESOURCE GROUP>/providers/Microsoft.Compute/virtualMachines/<VM NAME>?api-version=2018-06-01' -H "Authorization: Bearer <ACCESS TOKEN>"GET https://management.azure.com/subscriptions/<SUBSCRIPTION ID>/resourceGroups/<RESOURCE GROUP>/providers/Microsoft.Compute/virtualMachines/<VM NAME>?api-version=2018-06-01 HTTP/1.1Request headers
Request header Description Authorization Required. Set to a valid Beareraccess token.If you have any user or system-assigned managed identities assigned to the VM as identified in the
identityvalue in the response, skip to step 5 that shows you how to retain the system-assigned managed identity while adding a user-assigned managed identity on your VM.If you don't have any user-assigned managed identities assigned to your VM, use the following CURL command to call the Azure Resource Manager REST endpoint to assign the first user-assigned managed identity to the VM.
The following example assigns a user-assigned managed identity,
ID1to a VM named myVM in the resource group myResourceGroup. Replace<ACCESS TOKEN>with the value you received in the previous step when you requested a Bearer access token and the<SUBSCRIPTION ID>value as appropriate for your environment.API VERSION 2018-06-01
curl 'https://management.azure.com/subscriptions/<SUBSCRIPTION ID>/resourceGroups/myResourceGroup/providers/Microsoft.Compute/virtualMachines/myVM?api-version=2018-06-01' -X PATCH -d '{"identity":{"type":"UserAssigned", "userAssignedIdentities":{"/subscriptions/<SUBSCRIPTION ID>/resourcegroups/myResourceGroup/providers/Microsoft.ManagedIdentity/userAssignedIdentities/ID1":{}}}}' -H "Content-Type: application/json" -H "Authorization:Bearer <ACCESS TOKEN>"PATCH https://management.azure.com/subscriptions/<SUBSCRIPTION ID>/resourceGroups/myResourceGroup/providers/Microsoft.Compute/virtualMachines/myVM?api-version=2018-06-01 HTTP/1.1Request headers
Request header Description Content-Type Required. Set to application/json.Authorization Required. Set to a valid Beareraccess token.Request body
 {
    "identity":{
       "type":"UserAssigned",
       "userAssignedIdentities":{
          "/subscriptions/<SUBSCRIPTION ID>/resourcegroups/myResourceGroup/providers/Microsoft.ManagedIdentity/userAssignedIdentities/ID1":{

          }
       }
    }
 }
API VERSION 2017-12-01
curl 'https://management.azure.com/subscriptions/<SUBSCRIPTION ID>/resourceGroups/myResourceGroup/providers/Microsoft.Compute/virtualMachines/myVM?api-version=2017-12-01' -X PATCH -d '{"identity":{"type":"userAssigned", "identityIds":["/subscriptions/<SUBSCRIPTION ID>/resourcegroups/myResourceGroup/providers/Microsoft.ManagedIdentity/userAssignedIdentities/ID1"]}}' -H "Content-Type: application/json" -H "Authorization:Bearer <ACCESS TOKEN>"PATCH https://management.azure.com/subscriptions/<SUBSCRIPTION ID>/resourceGroups/myResourceGroup/providers/Microsoft.Compute/virtualMachines/myVM?api-version=2017-12-01 HTTP/1.1Request headers
Request header Description Content-Type Required. Set to application/json.Authorization Required. Set to a valid Beareraccess token.Request body
 {
    "identity":{
       "type":"userAssigned",
       "identityIds":[
          "/subscriptions/<SUBSCRIPTION ID>/resourcegroups/myResourceGroup/providers/Microsoft.ManagedIdentity/userAssignedIdentities/ID1"
       ]
    }
 }
If you have an existing user-assigned or system-assigned managed identity assigned to your VM:
API VERSION 2018-06-01
Add the user-assigned managed identity to the
userAssignedIdentitiesdictionary value.For example, if you have system-assigned managed identity and the user-assigned managed identity
ID1currently assigned to your VM and would like to add the user-assigned managed identityID2to it:curl 'https://management.azure.com/subscriptions/<SUBSCRIPTION ID>/resourceGroups/myResourceGroup/providers/Microsoft.Compute/virtualMachines/myVM?api-version=2018-06-01' -X PATCH -d '{"identity":{"type":"SystemAssigned, UserAssigned", "userAssignedIdentities":{"/subscriptions/<SUBSCRIPTION ID>/resourcegroups/myResourceGroup/providers/Microsoft.ManagedIdentity/userAssignedIdentities/ID1":{},"/subscriptions/<SUBSCRIPTION ID>/resourcegroups/myResourceGroup/providers/Microsoft.ManagedIdentity/userAssignedIdentities/ID2":{}}}}' -H "Content-Type: application/json" -H "Authorization:Bearer <ACCESS TOKEN>"PATCH https://management.azure.com/subscriptions/<SUBSCRIPTION ID>/resourceGroups/myResourceGroup/providers/Microsoft.Compute/virtualMachines/myVM?api-version=2018-06-01 HTTP/1.1Request headers
Request header Description Content-Type Required. Set to application/json.Authorization Required. Set to a valid Beareraccess token.Request body
 {
    "identity":{
       "type":"SystemAssigned, UserAssigned",
       "userAssignedIdentities":{
          "/subscriptions/<SUBSCRIPTION ID>/resourcegroups/myResourceGroup/providers/Microsoft.ManagedIdentity/userAssignedIdentities/ID1":{

          },
          "/subscriptions/<SUBSCRIPTION ID>/resourcegroups/myResourceGroup/providers/Microsoft.ManagedIdentity/userAssignedIdentities/ID2":{

          }
       }
    }
 }
API VERSION 2017-12-01
Retain the user-assigned managed identities you would like to keep in the
identityIdsarray value while adding the new user-assigned managed identity.For example, if you have system-assigned managed identity and the user-assigned managed identity
ID1currently assigned to your VM and would like to add the user-assigned managed identityID2to it:curl 'https://management.azure.com/subscriptions/<SUBSCRIPTION ID>/resourceGroups/myResourceGroup/providers/Microsoft.Compute/virtualMachines/myVM?api-version=2017-12-01' -X PATCH -d '{"identity":{"type":"SystemAssigned,UserAssigned", "identityIds":["/subscriptions/<SUBSCRIPTION ID>/resourcegroups/myResourceGroup/providers/Microsoft.ManagedIdentity/userAssignedIdentities/ID1","/subscriptions/<SUBSCRIPTION ID>/resourcegroups/myResourceGroup/providers/Microsoft.ManagedIdentity/userAssignedIdentities/ID2"]}}' -H "Content-Type: application/json" -H "Authorization:Bearer <ACCESS TOKEN>"PATCH https://management.azure.com/subscriptions/<SUBSCRIPTION ID>/resourceGroups/myResourceGroup/providers/Microsoft.Compute/virtualMachines/myVM?api-version=2017-12-01 HTTP/1.1Request headers
Request header Description Content-Type Required. Set to application/json.Authorization Required. Set to a valid Beareraccess token.Request body
 {
    "identity":{
       "type":"SystemAssigned,UserAssigned",
       "identityIds":[
          "/subscriptions/<SUBSCRIPTION ID>/resourcegroups/myResourceGroup/providers/Microsoft.ManagedIdentity/userAssignedIdentities/ID1",
          "/subscriptions/<SUBSCRIPTION ID>/resourcegroups/myResourceGroup/providers/Microsoft.ManagedIdentity/userAssignedIdentities/ID2"
       ]
    }
 }
Remove a user-assigned managed identity from an Azure VM
To remove a user-assigned identity to a VM, your account needs the Virtual Machine Contributor role assignment.
Retrieve a Bearer access token, which you will use in the next step in the Authorization header to create your VM with a system-assigned managed identity.
az account get-access-tokenTo ensure you don't delete any existing user-assigned managed identities that you would like to keep assigned to the VM or remove the system-assigned managed identity, you need to list the managed identities by using the following CURL command:
curl 'https://management.azure.com/subscriptions/<SUBSCRIPTION ID>/resourceGroups/<RESOURCE GROUP>/providers/Microsoft.Compute/virtualMachines/<VM NAME>?api-version=2018-06-01' -H "Authorization: Bearer <ACCESS TOKEN>"GET https://management.azure.com/subscriptions/<SUBSCRIPTION ID>/resourceGroups/<RESOURCE GROUP>/providers/Microsoft.Compute/virtualMachines/<VM NAME>?api-version=2018-06-01 HTTP/1.1Request headers
Request header Description Content-Type Required. Set to application/json.Authorization Required. Set to a valid Beareraccess token.If you have managed identities assigned to the VM, they are listed in the response in the
identityvalue.For example, if you have user-assigned managed identities
ID1andID2assigned to your VM, and you only want to keepID1assigned and retain the system-assigned identity:API VERSION 2018-06-01
Add
nullto the user-assigned managed identity you would like to remove:curl 'https://management.azure.com/subscriptions/<SUBSCRIPTION ID>/resourceGroups/myResourceGroup/providers/Microsoft.Compute/virtualMachines/myVM?api-version=2018-06-01' -X PATCH -d '{"identity":{"type":"SystemAssigned, UserAssigned", "userAssignedIdentities":{"/subscriptions/<SUBSCRIPTION ID>/resourcegroups/myResourceGroup/providers/Microsoft.ManagedIdentity/userAssignedIdentities/ID2":null}}}' -H "Content-Type: application/json" -H "Authorization:Bearer <ACCESS TOKEN>"PATCH https://management.azure.com/subscriptions/<SUBSCRIPTION ID>/resourceGroups/myResourceGroup/providers/Microsoft.Compute/virtualMachines/myVM?api-version=2018-06-01 HTTP/1.1Request headers
Request header Description Content-Type Required. Set to application/json.Authorization Required. Set to a valid Beareraccess token.Request body
 {
    "identity":{
       "type":"SystemAssigned, UserAssigned",
       "userAssignedIdentities":{
          "/subscriptions/<SUBSCRIPTION ID>/resourcegroups/myResourceGroup/providers/Microsoft.ManagedIdentity/userAssignedIdentities/ID2":null
       }
    }
 }
API VERSION 2017-12-01
Retain only the user-assigned managed identity(s) you would like to keep in the
identityIdsarray:curl 'https://management.azure.com/subscriptions/<SUBSCRIPTION ID>/resourceGroups/myResourceGroup/providers/Microsoft.Compute/virtualMachines/myVM?api-version=2017-12-01' -X PATCH -d '{"identity":{"type":"SystemAssigned, UserAssigned", "identityIds":["/subscriptions/<SUBSCRIPTION ID>/resourcegroups/myResourceGroup/providers/Microsoft.ManagedIdentity/userAssignedIdentities/ID1"]}}' -H "Content-Type: application/json" -H "Authorization:Bearer <ACCESS TOKEN>"PATCH https://management.azure.com/subscriptions/<SUBSCRIPTION ID>/resourceGroups/myResourceGroup/providers/Microsoft.Compute/virtualMachines/myVM?api-version=2017-12-01 HTTP/1.1Request headers
Request header Description Content-Type Required. Set to application/json.Authorization Required. Set to a valid Beareraccess token.Request body
 {
    "identity":{
       "type":"SystemAssigned, UserAssigned",
       "identityIds":[
          "/subscriptions/<SUBSCRIPTION ID>/resourcegroups/myResourceGroup/providers/Microsoft.ManagedIdentity/userAssignedIdentities/ID1"
       ]
    }
 }
If your VM has both system-assigned and user-assigned managed identities, you can remove all the user-assigned managed identities by switching to use only system-assigned managed identity using the following command:
curl 'https://management.azure.com/subscriptions/<SUBSCRIPTION ID>/resourceGroups/myResourceGroup/providers/Microsoft.Compute/virtualMachines/myVM?api-version=2018-06-01' -X PATCH -d '{"identity":{"type":"SystemAssigned"}}' -H "Content-Type: application/json" -H "Authorization:Bearer <ACCESS TOKEN>"
PATCH https://management.azure.com/subscriptions/<SUBSCRIPTION ID>/resourceGroups/myResourceGroup/providers/Microsoft.Compute/virtualMachines/myVM?api-version=2018-06-01 HTTP/1.1
Request headers
| Request header | Description |
|---|---|
| Content-Type | Required. Set to application/json. |
| Authorization | Required. Set to a valid Bearer access token. |
Request body
{
   "identity":{
      "type":"SystemAssigned"
   }
}
If your VM has only user-assigned managed identities and you would like to remove them all, use the following command:
curl 'https://management.azure.com/subscriptions/<SUBSCRIPTION ID>/resourceGroups/myResourceGroup/providers/Microsoft.Compute/virtualMachines/myVM?api-version=2018-06-01' -X PATCH -d '{"identity":{"type":"None"}}' -H "Content-Type: application/json" -H Authorization:"Bearer <ACCESS TOKEN>"
PATCH https://management.azure.com/subscriptions/<SUBSCRIPTION ID>/resourceGroups/myResourceGroup/providers/Microsoft.Compute/virtualMachines/myVM?api-version=2018-06-01 HTTP/1.1
Request headers
| Request header | Description |
|---|---|
| Content-Type | Required. Set to application/json. |
| Authorization | Required. Set to a valid Bearer access token. |
Request body
{
   "identity":{
      "type":"None"
   }
}
Next steps
For information on how to create, list, or delete user-assigned managed identities using REST see:
In this article, you learn how to enable and remove managed identities for Azure resources for an Azure VM, using an Azure SDK.
Prerequisites
- If you're not familiar with the managed identities for Azure resources feature, see this overview. If you don't have an Azure account, sign up for a free account before you continue.
Azure SDKs with managed identities for Azure resources support
Azure supports multiple programming platforms through a series of Azure SDKs. Several of them have been updated to support managed identities for Azure resources, and provide corresponding samples to demonstrate usage. This list is updated as other support is added:
Next steps
- See related articles under Configure Identity for an Azure VM, to learn how you can also use the Azure portal, PowerShell, CLI, and resource templates.