Note
Access to this page requires authorization. You can try signing in or changing directories.
Access to this page requires authorization. You can try changing directories.
This article describes how to assign Microsoft Entra roles to users and groups using the Microsoft Entra admin center, Microsoft Graph PowerShell, or Microsoft Graph API. It also describes how to assign roles at different scopes, such as tenant, application registration, and administrative unit scopes.
You can assign both direct and indirect role assignments to a user. If a user is assigned a role by a group membership, add the user to the group to add the role assignment. For more information, see Use Microsoft Entra groups to manage role assignments.
In Microsoft Entra ID, roles are typically assigned to apply to the entire tenant. However, you can also assign Microsoft Entra roles for different resources, such as application registrations or administrative units. For example, you could assign the Helpdesk Administrator role so that it just applies to a particular administrative unit and not the entire tenant. The resources that a role assignment applies to is also called the scope. Restricting the scope of a role assignment is supported for built-in and custom roles. For more information about scope, see Overview of role-based access control (RBAC) in Microsoft Entra ID.
Microsoft Entra roles in PIM
If you have a Microsoft Entra ID P2 license and Privileged Identity Management (PIM), you have additional capabilities when assigning roles, such as making a user eligible for a role assignment or defining the start and end time for a role assignment. For information about assigning Microsoft Entra roles in PIM, see these articles:
| Method | Information |
|---|---|
| Microsoft Entra admin center | Assign Microsoft Entra roles in Privileged Identity Management |
| Microsoft Graph PowerShell | Tutorial: Assign Microsoft Entra roles in Privileged Identity Management using Microsoft Graph PowerShell |
| Microsoft Graph API | Manage Microsoft Entra role assignments using PIM APIs Assign Microsoft Entra roles in Privileged Identity Management |
Prerequisites
- Privileged Role Administrator
- Microsoft Graph PowerShell module when using PowerShell
- Admin consent when using Graph Explorer for Microsoft Graph API
For more information, see Prerequisites to use PowerShell or Graph Explorer.
Assign roles with tenant scope
This section describes how to assign roles at tenant scope.
Sign in to the Microsoft Entra admin center as at least a Privileged Role Administrator.
Browse to Entra ID > Roles & admins.

Select a role name to open the role. Don't add a check mark next to the role.

Select Add assignments and then select the users or groups you want to assign to this role.
Only role-assignable groups are displayed. If a group isn't listed, you'll need to create a role-assignable group. For more information, see Create a role-assignable group in Microsoft Entra ID.
If your experience is different than the following screenshot, you might have Microsoft Entra ID P2 and PIM. For more information, see Assign Microsoft Entra roles in Privileged Identity Management.
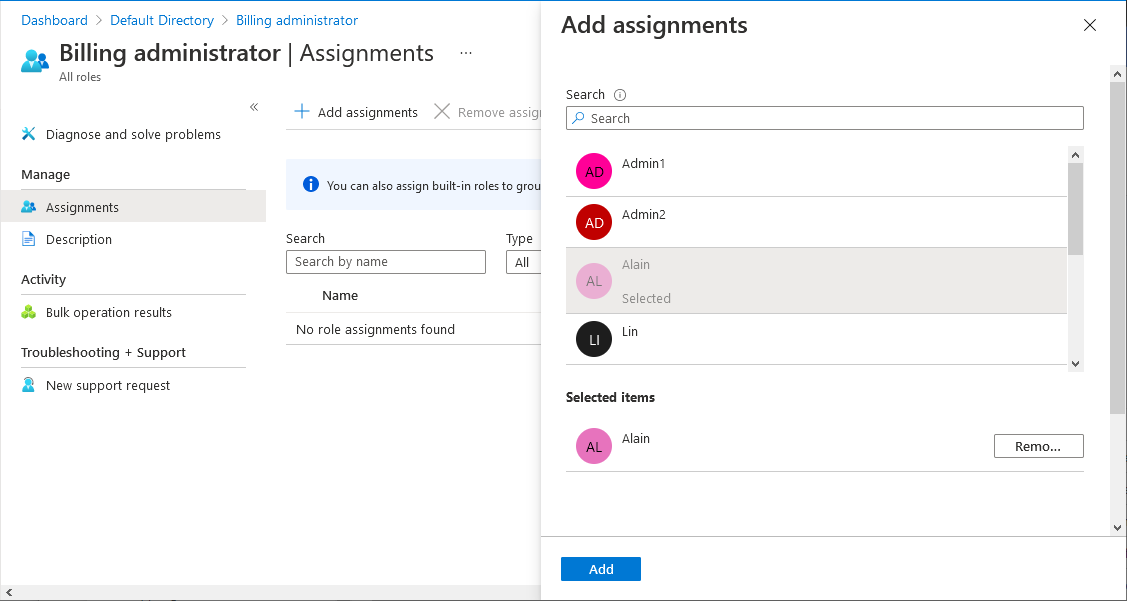
Select Add to assign the role.


Assign roles with app registration scope
Built-in roles and custom roles are assigned by default at tenant scope to grant access permissions over all app registrations in your organization. Additionally, custom roles and some relevant built-in roles (depending on the type of Microsoft Entra resource) can also be assigned at the scope of a single Microsoft Entra resource. This allows you to give the user the permission to update credentials and basic properties of a single app without having to create a second custom role.
This section describes how to assign roles at an application registration scope.
Sign in to the Microsoft Entra admin center as at least a Application Developer.
Browse to Entra ID > App registrations.
Select an application. You can use search box to find the desired app.
You might have to select All applications to see the complete list of app registrations in your tenant.

Select Roles and administrators from the left navigation menu to see the list of all roles available to be assigned over the app registration.

Select the desired role.
Tip
You won't see the entire list of Microsoft Entra built-in or custom roles here. This is expected. We show the roles which have permissions related to managing app registrations only.
Select Add assignments and then select the users or groups you want to assign this role to.

Select Add to assign the role scoped over the app registration.


Assign roles with administrative unit scope
In Microsoft Entra ID, for more granular administrative control, you can assign a Microsoft Entra role with a scope that's limited to one or more administrative units. When a Microsoft Entra role is assigned at the scope of an administrative unit, role permissions apply only when managing members of the administrative unit itself, and don't apply to tenant-wide settings or configurations.
For example, an administrator who is assigned the Groups Administrator role at the scope of an administrative unit can manage groups that are members of the administrative unit, but they can't manage other groups in the tenant. They also can't manage tenant-level settings related to groups, such as expiration or group naming policies.
This section describes how to assign Microsoft Entra roles with administrative unit scope.
Prerequisites
- Microsoft Entra ID P1 or P2 license for each administrative unit administrator
- Microsoft Entra ID Free licenses for administrative unit members
- Privileged Role Administrator
- Microsoft Graph PowerShell module when using PowerShell
- Admin consent when using Graph Explorer for Microsoft Graph API
For more information, see Prerequisites to use PowerShell or Graph Explorer.
Roles that can be assigned with administrative unit scope
The following Microsoft Entra roles can be assigned with administrative unit scope. Additionally, any custom role can be assigned with administrative unit scope as long as the custom role's permissions include at least one permission relevant to users, groups, or devices.
| Role | Description |
|---|---|
| Authentication Administrator | Has access to view, set, and reset authentication method information for any non-admin user in the assigned administrative unit only. |
| Attribute Assignment Administrator | Can read and update custom security attribute assignments (from any attribute set) for users or service principals within the administrative unit only. |
| Attribute Assignment Reader | Can read custom security attributes (from any attribute set) for users or service principals within the administrative unit only. |
| Cloud Device Administrator | Limited access to manage devices in Microsoft Entra ID. |
| Groups Administrator | Can manage all aspects of groups in the assigned administrative unit only. |
| Helpdesk Administrator | Can reset passwords for non-administrators in the assigned administrative unit only. |
| License Administrator | Can assign, remove, and update license assignments within the administrative unit only. |
| Password Administrator | Can reset passwords for non-administrators within the assigned administrative unit only. |
| Printer Administrator | Can manage printers and printer connectors. For more information, see Delegate administration of printers in Universal Print. |
| Privileged Authentication Administrator | Can access to view, set and reset authentication method information for any user (admin or non-admin). |
| SharePoint Administrator | Can manage Microsoft 365 groups in the assigned administrative unit only. For SharePoint sites associated with Microsoft 365 groups in an administrative unit, can also update site properties (site name, URL, and external sharing policy) using the Microsoft 365 admin center. Cannot use the SharePoint admin center or SharePoint APIs to manage sites. |
| Teams Administrator | Can manage Microsoft 365 groups in the assigned administrative unit only. Can manage team members in the Microsoft 365 admin center for teams associated with groups in the assigned administrative unit only. Cannot use the Teams admin center. |
| Teams Devices Administrator | Can perform management related tasks on Teams certified devices. |
| User Administrator | Can manage all aspects of users and groups, including resetting passwords for limited admins within the assigned administrative unit only. Cannot currently manage users' profile photographs. |
| <Custom role> | Can perform actions that apply to users, groups, or devices, according to the definition of the custom role. |
Certain role permissions apply only to nonadministrator users when assigned with the scope of an administrative unit. In other words, administrative unit scoped Helpdesk Administrators can reset passwords for users in the administrative unit only if those users don't have administrator roles. The following list of permissions are restricted when the target of an action is another administrator:
- Read and modify user authentication methods, or reset user passwords
- Modify sensitive user properties such as telephone numbers, alternate email addresses, or Open Authorization (OAuth) secret keys
- Delete or restore user accounts
Security principals that can be assigned with administrative unit scope
The following security principals can be assigned to a role with an administrative unit scope:
- Users
- Microsoft Entra role-assignable groups
- Service principals
Service principals and guest users
Service principals and guest users won't be able to use a role assignment scoped to an administrative unit unless they're also assigned corresponding permissions to read the objects. This is because service principals and guest users don't receive directory read permissions by default, which are required to perform administrative actions. To enable a service principal or guest user to use a role assignment scoped to an administrative unit, you must assign the Directory Readers role (or another role that includes read permissions) at a tenant scope.
It isn't currently possible to assign directory read permissions scoped to an administrative unit. For more information about default permissions for users, see default user permissions.
Assign roles with administrative unit scope
This section describes how to assign roles at administrative unit scope.
Sign in to the Microsoft Entra admin center as at least a Privileged Role Administrator.
Browse to Entra ID > Roles & admins > Admin units.
Select an administrative unit.

Select Roles and administrators from the left navigation menu to see the list of all roles available to be assigned over an administrative unit.

Select the desired role.
Tip
You won't see the entire list of Microsoft Entra built-in or custom roles here. This is expected. We show the roles which have permissions related to the objects that are supported within the administrative unit. To see the list of objects supported within an administrative unit, see Administrative units in Microsoft Entra ID.
Select Add assignments and then select the users or groups you want to assign this role to.
Select Add to assign the role scoped over the administrative unit.

