Learn how to integrate face liveness detection into your workflow by using server-side logic and companion frontend client applications.
Tip
For general information about face liveness detection, see the conceptual guide.
In this tutorial, you learn how to run a frontend application with an app server to perform liveness detection. You can also add face verification across various platforms and languages.
Important
The Face client SDKs for liveness are a gated feature. You must request access to the liveness feature by filling out the Face Recognition intake form. When your Azure subscription is granted access, you can download the Face liveness SDK.
Prerequisites
- Azure subscription - Create one for free
- Your Azure account must have a Cognitive Services Contributor role assigned so you can agree to the responsible AI terms and create a resource. To get this role assigned to your account, follow the steps in the Assign roles documentation, or contact your administrator.
- After you have your Azure subscription, create a Face resource in the Azure portal to get your key and endpoint. After it deploys, select Go to resource.
- You need the key and endpoint from the resource you create to connect your application to the Face service.
- Access to the gated artifacts required for Azure Vision in Foundry Tools Face Client SDK for Mobile (iOS and Android) and Web.
- Familiarity with the Face liveness detection feature. See the conceptual guide.
Tip
After completing the prerequisites, you can try the liveness experience on the following platforms:
- iOS: iOS App Store — tap the app screen 10 times after installation to enable developer mode.
- Android: Google Play Store — tap the app screen 10 times after installation to enable developer mode.
- Web: Try it directly in Vision Studio.
You can also build and run a complete frontend sample (iOS, Android, or Web) from the Samples section.
Prepare the frontend application
SDKs are available in multiple languages to simplify integration with your frontend application. See the README for your chosen SDK in the following sections to integrate both the UI and required code.
Important
Each frontend SDK requires access to a gated asset to successfully compile. See the following instructions to set up this access.
For Swift iOS:
For Kotlin/Java Android:
For JavaScript Web:
Once integrated into your frontend application, the SDK starts the camera, guides the user to adjust their position, composes the liveness payload, and sends it to the Azure Face service for processing.
Monitor the repository’s Releases section for new SDK version updates and enable automated dependency update alerts—such as GitHub Dependabot (for GitHub repos) or Renovate (GitHub, GitLab, Bitbucket, Azure Repos).
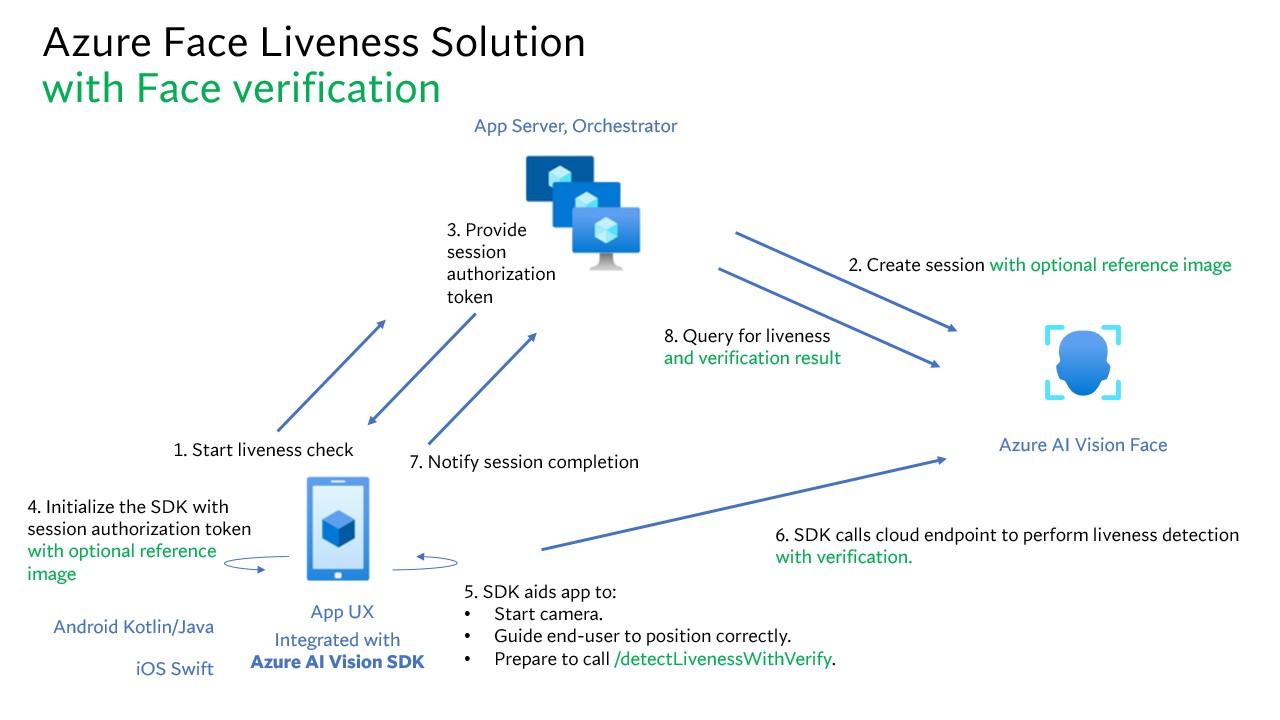
The following steps describe the liveness orchestration process:

The frontend application starts the liveness check and notifies the app server.
The app server creates a new liveness session with Azure Face Service. The service creates a liveness session and responds with a session authorization token. For more information about each request parameter involved in creating a liveness session, see Liveness Create Session Operation.
var endpoint = new Uri(System.Environment.GetEnvironmentVariable("FACE_ENDPOINT"));
var key = new AzureKeyCredential(System.Environment.GetEnvironmentVariable("FACE_APIKEY"));

var body = JsonSerializer.Serialize(new
{
    livenessOperationMode = "PassiveActive",
    deviceCorrelationId = "723d6d03-ef33-40a8-9682-23a1feb7bccd",
    enableSessionImage = true
});

using var client = new HttpClient();
client.DefaultRequestHeaders.Add("Ocp-Apim-Subscription-Key", key);

var response = await client.PostAsync(
    $"{endpoint}/face/v1.2/detectLiveness-sessions",
    new StringContent(body, Encoding.UTF8, "application/json"));

response.EnsureSuccessStatusCode();

using var doc  = JsonDocument.Parse(await response.Content.ReadAsStringAsync());
var root       = doc.RootElement;

Console.WriteLine("Session created");
Console.WriteLine($"sessionId : {root.GetProperty("sessionId").GetString()}");
Console.WriteLine($"authToken : {root.GetProperty("authToken").GetString()}");
String endpoint = System.getenv("FACE_ENDPOINT");
String key = System.getenv("FACE_APIKEY");

String body = """
{
    "livenessOperationMode": "PassiveActive",
    "deviceCorrelationId": "723d6d03-ef33-40a8-9682-23a1feb7bccd",
    "enableSessionImage": true,
}
""";

HttpRequest req = HttpRequest.newBuilder()
        .uri(URI.create(endpoint + "/face/v1.2/detectLiveness-sessions"))
        .header("Content-Type", "application/json")
        .header("Ocp-Apim-Subscription-Key", key)
        .POST(HttpRequest.BodyPublishers.ofString(body))
        .build();

HttpResponse<String> res = HttpClient.newHttpClient()
        .send(req, HttpResponse.BodyHandlers.ofString());

if (res.statusCode() != 200) throw new RuntimeException("HTTP error: " + res.statusCode());

JsonNode json = new ObjectMapper().readTree(res.body());
System.out.println("Session created");
System.out.println("sessionId : " + json.get("sessionId").asText());
System.out.println("authToken : " + json.get("authToken").asText());
endpoint = os.environ["FACE_ENDPOINT"]
key = os.environ["FACE_APIKEY"]

url  = f"{endpoint}/face/v1.2/detectLiveness-sessions"
body = {
    "livenessOperationMode": "PassiveActive",
    "deviceCorrelationId":  "723d6d03-ef33-40a8-9682-23a1feb7bccd",
    "enableSessionImage":   True
}

headers = {
    "Ocp-Apim-Subscription-Key": key,
    "Content-Type": "application/json"
}

res = requests.post(url, headers=headers, data=json.dumps(body))
res.raise_for_status()

data = res.json()
print("Session created")
print("sessionId :", data["sessionId"])
print("authToken :", data["authToken"])
const endpoint = process.env['FACE_ENDPOINT'];
const apikey = process.env['FACE_APIKEY'];

const url  = `${endpoint}/face/v1.2/detectLiveness-sessions`;
const body = {
    livenessOperationMode: "PassiveActive",
    deviceCorrelationId:  "723d6d03-ef33-40a8-9682-23a1feb7bccd",
    enableSessionImage:   true
};

const headers = {
    "Ocp-Apim-Subscription-Key": key,
    "Content-Type": "application/json"
};

async function createLivenessSession() {
    const res = await fetch(url, {
        method: "POST",
        headers,
        body: JSON.stringify(body)
    });

    if (!res.ok) {
        throw new Error(`${res.status} ${await res.text()}`);
    }

    const data = await res.json();
    console.log("Session created");
    console.log("sessionId :", data.sessionId);
    console.log("authToken :", data.authToken);
}
curl --request POST --location "%FACE_ENDPOINT%/face/v1.2/detectLiveness-sessions" ^
--header "Ocp-Apim-Subscription-Key: %FACE_APIKEY%" ^
--header "Content-Type: application/json" ^
--data ^
"{ ^
    ""livenessOperationMode"": ""passiveactive"", ^
    ""deviceCorrelationId"": ""723d6d03-ef33-40a8-9682-23a1feb7bccd"", ^
    ""enableSessionImage"": ""true"" ^
}"
curl --request POST --location "${FACE_ENDPOINT}/face/v1.2/detectLivenesswithVerify-sessions" \
--header "Ocp-Apim-Subscription-Key: ${FACE_APIKEY}" \
--header "Content-Type: application/json" \
--data \
'{
    "livenessOperationMode": "passiveactive",
    "deviceCorrelationId": "723d6d03-ef33-40a8-9682-23a1feb7bccd",
    "enableSessionImage": "true"
}'
An example of the response body:
{
    "sessionId": "a6e7193e-b638-42e9-903f-eaf60d2b40a5",
    "authToken": "<session-authorization-token>",
    "status": "NotStarted",
    "modelVersion": "2025-05-20",
    "results": {
        "attempts": []
    }
}
The app server provides the session authorization token back to the frontend application.
The frontend application uses the session authorization token to start the face liveness detector, which kicks off the liveness flow.
    FaceLivenessDetector(
        sessionAuthorizationToken = FaceSessionToken.sessionToken,
        verifyImageFileContent = FaceSessionToken.sessionSetInClientVerifyImage,
        deviceCorrelationId = "null",
        onSuccess = viewModel::onSuccess,
        onError = viewModel::onError
    )
struct HostView: View {
   @State var livenessDetectionResult: LivenessDetectionResult? = nil
   var token: String
   var body: some View {
       if livenessDetectionResult == nil {
           FaceLivenessDetectorView(result: $livenessDetectionResult,
                                    sessionAuthorizationToken: token)
       } else if let result = livenessDetectionResult {
           VStack {
               switch result {
                   case .success(let success):
                   /// <#show success#>
                   case .failure(let error):
                   /// <#show failure#>
               }
           }
       }
   }
}
faceLivenessDetector = document.createElement("azure-ai-vision-face-ui");
document.getElementById("container").appendChild(faceLivenessDetector);
faceLivenessDetector.start(session.authToken)
The SDK starts the camera, guides the user to position correctly, and then prepares the payload to call the liveness detection service endpoint.
The SDK calls Azure Vision Face service to perform the liveness detection. When the service responds, the SDK notifies the frontend application that the liveness check is complete. The service response doesn't contain the liveness decision. Query this information from the app server.
The frontend application relays the liveness check completion to the app server.
The app server queries for the liveness detection result from Azure Vision Face service.
using var client = new HttpClient();
client.DefaultRequestHeaders.Add("Ocp-Apim-Subscription-Key", key);

var response = await client.GetAsync(
    $"{endpoint}/face/v1.2/livenessSessions/{sessionId}/result");

response.EnsureSuccessStatusCode();

using var doc = JsonDocument.Parse(await response.Content.ReadAsStringAsync());
var root = doc.RootElement;
var attempts = root.GetProperty("results").GetProperty("attempts");
var latestAttempt = attempts[attempts.GetArrayLength() - 1];
var attemptStatus = latestAttempt.GetProperty("attemptStatus").GetString();

Console.WriteLine($"Session id: {root.GetProperty("sessionId").GetString()}");
Console.WriteLine($"Session status: {root.GetProperty("status").GetString()}");
Console.WriteLine($"Latest attempt status: {attemptStatus}");

if (attemptStatus == "Succeeded")
    Console.WriteLine($"Liveness detection decision: {latestAttempt.GetProperty("result").GetProperty("livenessDecision").GetString()}");
else
{
    var error = latestAttempt.GetProperty("error");
    Console.WriteLine($"Error: {error.GetProperty("code").GetString()} - {error.GetProperty("message").GetString()}");
}
HttpRequest req = HttpRequest.newBuilder()
    .uri(URI.create(endpoint + "/face/v1.2/livenessSessions/" + sessionId + "/result"))
    .header("Ocp-Apim-Subscription-Key", key)
    .GET()
    .build();

HttpResponse<String> res = HttpClient.newHttpClient()
    .send(req, HttpResponse.BodyHandlers.ofString());

if (res.statusCode() != 200) throw new RuntimeException("HTTP error: " + res.statusCode());

JsonNode root = new ObjectMapper().readTree(res.body());
JsonNode attempts = root.path("results").path("attempts");
JsonNode latestAttempt = attempts.get(attempts.size() - 1);

String attemptStatus = latestAttempt.path("attemptStatus").asText();

System.out.println("Session id: " + root.path("sessionId").asText());
System.out.println("Session status: " + root.path("status").asText());
System.out.println("Latest attempt status: " + attemptStatus);

if ("Succeeded".equals(attemptStatus)) {
    System.out.println("Liveness detection decision: " +
        latestAttempt.path("result").path("livenessDecision").asText());
} else {
    JsonNode error = latestAttempt.path("error");
    System.out.println("Error: " + error.path("code").asText() + " - " +
        error.path("message").asText());
}
url = f"{endpoint}/face/v1.2/livenessSessions/{sessionId}/result"
headers = { "Ocp-Apim-Subscription-Key": key }

res = requests.get(url, headers=headers)
res.raise_for_status()

data = res.json()
attempts = data["results"]["attempts"]
latest_attempt = attempts[-1]
attempt_status = latest_attempt.get("attemptStatus")

print(f"Session id: {data['sessionId']}")
print(f"Session status: {data['status']}")
print(f"Latest attempt status: {attempt_status}")

if attempt_status == "Succeeded":
    print(f"Liveness detection decision: {latest_attempt['result']['livenessDecision']}")
else:
    err = latest_attempt.get("error", {})
    print(f"Error: {err.get('code')} - {err.get('message')}")
const url = `${endpoint}/face/v1.2/livenessSessions/${sessionId}/result`;
const headers = {
    "Ocp-Apim-Subscription-Key": apikey
};

async function getLivenessSessionResult() {
    const res = await fetch(url, { method: "GET", headers });
    if (!res.ok) {
        throw new Error(`${res.status} ${await res.text()}`);
    }

    const data = await res.json();
    const attempts = data.results.attempts;
    const latestAttempt = attempts[attempts.length - 1];
    const attemptStatus = latestAttempt.attemptStatus;

    console.log("Session id :", data.sessionId);
    console.log("Session status :", data.status);
    console.log("Latest attempt status :", attemptStatus);

    if (attemptStatus === "Succeeded") {
        console.log("Liveness detection decision :", latestAttempt.result.livenessDecision);
    } else {
            const err = latestAttempt.error || {};
            console.log(`Error: ${err.code} - ${err.message}`);
    }
}
curl --request GET --location "%FACE_ENDPOINT%/face/v1.2/detectLiveness-sessions/<session-id>" ^
--header "Ocp-Apim-Subscription-Key: %FACE_APIKEY%"
curl --request GET --location "${FACE_ENDPOINT}/face/v1.2/detectLiveness-sessions/<session-id>" \
--header "Ocp-Apim-Subscription-Key: ${FACE_APIKEY}"
An example of the response body:
{
    "sessionId": "b12e033e-bda7-4b83-a211-e721c661f30e",
    "authToken": "eyJhbGciOiJFUzI1NiIsIm",
    "status": "NotStarted",
    "modelVersion": "2024-11-15",
    "results": {
        "attempts": [
            {
                "attemptId": 2,
                "attemptStatus": "Succeeded",
                "result": {
                "livenessDecision": "realface",
                "targets": {
                    "color": {
                    "faceRectangle": {
                            "top": 669,
                            "left": 203,
                            "width": 646,
                            "height": 724
                        }
                    }
                },
                "digest": "B0A803BB7B26F3C8F29CD36030F8E63ED3FAF955FEEF8E01C88AB8FD89CCF761",
                "sessionImageId": "Ae3PVWlXAmVAnXgkAFt1QSjGUWONKzWiSr2iPh9p9G4I"
                }
            },
            {
                "attemptId": 1,
                "attemptStatus": "Failed",
                "error": {
                "code": "FaceWithMaskDetected",
                "message": "Mask detected on face image.",
                "targets": {
                        "color": {
                        "faceRectangle": {
                            "top": 669,
                            "left": 203,
                            "width": 646,
                            "height": 724
                        }
                        }
                    }
                }
            }
        ]
    }
}
The app server deletes the session after it queries all session results.
using var client = new HttpClient();
client.DefaultRequestHeaders.Add("Ocp-Apim-Subscription-Key", key);

await client.DeleteAsync($"{endpoint}/face/v1.2/livenessSessions/{sessionId}");
Console.WriteLine($"Session deleted: {sessionId}");
HttpRequest req = HttpRequest.newBuilder()
    .uri(URI.create(endpoint + "/face/v1.2/livenessSessions/" + sessionId))
    .header("Ocp-Apim-Subscription-Key", key)
    .DELETE()
    .build();

HttpClient.newHttpClient().send(req, HttpResponse.BodyHandlers.ofString());
System.out.println("Session deleted: " + sessionId);
headers = { "Ocp-Apim-Subscription-Key": key }
requests.delete(f"{endpoint}/face/v1.2/livenessSessions/{sessionId}", headers=headers)
print(f"Session deleted: {sessionId}")
const headers = { "Ocp-Apim-Subscription-Key": apikey };
await fetch(`${endpoint}/face/v1.2/livenessSessions/${sessionId}`, { method: "DELETE", headers });
console.log(`Session deleted: ${sessionId}`);
curl --request DELETE --location "%FACE_ENDPOINT%/face/v1.2/detectLiveness-sessions/<session-id>" ^
--header "Ocp-Apim-Subscription-Key: %FACE_APIKEY%"
curl --request DELETE --location "${FACE_ENDPOINT}/face/v1.2/detectLiveness-sessions/<session-id>" \
--header "Ocp-Apim-Subscription-Key: ${FACE_APIKEY}"
Combining face verification with liveness detection enables biometric verification of a particular person of interest with an added guarantee that the person is physically present in the system.
Integrating liveness detection with verification involves two parts:
Step 1 - Select a reference image
To get the most accurate recognition results, follow the tips listed in the composition requirements for ID verification scenarios.
Step 2 - Set up the orchestration of liveness with verification
The following high-level steps show how to orchestrate liveness with verification:
Provide the verification reference image by using one of the following two methods:
The app server provides the reference image when creating the liveness session. For more information about each request parameter involved in creating a liveness session with verification, see Liveness With Verify Create Session Operation.
var endpoint = new Uri(System.Environment.GetEnvironmentVariable("FACE_ENDPOINT"));
var key      = System.Environment.GetEnvironmentVariable("FACE_APIKEY");

// Create the JSON part
var jsonPart = new StringContent(
    JsonSerializer.Serialize(new
    {
        livenessOperationMode = "PassiveActive",
        deviceCorrelationId = "723d6d03-ef33-40a8-9682-23a1feb7bcc",
        enableSessionImage = true
    }),
    Encoding.UTF8,
    "application/json"
);
jsonPart.Headers.ContentDisposition = new ContentDispositionHeaderValue("form-data")
{
    Name = "CreateLivenessWithVerifySessionRequest"
};

// Create the file part
using var fileStream = File.OpenRead("test.png");
var filePart = new StreamContent(fileStream);
filePart.Headers.ContentType = new MediaTypeHeaderValue("image/png");
filePart.Headers.ContentDisposition = new ContentDispositionHeaderValue("form-data")
{
    Name = "VerifyImage",
    FileName = "test.png"
};

// Build multipart form data
using var formData = new MultipartFormDataContent();
formData.Add(jsonPart);
formData.Add(filePart);

using var client = new HttpClient();
client.DefaultRequestHeaders.Add("Ocp-Apim-Subscription-Key", key);

var response = await client.PostAsync($"{endpoint}/face/v1.2/createLivenessWithVerifySession", formData);
response.EnsureSuccessStatusCode();

using var doc = JsonDocument.Parse(await response.Content.ReadAsStringAsync());
var root = doc.RootElement;

Console.WriteLine("Session created.");
Console.WriteLine($"Session id: {root.GetProperty("sessionId").GetString()}");
Console.WriteLine($"Auth token: {root.GetProperty("authToken").GetString()}");
String endpoint = System.getenv("FACE_ENDPOINT");
String key      = System.getenv("FACE_APIKEY");

String json = """
{
"livenessOperationMode": "PassiveActive",
"deviceCorrelationId": "723d6d03-ef33-40a8-9682-23a1feb7bcc",
"enableSessionImage": true
}
""";

byte[] img = Files.readAllBytes(Path.of("test.png"));
String boundary = "----faceBoundary" + java.util.UUID.randomUUID();

var head =
    "--" + boundary + "\r\n" +
    "Content-Disposition: form-data; name=\"CreateLivenessWithVerifySessionRequest\"\r\n" +
    "Content-Type: application/json\r\n\r\n" +
    json + "\r\n" +
    "--" + boundary + "\r\n" +
    "Content-Disposition: form-data; name=\"VerifyImage\"; filename=\"test.png\"\r\n" +
    "Content-Type: image/png\r\n\r\n";

var tail = "\r\n--" + boundary + "--\r\n";

byte[] body = java.nio.ByteBuffer
    .allocate(head.getBytes(StandardCharsets.UTF_8).length + img.length + tail.getBytes(StandardCharsets.UTF_8).length)
    .put(head.getBytes(StandardCharsets.UTF_8))
    .put(img)
    .put(tail.getBytes(StandardCharsets.UTF_8))
    .array();

HttpRequest req = HttpRequest.newBuilder()
    .uri(URI.create(endpoint + "/face/v1.2/createLivenessWithVerifySession"))
    .header("Ocp-Apim-Subscription-Key", key)
    .header("Content-Type", "multipart/form-data; boundary=" + boundary)
    .POST(HttpRequest.BodyPublishers.ofByteArray(body))
    .build();

HttpResponse<String> res = HttpClient.newHttpClient().send(req, HttpResponse.BodyHandlers.ofString());
if (res.statusCode() != 200) throw new RuntimeException("HTTP error: " + res.statusCode());

JsonNode root = new ObjectMapper().readTree(res.body());
System.out.println("Session created.");
System.out.println("Session id: " + root.get("sessionId").asText());
System.out.println("Auth token: " + root.get("authToken").asText());
endpoint = os.environ["FACE_ENDPOINT"]
key      = os.environ["FACE_APIKEY"]

url = f"{endpoint}/face/v1.2/createLivenessWithVerifySession"
files = {
    "CreateLivenessWithVerifySessionRequest": (
        "request.json",
        json.dumps({
            "livenessOperationMode": "PassiveActive",
            "deviceCorrelationId": "723d6d03-ef33-40a8-9682-23a1feb7bcc",
            "enableSessionImage": True
        }),
        "application/json"
    ),
    "VerifyImage": ("test.png", open("test.png", "rb"), "image/png")
}
headers = { "Ocp-Apim-Subscription-Key": key }

res = requests.post(url, headers=headers, files=files)
res.raise_for_status()

data = res.json()
print("Session created.")
print("Session id:", data["sessionId"])
print("Auth token:", data["authToken"])
const endpoint = process.env["FACE_ENDPOINT"];
const apikey   = process.env["FACE_APIKEY"];

const form = new FormData();
form.append(
    "CreateLivenessWithVerifySessionRequest",
    new Blob([JSON.stringify({
        livenessOperationMode: "PassiveActive",
        deviceCorrelationId: "723d6d03-ef33-40a8-9682-23a1feb7bcc",
        enableSessionImage: true
    })], { type: "application/json" }),
    "request.json"
);
// If your runtime doesn't support Blob here, you can use fs.createReadStream instead.
form.append("VerifyImage", new Blob([fs.readFileSync("test.png")], { type: "image/png" }), "test.png");

const res = await fetch(`${endpoint}/face/v1.2/createLivenessWithVerifySession`, {
    method: "POST",
    headers: { "Ocp-Apim-Subscription-Key": apikey },
    body: form
});
if (!res.ok) {
    throw new Error(`${res.status} ${await res.text()}`);
}

const data = await res.json();
console.log("Session created.");
console.log("Session id:", data.sessionId);
console.log("Auth token:", data.authToken);
curl --request POST --location "%FACE_ENDPOINT%/face/v1.2/detectLivenesswithVerify-sessions" ^
--header "Ocp-Apim-Subscription-Key: %FACE_APIKEY%" ^
--form "Parameters=""{\\\""livenessOperationMode\\\"": \\\""passiveactive\\\"", \\\""deviceCorrelationId\\\"": \\\""723d6d03-ef33-40a8-9682-23a1feb7bccd\\\"", ""enableSessionImage"": ""true""}""" ^
--form "VerifyImage=@""test.png"""
curl --request POST --location "${FACE_ENDPOINT}/face/v1.2/detectLivenesswithVerify-sessions" \
--header "Ocp-Apim-Subscription-Key: ${FACE_APIKEY}" \
--form 'Parameters="{
    \"livenessOperationMode\": \"passiveactive\",
    \"deviceCorrelationId\": \"723d6d03-ef33-40a8-9682-23a1feb7bccd\"
}"' \
--form 'VerifyImage=@"test.png"'
An example of the response body:
{
    "sessionId": "3847ffd3-4657-4e6c-870c-8e20de52f567",
    "authToken": "<session-authorization-token>",
    "status": "NotStarted",
    "modelVersion": "2024-11-15",
    "results": {
        "attempts": [],
        "verifyReferences": [
        {
            "referenceType": "image",
            "faceRectangle": {
            "top": 98,
            "left": 131,
            "width": 233,
            "height": 300
            },
            "qualityForRecognition": "high"
        }
        ]
    }
}
The frontend application provides the reference image when initializing the mobile SDKs. This scenario isn't supported in the web solution.
    FaceLivenessDetector(
        sessionAuthorizationToken = FaceSessionToken.sessionToken,
        verifyImageFileContent = FaceSessionToken.sessionSetInClientVerifyImage,
        deviceCorrelationId = "null",
        onSuccess = viewModel::onSuccess,
        onError = viewModel::onError
    )
struct HostView: View {
    @State var livenessDetectionResult: LivenessDetectionResult? = nil
    var token: String
    var body: some View {
        if livenessDetectionResult == nil {
            FaceLivenessDetectorView(result: $livenessDetectionResult,
                                        sessionAuthorizationToken: token)
        } else if let result = livenessDetectionResult {
            VStack {
                switch result {
                    case .success(let success):
                    /// <#show success#>
                    case .failure(let error):
                    /// <#show failure#>
                }
            }
        }
    }
}
The app server can now query for the verification result in addition to the liveness result.
using var client = new HttpClient();
client.DefaultRequestHeaders.Add("Ocp-Apim-Subscription-Key", key);

var response = await client.GetAsync($"{endpoint}/face/v1.2/livenessSessions/{sessionId}/result");
response.EnsureSuccessStatusCode();

using var doc = JsonDocument.Parse(await response.Content.ReadAsStringAsync());
var root = doc.RootElement;

var attempts = root.GetProperty("results").GetProperty("attempts");
var latestAttempt = attempts[attempts.GetArrayLength() - 1];
var attemptStatus = latestAttempt.GetProperty("attemptStatus").GetString();

Console.WriteLine($"Session id: {root.GetProperty("sessionId").GetString()}");
Console.WriteLine($"Session status: {root.GetProperty("status").GetString()}");
Console.WriteLine($"Latest attempt status: {attemptStatus}");

if (attemptStatus == "Succeeded")
{
    var decision = latestAttempt.GetProperty("result").GetProperty("livenessDecision").GetString();
    var verify   = latestAttempt.GetProperty("verifyResult");
    Console.WriteLine($"Liveness detection decision: {decision}");
    Console.WriteLine($"Verify isIdentical: {verify.GetProperty("isIdentical").GetBoolean()}");
    Console.WriteLine($"Verify matchConfidence: {verify.GetProperty("matchConfidence").GetDouble()}");
}
else
{
    var err = latestAttempt.GetProperty("error");
    Console.WriteLine($"Error: {err.GetProperty("code").GetString()} - {err.GetProperty("message").GetString()}");
}
HttpRequest req = HttpRequest.newBuilder()
    .uri(URI.create(endpoint + "/face/v1.2/livenessSessions/" + sessionId + "/result"))
    .header("Ocp-Apim-Subscription-Key", key)
    .GET()
    .build();

HttpResponse<String> res = HttpClient.newHttpClient().send(req, HttpResponse.BodyHandlers.ofString());
if (res.statusCode() != 200) throw new RuntimeException("HTTP error: " + res.statusCode());

ObjectMapper om = new ObjectMapper();
JsonNode root = om.readTree(res.body());

JsonNode attempts = root.path("results").path("attempts");
JsonNode latest   = attempts.get(attempts.size() - 1);
String attemptStatus = latest.path("attemptStatus").asText();

System.out.println("Session id: " + root.path("sessionId").asText());
System.out.println("Session status: " + root.path("status").asText());
System.out.println("Latest attempt status: " + attemptStatus);

if ("Succeeded".equals(attemptStatus)) {
    String decision = latest.path("result").path("livenessDecision").asText();
    JsonNode verify = latest.path("verifyResult");
    System.out.println("Liveness detection decision: " + decision);
    System.out.println("Verify isIdentical: " + verify.path("isIdentical").asBoolean());
    System.out.println("Verify matchConfidence: " + verify.path("matchConfidence").asDouble());
} else {
    JsonNode err = latest.path("error");
    System.out.println("Error: " + err.path("code").asText() + " - " + err.path("message").asText());
}
url = f"{endpoint}/face/v1.2/livenessSessions/{sessionId}/result"
headers = {"Ocp-Apim-Subscription-Key": key}

res = requests.get(url, headers=headers)
res.raise_for_status()

data = res.json()
attempts = data["results"]["attempts"]
latest = attempts[-1]
attempt_status = latest.get("attemptStatus")

print(f"Session id: {data['sessionId']}")
print(f"Session status: {data['status']}")
print(f"Latest attempt status: {attempt_status}")

if attempt_status == "Succeeded":
    decision = latest["result"]["livenessDecision"]
    verify   = latest.get("verifyResult", {})
    print(f"Liveness detection decision: {decision}")
    print(f"Verify isIdentical: {verify.get('isIdentical')}")
    print(f"Verify matchConfidence: {verify.get('matchConfidence')}")
else:
    err = latest.get("error", {})
    print(f"Error: {err.get('code')} - {err.get('message')}")
const url = `${endpoint}/face/v1.2/livenessSessions/${sessionId}/result`;
const headers = { "Ocp-Apim-Subscription-Key": apikey };

async function getLivenessWithVerifyResult() {
const res = await fetch(url, { method: "GET", headers });
if (!res.ok) throw new Error(`${res.status} ${await res.text()}`);

const data = await res.json();
const attempts = data.results.attempts;
const latest = attempts[attempts.length - 1];
const attemptStatus = latest.attemptStatus;

console.log("Session id:", data.sessionId);
console.log("Session status:", data.status);
console.log("Latest attempt status:", attemptStatus);

if (attemptStatus === "Succeeded") {
    console.log("Liveness detection decision:", latest.result.livenessDecision);
    console.log("Verify isIdentical:", latest.verifyResult?.isIdentical);
    console.log("Verify matchConfidence:", latest.verifyResult?.matchConfidence);
} else {
    const err = latest.error || {};
    console.log(`Error: ${err.code} - ${err.message}`);
}
}
curl --request GET --location "%FACE_ENDPOINT%/face/v1.2/detectLivenesswithVerify-sessions/<session-id>" ^
--header "Ocp-Apim-Subscription-Key: %FACE_APIKEY%"
curl --request GET --location "${FACE_ENDPOINT}/face/v1.2/detectLivenesswithVerify-sessions/<session-id>" \
--header "Ocp-Apim-Subscription-Key: ${FACE_APIKEY}"
An example of the response body:
{
    "sessionId": "b12e033e-bda7-4b83-a211-e721c661f30e",
    "authToken": "eyJhbGciOiJFUzI1NiIsIm",
    "status": "NotStarted",
    "modelVersion": "2024-11-15",
    "results": {
        "attempts": [
        {
            "attemptId": 2,
            "attemptStatus": "Succeeded",
            "result": {
            "livenessDecision": "realface",
            "targets": {
                "color": {
                "faceRectangle": {
                    "top": 669,
                    "left": 203,
                    "width": 646,
                    "height": 724
                }
                }
            },
            "verifyResult": {
                "matchConfidence": 0.08871888,
                "isIdentical": false
            },
            "digest": "B0A803BB7B26F3C8F29CD36030F8E63ED3FAF955FEEF8E01C88AB8FD89CCF761",
            "sessionImageId": "Ae3PVWlXAmVAnXgkAFt1QSjGUWONKzWiSr2iPh9p9G4I",
            "verifyImageHash": "43B7D8E8769533C3290DBD37A84D821B2C28CB4381DF9C6784DBC4AAF7E45018"
            }
        },
        {
            "attemptId": 1,
            "attemptStatus": "Failed",
            "error": {
                "code": "FaceWithMaskDetected",
                "message": "Mask detected on face image.",
                "targets": {
                    "color": {
                    "faceRectangle": {
                            "top": 669,
                            "left": 203,
                            "width": 646,
                            "height": 724
                        }
                    }
                }
            }
        }
        ],
        "verifyReferences": [
            {
                "referenceType": "image",
                "faceRectangle": {
                "top": 316,
                "left": 131,
                "width": 498,
                "height": 677
                },
                "qualityForRecognition": "high"
            }
        ]
        }
    }
The app server can delete the session if you don't need its result anymore.
using var client = new HttpClient();
client.DefaultRequestHeaders.Add("Ocp-Apim-Subscription-Key", key);

await client.DeleteAsync($"{endpoint}/face/v1.2/livenessWithVerifySessions/{sessionId}");
Console.WriteLine($"Liveness-with-Verify session deleted: {sessionId}");
HttpRequest req = HttpRequest.newBuilder()
    .uri(URI.create(endpoint + "/face/v1.2/livenessWithVerifySessions/" + sessionId))
    .header("Ocp-Apim-Subscription-Key", key)
    .DELETE()
    .build();

HttpClient.newHttpClient().send(req, HttpResponse.BodyHandlers.ofString());
System.out.println("Liveness-with-Verify session deleted: " + sessionId);
headers = { "Ocp-Apim-Subscription-Key": key }
requests.delete(f"{endpoint}/face/v1.2/livenessWithVerifySessions/{sessionId}", headers=headers)
print(f"Liveness-with-Verify session deleted: {sessionId}")
const headers = { "Ocp-Apim-Subscription-Key": apikey };
await fetch(`${endpoint}/face/v1.2/livenessWithVerifySessions/${sessionId}`, { method: "DELETE", headers });
console.log(`Liveness-with-Verify session deleted: ${sessionId}`);
curl --request DELETE --location "%FACE_ENDPOINT%/face/v1.2/detectLivenesswithVerify-sessions/<session-id>" ^
--header "Ocp-Apim-Subscription-Key: %FACE_APIKEY%"
curl --request DELETE --location "${FACE_ENDPOINT}/face/v1.2/detectLivenesswithVerify-sessions/<session-id>" \
--header "Ocp-Apim-Subscription-Key: ${FACE_APIKEY}"
Optionally, you can perform additional face operations after the liveness check, such as face analysis (to get face attributes) and face identity operations.
- Set the
enableSessionImage parameter to true during the Session-Creation step.
- Extract the
sessionImageId from the Session-Get-Result step.
- Download the session image (referenced in Liveness Get Session Image Operation API), or provide the
sessionImageId in the Detect from Session Image ID API operation to continue with other face analysis or face identity operations.
For more information on these operations, see Face detection concepts and Face Recognition concepts.
Support options
In addition to using the main Foundry Tools support options, you can also post your questions in the issues section of the SDK repo.
Related content
To learn how to integrate the liveness solution into your existing application, see the Azure Vision SDK reference.
To learn more about the features available to orchestrate the liveness solution, see the Session REST API reference.

