


Events
Mar 17, 9 PM - Mar 21, 10 AM
Join the meetup series to build scalable AI solutions based on real-world use cases with fellow developers and experts.
Register nowThis browser is no longer supported.
Upgrade to Microsoft Edge to take advantage of the latest features, security updates, and technical support.
This content applies to: ![]() v2.1 | Latest version:
v2.1 | Latest version: ![]() v4.0 (GA)
v4.0 (GA)
Important
Model compose behavior is changed for api-version=2024-11-30 (GA). For more information refer to composed custom models. The following behavior only applies to v3.1 and previous versions.
A composed model is created by taking a collection of custom models and assigning them to a single model ID. You can assign up to 200 trained custom models to a single composed model ID. When a document is submitted to a composed model, the service performs a classification step to decide which custom model accurately represents the form presented for analysis. Composed models are useful when you train several models and want to group them to analyze similar form types. For example, your composed model might include custom models trained to analyze your supply, equipment, and furniture purchase orders. Instead of manually trying to select the appropriate model, you can use a composed model to determine the appropriate custom model for each analysis and extraction.
To learn more, see Composed custom models.
In this article, you learn how to create and use composed custom models to analyze your forms and documents.
To get started, you need the following resources:
An Azure subscription. You can create a free Azure subscription.
A Document Intelligence instance. Once you have your Azure subscription, create a Document Intelligence resource in the Azure portal to get your key and endpoint. If you have an existing Document Intelligence resource, navigate directly to your resource page. You can use the free pricing tier (F0) to try the service, and upgrade later to a paid tier for production.
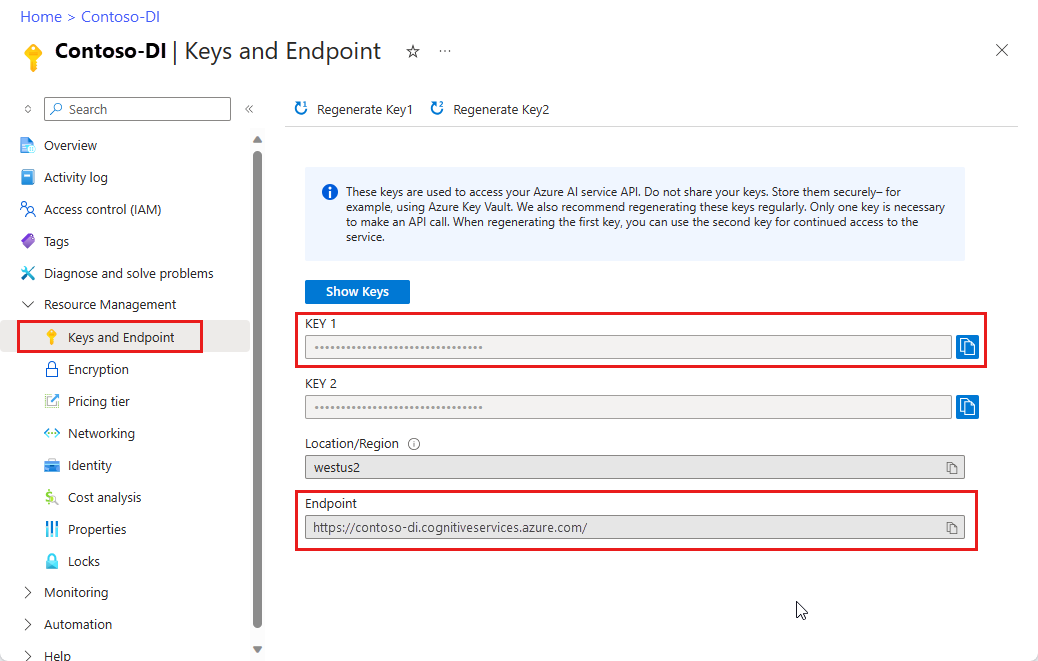
After the resource deploys, select Go to resource.
Copy the Keys and Endpoint values from the Azure portal and paste them in a convenient location, such as Microsoft Notepad. You need the key and endpoint values to connect your application to the Document Intelligence API.
Tip
For more information, see create a Document Intelligence resource.
First, you need a set of custom models to compose. You can use the Document Intelligence Studio, REST API, or client libraries. The steps are as follows:
Building a custom model begins with establishing your training dataset. You need a minimum of five completed forms of the same type for your sample dataset. They can be of different file types (jpg, png, pdf, tiff) and contain both text and handwriting. Your forms must follow the input requirements for Document Intelligence.
Tip
Follow these tips to optimize your data set for training:
See Build a training data set for tips on how to collect your training documents.
Once you gather a set of training documents, you need to upload your training data to an Azure blob storage container.
If you want to use manually labeled data, you have to upload the .labels.json and .ocr.json files that correspond to your training documents.
When you train your model with labeled data, the model uses supervised learning to extract values of interest, using the labeled forms you provide. Labeled data results in better-performing models and can produce models that work with complex forms or forms containing values without keys.
Document Intelligence uses the prebuilt-layout model API to learn the expected sizes and positions of typeface and handwritten text elements and extract tables. Then it uses user-specified labels to learn the key/value associations and tables in the documents. We recommend that you use five manually labeled forms of the same type (same structure) to get started with training a new model. Then, add more labeled data, as needed, to improve the model accuracy. Document Intelligence enables training a model to extract key-value pairs and tables using supervised learning capabilities.
Training with labels leads to better performance in some scenarios. To train with labels, you need to have special label information files (<filename>.pdf.labels.json) in your blob storage container alongside the training documents.
Label files contain key-value associations that a user enters manually and are needed for labeled data training. However, not every source file needs to have a corresponding label file. Source files without labels are treated as ordinary training documents. We recommend five or more labeled files for reliable training. You can use a UI tool like Document Intelligence Studio to generate these files.
Label files contain key-value associations that a user entered manually. The files are needed for labeled data training, but not every source file needs to have a corresponding label file. Source files without labels are treated as ordinary training documents. We recommend five or more labeled files for reliable training. You can use a UI tool like Document Intelligence Studio to generate these files.
Once you have your label files, you can include them with by calling the training method with the useLabelFile parameter set to true.

Note
the create compose model operation is only available for custom models trained with labels. Attempting to compose unlabeled models will produce an error.
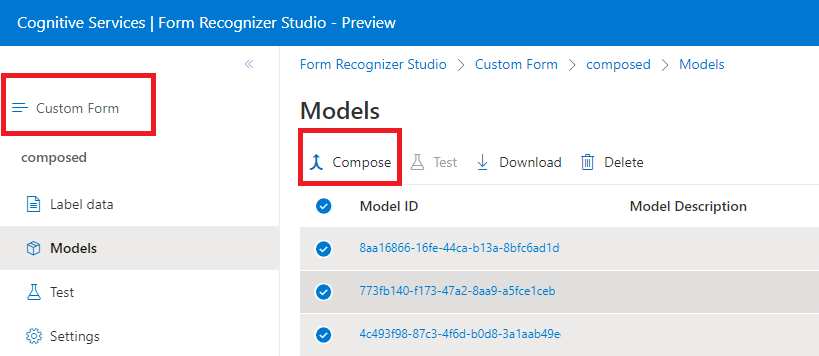
With the create compose model operation, you can assign up to 100 trained custom models to a single model ID. When analyze documents with a composed model, Document Intelligence first classifies the form you submitted, then chooses the best matching assigned model, and returns results for that model. This operation is useful when incoming forms may belong to one of several templates.
Once the training process is successfully completed, you can begin to build your composed model. Here are the steps for creating and using composed models:
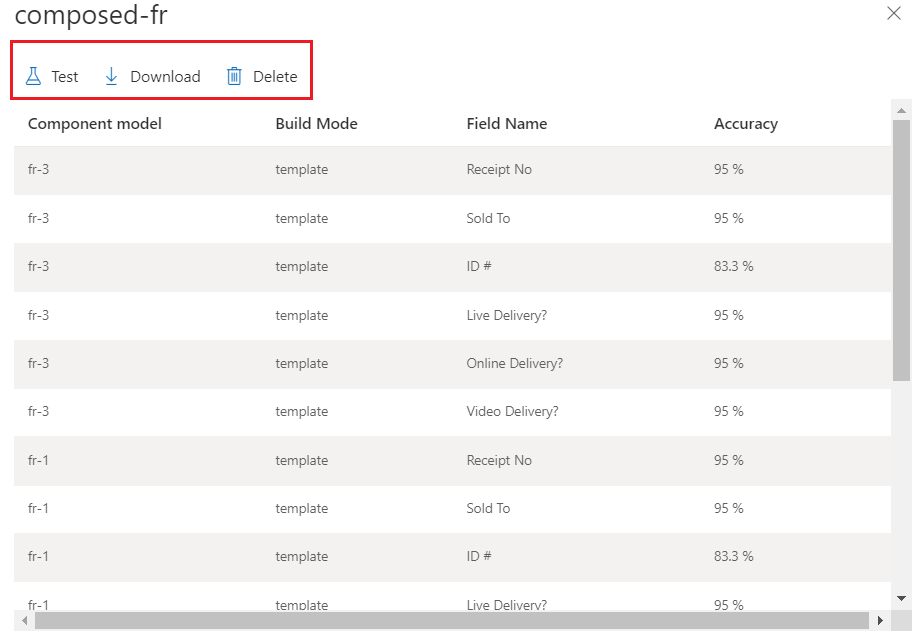
The composed models API accepts a list of model IDs to be composed.
To make an Analyze document request, use a unique model name in the request parameters.

You can manage custom models throughout your development needs including copying, listing, and deleting your models.
Great! You learned the steps to create custom and composed models and use them in your Document Intelligence projects and applications.
Try one of our Document Intelligence quickstarts:
Document Intelligence uses advanced machine-learning technology to detect and extract information from document images and return the extracted data in a structured JSON output. With Document Intelligence, you can train standalone custom models or combine custom models to create composed models.
Custom models. Document Intelligence custom models enable you to analyze and extract data from forms and documents specific to your business. Custom models are trained for your distinct data and use cases.
Composed models. A composed model is created by taking a collection of custom models and assigning them to a single model that encompasses your form types. When a document is submitted to a composed model, the service performs a classification step to decide which custom model accurately represents the form presented for analysis.
In this article, learn how to create Document Intelligence custom and composed models using our Document Intelligence Sample Labeling tool, REST APIs, or client libraries.
Try extracting data from custom forms using our Sample Labeling tool. You need the following resources:
An Azure subscription—you can create one for free
A Document Intelligence instance in the Azure portal. You can use the free pricing tier (F0) to try the service. After your resource deploys, select Go to resource to get your key and endpoint.
In the Document Intelligence UI:
The steps for building, training, and using custom and composed models are as follows:
Building a custom model begins with establishing your training dataset. You need a minimum of five completed forms of the same type for your sample dataset. They can be of different file types (jpg, png, pdf, tiff) and contain both text and handwriting. Your forms must follow the input requirements for Document Intelligence.
You need to upload your training data to an Azure blob storage container. If you don't know how to create an Azure storage account with a container, see Azure Storage quickstart for Azure portal. You can use the free pricing tier (F0) to try the service, and upgrade later to a paid tier for production.
You train your model with labeled data sets. Labeled datasets rely on the prebuilt-layout API, but supplementary human input is included such as your specific labels and field locations. Start with at least five completed forms of the same type for your labeled training data.
When you train with labeled data, the model uses supervised learning to extract values of interest, using the labeled forms you provide. Labeled data results in better-performing models and can produce models that work with complex forms or forms containing values without keys.
Document Intelligence uses the Layout API to learn the expected sizes and positions of typeface and handwritten text elements and extract tables. Then it uses user-specified labels to learn the key/value associations and tables in the documents. We recommend that you use five manually labeled forms of the same type (same structure) to get started when training a new model. Add more labeled data as needed to improve the model accuracy. Document Intelligence enables training a model to extract key value pairs and tables using supervised learning capabilities.
Get started with Train with labels
[!VIDEO https://learn.microsoft.com/Shows/Docs-Azure/Azure-Form-Recognizer/player]
Note
Model Compose is only available for custom models trained with labels. Attempting to compose unlabeled models will produce an error.
With the Model Compose operation, you can assign up to 200 trained custom models to a single model ID. When you call Analyze with the composed model ID, Document Intelligence classifies the form you submitted first, chooses the best matching assigned model, and then returns results for that model. This operation is useful when incoming forms may belong to one of several templates.
Using the Document Intelligence Sample Labeling tool, the REST API, or the client libraries, follow the steps to set up a composed model:
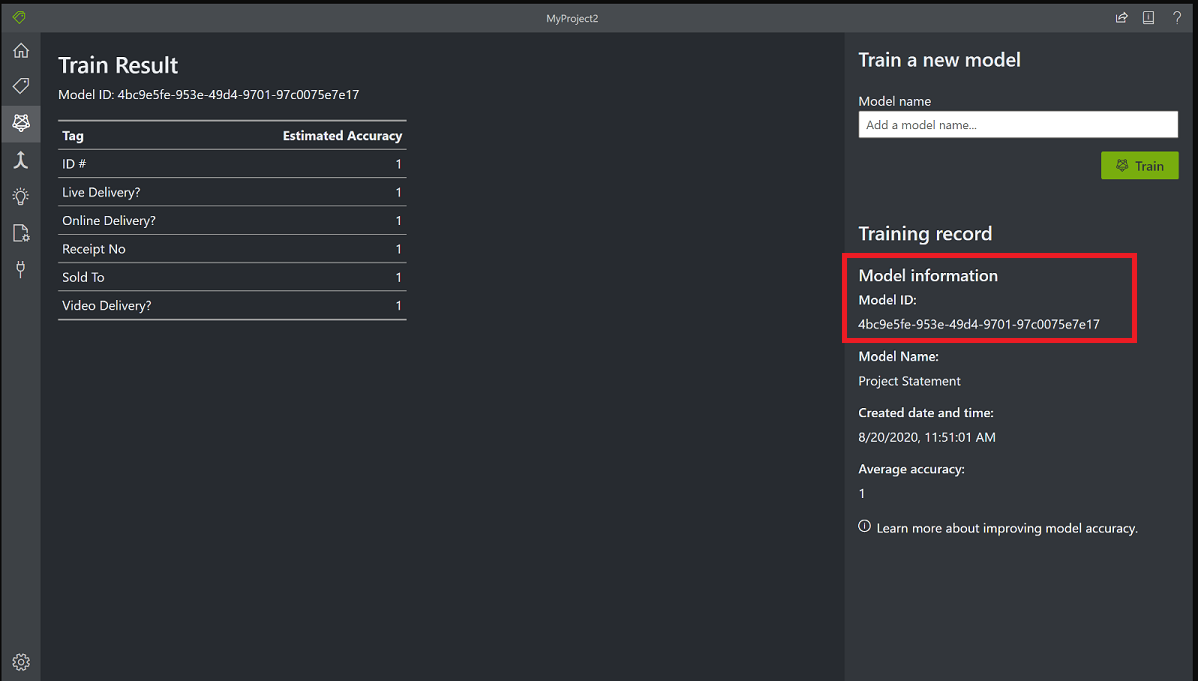
Once the training process is successfully completed, your custom model is assigned a model ID. You can retrieve a model ID as follows:
The REST API returns a 201 (Success) response with a Location header. The value of the last parameter in this header is the model ID for the newly trained model:

After you gather your custom models that correspond to a single form type, you can compose them into a single model.
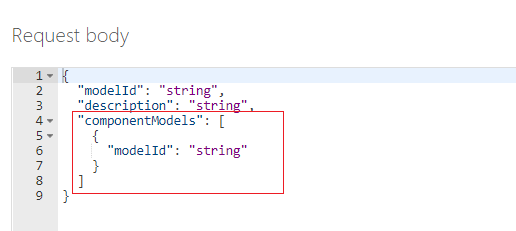
Using the REST API, you can make a Compose Custom Model request to create a single composed model from existing models. The request body requires a string array of your modelIds to compose and you can optionally define the modelName.
The custom form Analyze operation requires you to provide the modelID in the call to Document Intelligence. You can provide a single custom model ID or a composed model ID for the modelID parameter.
Using the REST API, you can make an Analyze Document request to analyze a document and extract key-value pairs and table data.
Test your newly trained models by analyzing forms that weren't part of the training dataset. Depending on the reported accuracy, you might want to do further training to improve the model. You can continue further training to improve results.
You can manage your custom models throughout their lifecycle by viewing a list of all custom models under your subscription, retrieving information about a specific custom model, and deleting custom models from your account.
Great! You learned the steps to create custom and composed models and use them in your Document Intelligence projects and applications.
Learn more about the Document Intelligence client library by exploring our API reference documentation.
Events
Mar 17, 9 PM - Mar 21, 10 AM
Join the meetup series to build scalable AI solutions based on real-world use cases with fellow developers and experts.
Register nowTraining
Module
Create a composed Azure AI Document Intelligence model - Training
Create a composed Document intelligence model.
Certification
Microsoft Certified: Azure AI Engineer Associate - Certifications
Design and implement an Azure AI solution using Azure AI services, Azure AI Search, and Azure Open AI.