Note
Access to this page requires authorization. You can try signing in or changing directories.
Access to this page requires authorization. You can try changing directories.
In the overview, you learned about the Immersive Reader and how it implements proven techniques to improve reading comprehension for language learners, emerging readers, and students with learning differences. This article demonstrates how to launch the Immersive Reader using JavaScript, Python, Android, or iOS.
Prerequisites
- An Azure subscription. You can create one for free.
- An Immersive Reader resource configured for Microsoft Entra authentication. Follow these instructions to get set up. Save the output of your session into a text file so you can configure the environment properties.
- Node.js and Yarn.
- An IDE such as Visual Studio Code.
Create a Node.js web app with Express
Create a Node.js web app with the express-generator tool.
npm install express-generator -g
express --view=pug myapp
cd myapp
Install yarn dependencies, and add dependencies request and dotenv, which are used later in the tutorial.
yarn
yarn add request
yarn add dotenv
Install the axios and qs libraries with the following command:
npm install axios qs
Set up authentication
Next, write a backend API to retrieve a Microsoft Entra authentication token.
You need some values from the Microsoft Entra auth configuration prerequisite step for this part. Refer back to the text file you saved from that session.
TenantId     => Azure subscription TenantId
ClientId     => Microsoft Entra ApplicationId
ClientSecret => Microsoft Entra Application Service Principal password
Subdomain    => Immersive Reader resource subdomain (resource 'Name' if the resource was created in the Azure portal, or 'CustomSubDomain' option if the resource was created with Azure CLI PowerShell. Check the Azure portal for the subdomain on the Endpoint in the resource Overview page, for example, 'https://[SUBDOMAIN].cognitiveservices.azure.com/')
Create a new file called .env in the root of your project. Paste the following code into it, supplying the values given when you created your Immersive Reader resource. Don't include quotation marks or the { and } characters.
TENANT_ID={YOUR_TENANT_ID}
CLIENT_ID={YOUR_CLIENT_ID}
CLIENT_SECRET={YOUR_CLIENT_SECRET}
SUBDOMAIN={YOUR_SUBDOMAIN}
Be sure not to commit this file into source control, as it contains secrets that shouldn't be made public.
Next, open app.js and add the following to the top of the file. This loads the properties defined in the .env file as environment variables into Node.
require('dotenv').config();
Open the routes\index.js file and replace its content with the following code.
This code creates an API endpoint that acquires a Microsoft Entra authentication token using your service principal password. It also retrieves the subdomain. It then returns an object containing the token and subdomain.
var request = require('request');
var express = require('express');
var router = express.Router();

router.get('/getimmersivereaderlaunchparams', function(req, res) {
    request.post ({
                headers: {
                    'content-type': 'application/x-www-form-urlencoded'
                },
                url: `https://login.windows.net/${process.env.TENANT_ID}/oauth2/token`,
                form: {
                    grant_type: 'client_credentials',
                    client_id: process.env.CLIENT_ID,
                    client_secret: process.env.CLIENT_SECRET,
                    resource: 'https://cognitiveservices.azure.com/'
                }
        },
        function(err, resp, tokenResponse) {
                if (err) {
                    return res.status(500).send('CogSvcs IssueToken error');
                }

                const token = JSON.parse(tokenResponse).access_token;
                const subdomain = process.env.SUBDOMAIN;
                return res.send({token: token, subdomain: subdomain});
        }
  );
});

/* GET home page. */
router.get('/', function(req, res, next) {
  res.render('index', { title: 'Express' });
});

module.exports = router;
The getimmersivereaderlaunchparams API endpoint should be secured behind some form of authentication (for example, OAuth) to prevent unauthorized users from obtaining tokens to use against your Immersive Reader service and billing; that work is beyond the scope of this tutorial.
Launch the Immersive Reader with sample content
Open views\layout.pug, and add the following code under the
headtag, before thebodytag. Thesescripttags load the Immersive Reader SDK and jQuery.script(src='https://ircdname.azureedge.net/immersivereadersdk/immersive-reader-sdk.1.2.0.js') script(src='https://code.jquery.com/jquery-3.3.1.min.js')Open views\index.pug, and replace its content with the following code. This code populates the page with some sample content, and adds a button that launches the Immersive Reader.
extends layout

block content
      h2(id='title') Geography
      p(id='content') The study of Earth's landforms is called physical geography. Landforms can be mountains and valleys. They can also be glaciers, lakes or rivers.
      div(class='immersive-reader-button' data-button-style='iconAndText' data-locale='en-US' onclick='launchImmersiveReader()')
      script.

        function getImmersiveReaderLaunchParamsAsync() {
                return new Promise((resolve, reject) => {
                    $.ajax({
                            url: '/getimmersivereaderlaunchparams',
                            type: 'GET',
                            success: data => {
                                    resolve(data);
                            },
                            error: err => {
                                    console.log('Error in getting token and subdomain!', err);
                                    reject(err);
                            }
                    });
                });
        }

        async function launchImmersiveReader() {
                const content = {
                        title: document.getElementById('title').innerText,
                        chunks: [{
                                content: document.getElementById('content').innerText + '\n\n',
                                lang: 'en'
                        }]
                };

                const launchParams = await getImmersiveReaderLaunchParamsAsync();
                const token = launchParams.token;
                const subdomain = launchParams.subdomain;

                ImmersiveReader.launchAsync(token, subdomain, content);
        }
Our web app is now ready. Start the app by running:
npm startOpen your browser and navigate to
http://localhost:3000. You should see the above content on the page. Select the Immersive Reader button to launch the Immersive Reader with your content.
Specify the language of your content
The Immersive Reader has support for many different languages. You can specify the language of your content by following these steps.
Open views\index.pug and add the following code below the
p(id=content)tag that you added in the previous step. This code adds some content Spanish content to your page.p(id='content-spanish') El estudio de las formas terrestres de la Tierra se llama geografía física. Los accidentes geográficos pueden ser montañas y valles. También pueden ser glaciares, lagos o ríos.In views\index.pug, add the following code above the call to
ImmersiveReader.launchAsync. This code passes the Spanish content into the Immersive Reader.content.chunks.push({ content: document.getElementById('content-spanish').innerText + '\n\n', lang: 'es' });Navigate to
http://localhost:3000again. You should see the Spanish text on the page, and when you select Immersive Reader, it shows up in the Immersive Reader as well.
Specify the language of the Immersive Reader interface
By default, the language of the Immersive Reader interface matches the browser's language settings. You can also specify the language of the Immersive Reader interface with the following code.
In views\index.pug, replace the call to
ImmersiveReader.launchAsync(token, subdomain, content)with the following code.const options = { uiLang: 'fr', } ImmersiveReader.launchAsync(token, subdomain, content, options);Navigate to
http://localhost:3000. When you launch the Immersive Reader, the interface is shown in French.
Launch the Immersive Reader with math content
You can include math content in the Immersive Reader by using MathML.
Modify views\index.pug to include the following code above the call to
ImmersiveReader.launchAsync:const mathML = '<math xmlns="https://www.w3.org/1998/Math/MathML" display="block"> \ <munderover> \ <mo>∫</mo> \ <mn>0</mn> \ <mn>1</mn> \ </munderover> \ <mrow> \ <msup> \ <mi>x</mi> \ <mn>2</mn> \ </msup> \ <mo>ⅆ</mo> \ <mi>x</mi> \ </mrow> \ </math>'; content.chunks.push({ content: mathML, mimeType: 'application/mathml+xml' });Navigate to
http://localhost:3000. When you launch the Immersive Reader and scroll to the bottom, you'll see the math formula.
Next step
Prerequisites
- An Azure subscription. You can create one for free.
- An Immersive Reader resource configured for Microsoft Entra authentication. Follow these instructions to get set up. Save the output of your session into a text file so you can configure the environment properties.
- An IDE such as Visual Studio Code.
- Git.
- Clone the Immersive Reader SDK from GitHub.
You can install the following tools as part of the instructions in this guide:
- Python and pip. Starting with Python 3.4, pip is included by default with the Python binary installers.
- Flask
- Jinja
- virtualenv and virtualenvwrapper-win for Windows or virtualenvwrapper for OSX
- The requests module
Configure authentication credentials
Create a new file called .env in the root directory of your project. Paste the following names and values into it. Supply the values given when you created your Immersive Reader resource.
TENANT_ID={YOUR_TENANT_ID}
CLIENT_ID={YOUR_CLIENT_ID}
CLIENT_SECRET={YOUR_CLIENT_SECRET}
SUBDOMAIN={YOUR_SUBDOMAIN}
Don't commit this file into source control because it contains secrets that shouldn't be made public.
Secure the getimmersivereadertoken API endpoint behind some form of authentication, such as OAuth. Authentication prevents unauthorized users from obtaining tokens to use against your Immersive Reader service and billing. That work is beyond the scope of this tutorial.
Create a Python web app on Windows
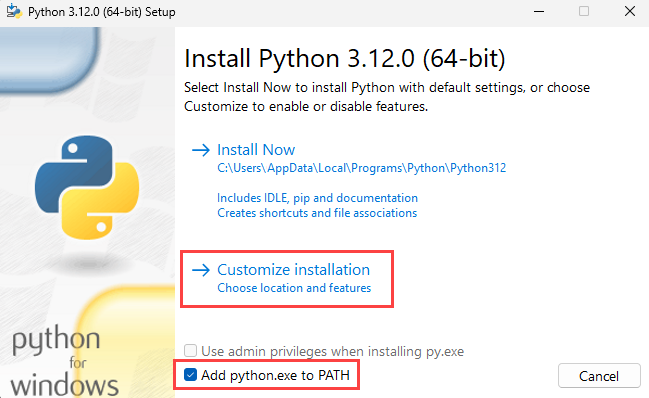
Install Python.
Select the Add Python to PATH check box, and select Custom installation.
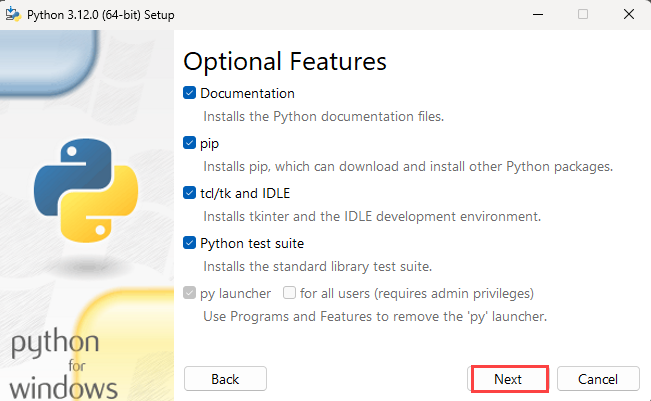
Add Optional Features by selecting check boxes, and then select Next.
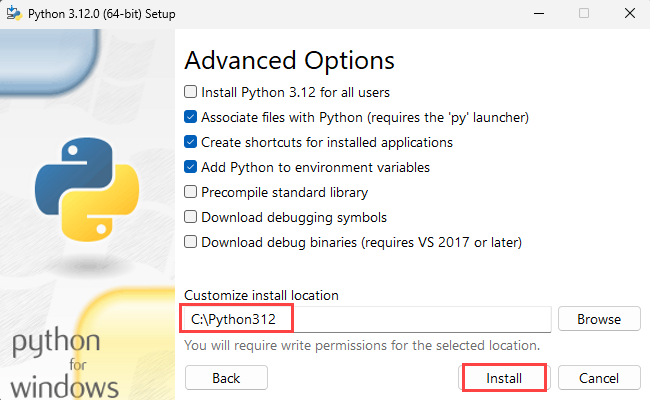
Under Advanced Options, set the installation path as your root folder, for example, C:\Python312. Then select Install.
Tip
When you set a custom installation path, the PATH variable might still point to the default installation path. Verify that the PATH points to the custom folder.
After the Python installation is finished, open a command prompt and use cd to go to the Python Scripts folder.
cd C:\Python312\Scripts
Install Flask.
pip install flask
Install Jinja2. It's a full-featured template engine for Python.
pip install jinja2
Install virtualenv. This tool creates isolated Python environments.
pip install virtualenv
Install virtualenvwrapper-win. The idea behind virtualenvwrapper is to ease usage of virtualenv.
pip install virtualenvwrapper-win
Install the requests module. Requests is an Apache2 Licensed HTTP library, written in Python.
pip install requests
Install the python-dotenv module. This module reads the key-value pair from the .env file and adds them to the environment variable.
pip install python-dotenv
Make a virtual environment.
mkvirtualenv.bat quickstart-python
Use cd to go to the sample project root folder.
cd C:\immersive-reader-sdk\js\samples\quickstart-python
Connect the sample project with the environment. This action maps the newly created virtual environment to the sample project root folder.
setprojectdir .
Activate the virtual environment.
activate
The project should now be active, and you'll see something like (quickstart-python) C:\immersive-reader-sdk\js\samples\quickstart-python> in the command prompt.
Deactivate the environment.
deactivate
The (quickstart-python) prefix should be gone because the environment is deactivated.
To reactivate the environment, run workon quickstart-python from the sample project root folder.
workon quickstart-python
Start the Immersive Reader with sample content
When the environment is active, run the sample project by entering flask run from the sample project root folder.
flask run
Open your browser, and go to http://localhost:5000.
Create a Python web app on OSX
Install Python.
The Python root folder, for example, Python312, should now be in the Applications folder. Open Terminal and use cd to go into the Python folder.
cd Python312
Install pip.
curl https://bootstrap.pypa.io/get-pip.py -o get-pip.py
Run the following code to install pip for the currently signed-in user to avoid permissions issues.
python get-pip.py --user
sudo nano /etc/paths
- Enter your password, when prompted.
- Add the path of your pip installation to your PATH variable.
- Go to the bottom of the file, and enter the path you want to add as the last item of the list, for example,
PATH=$PATH:/usr/local/bin. - Select CTRL+X to quit.
- Enter Y to save the modified buffer.
That's it! To test it, in a new Terminal window, enter echo $PATH.
Install Flask.
pip install flask --user
Install Jinja2. It's a full-featured template engine for Python.
pip install Jinja2 --user
Install virtualenv. This tool creates isolated Python environments.
pip install virtualenv --user
Install virtualenvwrapper. The idea behind virtualenvwrapper is to ease usage of virtualenv.
pip install virtualenvwrapper --user
Install the requests module. Requests is an Apache2 Licensed HTTP library, written in Python.
pip install requests --user
Install the python-dotenv module. This module reads the key-value pair from the .env file and adds them to the environment variable.
pip install python-dotenv --user
Choose a folder where you want to keep your virtual environments, and run this command:
mkdir ~/.virtualenvs
Use cd to go to the Immersive Reader SDK Python sample application folder.
cd immersive-reader-sdk/js/samples/quickstart-python
Make a virtual environment.
mkvirtualenv -p /usr/local/bin/python3 quickstart-python
Connect the sample project with the environment. This action maps the newly created virtual environment to the sample project root folder.
setprojectdir .
Activate the virtual environment.
activate
The project should now be active, and you'll see something like (quickstart-python) /immersive-reader-sdk/js/samples/quickstart-python> in the command prompt.
Deactivate the environment.
deactivate
The (quickstart-python) prefix should be gone because the environment is deactivated.
To reactivate the environment, run workon quickstart-python from the sample project root folder.
workon quickstart-python
Start the Immersive Reader with sample content
When the environment is active, run the sample project by entering flask run from the sample project root folder.
flask run
Open your browser, and go to http://localhost:5000.
Next step
Prerequisites
- An Azure subscription. You can create one for free.
- An Immersive Reader resource configured for Microsoft Entra authentication. Follow these instructions to get set up. Save the output of your session into a text file so you can configure the environment properties.
- Git.
- Clone the Immersive Reader SDK from GitHub.
- Android Studio.
Configure authentication credentials
Start Android Studio, and open the Immersive Reader SDK project from the immersive-reader-sdk/js/samples/quickstart-java-android directory (Java) or the immersive-reader-sdk/js/samples/quickstart-kotlin directory (Kotlin).
Tip
You might need to let the system update the Gradle plugins to at least version 8.
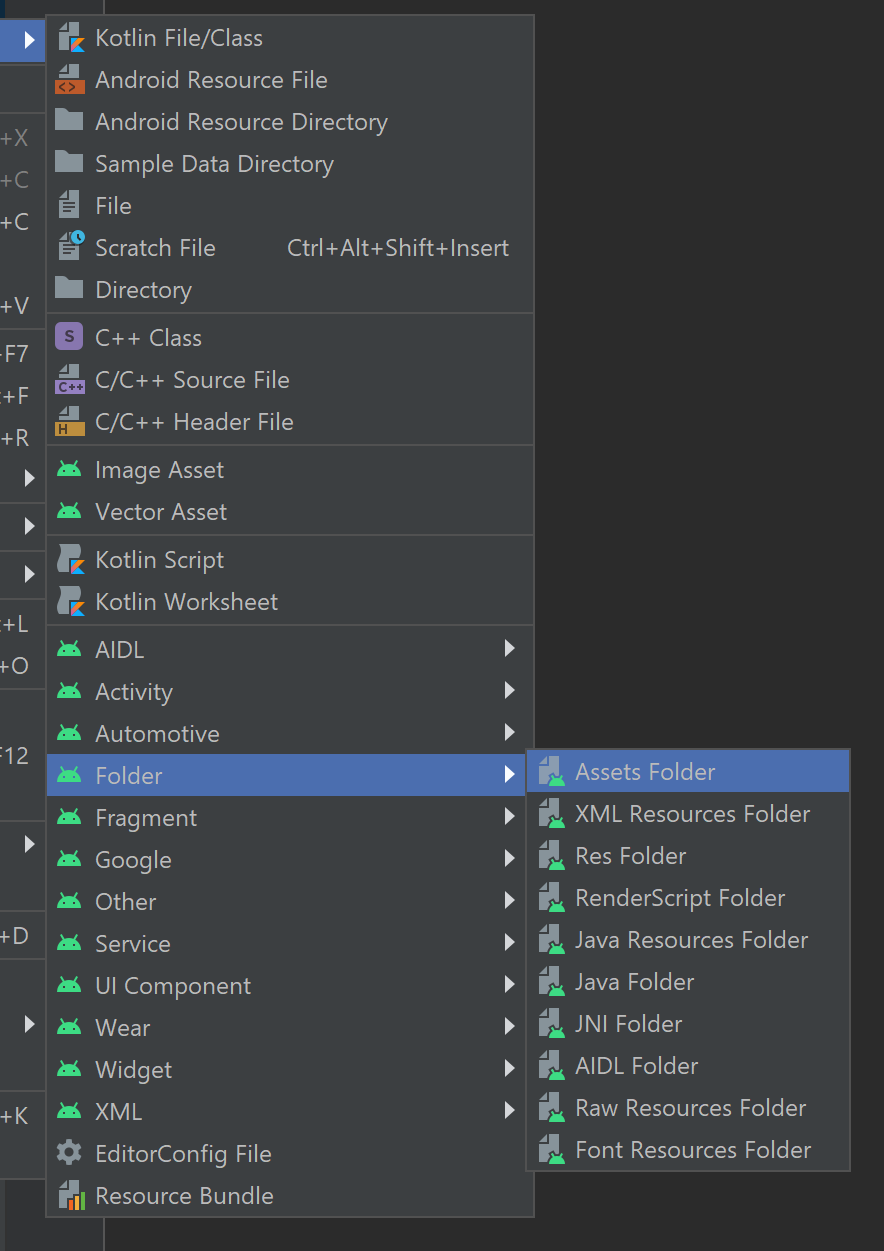
To create a new assets folder, right-click on app and select Folder -> Assets Folder from the dropdown.
Right-click on assets and select New -> File. Name the file env.

Add the following names and values, and supply values as appropriate. Don't commit this file into source control because it contains secrets that shouldn't be made public.
TENANT_ID=<YOUR_TENANT_ID>
CLIENT_ID=<YOUR_CLIENT_ID>
CLIENT_SECRET=<YOUR_CLIENT_SECRET>
SUBDOMAIN=<YOUR_SUBDOMAIN>
Start the Immersive Reader with sample content
Choose a device emulator from the AVD Manager, and run the project.
Next steps
Prerequisites
- An Azure subscription. You can create one for free.
- An Immersive Reader resource configured for Microsoft Entra authentication. Follow these instructions to get set up. Save the output of your session into a text file so you can configure the environment properties.
- macOS and Xcode.
- Git.
- Clone the Immersive Reader SDK from GitHub.
Configure authentication credentials
In Xcode, select Open Existing Project. Open the file immersive-reader-sdk/js/samples/ios/quickstart-swift.xcodeproj.
On the top menu, select Product > Scheme > Edit Scheme.
In the Run view, select the Arguments tab.
In the Environment Variables section, add the following names and values. Supply the values given when you created your Immersive Reader resource.
TENANT_ID=<YOUR_TENANT_ID>
CLIENT_ID=<YOUR_CLIENT_ID>
CLIENT_SECRET<YOUR_CLIENT_SECRET>
SUBDOMAIN=<YOUR_SUBDOMAIN>
Don't commit this change into source control because it contains secrets that shouldn't be made public.
Start the Immersive Reader with sample content
In Xcode, select a device simulator, then run the project from the controls or enter Ctrl+R.