Tutorial: Deploy a web app for chat on your data
Note
Azure AI Studio is currently in public preview. This preview is provided without a service-level agreement, and we don't recommend it for production workloads. Certain features might not be supported or might have constrained capabilities. For more information, see Supplemental Terms of Use for Microsoft Azure Previews.
In this article, you deploy a chat web app that uses your own data with an Azure OpenAI Service model.
You upload your local data files to Azure Blob storage and create an Azure AI Search index. Your data source is used to help ground the model with specific data. Grounding means that the model uses your data to help it understand the context of your question. You're not changing the deployed model itself. Your data is stored separately and securely in your Azure subscription. For more information, see Azure OpenAI on your data.
The steps in this tutorial are:
- Deploy and test a chat model without your data
- Add your data
- Test the model with your data
- Deploy your web app
Prerequisites
An Azure subscription - Create one for free.
Access granted to Azure OpenAI in the desired Azure subscription.
Currently, access to this service is granted only by application. You can apply for access to Azure OpenAI by completing the form at https://aka.ms/oai/access. Open an issue on this repo to contact us if you have an issue.
An Azure AI hub resource and project in Azure AI Studio.
You need at least one file to upload that contains example data. To complete this tutorial, use the product information samples from the Azure/aistudio-copilot-sample repository on GitHub. Specifically, the product_info_11.md contains product information about the TrailWalker hiking shoes that's relevant for this tutorial example. You can download the file or copy its contents to a file named
product_info_11.mdon your local computer.
Deploy and test a chat model without your data
Follow these steps to deploy a chat model and test it without your data.
Sign in to Azure AI Studio.
Go to your project or create a new project in Azure AI Studio.
Select Build from the top menu and then select Deployments > Create > Real-time endpoint.

On the Select a model page, select the model you want to deploy from the Model dropdown. For example, select gpt-35-turbo-16k. Then select Confirm.

On the Deploy model page, enter a name for your deployment, and then select Deploy. After the deployment is created, you see the deployment details page. Details include the date you created the deployment and the created date and version of the model you deployed.
On the deployment details page from the previous step, select Open in playground.

In the playground, make sure that Chat is selected from the Mode dropdown. Select your deployed GPT chat model from the Deployment dropdown.
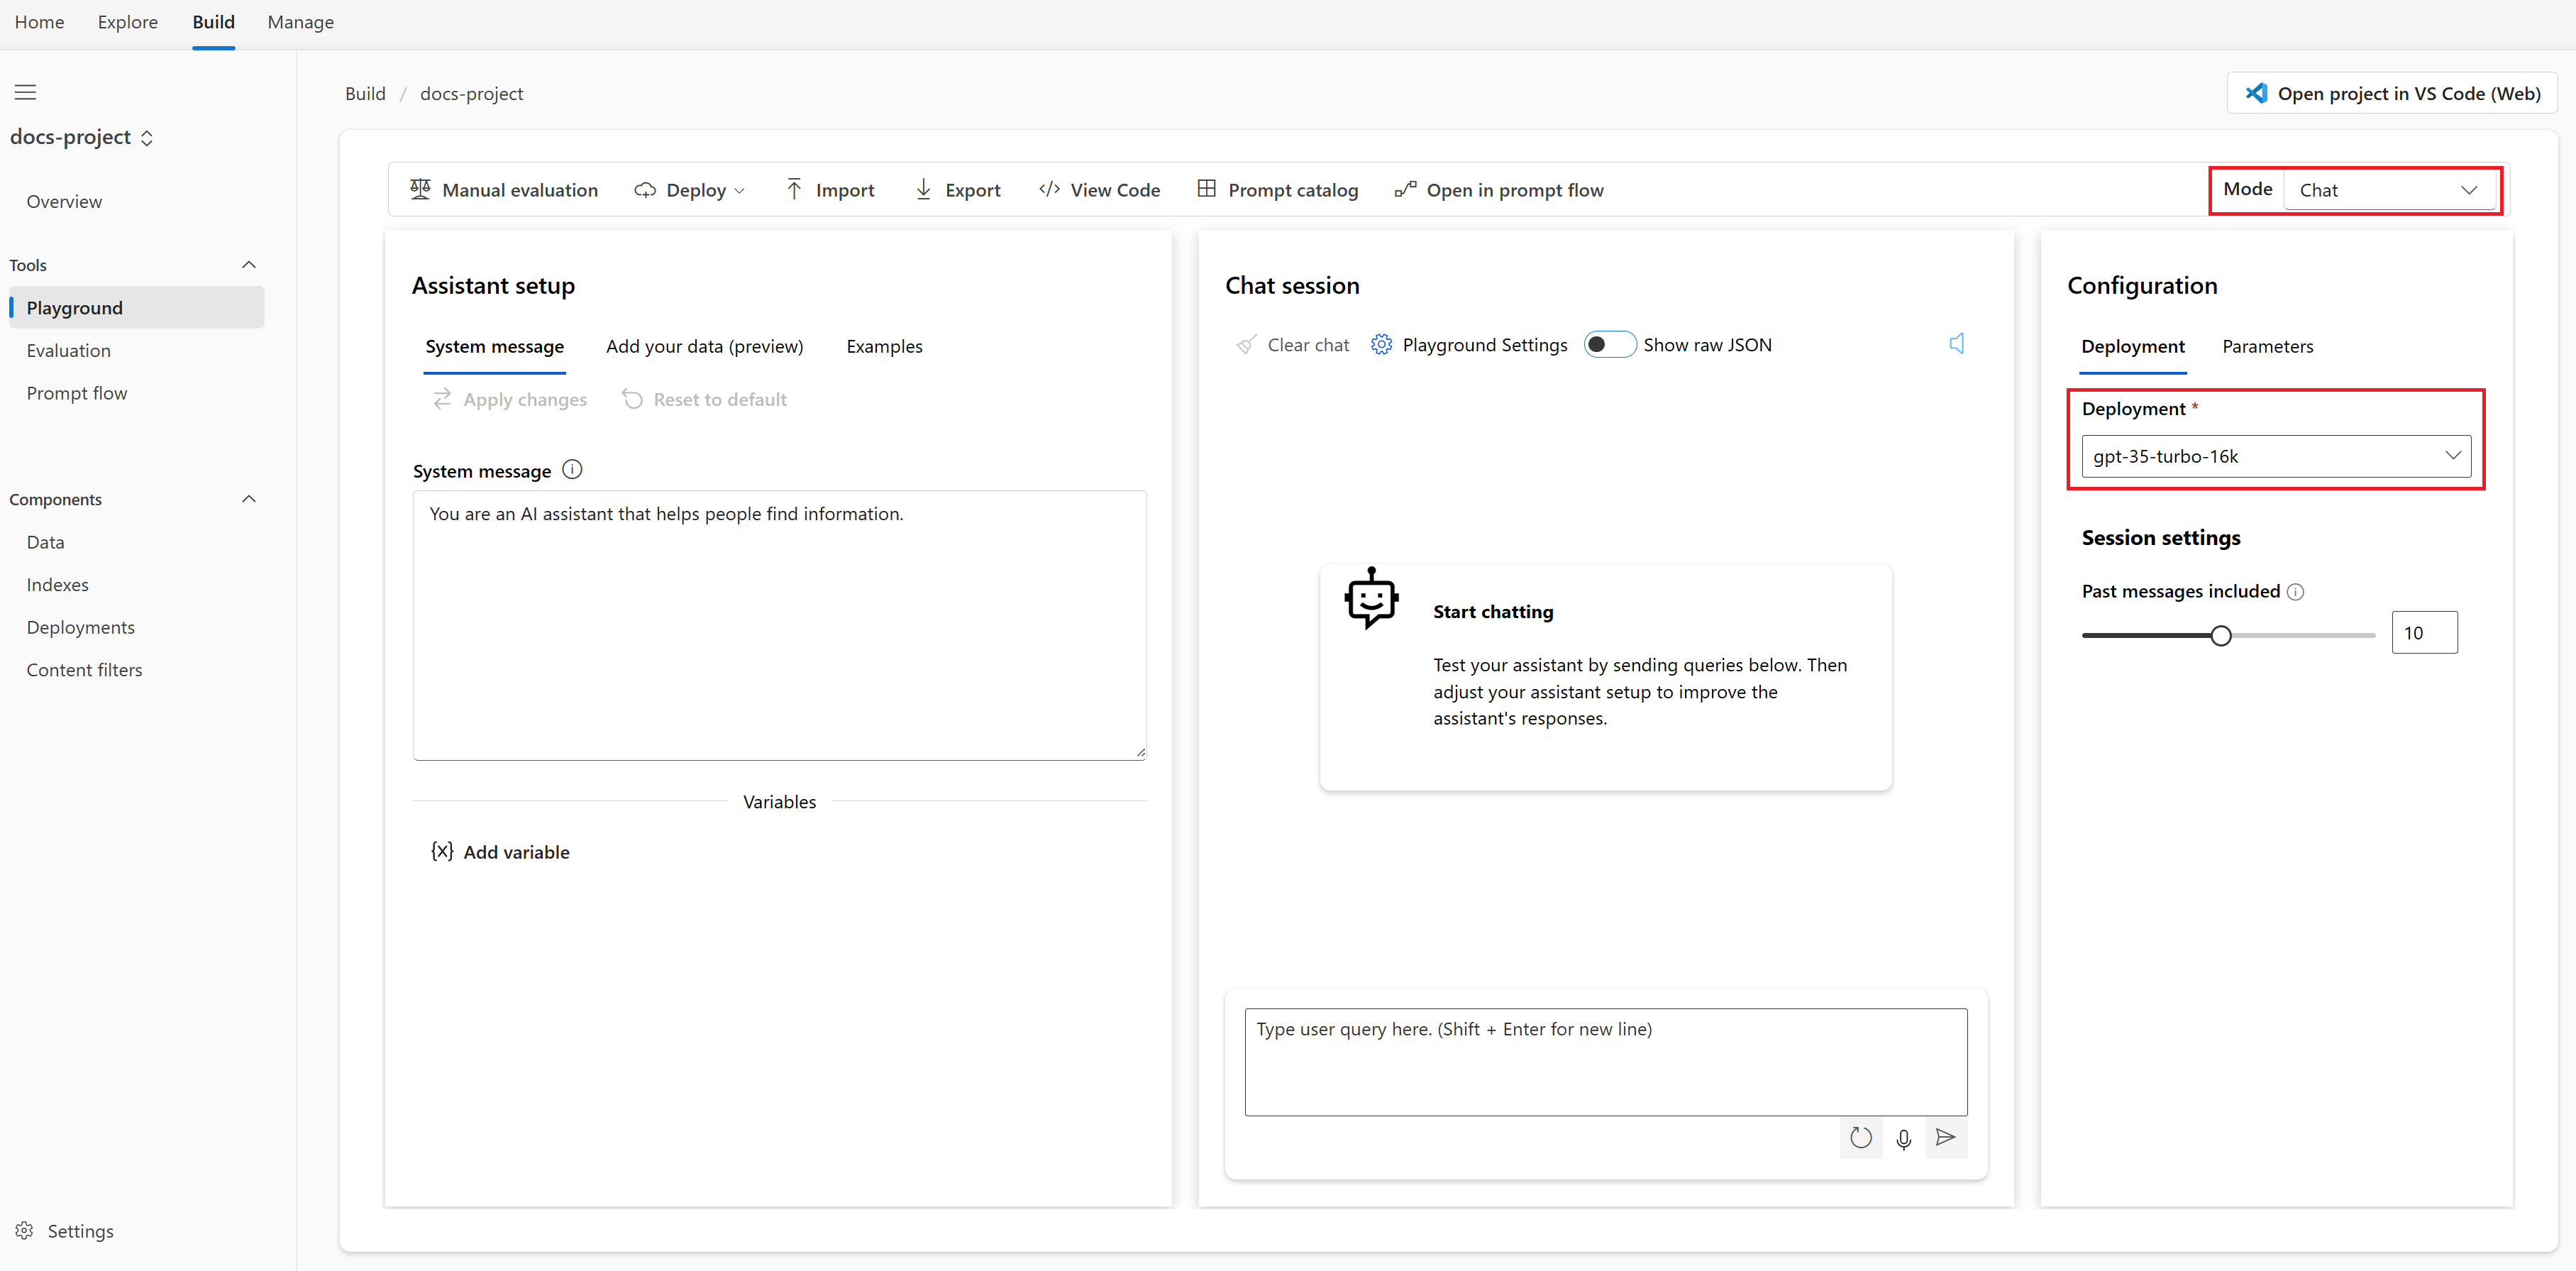
In the System message text box on the Assistant setup pane, provide this prompt to guide the assistant: "You're an AI assistant that helps people find information." You can tailor the prompt for your scenario.
Select Apply changes to save your changes, and when prompted to see if you want to update the system message, select Continue.
In the chat session pane, enter the following question: "How much are the TrailWalker hiking shoes", and then select the right arrow icon to send.

The assistant replies that it doesn't know the answer. This is because the model doesn't have access to product information about the TrailWalker hiking shoes.
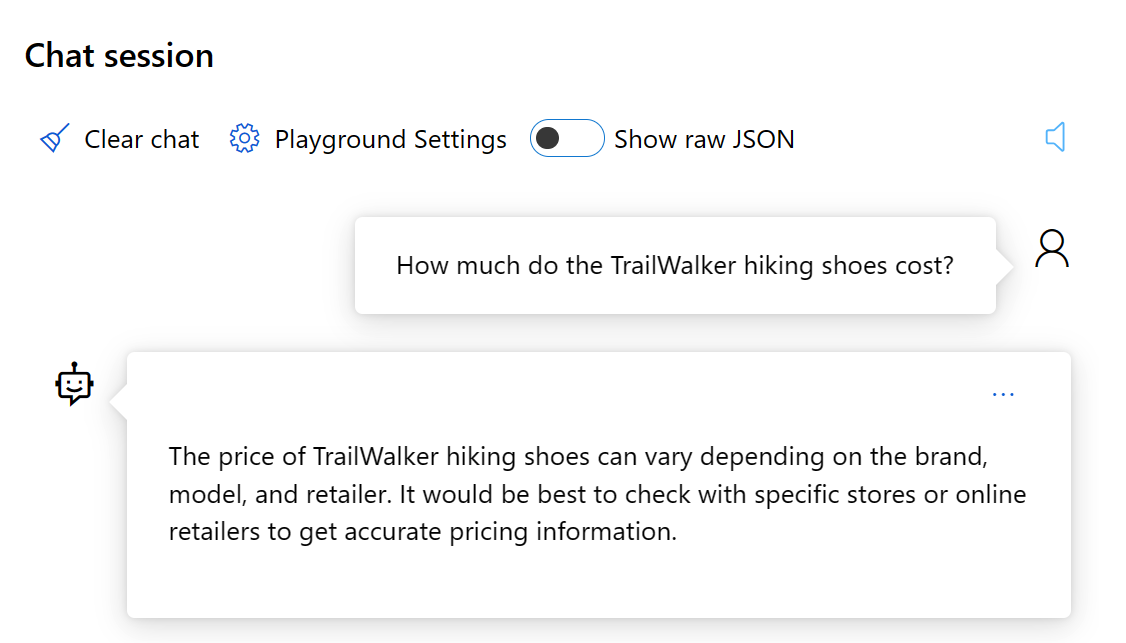


In the next section, you'll add your data to the model to help it answer questions about your products.
Add your data
Follow these steps to add your data to the playground to help the assistant answer questions about your products. You're not changing the deployed model itself. Your data is stored separately and securely in your Azure subscription.
If you aren't already in the playground, select Build from the top menu and then select Playground from the collapsible left menu.
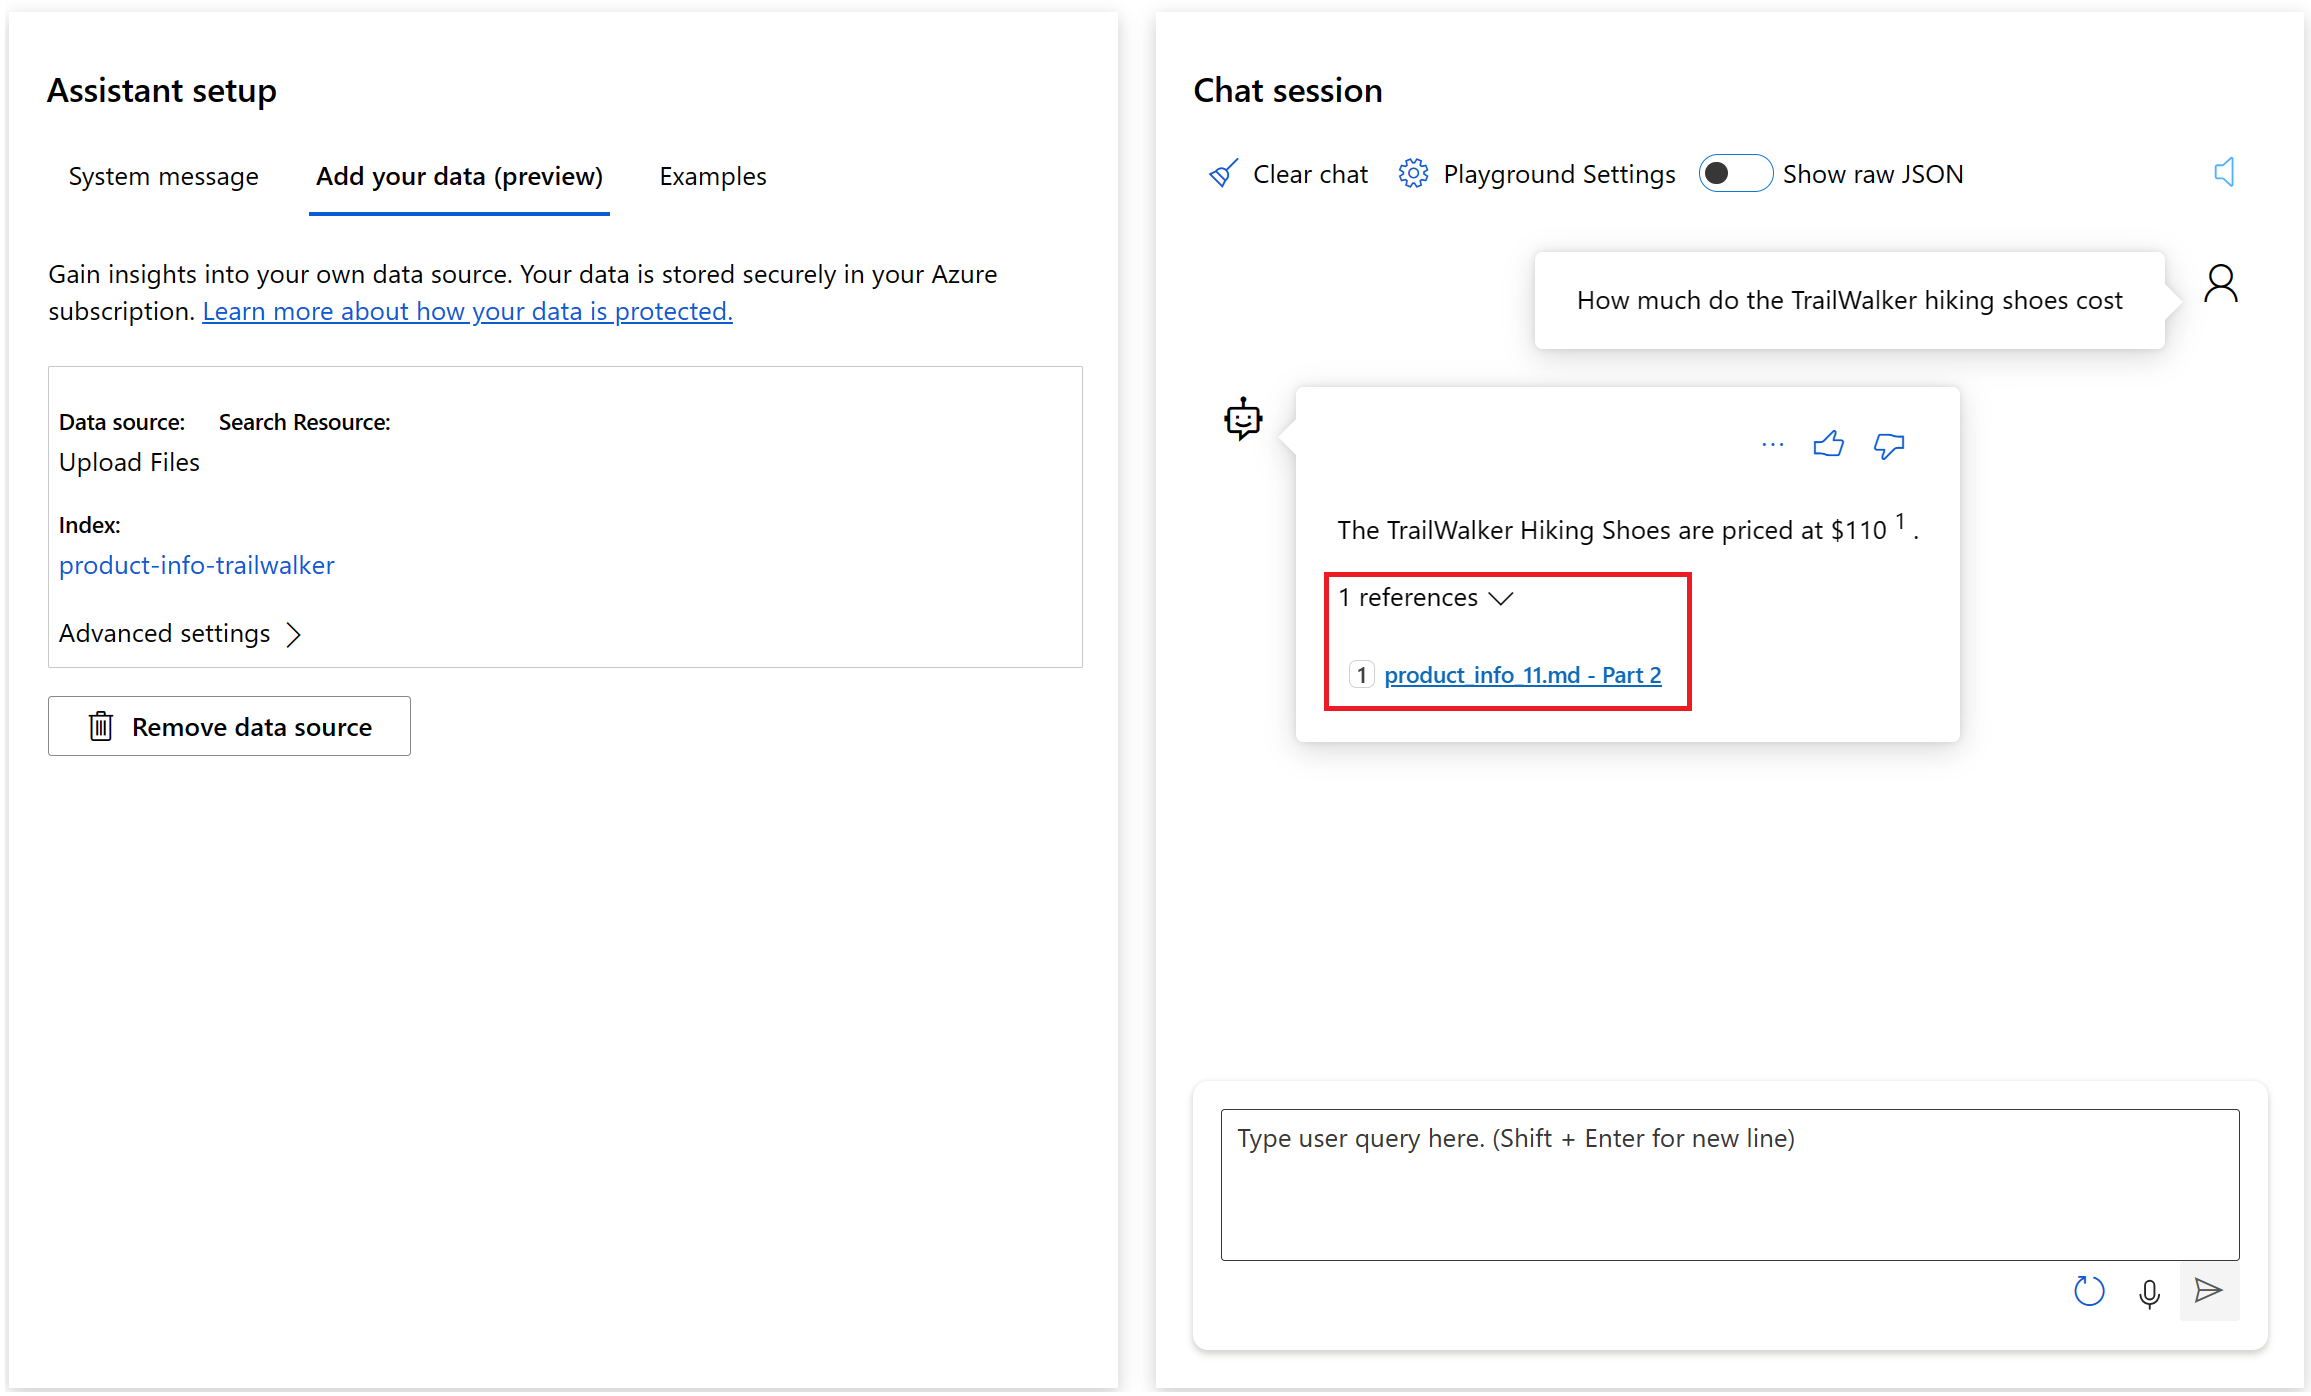
On the Assistant setup pane, select Add your data (preview) > + Add a data source.

In the Select or add data source page that appears, select Upload files from the Select data source dropdown.

Tip
For data source options and supported file types and formats, see Azure OpenAI on your data.
Enter your data source details:

Note
Azure OpenAI needs both a storage resource and a search resource to access and index your data. Your data is stored securely in your Azure subscription.
- Subscription: Select the Azure subscription that contains the Azure OpenAI resource you want to use.
- Storage resource: Select the Azure Blob storage resource where you want to upload your files.
- Data source: Select an existing Azure AI Search index, Azure Storage container, or upload local files as the source we'll build the grounding data from. Your data is stored securely in your Azure subscription.
- Index name: Select the Azure AI Search resource where the index used for grounding is created. A new search index with the provided name is generated after data ingestion is complete.
Select your Azure AI Search resource, and select the acknowledgment that connecting it incurs usage on your account. Then select Next.
On the Upload files pane, select Browse for a file and select the files you want to upload. Select the
product_info_11.mdfile you downloaded or created earlier. See the prerequisites. If you want to upload more than one file, do so now. You won't be able to add more files later in the same playground session.Select Upload to upload the file to your Azure Blob storage account. Then select Next.

On the Data management pane under Search type, select Keyword. This setting helps determine how the model responds to requests. Then select Next.
Note
If you had added vector search on the Select or add data source page, then more options would be available here for an additional cost. For more information, see Azure OpenAI on your data.
Review the details you entered, and select Save and close. You can now chat with the model and it uses information from your data to construct the response.

Now on the Assistant setup pane, you can see that your data ingestion is in progress. Before proceeding, wait until you see the data source and index name in place of the status.

You can now chat with the model asking the same question as before ("How much are the TrailWalker hiking shoes"), and this time it uses information from your data to construct the response. You can expand the references button to see the data that was used.


Deploy your web app
Once you're satisfied with the experience in Azure AI Studio, you can deploy the model as a standalone web application.
Find your resource group in the Azure portal
In this tutorial, your web app is deployed to the same resource group as your Azure AI hub resource. Later you configure authentication for the web app in the Azure portal.
Follow these steps to navigate from Azure AI Studio to your resource group in the Azure portal:
In Azure AI Studio, select Manage from the top menu and then select Details. If you have multiple Azure AI hub resources, select the one you want to use in order to see its details.
In the Resource configuration pane, select the resource group name to open the resource group in the Azure portal. In this example, the resource group is named
rg-docsazureairesource.
You should now be in the Azure portal, viewing the contents of the resource group where you deployed the Azure AI hub resource.

Keep this page open in a browser tab - you return to it later.


Deploy the web app
Publishing creates an Azure App Service in your subscription. It might incur costs depending on the pricing plan you select. When you're done with your app, you can delete it from the Azure portal.
To deploy the web app:
Complete the steps in the previous section to add your data to the playground.
Note
You can deploy a web app with or without your own data, but at least you need a deployed model as described in deploy and test a chat model without your data.
Select Deploy > A new web app.

On the Deploy to a web app page, enter the following details:
- Name: A unique name for your web app.
- Subscription: Your Azure subscription.
- Resource group: Select a resource group in which to deploy the web app. You can use the same resource group as the Azure AI hub resource.
- Location: Select a location in which to deploy the web app. You can use the same location as the Azure AI hub resource.
- Pricing plan: Choose a pricing plan for the web app.
- Enable chat history in the web app: For the tutorial, the chat history box isn't selected. If you enable the feature, your users will have access to their individual previous queries and responses. For more information, see chat history remarks.
- I acknowledge that web apps will incur usage to my account: Selected
Wait for the app to be deployed, which might take a few minutes.

When it's ready, the Launch button is enabled on the toolbar. But don't launch the app yet and don't close the Playground page - you return to it later.


Configure web app authentication
By default, the web app will only be accessible to you. In this tutorial, you add authentication to restrict access to the app to members of your Azure tenant. Users are asked to sign in with their Microsoft Entra account to be able to access your app. You can follow a similar process to add another identity provider if you prefer. The app doesn't use the user's sign in information in any other way other than verifying they're a member of your tenant.
Return to the browser tab containing the Azure portal (or re-open the Azure portal in a new browser tab) and view the contents of the resource group where you deployed the Azure AI hub resource and web app (you might need to refresh the view the see the web app).
Select the App Service resource from the list of resources in the resource group.
From the collapsible left menu under Settings, select Authentication.

Add an identity provider with the following settings:
- Identity provider: Select Microsoft as the identity provider. The default settings on this page restrict the app to your tenant only, so you don't need to change anything else here.
- Tenant type: Workforce
- App registration: Create a new app registration
- Name: The name of your web app service
- Supported account types: Current tenant - Single tenant
- Restrict access: Requires authentication
- Unauthenticated requests: HTTP 302 Found redirect - recommended for websites

Use the web app
You're almost there! Now you can test the web app.
Wait 10 minutes or so for the authentication settings to take effect.
Return to the browser tab containing the Playground page in Azure AI Studio.
Select Launch to launch the deployed web app. If prompted, accept the permissions request.
If the authentication settings haven't yet taken effect, close the browser tab for your web app and return to the Playground page in Azure AI Studio. Then wait a little longer and try again.
In your web app, you can ask the same question as before ("How much are the TrailWalker hiking shoes"), and this time it uses information from your data to construct the response. You can expand the references button to see the data that was used.


Clean up resources
To avoid incurring unnecessary Azure costs, you should delete the resources you created in this quickstart if they're no longer needed. To manage resources, you can use the Azure portal.
Remarks
Chat history
With the chat history feature, your users will have access to their individual previous queries and responses.
You can enable chat history when you deploy the web app. Select the Enable chat history in the web app checkbox.

Important
Enabling chat history will create a Cosmos DB instance in your resource group, and incur additional charges for the storage used. Deleting your web app does not delete your Cosmos DB instance automatically. To delete your Cosmos DB instance, along with all stored chats, you need to navigate to the associated resource in the Azure portal and delete it.
Once you've enabled chat history, your users will be able to show and hide it in the top right corner of the app. When the history is shown, they can rename, or delete conversations. As they're logged into the app, conversations will be automatically ordered from newest to oldest, and named based on the first query in the conversation.
If you delete the Cosmos DB resource but keep the chat history option enabled on the studio, your users will be notified of a connection error, but can continue to use the web app without access to the chat history.
Next steps
- Create a project in Azure AI Studio.
- Learn more about what you can do in the Azure AI Studio.
Feedback
Coming soon: Throughout 2024 we will be phasing out GitHub Issues as the feedback mechanism for content and replacing it with a new feedback system. For more information see: https://aka.ms/ContentUserFeedback.
Submit and view feedback for