Note
Access to this page requires authorization. You can try signing in or changing directories.
Access to this page requires authorization. You can try changing directories.
By default, the AKS Edge Essentials Linux node has a single network interface card (NIC) assigned. However, you can configure the Linux node with multiple network interfaces during the deployment of your node. This functionality can be helpful in numerous scenarios where you might have a networking division or separation into different networks or zones. In order to connect an AKS Edge Essentials Linux node to the different networks, you must attach different network interface cards to the Linux node.
This article describes how to configure the AKS Edge Essentials Linux node to support multiple NICs and connect to multiple networks. The following steps summarize this process:
- Create an AKS Edge Essentials deployment with a secondary NIC.
- Verify multiple NIC network configuration settings.
- Configure Multus CNI plugin.
- Configure Multus secondary network with sample pod.
- Verify pod attached networks.
For more information about networking concepts and Multus configurations, see AKS Edge Essentials networking and Multus - Quickstart guide.
Note
AKS Edge Essentials support for multiple NICs is limited to Linux nodes. If you need support for Windows nodes, you can file an issue/feature request in the AKS Edge Essentials GitHub repo.
Create an AKS Edge Essentials deployment with a secondary NIC
To deploy a Linux node with multiple NICs, you must add your secondary interface cards in your deployment JSON file. Modify your deployment JSON file, and as part of the LinuxNode.SecondaryNetworks section, ensure that you specify a secondary network to be added to the Linux node. You can specify an array of VMSwitchName with optional static IP information (Ip4Address,Ip4GatewayAddress and Ip4PrefixLength):
Follow the steps in Set up your machine.
Create a Hyper-V virtual switch. For more information, see Create and configure a virtual switch with Hyper-V.
Modify the deployment JSON file. Add the following parameters to the
LinuxNode.SecondaryNetworkssection:Parameter Accepted values Comments VMSwitchNameName of the virtual switch. Name of the virtual switch assigned to the Linux node. Ip4AddressIPv4 address in the range of the DCHP server scope. Static Ipv4 address of the Linux node. Ip4GatewayAddressIPv4 address of the subnet gateway. Gateway Ipv4 address, only valid when static Ipv4 address is specified. Ip4PrefixLengthIPv4 prefix length of the subnet. Ipv4 subnet prefix length, only valid when static Ipv4 address is specified. { ..., "LinuxNode": { ..., "SecondaryNetworks": [ { "VMSwitchName": <virtual-switch-name>, "Ip4Address": <linux-node-secondary-ip-address>, "Ip4GatewayAddress": <gateway-ip-address>, "Ip4PrefixLength": <ip-prefix-length> } ] } }Deploy your AKS Edge Essentials node following the steps in Create a single machine deployment, or Create a full deployment.
Verify multiple NIC network configuration settings
After you successfully install and deploy the AKS Edge Essentials node, follow these steps to make sure both the primary and secondary interfaces were created and added to the Linux node. To check the interfaces, run the following command:
Invoke-AksEdgeNodeCommand -NodeType "Linux" -command "sudo ip addr"
Configure Multus CNI plugin
After successfully installing and deploying the AKS Edge Essentials node, follow these steps to enable Multus:
Verify that the default network is ready by listing the Kubernetes nodes:
kubectl get nodesClone the Multus Cni repo:
git clone https://github.com/k8snetworkplumbingwg/multus-cni.gitChange to the multus-cni project directory.
Navigate to the deployments folder to view the daemon set scripts used to configure Multus.
If you're using the K3s version, make the following edits to the multus-daemonset.yml script to make it compatible for use with K3s:
Get the AKS Edge Essentials storage hash token. The hash can be located by going to /var/lib/rancher/k3s/data/.
Invoke-AksEdgeNodeCommand -NodeType "Linux" -command "sudo ls -AU /var/lib/rancher/k3s/data/ | head -1"Replace the following volume configuration lines:
volumes:
- name: cni
    hostPath:
    path: /etc/cni/net.d
- name: cnibin
    hostPath:
    path: /opt/cni/bin
Use the storage hash token from the previous step and replace the configuration with the following lines:
volumes:
- name: cni
    hostPath:
    path: /var/lib/rancher/k3s/agent/etc/cni/net.d
- name: cnibin
    hostPath:
    path: /var/lib/rancher/k3s/data/<replace-with-your-hash>/bin
Replace the following container configuration lines:
containers:
- name: kube-multus
    image: ghcr.io/k8snetworkplumbingwg/multus-cni:snapshot
    command: ["/thin_entrypoint"]
    args:
    - "--multus-conf-file=auto"
    - "--multus-autoconfig-dir=/host/etc/cni/net.d"
    - "--cni-conf-dir=/host/etc/cni/net.d"
Replace them with the appropriate K3s container configuration:
containers:
- name: kube-multus
    image: nfvpe/multus:v3.4.1
    command: ["/entrypoint.sh"]
    args:
    - "--multus-conf-file=auto"
    - "--cni-version=0.3.1"
    # Add the following arg
    - "--multus-kubeconfig-file-host=/var/lib/rancher/k3s/agent/etc/cni/net.d/multus.d/multus.kubeconfig"
Apply the updated Multus daemon set file using the following command:
kubectl apply -f multus-daemonset.yml
If everything is correctly installed, Kubernetes starts the Multus daemon set, which runs a pod on each node, and results in a Multus binary to be placed on each node in /var/lib/rancher/k3s/data/[replace-with-your-hash]/bin.
The daemonset reads the first alphabetical configuration file in /var/lib/rancher/k3s/agent/etc/cni/net.d, and creates a new configuration file for Multus on each node as /var/lib/rancher/k3s/agent/etc/cni/net.d/00-multus.conf. This file is autogenerated and is based on the default network configuration. It also creates a /var/lib/rancher/k3s/agent/etc/cni/net.d/multus.d directory on each node with authentication information for Multus to access the Kubernetes API.
Validate Multus installation
The installation can check the following information:
All files listed previously were generated by looking at the specified directory paths:
Invoke-AksEdgeNodeCommand -NodeType "Linux" -command "sudo ls -l /var/lib/rancher/k3s/data/<replace-with-your-hash>/bin | grep multus"Ensure that the Multus pods ran without error by running this command:
kubectl get pods --all-namespaces | Select-String 'Multus'Check the 00-multus.conf file to ensure the correct CNI version is specified. Update the CNI version value to 0.3.1 if that isn't already the default value:
Invoke-AksEdgeNodeCommand -NodeType "Linux" -command "sudo cat /var/lib/rancher/k3s/agent/etc/cni/net.d/00-multus.conf"
Configure Multus secondary network with sample pod
Once the Multus plugin is installed and running, create the Kubernetes network attachment definition.
Create a secondarynet-conf.yaml yaml file for the secondary network. A part of the Multus quickstart installation, creates a CRD (custom resource definition), which can be used to define the configuration for all extra interfaces. The following sample YAML file adds a secondary network:
# This net-attach-def defines secondarynet-conf
apiVersion: "k8s.cni.cncf.io/v1"
kind: NetworkAttachmentDefinition
metadata:
  name: secondarynet-conf
spec:
  config: '{
      "cniVersion": "0.3.1",
      "plugins": [
          {
          "type": "bridge",
          "bridge": "mynet1",
          "ipam": {
            "subnet": "10.0.0.0/24",
            "rangeStart": "10.0.0.60",
            "rangeEnd": "10.0.0.120"},
            "gateway": "10.0.0.1"
          }
      ]
      }'
Note
The official Multus documentation specifies a
macvlantype secondary interface. However, themacvlanplugin isn't available by default. To use this plugin, install it before specifying the secondary net configuration. For more information about various network plugins and their sample configurations, see Using the Multus CNI in OpenShift.Create the secondary interface using the secondarynet-conf.yaml created in the previous step:
kubectl apply -f secondarynet-conf.yamlCreate a samplepod.yaml file to deploy a sample pod that attaches to the previously created secondary interface. The following YAML code is a sample for creating a new pod that uses the secondary interface:
apiVersion: v1
kind: Pod
metadata:
  name: samplepod
  annotations:
      k8s.v1.cni.cncf.io/networks: secondarynet-conf
spec:
  containers:
  - name: samplepod
    command: ["/bin/ash", "-c", "trap : TERM INT; sleep infinity & wait"]
    image: alpine
Create the sample pod using the
samplepod.yamlcreated in the previous step:kubectl apply -f samplepod.yaml
Verify pod attached networks
The final step is to ensure that the pod is running and has the correct network interfaces attached.
Check that the pod is running:
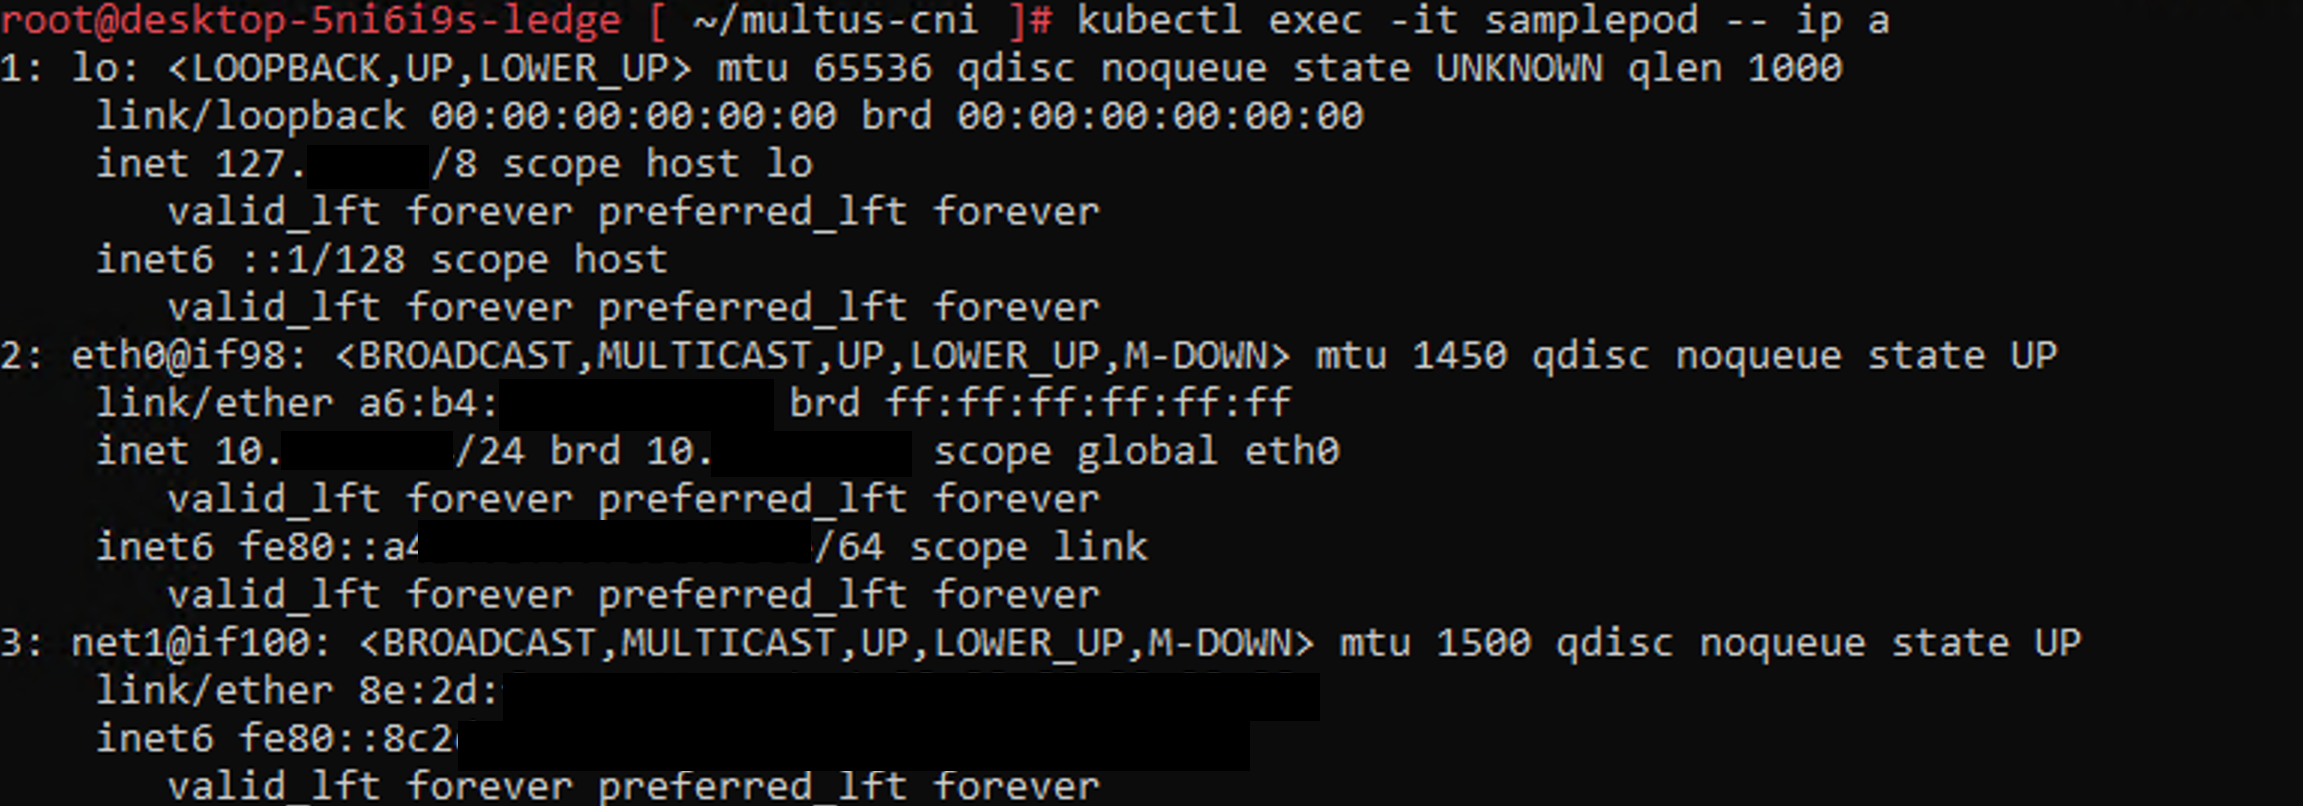
kubectl get podsInspect the pod, and see what interfaces are attached:
kubectl exec -it samplepod -- ip aThere are three interfaces:
- lo: a loopback interface
- eth0: the default network
- net1: the new interface created using secondarynet-conf