Note
Access to this page requires authorization. You can try signing in or changing directories.
Access to this page requires authorization. You can try changing directories.
In this article, you will deploy an AWS EDW workload to Azure.
Sign in to Azure
Sign in to Azure using the
az logincommand.az loginIf your Azure account has multiple subscriptions, make sure to select the correct subscription. List the names and IDs of your subscriptions using the
az account listcommand.az account list --query "[].{id: id, name:name }" --output tableSelect a specific subscription using the
az account setcommand.az account set --subscription $subscriptionId
EDW workload deployment script
Review the environment variables in the file deployment/environmentVariables.sh and then you use the
deploy.sh script in the deployment/infra/ directory of the GitHub repository to deploy
the application to Azure.
The script first checks that all of the prerequisite tools are installed. If not, the script terminates and displays an error message letting you know which prerequisites are missing. If this happens, review the prerequisites, install any missing tools, and then run the script again. The Node autoprovisioning (NAP) for AKS feature flag must be registered on your Azure subscription. If it isn't already registered, the script executes an Azure CLI command to register the feature flag.
The script records the state of the deployment in a file called deploy.state, which is located in the deployment directory. You can use this file to set environment variables when deploying the app.
As the script executes the commands to configure the infrastructure for the workflow, it checks that each command executes successfully. If any issues occur, an error message is displayed, and the execution stops.
The script displays a log as it runs. You can persist the log by redirecting the log information output and saving it to the install.log file in the logs directory using the following commands:
mkdir ./logs
./deployment/infra/deploy.sh | tee ./logs/install.log
For more information, see the ./deployment/infra/deploy.sh script in our GitHub repository.
Workload resources
The deployment script creates the following Azure resources:
Azure resource group: The Azure resource group that stores the resources created by the deployment script.
Azure Storage account: The Azure Storage account that contains the queue where messages are sent by the producer app and read by the consumer app, and the table where the consumer app stores the processed messages.
Azure container registry: The container registry provides a repository for the container that deploys the refactored consumer app code.
Azure Kubernetes Service (AKS) cluster: The AKS cluster provides Kubernetes orchestration for the consumer app container and has the following features enabled:
- Node autoprovisioning (NAP): The implementation of the Karpenter node autoscaler on AKS.
- Kubernetes Event-driven Autoscaling (KEDA): KEDA enables pod scaling based on events, such as exceeding a specified queue depth threshold.
- Workload identity: Allows you to attach role-based access policies to pod identities for enhanced security.
- Attached Azure container registry: This feature allows the AKS cluster to pull images from repositories on the specified ACR instance.
Application and system node pool: The script also creates an application and system node pool in the AKS cluster that has a taint to prevent application pods from being scheduled in the system node pool.
AKS cluster managed identity: The script assigns the
acrPullrole to this managed identity, which facilitates access to the attached Azure container registry for pulling images.Workload identity: The script assigns the Storage Queue Data Contributor and Storage Table Data Contributor roles to provide role-based access control (RBAC) access to this managed identity, which is associated with the Kubernetes service account used as the identity for pods on which the consumer app containers are deployed.
Two federated credentials: One credential enables the managed identity to implement pod identity, and the other credential is used for the KEDA operator service account to provide access to the KEDA scaler to gather the metrics needed to control pod autoscaling.
Validate deployment and run the workload
Once the deployment script completes, you can deploy the workload on the AKS cluster.
Set the source for gathering and updating the environment variables for
./deployment/environmentVariables.shusing the following command:source ./deployment/environmentVariables.shYou need the information in the
./deployment/deploy.statefile to set environment variables for the names of the resources created in the deployment. Display the contents of the file using the followingcatcommand:cat ./deployment/deploy.stateYour output should show the following variables:
SUFFIX=
RESOURCE_GROUP=
AZURE_STORAGE_ACCOUNT_NAME=
AZURE_QUEUE_NAME=
AZURE_COSMOSDB_TABLE=
AZURE_CONTAINER_REGISTRY_NAME=
AKS_MANAGED_IDENTITY_NAME=
AKS_CLUSTER_NAME=
WORKLOAD_MANAGED_IDENTITY_NAME=
SERVICE_ACCOUNT=
FEDERATED_IDENTITY_CREDENTIAL_NAME=
KEDA_SERVICE_ACCT_CRED_NAME=
Read the file and create environment variables for the names of the Azure resources created by the deployment script using the following commands:
while IFS= read -r; line do \
echo "export $line" \
export $line; \
done < ./deployment/deploy.state
Get the AKS cluster credentials using the
az aks get-credentialscommand.az aks get-credentials --resource-group $RESOURCE_GROUP --name $AKS_CLUSTER_NAMEVerify that the KEDA operator pods are running in the
kube-systemnamespace on the AKS cluster using thekubectl getcommand.kubectl get pods --namespace kube-system | grep kedaYour output should look similar to the following example output:

Generate simulated load
Now, you generate simulated load using the producer app to populate the queue with messages.
In a separate terminal window, navigate to the project directory.
Set the environment variables using the steps in the previous section. 1. Run the producer app using the following command:
python3 ./app/keda/aqs-producer.pyOnce the app starts sending messages, switch back to the other terminal window.
Deploy the consumer app container onto the AKS cluster using the following commands:
chmod +x ./deployment/keda/deploy-keda-app-workload-id.sh
./deployment/keda/deploy-keda-app-workload-id.sh
The deployment script (
deploy-keda-app-workload-id.sh) performs templating on the application manifest YAML specification to pass environment variables to the pod. Review the following excerpt from this script:cat <<EOF | kubectl apply -f - apiVersion: apps/v1 kind: Deployment metadata: name: $AQS_TARGET_DEPLOYMENT namespace: $AQS_TARGET_NAMESPACE spec: replicas: 1 selector: matchLabels: app: aqs-reader template: metadata: labels: app: aqs-reader azure.workload.identity/use: "true" spec: serviceAccountName: $SERVICE_ACCOUNT containers: - name: keda-queue-reader image: ${AZURE_CONTAINER_REGISTRY_NAME}.azurecr.io/aws2azure/aqs-consumer imagePullPolicy: Always env: - name: AZURE_QUEUE_NAME value: $AZURE_QUEUE_NAME - name: AZURE_STORAGE_ACCOUNT_NAME value: $AZURE_STORAGE_ACCOUNT_NAME - name: AZURE_TABLE_NAME value: $AZURE_TABLE_NAME resources: requests: memory: "64Mi" cpu: "250m" limits: memory: "128Mi" cpu: "500m" EOFThe
azure.workload.identity/uselabel in thespec/templatesection is the pod template for the deployment. Setting the label totruespecifies that you're using workload identity. TheserviceAccountNamein the pod specification specifies the Kubernetes service account to associate with the workload identity. While the pod specification contains a reference for an image in a private repository, there's noimagePullSecretspecified.Verify that the script ran successfully using the
kubectl getcommand.kubectl get pods --namespace $AQS_TARGET_NAMESPACEYou should see a single pod in the output.
Verify that a Karpenter node pool was created. Do this using the
kubectl get nodepoolcommand. The command response will look like this:
Verify that the default node pool is a Karpenter node pool using the
kubectl describe nodepoolcommand. In the command response, you can verify that the node pool is a Karpenter node pool. You should see something like this:


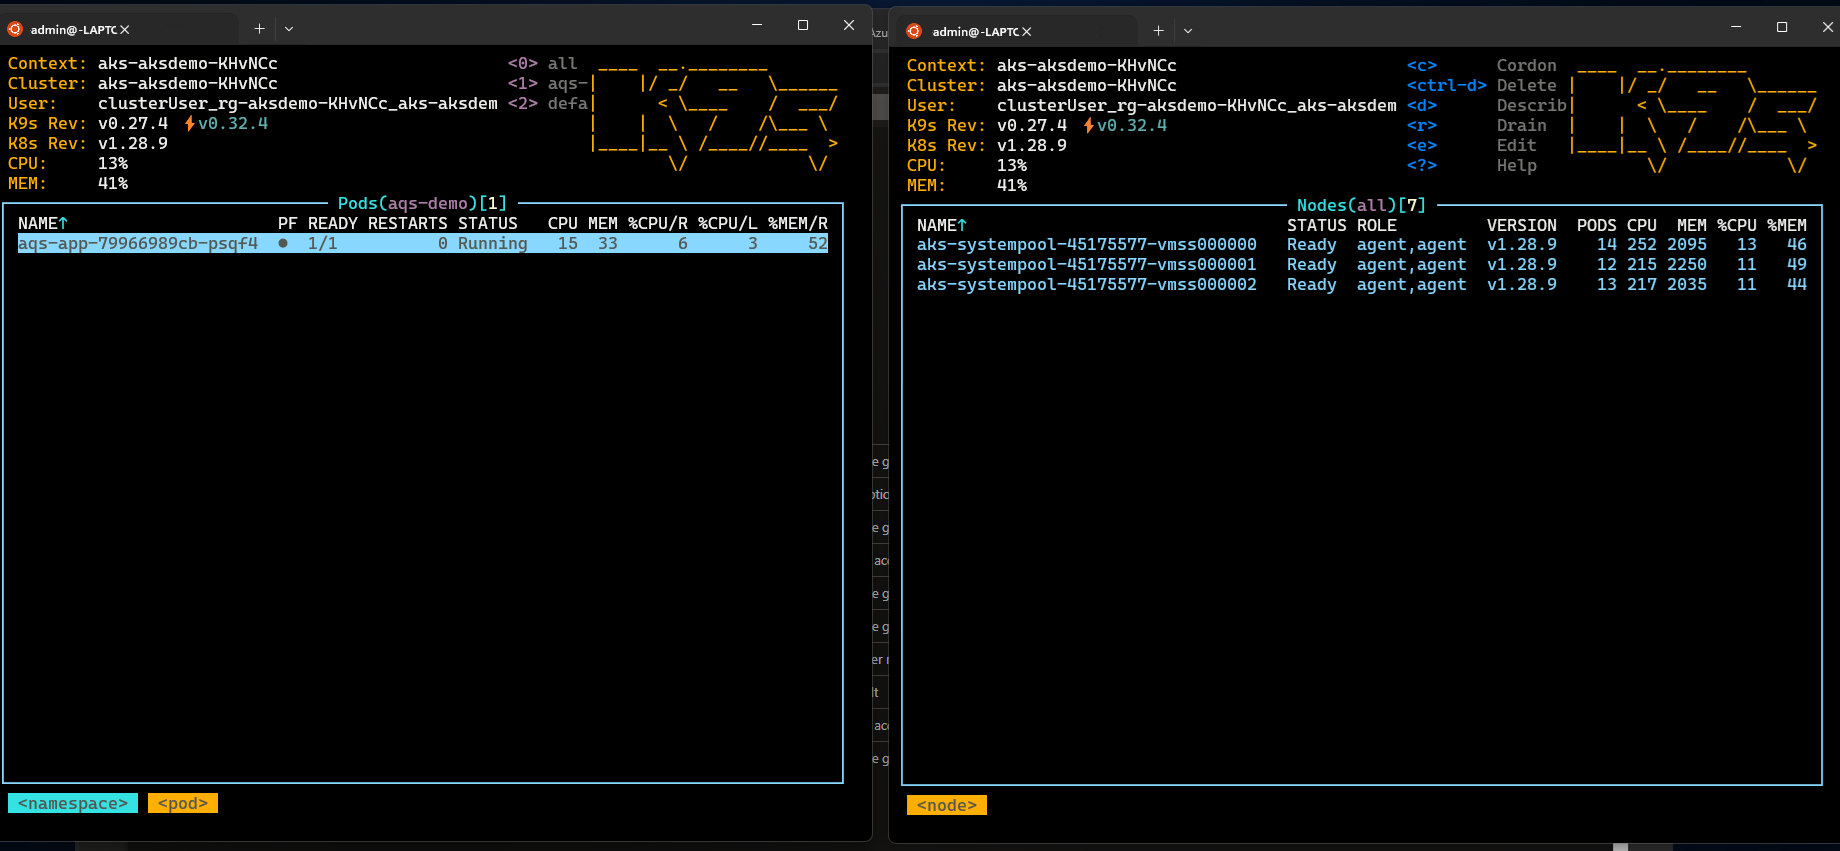
Monitor scale out for pods and nodes with k9s
You can use various tools to verify the operation of apps deployed to AKS, including the Azure portal and k9s. For more information on k9s, see the k9s overview.
Install k9s on your AKS cluster using the appropriate guidance for your environment in the k9s installation overview.
Create two windows, one with a view of the pods and the other with a view of the nodes in the namespace you specified in the
AQS_TARGET_NAMESPACEenvironment variable (default value isaqs-demo) and start k9s in each window.You should see something similar to the following:
After you confirm that the consumer app container is installed and running on the AKS cluster, install the
ScaledObjectand trigger authentication used by KEDA for pod autoscaling by running the scaled object installation script (keda-scaleobject-workload-id.sh). using the following commands:chmod +x ./deployment/keda/keda-scaleobject-workload-id.sh ./deployment/keda/keda-scaleobject-workload-id.shThe script also performs templating to inject environment variables where needed. Review the following excerpt from this script:
cat <<EOF | kubectl apply -f -
apiVersion: keda.sh/v1alpha1
kind: ScaledObject
metadata:
  name: aws2az-queue-scaleobj
  namespace: ${AQS_TARGET_NAMESPACE}
spec:
  scaleTargetRef:
    name: ${AQS_TARGET_DEPLOYMENT}     #K8s deployement to target
  minReplicaCount: 0  # We don't want pods if the queue is empty nginx-deployment
  maxReplicaCount: 15 # We don't want to have more than 15 replicas
  pollingInterval: 30 # How frequently we should go for metrics (in seconds)
  cooldownPeriod:  10 # How many seconds should we wait for downscale
  triggers:
  - type: azure-queue
    authenticationRef:
      name: keda-az-credentials
    metadata:
      queueName: ${AZURE_QUEUE_NAME}
      accountName: ${AZURE_STORAGE_ACCOUNT_NAME}
      queueLength: '5'
      activationQueueLength: '20' # threshold for when the scaler is active
      cloud: AzurePublicCloud
---
apiVersion: keda.sh/v1alpha1
kind: TriggerAuthentication
metadata:
  name: keda-az-credentials
  namespace: $AQS_TARGET_NAMESPACE
spec:
  podIdentity:
    provider: azure-workload
    identityId: '${workloadManagedIdentityClientId}'
EOF
The manifest describes two resources: the
TriggerAuthenticationobject, which specifies to KEDA that the scaled object is using pod identity for authentication, and theidentityIDproperty, which refers to the managed identity used as the workload identity.When the scaled object is correctly installed and KEDA detects the scaling threshold is exceeded, it begins scheduling pods. If you're using k9s, you should see something like this:

If you allow the producer to fill the queue with enough messages, KEDA might need to schedule more pods than there are nodes to serve. To accommodate this, Karpenter will kick in and start scheduling nodes. If you're using k9s, you should see something like this:
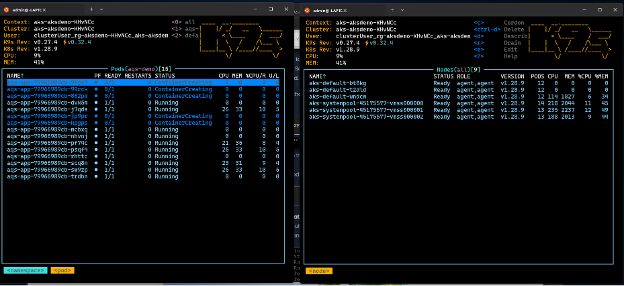
In these two images, notice how the number of nodes whose names contain
aks-defaultincreased from one to three nodes. If you stop the producer app from putting messages on the queue, eventually the consumers will reduce the queue depth below the threshold, and both KEDA and Karpenter will scale in. If you're using k9s, you should see something like this:
Finally, you can view Karpenter autoscaling activity using the
kubectl get eventscommand as shown here:


Clean up resources
You can use the cleanup script (/deployment/infra/cleanup.sh) in our GitHub repository to remove all the resources you created.
Next steps
For more information on developing and running applications in AKS, see the following resources:
- Install existing applications with Helm in AKS
- Deploy and manage a Kubernetes application from Azure Marketplace in AKS
- Deploy an application that uses OpenAI on AKS
Contributors
Microsoft maintains this article. The following contributors originally wrote it:
- Ken Kilty | Principal TPM
- Russell de Pina | Principal TPM
- Jenny Hayes | Senior Content Developer
- Carol Smith | Senior Content Developer
- Erin Schaffer | Content Developer 2