Note
Access to this page requires authorization. You can try signing in or changing directories.
Access to this page requires authorization. You can try changing directories.
Important
The KEDA add-on for AKS doesn't currently support modifying the CPU requests or limits and other Helm values for the Metrics Server or Operator. Keep this limitation in mind when using the add-on. If you have any questions, feel free to reach out here.
This article shows you how to enable the Kubernetes Event-driven Autoscaling (KEDA) add-on on an existing Azure Kubernetes Service (AKS) cluster using the Azure portal.
Important
Your cluster Kubernetes version determines what KEDA version will be installed on your AKS cluster. To see which KEDA version maps to each AKS version, see the AKS managed add-ons column of the Kubernetes component version table.
For GA Kubernetes versions, AKS offers full support of the corresponding KEDA minor version in the table. Kubernetes preview versions and the latest KEDA patch are partially covered by customer support on a best-effort basis. As such, these features aren't meant for production use. For more information, see the following support articles:
Note
KEDA version 2.15+ introduces a breaking change that removes pod identity support. We recommend moving over to workload identity for your authentication if you're using pod identity. While the KEDA managed add-on doesn't currently run KEDA version 2.15, it will begin running it in the AKS preview version 1.31.
For more information on how to securely scale your applications with workload identity, please read our tutorial. To view KEDA's breaking change/deprecation policy, please read their official documentation.
Before you begin
- An Azure subscription. If you don't have an Azure subscription, you can create a free account.
- An existing AKS cluster. If you don't have an AKS cluster, create one using the steps in Deploy an Azure Kubernetes Service (AKS) cluster.
- Ensure you have firewall rules configured to allow access to the Kubernetes API server. For more information, see Outbound network and FQDN rules for Azure Kubernetes Service (AKS) clusters.
Note
If you're using Microsoft Entra Workload ID and you enable KEDA before Workload ID, you need to restart the KEDA operator pods so the proper environment variables can be injected:
Restart the pods by running
kubectl rollout restart deployment keda-operator -n kube-system.Obtain KEDA operator pods using
kubectl get pod -n kube-systemand finding pods that begin withkeda-operator.Verify successful injection of the environment variables by running
kubectl describe pod <keda-operator-pod> -n kube-system. UnderEnvironment, you should see values forAZURE_TENANT_ID,AZURE_FEDERATED_TOKEN_FILE, andAZURE_AUTHORITY_HOST.
Enable the KEDA add-on on an existing AKS cluster
Sign in to the Azure portal and navigate to your AKS cluster resource.
From the service menu, under Settings, select Application scaling > Enable KEDA add-on.
It may take a few minutes for the changes to take effect.
Once the KEDA add-on is enabled, you can verify KEDA is running on your cluster.
Verify KEDA is running on your cluster
From the service menu of your AKS cluster resource, under Kubernetes resources, select Workloads.
Select the Pods tab, and look for the
kedapods. If they're listed, KEDA is successfully running on your cluster.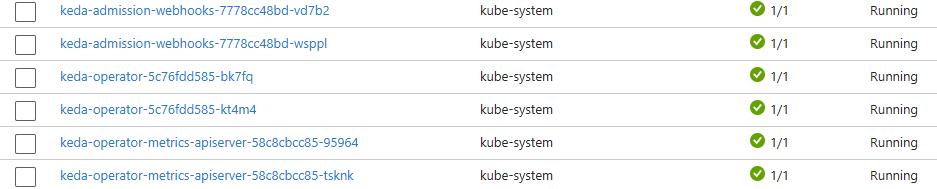
Once you verify that KEDA is running, you can check the KEDA version on your cluster.
Check the KEDA version on your cluster
From the service menu of your AKS cluster resource, under Kubernetes resources, select Custom resources.
Find the keda.sh resource. From there, you can view the KEDA version running on your cluster.

Disable the KEDA add-on on an existing cluster
To disable the KEDA add-on, see Disable the KEDA add-on on your AKS cluster.
Next steps
In this article, you learned how to enable the KEDA add-on on an existing AKS cluster using the Azure portal. With the KEDA add-on installed on your cluster, you can deploy a sample application to start scaling apps.
For information on KEDA troubleshooting, see Troubleshoot the Kubernetes Event-driven Autoscaling (KEDA) add-on. For more information on KEDA, see the upstream KEDA docs.
Collaborate with us on GitHub
The source for this content can be found on GitHub, where you can also create and review issues and pull requests. For more information, see our contributor guide.

Azure Kubernetes Service