Note
Access to this page requires authorization. You can try signing in or changing directories.
Access to this page requires authorization. You can try changing directories.
This article explains how to enable API analysis in Azure API Center to set up a linting engine and triggers. These capabilities analyze your API definitions for adherence to organizational style rules, generating both individual and summary reports. API analysis helps identify and correct common errors and inconsistencies in your API definitions.
The following procedures support automated deployment of the linting engine and event subscription in your API center. Use the Azure Developer CLI (azd) for one-step deployment of linting infrastructure for a streamlined deployment process. The Azure CLI command examples can run in PowerShell or a bash shell. Separate command examples are provided, as needed.
If you prefer to set up the engine and resources via manual deployment, see the Azure API Center Analyzer GitHub repository for guidance to deploy the function app and configure the event subscription.
Note
Azure API Center also automatically configures a default linting engine and dependencies for API analysis. If you enable self-managed analysis as described in this article, you override these built-in features.
Scenario overview
In this scenario, you analyze API definitions in your API center by using the Spectral open source linting engine. A function app built with Azure Functions runs the linting engine in response to events in your API center. Spectral checks that the APIs defined in a JSON or YAML specification document conform to the rules in a customizable API style guide. An analysis report is generated that you can view in your API center.
The following diagram shows the steps to enable linting and analysis in your API center.

Deploy a function app that runs the Spectral linting engine on an API definition.
Configure an event subscription in an Azure API center that triggers the function app.
An event is triggered by adding or replacing an API definition in the API center.
On receiving the event, the function app invokes the Spectral linting engine.
The linting engine checks that the APIs defined in the definition conform to the organization's API style guide and generates a report.
View the analysis report in the API center.
Limitations
Linting currently supports only JSON or YAML specification files, such as OpenAPI or AsyncAPI specification documents.
By default, the linting engine uses the built-in
spectral:oasruleset. To extend the ruleset or create custom API style guides, see the Spectral repository on GitHub.The function app that invokes linting is charged separately, and you manage and maintain it.
Prerequisites
An API center in your Azure subscription. To create a subscription, see Quickstart: Create your API center.
The Event Grid resource provider registered in your subscription. If you need to register the Event Grid resource provider, see Subscribe to events published by a partner with Azure Event Grid.
Azure Developer CLI (azd). Install
azdon your machine into the environment you plan to use for the following procedure.Azure Functions Core Tools. Install the core tools on your machine into the environment you plan to use for the following procedure. Make sure the tools are reachable by your
PATHsettings.For Azure CLI:
Use the Bash environment in Azure Cloud Shell. For more information, see Get started with Azure Cloud Shell.

If you prefer to run CLI reference commands locally, install the Azure CLI. If you're running on Windows or macOS, consider running Azure CLI in a Docker container. For more information, see How to run the Azure CLI in a Docker container.
If you're using a local installation, sign in to the Azure CLI by using the az login command. To finish the authentication process, follow the steps displayed in your terminal. For other sign-in options, see Authenticate to Azure using Azure CLI.
When you're prompted, install the Azure CLI extension on first use. For more information about extensions, see Use and manage extensions with the Azure CLI.
Run az version to find the version and dependent libraries that are installed. To upgrade to the latest version, run az upgrade.
Note
The
az apiccommands require theapic-extensionAzure CLI extension. The extension can be installed dynamically when you run your firstaz apiccommand, or you can install the extension manually. For more information, see Manage Azure CLI Extensions: Install, Update, and Remove.For the latest changes and updates in the
apic-extension, see the release notes. Certain features might require a preview or specific version of the extension.
Use azd deployment for function app and event subscription
The following procedures provide automated steps for the Azure Developer CLI (azd) to configure the function app and event subscription that enable linting and analysis in your API center.
Note
If you prefer to set up the engine and resources with manual deployment, see the Azure API Center Analyzer GitHub repository for guidance to deploy the function app and configure the event subscription.
Run the sample by using azd
Clone the sample Azure API Center Analyzer GitHub repository to your local machine.
Launch Visual Studio Code, and select File > Open Folder (Ctrl+K, Ctrl+O). Browse to the
APICenter-Analyzerfolder for the cloned repository and choose Select folder.In the Visual Studio Code Activity Bar, select Explorer (Ctrl+Shift+E) so you can view the repository folder structure.
Expand the
resources/rulesetsfolder and notice theoas.yamlfile. This file reflects your current API style guide. You can modify this file to satisfy your organizational needs.Expand the
src/functionsfolder and notice theApiAnalyzerFunction.tsfile. This file provides the function code for the function app. You can modify this file to adjust the function behavior to meet your application requirements.
Open a terminal in Visual Studio Code and authenticate with the Azure Developer CLI (
azd):azd auth loginTip
You can avoid authentication issues across development environments by running the following commands:
- Create a new development environment:
azd env new - Get your tenant ID:
az account show --query tenantId -o tsv(copy the output ID for later) - Sign out:
azd auth logoutcommand - Sign into
azdwith yourtenantIdvalue from step 2:azd auth login --tenant-id <tenant_ID>
When you successfully authenticate, the command output shows you Logged into Azure as <your_user_alias>.
- Create a new development environment:
Next, sign into the Azure portal by using the Azure CLI:
az loginYou're prompted to enter your credentials to sign into Azure.
A browser window confirms your successful sign in. Close the window and return to this procedure.
Run the following command to deploy the linting infrastructure to your Azure subscription.
For this command, you need the following information. Most of these values are available on the Overview page for your API center resource in the Azure portal.
- Subscription name and ID
- API center name
- Resource group name for the API center
- Deployment region for the function app (can be different from your API center region)
azd upFollow the prompts to provide the required deployment information and settings. For more information, see Running the sample by using the Azure Developer CLI (azd).
As the deployment progresses, the output shows the completed provisioning tasks:
Note
It can take several minutes to provision the function app and deploy it to Azure.
Packaging services (azd package)

(✓) Done: Packaging service function
- Build Output: C:\GitHub\APICenter-Analyzer
- Package Output: C:\Users\<user>\AppData\Local\Temp\api-center-analyzer-function-azddeploy-0123456789.zip

Loading azd .env file from current environment

Provisioning Azure resources (azd provision)
Provisioning Azure resources can take some time.

Subscription: <your_selected_subscription>
Location: <your_selected_region_for_this_process>

You can view detailed progress in the Azure Portal:

https://portal.azure.com/#view/HubsExtension/DeploymentDetailsBlade/~/overview/id/%2Fsubscriptions%2F00001111-a2a2-b3b3-c4c4-dddddd555555%2Fproviders%2FMicrosoft.Resources%2Fdeployments%2F<your_azd_environment_name-0123456789>

(✓) Done: Resource group: <new_resource_group_for_function_app> (5.494s)
(✓) Done: App Service plan: <new_app_service_plan> (5.414s)
(✓) Done: Storage account: <new_storage_account> (25.918s)
(✓) Done: Log Analytics workspace: <new_workspace> (25.25s)
(✓) Done: Application Insights: <new_application_insights> (5.628s)
(✓) Done: Portal dashboard: <new_dashboard> (1.63s)
(✓) Done: Function App: <new_function_app> (39.402s)
The output includes a link to monitor the deployment progress in the Azure portal.
After provisioning completes, the process deploys the new function app to the Azure portal:
Deploying services (azd deploy)

(✓) Done: Deploying service function
- Endpoint: https://<new_function_app>.azurewebsites.net/

Configuring EventGrid subscription for API Center

Examples from AI knowledge base
When the deployment completes, confirm the new function app is present and the function is published.
If the
apicenter-analyerfunction isn't listed or the Status isn't Enabled, publish the function by using the Azure Functions Core Tools.Configure an event subscription by using PowerShell or a bash shell in Visual Studio Code.
Confirm function published in Azure portal
When the deployment completes, confirm the new function app is present in the Azure portal and the function is published.
Sign in to the Azure portal, browse to the Function App section, and select your new function app in the list.
On the Overview page for the new function app, confirm the function app Status is Running.
In the Functions section, confirm the
apicenter-analyerfunction is listed and the Status is Enabled.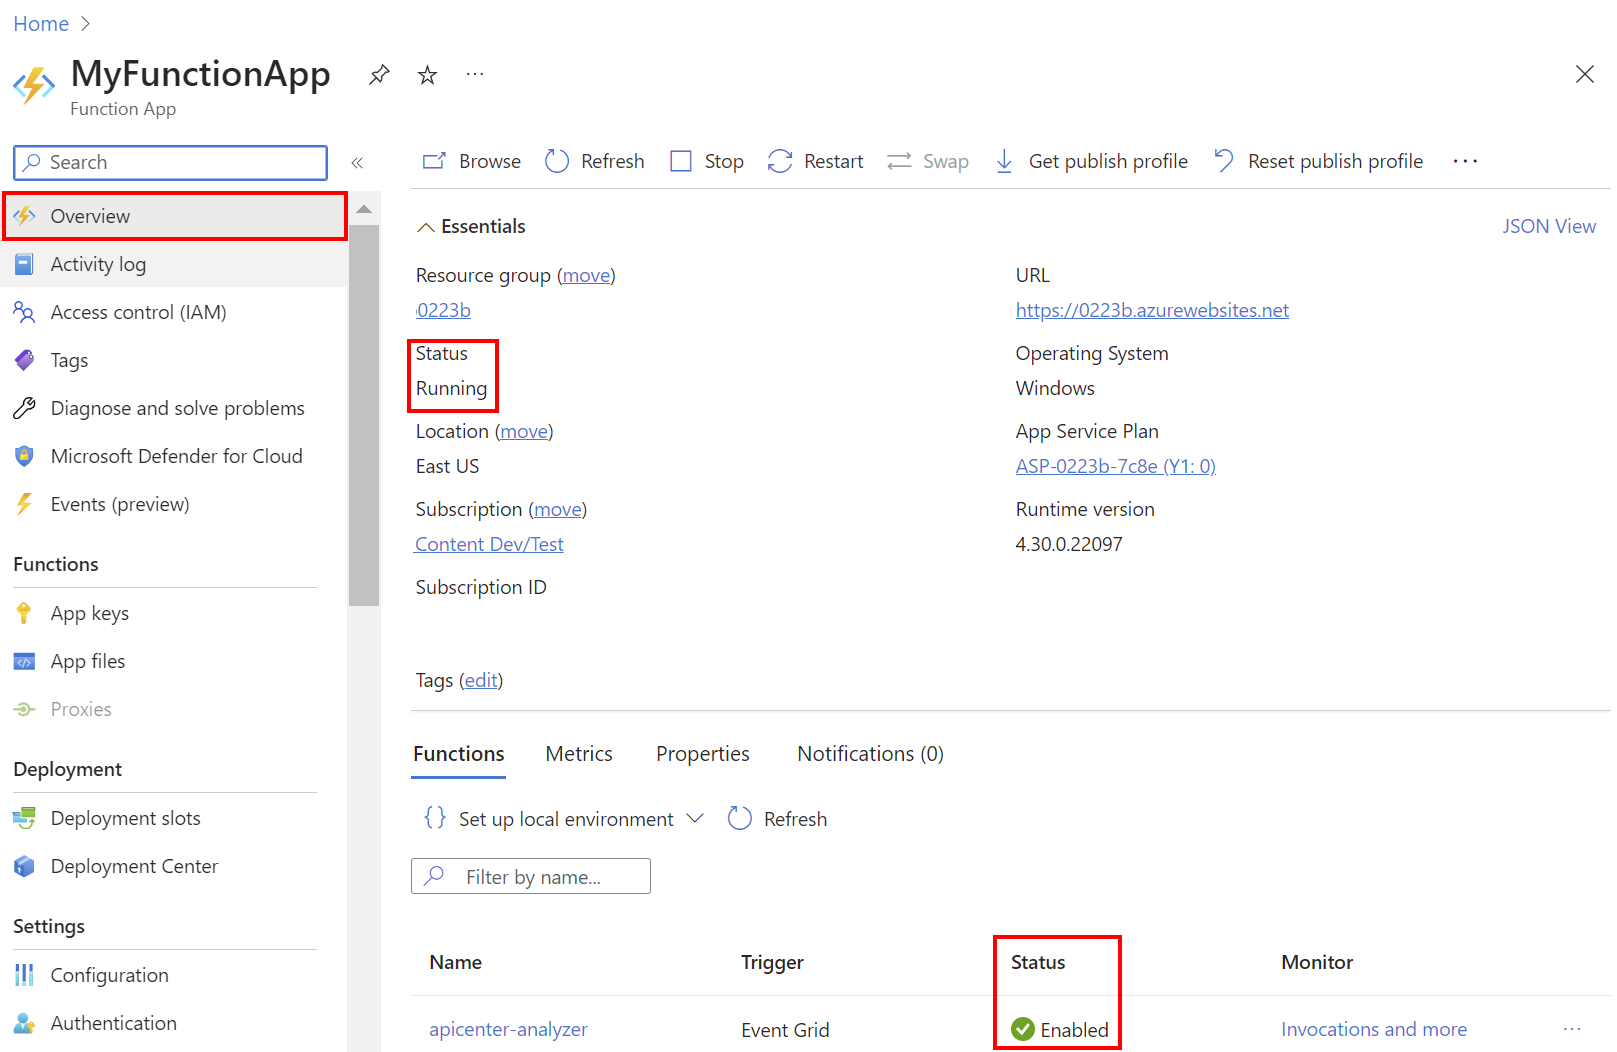
Publish apicenter-analyzer function with Azure Functions Core Tools
If the deployment process doesn't publish the apicenter-analyer function to the function app in the Azure portal, you can run the following commands in a Visual Studio Code terminal and complete the process.
Run the following command to confirm the function isn't published to the function app:
Note
This command uses the new resource group created by the deployment process for the function app and not the resource group for your API center. Replace
<function-app-name>and<new_resource_group_for_function_app>with your function app name and the name of the resource group for the function app.az functionapp function list --name <function_app_name> --resource-group <new_resource_group_for_function_app> --query "[].name" -o tsvThe command output should be empty.
In Explorer, expand the
src/functionsfolder and open theApiAnalyzerFunction.tsfile. This action confirms the environment is set to look for content in the correct location.Confirm your environment includes the npm package manager and node runtime environment, and install any tools as needed:
node --version
npm --version
As needed, install the Azure Functions Code Tools into the environment:
npm install -g azure-functions-core-tools@4 --unsafe-perm trueRun the following command to publish the function code to the function app in the Azure portal. Replace
<function-app-name>with your function app name.func azure functionapp publish <function_app_name> --typescriptThe command shows the following output:
Getting site publishing info...
[2026-02-26T19:58:38.779Z] Starting the function app deployment...
Uploading package...
Uploading 33.8 MB [###############################################################################]
Upload completed successfully.
Deployment completed successfully.
apicenter-analyzer - [eventGridTrigger]
In the Azure portal, confirm the
apicenter-analyzerfunction is now published and enabled for your function app.
Configure event subscription
After the function is successfully published to the function app in the Azure portal, you can create an event subscription in your API center to trigger the function app when an API definition file is uploaded or updated.
Get the resource ID of your API center. Substitute
<apic-name>and<resource-group-name>with your API center name and the name of the resource group for your API center.#! /bin/bash apicID=$(az apic show --name <apic-name> --resource-group <resource-group-name> \ --query "id" --output tsv)# PowerShell syntax $apicID=$(az apic show --name <apic-name> --resource-group <resource-group-name> ` --query "id" --output tsv)Get the resource ID of the function in the function app. In this example, the function name is apicenter-analyzer. Substitute
<function-app-name>and<resource-group-name>with your function app name and the name of the resource group for your function app.#! /bin/bash functionID=$(az functionapp function show --name <function-app-name> \ --function-name apicenter-analyzer --resource-group <resource-group-name> \ --query "id" --output tsv)# PowerShell syntax $functionID=$(az functionapp function show --name <function-app-name> ` --function-name apicenter-analyzer --resource-group <resource-group-name> ` --query "id" --output tsv)Create an event subscription by using the az eventgrid event-subscription create command. The created subscription includes events for adding or updating API definitions.
#! /bin/bash
az eventgrid event-subscription create --name MyEventSubscription \
    --source-resource-id "$apicID" --endpoint "$functionID" \
    --endpoint-type azurefunction --included-event-types \
    Microsoft.ApiCenter.ApiDefinitionAdded Microsoft.ApiCenter.ApiDefinitionUpdated
# PowerShell syntax az eventgrid event-subscription create --name MyEventSubscription ` --source-resource-id "$apicID" --endpoint "$functionID" ` --endpoint-type azurefunction --included-event-types ` Microsoft.ApiCenter.ApiDefinitionAdded Microsoft.ApiCenter.ApiDefinitionUpdatedThe command output shows details of the event subscription. You can also get details by using the az eventgrid event-subscription show command:
az eventgrid event-subscription show --name MyEventSubscription --source-resource-id "$apicID"Note
It can take a short time for the event subscription to propagate to the function app.
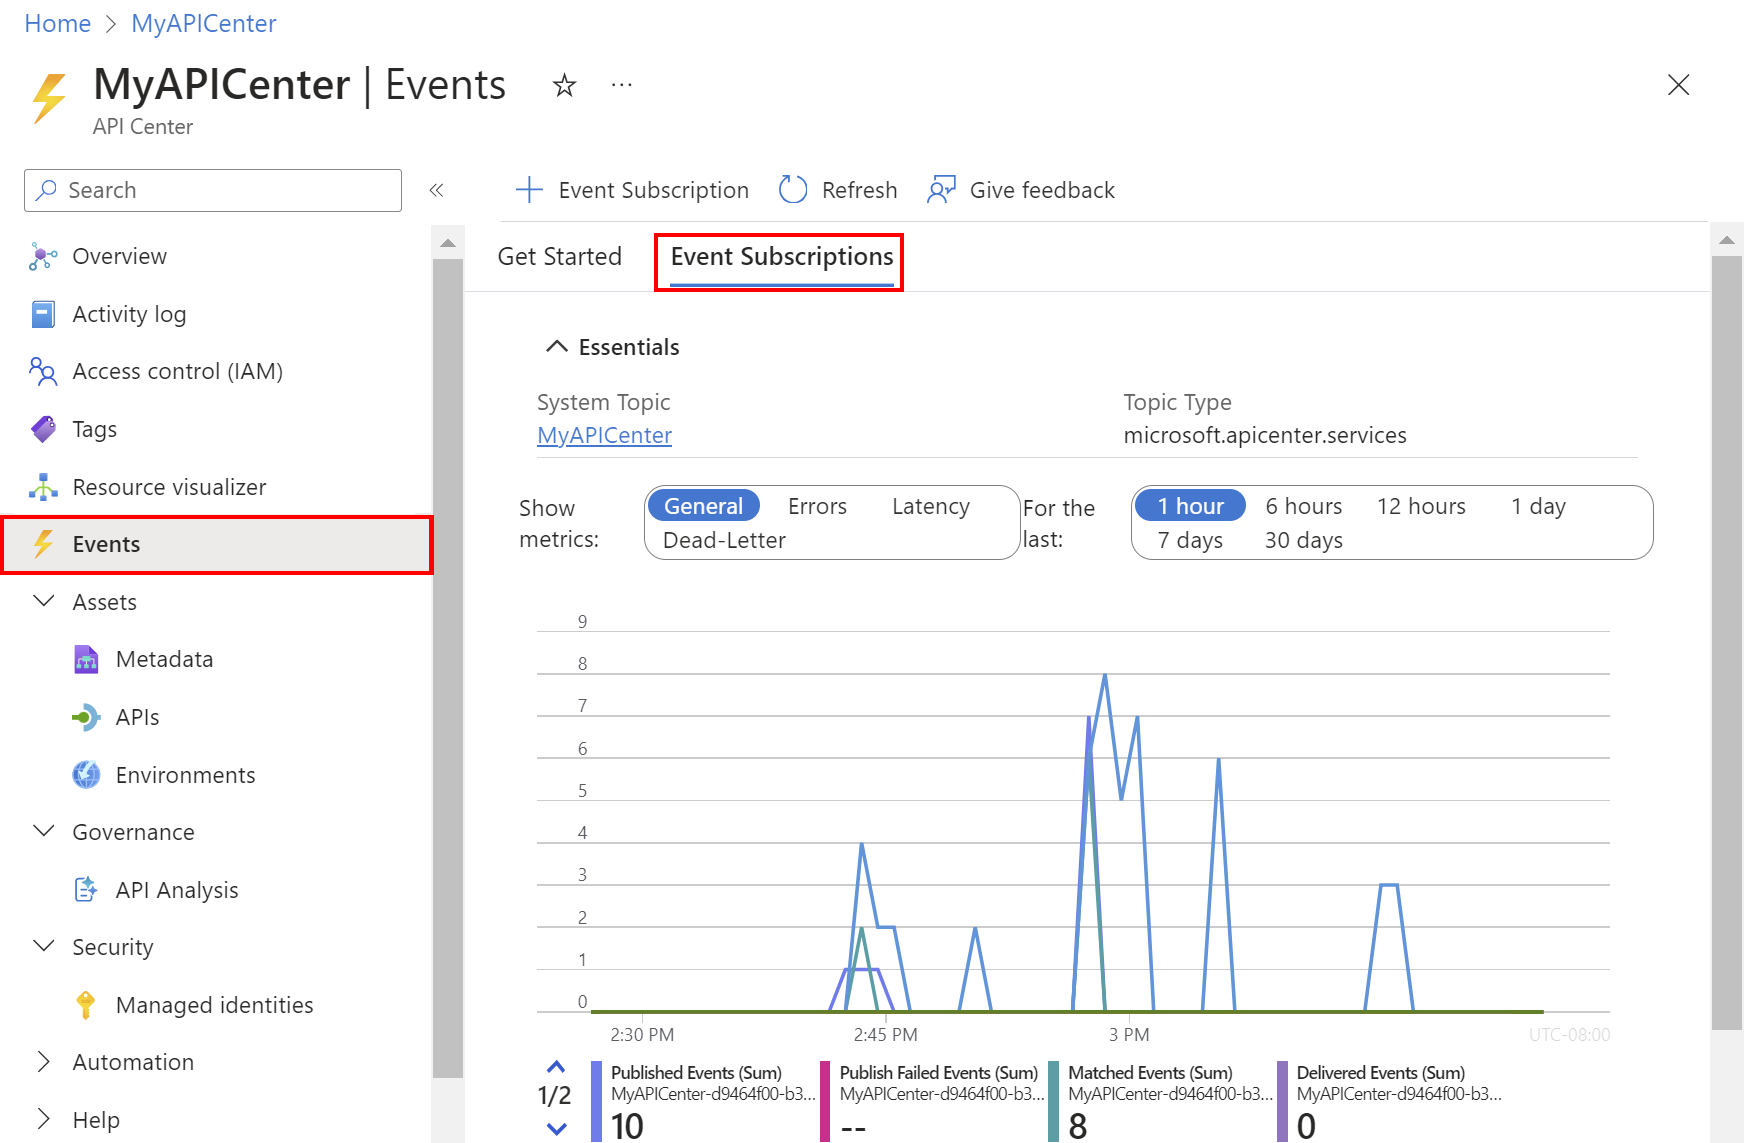
Browse to your API center in the Azure portal, and confirm the new event subscription under Events > Event Subscriptions.
Trigger event in your API center
To test the event subscription, try uploading or updating an API definition file associated with an API version in your API center. For example, upload an OpenAPI or AsyncAPI document. After the event subscription is triggered, the function app invokes the API linting engine to analyze the API definition.
For detailed steps to add an API, API version, and API definition to your API center, see Tutorial: Register APIs in your API center.
To create an API by uploading an API definition file with the Azure CLI, see Register API from a specification file.
To confirm that the event subscription is triggered:
Browse to your API center, and select Events.
Select the Event Subscriptions tab and select the event subscription for your function app.
Review the metrics to confirm the event subscription is triggered and linting is invoked successfully.
Note
It might take a few minutes for the metrics to appear.
After the system analyzes the API definition, the linting engine generates a report based on the configured API style guide.
View API analysis reports
You can view the analysis report for your API definition in the Azure portal. After an API definition is analyzed, the report lists errors, warnings, and information based on the configured API style guide.
In the portal, you can also view a summary of analysis reports for all API definitions in your API center.
Analysis report for an API definition
To view the analysis report for an API definition in your API center:
In the portal, browse to your API center, expand Inventory, and select Assets.
In the Asset list, select the API for which you added or updated an API definition.
Select Versions, and then expand the row for the API to examine.
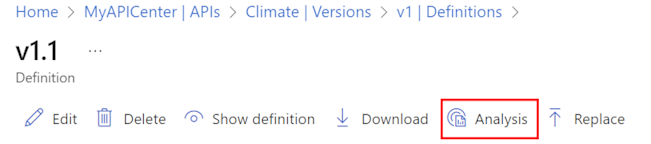
Under Definition, select the definition name that you uploaded or updated.
Select the Analysis tab.
The API Analysis Report opens, and it displays the API definition and errors, warnings, and information based on the configured API style guide. The following screenshot shows an example of an API analysis report.

API analysis summary
You can view a summary of analysis reports for all API definitions in your API center.
In the portal, browse to your API center, expand Governance, and select API Analysis.
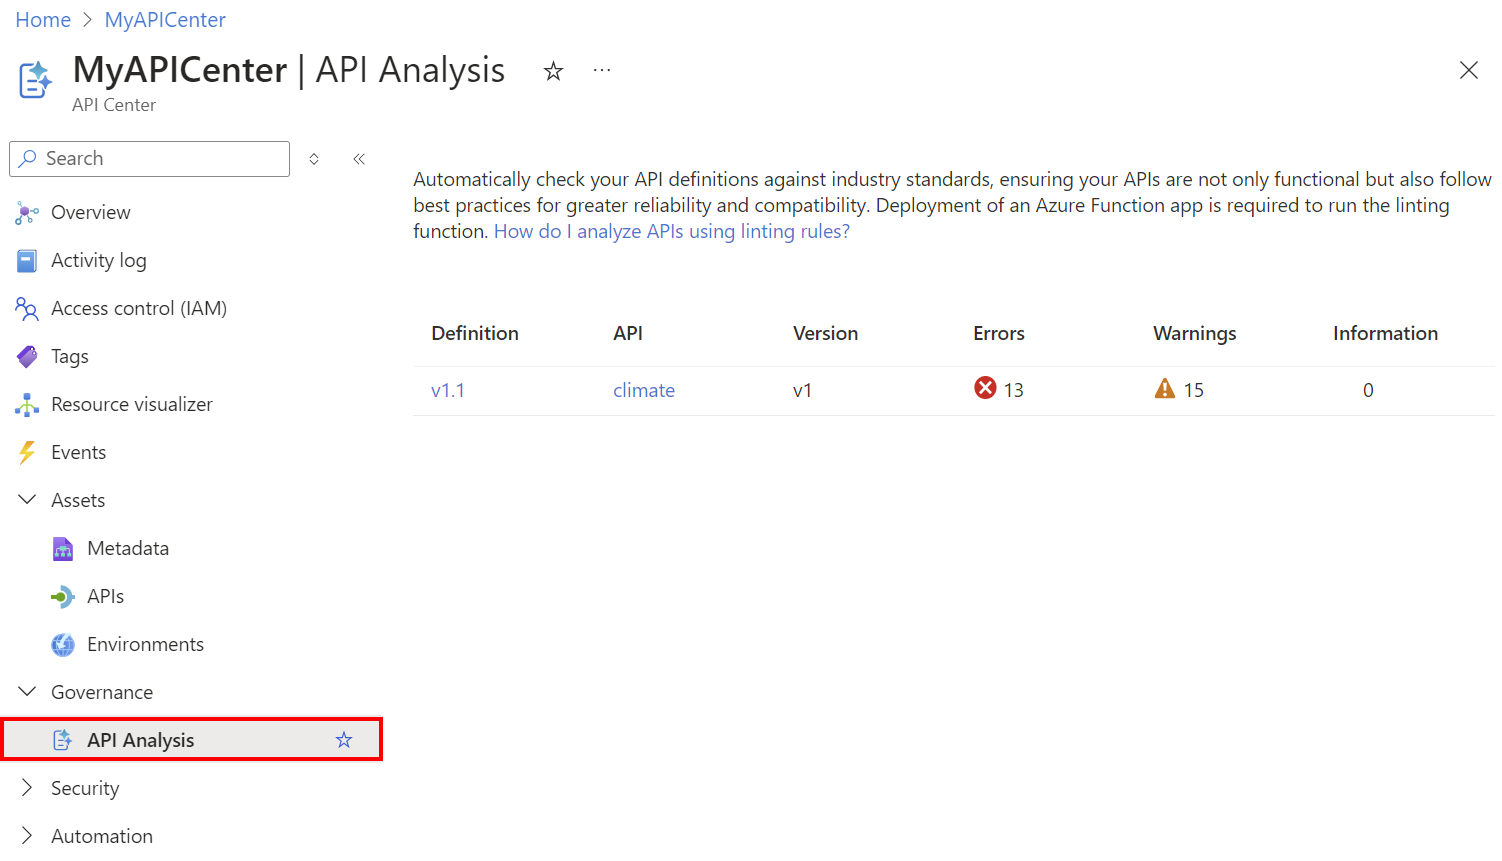
The icon at the right on each row opens the API Analysis Report for the definition.